HTML5之file控制元件
最近剛開始學習html5,本來應該先寫點關於語義化標籤的內容,鑑於自己對語義化標籤的理解還不算深刻,所以,打算待自己對這部分內容有深刻理解之後,再分享。
file控制元件和select都是屬於樣式有點不受控制的兩個怪胎,關於如何修改它們的樣式,後面會再作介紹。本篇部落格比較基礎,其實就是講file控制元件,以及fileList物件。
首先我學習起來屬於比較慢的,必須要自己慢慢理解和體會,囫圇吞棗式的學習不太喜歡,因此,每篇部落格亦不會分享太多內容,當然,僅是下文提及的一點內容,也花費了我一些時間。
file控制元件:
<input type = "file" id = "idName" fileList物件的常用方法有name(檔名稱)、type(檔案型別)、size(檔案大小)、lastModefiedDate(檔案的最後修改時間)等
預設情況下,選擇檔案為單選,但是加上multiple屬性之後,即可以多選。
此處的multiple屬性,只寫”multiple”或者是寫成”multiple=’multiple’”這種形式都是可以,這點類似於autofocus,loop這類屬性。個人習慣寫成multiple=’multiple’這種格式。
此外,file控制元件還有accept屬性,用於指定選擇檔案型別。
accept=”application/msexcel”
accept=”application/msword”
accept=”application/pdf”
accept=”application/poscript”
accept=”application/rtf”
accept=”application/x-zip-compressed”
accept=”audio/basic”
accept=”audio/x-aiff”
accept=”audio/x-mpeg”
accept=”audio/x-pn/realaudio”
accept=”audio/x-waw”
accept=”image/gif”
accept=”image/jpeg”
accept=”image/tiff”
accept=”image/x-ms-bmp”
accept=”image/x-photo-cd”
accept=”image/x-png”
accept=”image/x-portablebitmap”
accept=”image/x-portable-greymap”
accept=”image/x-portable-pixmap”
accept=”image/x-rgb”
accept=”text/html”
accept=”text/plain”
accept=”video/quicktime”
accept=”video/x-mpeg2”
accept=”video/x-msvideo”
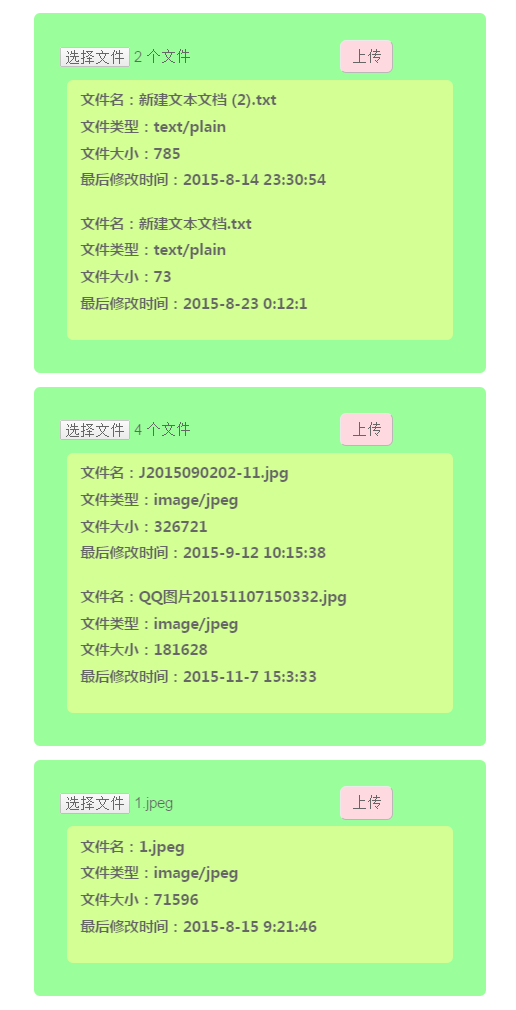
下面的程式碼對應三部分內容:
1、檔案型別不限,顯示檔案的檔名、檔案型別、檔案大小和檔案的最後修改時間
2、限制檔案型別為圖片,通過正則表示式的形式,在選擇之後判斷,顯示檔案的檔名、檔案型別、檔案大小和檔案的最後修改時間
3、限制檔案型別為圖片,通過accept屬性,在選擇檔案時限制,顯示檔案的檔名、檔案型別、檔案大小和檔案的最後修改時間
程式碼如下:
HTML部分:
<!doctype html>
<html lang="en">
<head>
<meta charset="UTF-8">
<meta JS部分:
<script type = "text/javascript">
    window.onload = function(){
        /*檔案上傳*/
        var filesList = document.getElementById("file");
        var up = document.getElementById("upload");
        var details = document.getElementById("details");
        /*通過正則表示式,限制檔案型別*/
        var imgList = document.getElementById("image");
        var show = document.getElementById("show");
        var information = document.getElementById("information");
        /*通過file空間的自帶屬性accept來限制檔案型別*/
        var imageOnly = document.getElementById("imageOnly");
        var uploadImg = document.getElementById("uploadImg");
        var upoadImg = document.getElementById("imgInfo");

        up.onclick = function(){
            insertInformation(details, filesList);
        }
        show.onclick = function(){
            insertInformation(information, imgList, /image\/\w+/);
        }
        uploadImg.onclick = function(){
            insertInformation(upoadImg, imageOnly);
        }

        /*將時間格式化為“yy-mm-dd hh:mm:ss”*/
        function FormatDate (strTime) {
            var date = new Date(strTime);
            return date.getFullYear()+"-"+(date.getMonth()+1)+"-"+date.getDate() +" "+ date.getHours() + ":" + date.getMinutes() + ":" + date.getSeconds();
        }

        /*des是存放資訊的物件,fileMes是file控制元件, pattern是正則表示式*/
        function insertInformation(des, fileMes, pattern){
            des.innerHTML = "";
            for (var i = 0; i < fileMes.files.length; i++)
            {
                var file = fileMes.files[i];
                if(pattern == undefined || pattern.test(file.type)){
                    des.innerHTML += "<p>檔名:" + file.name + "</p>";
                    des.innerHTML += "<p>檔案型別:" + file.type + "</p>";
                    des.innerHTML += "<p>檔案大小:" + file.size + "</p>";
                    des.innerHTML += "<p>最後修改時間:" + FormatDate(file.lastModifiedDate) + "</p>" + "<br/>";
                    des.style.display = "block";
                }else{
                    alert(file.name + "的檔案型別不正確");
                }
            }
        }
    };
</script>
相信很多人看英文的時間格式還是會有點不習慣,沒辦法,誰讓咱是中國人呢
所以寫了一個時間格式化的函式,將時間轉變為了”yy-mm-dd hh:mm:ss”形式。
上面程式碼的執行效果如下: