
手把手教你如何玩轉SSM框架整合(非Maven版本)
關於目前比較流行的框架,前面的文章都有進行了相關內容的介紹,所以在這裡的話主要就是介紹一下關於SSM,即Spring,springMVC和Mybatis的整合知識點。
自身搭建環境:windows7+IDEA+Mysql 5.7
如果你想看其他的環境搭建,那麼請參考我的其餘博文。
整合Spring+SpringMVC+Mybatis
步驟:
一:首先:配置Web專案的相關內容
(1)通過IDEA建立一個Web工程,然後命令工程名字即可
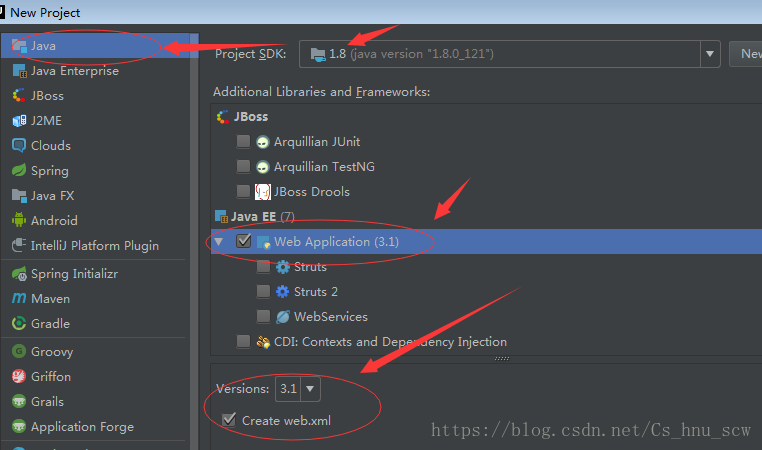
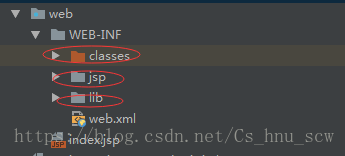
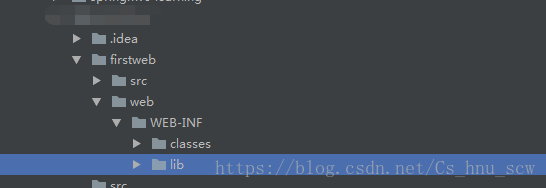
(2)在建立後的專案的web目錄下面,建立一個classes和jsp以及lib的檔案目錄
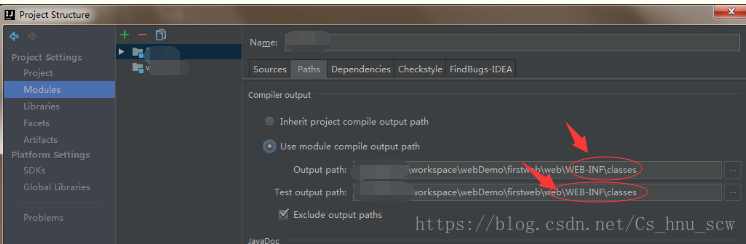
(3)配置資料夾路徑。點選File-》Project Structure或者快捷鍵(ctrl + shift + Alt + s)選擇Modules-> 選擇Paths -> 選擇“Use module compile out path” -> 將Outputpath 和Test output path 都設定為剛剛建立的classes資料夾。
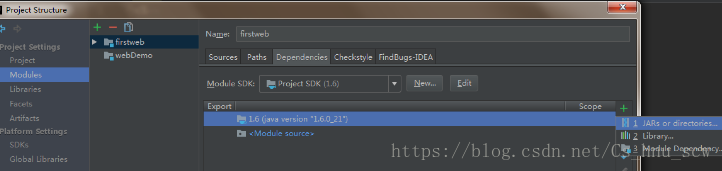
(4)
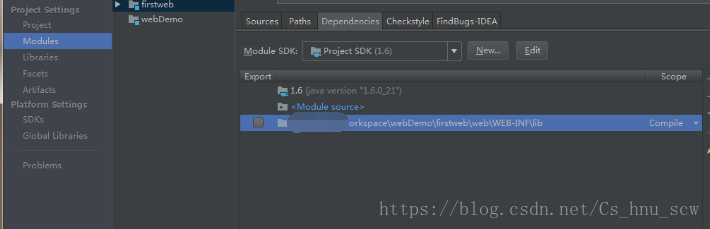
1首先,選擇當前視窗的Dependencies -> 將Module SDK選擇為1.6 ->點選右邊的 + 號 -> 選擇 “1 JARS or directories ...”
2其次: 選擇剛剛建立的lib資料夾 -> OK
3最後: 選擇Jar Directory -> OK

結果如下圖所示:
二:其次,下面的話就配置web專案執行所需要的Tomcat。
(1)點選IDEA的右上角
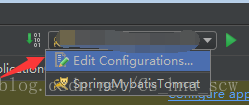
(2)其次,

(3)

然後選中我們的那個專案對應的explore即可。
(4)然後,再點選server進行配置下面的內容。
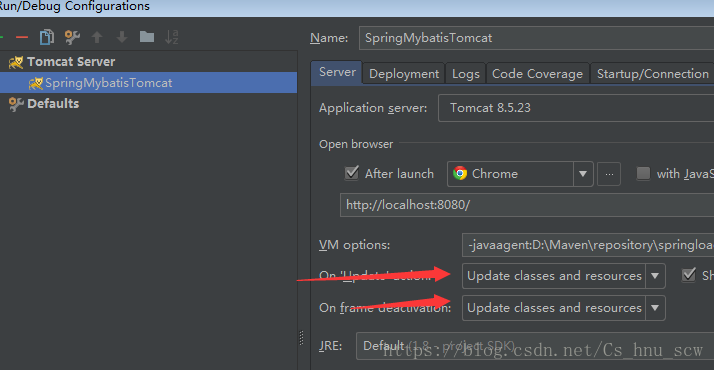
(5)到這個時候,我們的Web環境和Tomcat都配置好了,可以點選右上角的綠色按鈕直接執行。如果一切配置正確的話,那麼就會預設顯示index.jsp(這個JSP頁面是我們建立專案就預設生成有的)裡面的內容。
三:關鍵整合的地方(請認真看):
首先,放一下整個的專案結構圖,讓大家有一個整體的瞭解!
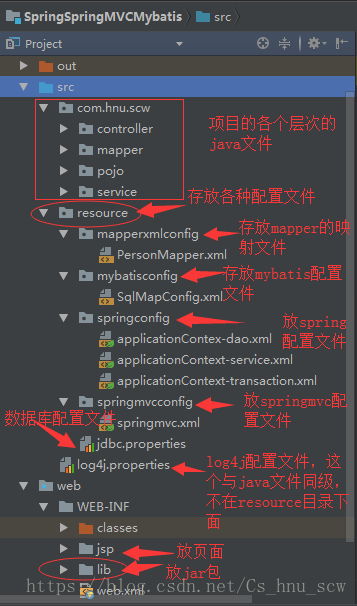
首先,進行配置檔案的配置內容。建立一個resouce檔案目錄,用於存放所有的配置檔案,這可以方便我們以後對配置檔案的管理。
********首先,要導包哦。這個可不能忘記了,具體的包我會放在最後原始碼上面。
(1)在resource目錄下建立一個mapperxmlconfig檔案,用於存放mybatis的mapper對映檔案。
(2)在resource目錄下建立一個mybatisconfig檔案,用於配置Mybatis.xml檔案,命名為SqlMapConfig.xml。
<?xml version="1.0" encoding="UTF-8"?>
<!DOCTYPE configuration PUBLIC "-//mybatis.org//DTD Config 3.0//EN"
        "http://mybatis.org/dtd/mybatis-3-config.dtd">
<configuration>
    <!-- 這裡面你可以配置一下關於JavaBean中類的一些別名,這樣就方便在之後的Mapper檔案中進行處理 -->
    <typeAliases>
        <package name="hnu.scw.pojo"/>
    </typeAliases>
</configuration>
(3)在resource目錄下建立一個springconfig的檔案,這裡存放之後的關於spring的一些配置檔案
(4)在springconfig檔案中,建立applicationContex-dao.xml檔案,主要是配置:載入properties檔案,資料來源,SqlSessionFactory,Mapper掃描
(如果大家喜歡將所有的關於spring的內容都配置在一個xml中也是可以的,看個人喜好,如果想分開進行管理就分開建立不同的xml檔案即可。)
<?xml version="1.0" encoding="UTF-8"?>
<beans xmlns="http://www.springframework.org/schema/beans"
       xmlns:context="http://www.springframework.org/schema/context"
       xmlns:xsi="http://www.w3.org/2001/XMLSchema-instance"
       xsi:schemaLocation="http://www.springframework.org/schema/beans http://www.springframework.org/schema/beans/spring-beans-4.0.xsd
    http://www.springframework.org/schema/context http://www.springframework.org/schema/context/spring-context-4.0.xsd">

    <!-- 配置 讀取properties檔案 jdbc.properties -->
    <context:property-placeholder location="classpath:resource/jdbc.properties" />
    <!-- 自動掃描所有的註解 -->
    <context:component-scan base-package="com.hnu.scw"/>

    <!-- 配置阿里的druid資料來源 -->
    <bean id="dataSource" class="com.alibaba.druid.pool.DruidDataSource">
        <property name="driverClassName" value="${jdbc.driver}" />
        <property name="url" value="${jdbc.url}" />
        <property name="username" value="${jdbc.username}" />
        <property name="password" value="${jdbc.password}" />
    </bean>

    <!-- 配置SqlSessionFactory -->
    <bean id="sqlSessionFactory" class="org.mybatis.spring.SqlSessionFactoryBean">
        <!-- 設定資料來源 -->
        <property name="dataSource" ref="dataSource"/>
        <!-- 設定MyBatis核心配置檔案 -->
        <property name="configLocation" value="classpath:resource/mybatisconfig/SqlMapConfig.xml" />
        <!-- 設定掃描mapper.xml檔案 -->
       <property name="mapperLocations" value="classpath:resource/mapperxmlconfig/*Mapper.xml"/>
    </bean>

    <!-- 配置Mapper層java類掃描 -->
    <bean class="org.mybatis.spring.mapper.MapperScannerConfigurer">
        <!-- 設定Mapper掃描包 -->
        <property name="basePackage" value="com.hnu.scw.mapper" />
        <property name="sqlSessionFactoryBeanName" value="sqlSessionFactory"/>
    </bean>
</beans>
(5)在springconfig檔案中,建立管理service層的檔案,命名為ApplicationContext-service.xml(這裡其實主要就是配置一下掃描service的工作)
<?xml version="1.0" encoding="UTF-8"?>
<beans xmlns="http://www.springframework.org/schema/beans"
       xmlns:context="http://www.springframework.org/schema/context"
       xmlns:xsi="http://www.w3.org/2001/XMLSchema-instance"
       xsi:schemaLocation="http://www.springframework.org/schema/context http://www.springframework.org/schema/context/spring-context-4.0.xsd">
    <!-- 配置Service掃描,不配置也可以,直接在dao層用一個總的掃描類即可 -->
    <context:component-scan base-package="com.hnu.scw.service" />
</beans>(6)在springconfig檔案中,建立管理transaction層的檔案,主要就是對事務以及AOP切面的處理。(這都是選擇性配置)
注意:這裡的配置還可以用註解的方式進行,但是習慣性是用這個了,看個人愛好吧。
<?xml version="1.0" encoding="UTF-8"?>
<beans xmlns="http://www.springframework.org/schema/beans"
       xmlns:aop="http://www.springframework.org/schema/aop" xmlns:tx="http://www.springframework.org/schema/tx"
       xmlns:xsi="http://www.w3.org/2001/XMLSchema-instance"
       xsi:schemaLocation="http://www.springframework.org/schema/beans http://www.springframework.org/schema/beans/spring-beans-4.0.xsd
    http://www.springframework.org/schema/aop http://www.springframework.org/schema/aop/spring-aop-4.0.xsd http://www.springframework.org/schema/tx http://www.springframework.org/schema/tx/spring-tx-4.0.xsd
    ">
    <!--新增spring-dao層配置檔案-->
    <import resource="applicationContext-dao.xml" />
    <!-- 事務管理器 -->
    <bean id="transactionManager"  class="org.springframework.jdbc.datasource.DataSourceTransactionManager">
        <!-- 資料來源 -->
        <property name="dataSource" ref="dataSource" />
    </bean>

    <!-- 事務模板物件 -->
    <bean name="transactionTemplate" class="org.springframework.transaction.support.TransactionTemplate" >
        <property name="transactionManager" ref="transactionManager" />
    </bean>

    <!-- 通知 -->
    <tx:advice id="txAdvice" transaction-manager="transactionManager">
        <tx:attributes>
            <!-- 以方法為單位,指定方法應用什麼事務屬性
             isolation:隔離級別
             propagation:傳播行為
             read-only:是否只讀
          -->
            <tx:method name="save*" isolation="REPEATABLE_READ" propagation="REQUIRED" read-only="false" />
            <tx:method name="add*" isolation="REPEATABLE_READ" propagation="REQUIRED" read-only="false" />
            <tx:method name="persist*" isolation="REPEATABLE_READ" propagation="REQUIRED" read-only="false" />
            <tx:method name="update*" isolation="REPEATABLE_READ" propagation="REQUIRED" read-only="false" />
            <tx:method name="modify*" isolation="REPEATABLE_READ" propagation="REQUIRED" read-only="false" />
            <tx:method name="delete*" isolation="REPEATABLE_READ" propagation="REQUIRED" read-only="false" />
            <tx:method name="remove*" isolation="REPEATABLE_READ" propagation="REQUIRED" read-only="false" />
            <tx:method name="get*" isolation="REPEATABLE_READ" propagation="REQUIRED" read-only="true" />
            <tx:method name="find*" isolation="REPEATABLE_READ" propagation="REQUIRED" read-only="true" />
            <tx:method name="transfer" isolation="REPEATABLE_READ" propagation="REQUIRED" read-only="false" />
        </tx:attributes>
    </tx:advice>

    <!-- 切面 -->
    <aop:config>
        <aop:pointcut expression="execution(* com.hnu.scw.service.impl.*.*(..))" id="txpc"/>
        <!-- 配置切面 : 通知+切點
            advice-ref:通知的名稱
            pointcut-ref:切點的名稱
        -->
        <aop:advisor advice-ref="txAdvice" pointcut-ref="txpc" />
    </aop:config>

    <!--
    如果嫌棄上面的配置太麻煩,想在service不同的類進行不同的事務控制,那麼就用下面的配置
    但是要注意:需要在service的類中進行手動的新增@Transactional註解,而用上面的話就不需要進行額外的配置了

     配置基於註解的宣告式事務
    <tx:annotation-driven transaction-manager="transactionManager"/>
    -->
</beans>
關於這些內容的含義,我就不多介紹了,如果有不懂的地方,可以看看我之前的文章,因為這些內容都介紹得非常非常的仔細了。
(7)在resource檔案目錄下,建立資料庫的properties檔案,這個就是連線資料庫對應的內容
jdbc.driver=com.mysql.jdbc.Driver
jdbc.url=jdbc:mysql://localhost:3306/test?characterEncoding=utf-8
jdbc.username=root
jdbc.password=123456
(8)直接在與Java檔案同級下,建立日誌檔案的properties檔案,這個根據需要自行判斷是否需要即可
# Global logging configuration
log4j.rootLogger=DEBUG, stdout
# Console output...
log4j.appender.stdout=org.apache.log4j.ConsoleAppender
log4j.appender.stdout.layout=org.apache.log4j.PatternLayout
log4j.appender.stdout.layout.ConversionPattern=%5p [%t] - %m%n(9)在resource目錄下,建立springmvcconfig檔案目錄,用於配置springMVC的配置檔案,並建立命名為springmvc.xml(主要:Controller掃描、註解驅動、檢視解析器)
<?xml version="1.0" encoding="UTF-8"?>
<beans xmlns="http://www.springframework.org/schema/beans"
       xmlns:xsi="http://www.w3.org/2001/XMLSchema-instance"
       xmlns:context="http://www.springframework.org/schema/context"
       xmlns:mvc="http://www.springframework.org/schema/mvc"
       xsi:schemaLocation="http://www.springframework.org/schema/beans http://www.springframework.org/schema/beans/spring-beans-4.0.xsd
        http://www.springframework.org/schema/mvc http://www.springframework.org/schema/mvc/spring-mvc-4.0.xsd
        http://www.springframework.org/schema/context http://www.springframework.org/schema/context/spring-context-4.0.xsd">
    <!-- 配置Controller掃描 -->
    <context:component-scan base-package="com.hnu.scw.controller" />

    <!-- 配置註解驅動 -->
    <mvc:annotation-driven />

    <!-- 配置檢視解析器 -->
    <bean  class="org.springframework.web.servlet.view.InternalResourceViewResolver">
        <!-- 字首 -->
        <property name="prefix" value="/WEB-INF/jsp/" />
        <!-- 字尾 -->
        <property name="suffix" value=".jsp" />
    </bean>
</beans>(10)配置web.xml檔案(主要:配置Spring、SpringMVC、解決post亂碼問題)
<?xml version="1.0" encoding="UTF-8"?>
<web-app xmlns="http://xmlns.jcp.org/xml/ns/javaee"
         xmlns:xsi="http://www.w3.org/2001/XMLSchema-instance"
         xsi:schemaLocation="http://xmlns.jcp.org/xml/ns/javaee http://xmlns.jcp.org/xml/ns/javaee/web-app_3_1.xsd"
         version="3.1">

    <!--配置專案啟動的時候載入spring的相關配置檔案-->
    <context-param>
        <param-name>contextConfigLocation</param-name>
        <param-value>classpath:resource/springconfig/applicationContex-*.xml</param-value>
    </context-param>
    <!--配置監聽器載入spring-->
    <listener>
        <listener-class>org.springframework.web.context.ContextLoaderListener</listener-class>
    </listener>

    <!--配置過濾器,解決post亂碼問題-->
    <filter>
        <filter-name>encoding</filter-name>
        <filter-class>org.springframework.web.filter.CharacterEncodingFilter</filter-class>
        <init-param>
            <param-name>encoding</param-name>
            <param-value>UTF-8</param-value>
        </init-param>
    </filter>
    <filter-mapping>
        <filter-name>encoding</filter-name>
        <url-pattern>*</url-pattern>
    </filter-mapping>

    <!--配置springmvc-->
    <servlet>
        <servlet-name>springmvc</servlet-name>
        <servlet-class>org.springframework.web.servlet.DispatcherServlet</servlet-class>
        <init-param>
            <param-name>contextConfigLocation</param-name>
            <param-value>classpath:resource/springmvcconfig/springmvc.xml</param-value>
        </init-param>
        <!-- 配置springmvc什麼時候啟動,引數必須為整數 -->
        <!-- 如果為0或者大於0,則springMVC隨著容器啟動而啟動 -->
        <!-- 如果小於0,則在第一次請求進來的時候啟動 -->
        <load-on-startup>1</load-on-startup>
    </servlet>
    <servlet-mapping>
        <servlet-name>springmvc</servlet-name>
        <url-pattern>/</url-pattern>
    </servlet-mapping>
</web-app>(11)上面這些的話,基本對整個的框架整合完成了,在裡面配置applicationContext-dao.xml的時候,進行掃描mapper.xml的時候,會報錯,那是因為在這個路徑下面還沒有內容,所以,別緊張。後面新增進去就可以了。
最後,進行編寫每一層的Java程式碼。我這都示例進行演示即可:
(1)建立pojo包,用於存放javabean實體。
package com.hnu.scw.pojo;
import java.io.Serializable;
/**
 * @ Author     :scw
 * @ Date       :Created in 下午 2:14 2018/6/15 0015
 * @ Description:定義一個‘人’的實體類
 * @ Modified By:
 * @Version: $version$
 */
public class Person implements Serializable{
    private Integer id;
    private String name;

    public Integer getId() {
        return id;
    }

    public void setId(Integer id) {
        this.id = id;
    }

    public String getName() {
        return name;
    }

    public void setName(String name) {
        this.name = name;
    }
}
(2)建立mapper類,示例PersonMapper
package com.hnu.scw.mapper;
import com.hnu.scw.pojo.Person;
/**
 * @ Author     :scw
 * @ Date       :Created in 下午 3:21 2018/6/15 0015
 * @ Description:對應於person的mapper操作介面
 * @ Modified By:
 * @Version: $version$
 */
public interface PersonMapper {
    /**
     * 新增一個person實體
     * @param person
     */
    void addPerson(Person person);
}
(3)建立service介面,
package com.hnu.scw.service;
import com.hnu.scw.pojo.Person;
/**
 * @ Author     :scw
 * @ Date       :Created in 下午 3:17 2018/6/15 0015
 * @ Description:person服務
 * @ Modified By:
 * @Version: $version$
 */
public interface PersonService {
    /**
     * 新增一個person實體
     * @param person
     */
    void addPerson(Person person);
}
(4)建立service介面實現類
package com.hnu.scw.service.imp;
import com.hnu.scw.mapper.PersonMapper;
import com.hnu.scw.pojo.Person;
import com.hnu.scw.service.PersonService;
import org.springframework.beans.factory.annotation.Autowired;
import org.springframework.stereotype.Service;
/**
 * @ Author     :scw
 * @ Date       :Created in 下午 3:19 2018/6/15 0015
 * @ Description:person實體處理的service實現類
 * @ Modified By:
 * @Version: $version$
 */
@Service
public class PersonServiceImp implements PersonService {
    @Autowired
    private PersonMapper personMapper;
    @Override
    public void addPerson(Person person) {
        personMapper.addPerson(person);
    }
}
(5)建立controller層,
package com.hnu.scw.controller;
import com.hnu.scw.pojo.Person;
import com.hnu.scw.service.PersonService;
import org.springframework.beans.factory.annotation.Autowired;
import org.springframework.stereotype.Controller;
import org.springframework.web.bind.annotation.RequestMapping;
/**
 * @ Author     :scw
 * @ Date       :Created in 下午 2:15 2018/6/15 0015
 * @ Description:${description}
 * @ Modified By:
 * @Version: $version$
 */
@Controller
public class MyTestController {

    @Autowired
    private PersonService personService;
    /**
     * 跳轉到新增person頁面
     * @return
     */
    @RequestMapping(value = "toaddperson")
    public String testMyFirst(){
        return "person_add";
    }

    /**
     * 新增person處理
     * @param person
     * @return
     */
    @RequestMapping(value = "addperson")
    public String addPerson(Person person){
        personService.addPerson(person);
        return "success";
    }
}
(6)在web/WEB-INF/jsp檔案目錄下,建立JSP頁面
person_add.jsp
<%@ page contentType="text/html;charset=UTF-8" language="java" %>
<html>
<head>
    <title>歡迎您的到來</title>
</head>
<body>
<h1>隨便填一填唄</h1>
<form action="${pageContext.request.contextPath}/addperson" method="post">
    <table>
        <tr>
            <td>大聲說出你的名字</td>
            <td>
                <input type="text" name="name" id="personname">
            </td>
        </tr>
        <tr>
            <td></td>
            <td>
                <input type="submit" id="submitform" name="submitform" value="提交">
            </td>
        </tr>
    </table>
</form>
</body>
</html>
success.jsp
<%--
  Created by IntelliJ IDEA.
  User: Administrator
  Date: 2018/6/15 0015
  Time: 下午 2:19
  To change this template use File | Settings | File Templates.
--%>
<%@ page contentType="text/html;charset=UTF-8" language="java" %>
<html>
<head>
    <title>新增成功</title>
</head>
<body>
<h1>恭喜你,新增成功,趕緊看看資料庫!</h1>
</body>
</html>
好了,差不多就是這麼個流程的整合,如果就是根據使用者自身的需求,可能還需要配置什麼內容,這都是可以根據需要進行新增的,但是正常的情況,一般的三個框架的整合就是完整的了哦。。。。
這三個框架的整體構建就已經學會了,然後剩下的就是進行熟練度的練習啦,如果對這幾個框架有不懂的,歡迎看我之前的文章,都有很詳細的介紹的哦!!一起共同努力!!!!!
如果需要SSM框架整合的Maven版本,那麼可以閱讀我的另外一篇文章哦。