
APK簽名機制之——JAR簽名機制詳解
在APK簽名機制原理詳解中我們已經瞭解了APK簽名和校驗的基本過程,這一篇我們來分析JAR簽名機制。JAR簽名對對jar包進行簽名的一種機制,由於jar包apk本質上都是zip包,所以可以應用到對apk的簽名。本文從JAR簽名結構、簽名過程,再到簽名校驗的原始碼分析,全方面來分析Android中JAR簽名及校驗的機制。
1. 簽名過程
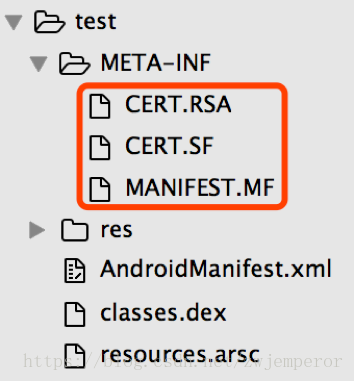
通過解壓工具開啟apk檔案,會發現有一個META-INF目錄,該目錄中有3個檔案,這3個檔案是簽名以後生成的,顯然與簽名相關,我們依次看這幾個檔案中的內容。
1.1 檔案內容解析
1.1.1 先看MANIFEST.MF:
Manifest-Version: 1.0
Created-By: 1.8.0_92 (Oracle Corporation)

Name: res/drawable-hdpi-v4/abc_list_longpressed_holo.9.png
SHA1-Digest: KQunCQh0E4bP0utgN0cHdQr9OwA=

Name: res/drawable-xxhdpi-v4/abc_ic_star_half_black_16dp.png
SHA1-Digest: EikVyBT5I7pmbJO2k8qF0V5hUc0=

......
這個檔案列出了apk中所有的檔案,以及它們的摘要,摘要字串是通過base64編碼的,通過計算來驗證下:
先計算出res/drawable-hdpi-v4/abc_list_longpressed_holo.9.png的sha1值。

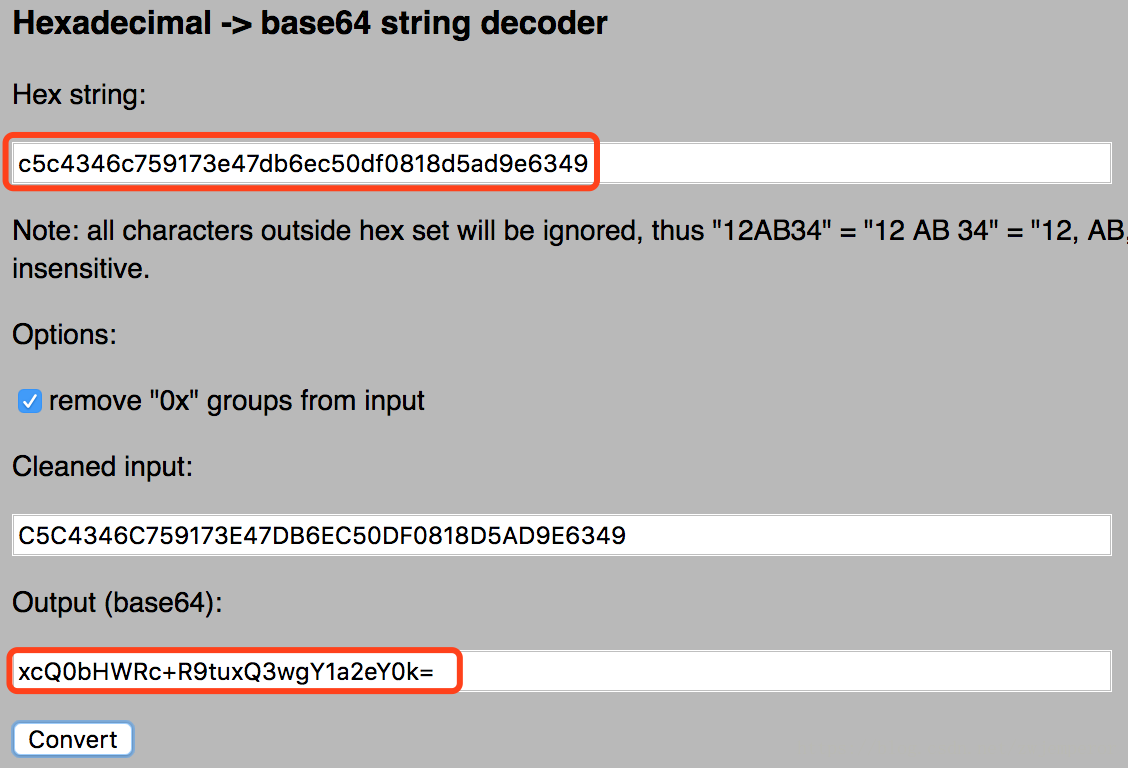
計算出的sha1值是經過16進行編碼的,再把它轉成base64編碼,可以通過線上工具進行轉換:tomeko.net
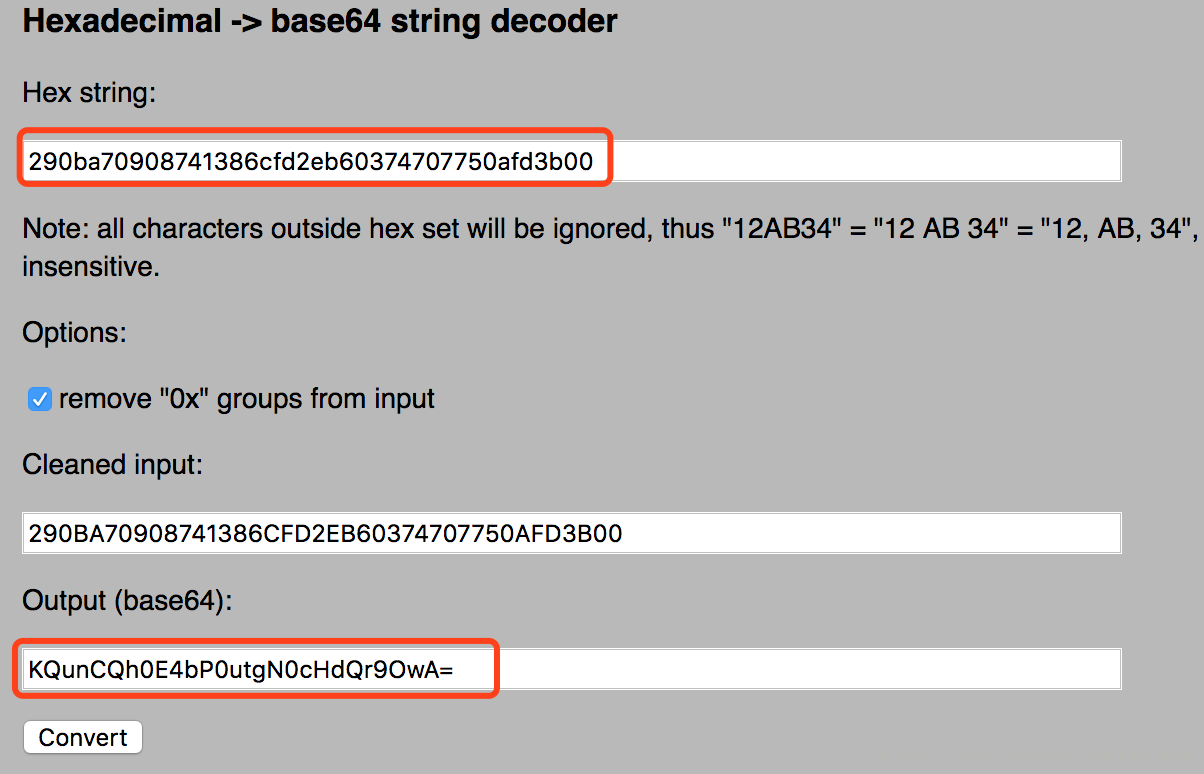
可以看到轉換過後的base64值和MANIFEST.MF檔案中內容是一樣的。
1.1. 2 再看CERT.SF
Signature-Version: 1.0
SHA1-Digest-Manifest: odZIAbrTVCfKGy6HEd5+gdBHw0I=
Created-By: 1.8.0_92 (Oracle Corporation)

Name: res/drawable-hdpi-v4/abc_list_longpressed_holo.9.png
SHA1-Digest: xcQ0bHWRc+R9tuxQ3wgY1a2eY0k=

Name: res/drawable-xxhdpi-v4/abc_ic_star_half_black_16dp.png
SHA1-Digest: pj+V2r2pJOgJwGGNpeqxnykl0Nc=

......
SF檔案的內容和MF比較相似,同樣包含了apk所有檔案的摘要,不同的是:
- SF檔案在主屬性中記錄了整個MF檔案的摘要(SHA1-Digest-Manifest)
- SF檔案其餘部分記錄的是MF相應條目的摘要,也就說對MF檔案相應條目再次進行了摘要計算。
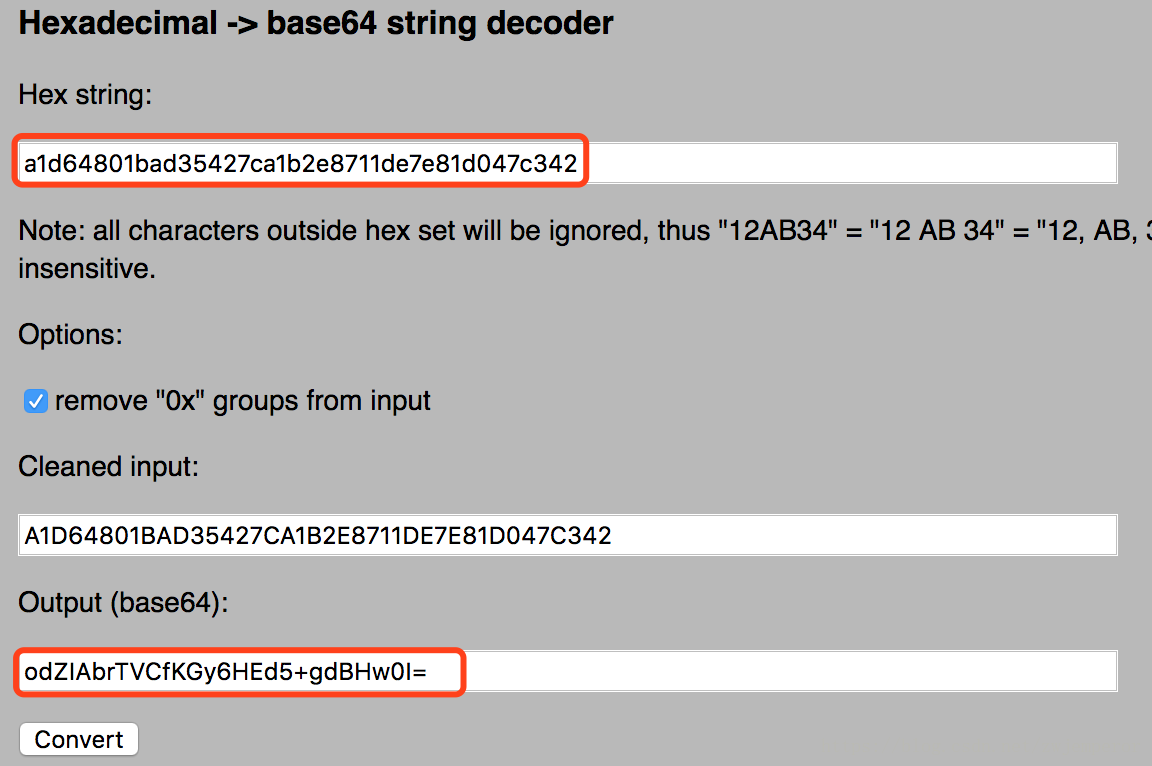
我們再來驗證下,首先計算出MANIFEST.MF檔案的sha1值,再轉換base64編碼:

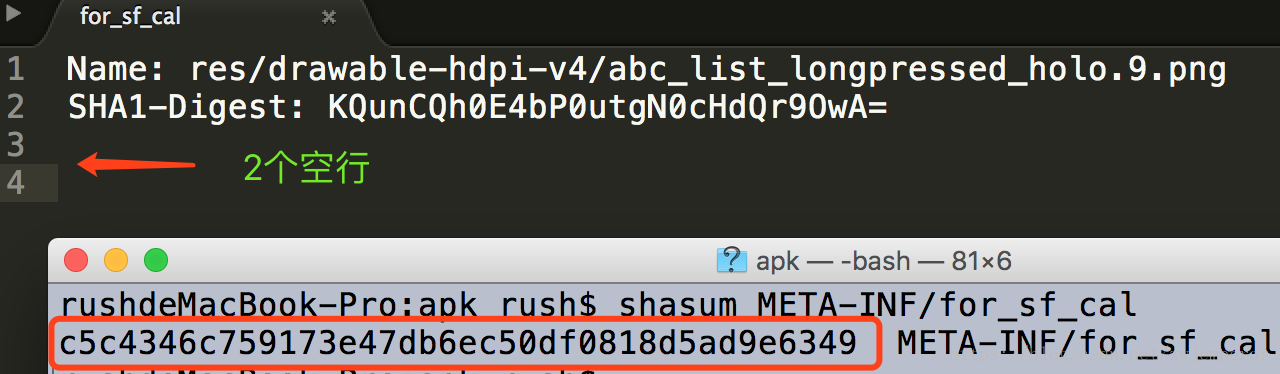
再來驗證res/drawable-hdpi-v4/abc_list_longpressed_holo.9.png
這裡要注意下,.MF檔案是以空行分隔的。計算.MF各條目摘要時需要再加一個換行符,因為空行還有一個換行符(具體可參考apksigner原始碼
再把sha1值轉為base64編碼:
1.1.3 再看CERT.RSA
cert.rsa中的是二進行內容,裡面儲存了簽名者的證書資訊,以及對cert.sf檔案的簽名。具體證書包含的內容已經在APK簽名機制原理詳解中作了說明,這裡不再重複介紹。
1.2 整體簽名過程
public static void main(String[] args) {
    ......
    //生成MANIFEST.MF檔案,遍歷apk的所有檔案,計算除META-INF目錄下的
    //.SF/.RSA/.DSA檔案外所有檔案的摘要。
    JarEntry je;
    Manifest manifest = addDigestsToManifest(inputJar);
    // MANIFEST.MF
    je = new JarEntry(JarFile.MANIFEST_NAME);
    je.setTime(timestamp);
    outputJar.putNextEntry(je);
    manifest.write(outputJar);

    // 生成CERT.SF檔案
    je = new JarEntry(CERT_SF_NAME);
    je.setTime(timestamp);
    outputJar.putNextEntry(je);
    ByteArrayOutputStream baos = new ByteArrayOutputStream();
    //計算MF檔案摘要,及MF相應條目的摘要
    writeSignatureFile(manifest, baos);
    //計算SF檔案的摘要
    byte[] signedData = baos.toByteArray();
    outputJar.write(signedData);

    // 生成CERT.RSA
    // 對SF檔案的摘要(signedData)進行簽名,將證書資訊一同寫入RSA檔案中
    je = new JarEntry(CERT_RSA_NAME);
    je.setTime(timestamp);
    outputJar.putNextEntry(je);
    writeSignatureBlock(new CMSProcessableByteArray(signedData),
    publicKey, privateKey, outputJar);
    outputJar.close();
    ......
}
2. 校驗過程
上面說的是簽名過程,接下來看apk安裝過程是怎樣進行簽名校驗的。校驗過程和簽名過程剛好相反:
首先校驗cert.sf檔案的簽名
計算cert.sf檔案的摘要,與通過簽名者公鑰解密簽名得到的摘要進行對比,如果一致則進入下一步;
校驗manifest.mf檔案的完整性
計算manifest.mf檔案的摘要,與cert.sf主屬性中記錄的摘要進行對比,如一致則逐一校驗mf檔案各個條目的完整性;
校驗apk中每個檔案的完整性
逐一計算apk中每個檔案(META-INF目錄除外)的摘要,與mf中的記錄進行對比,如全部一致,剛校驗通過;
校驗簽名的一致性
如果是升級安裝,還需校驗證書籤名是否與已安裝app一致。
以上步驟需要全部通過才算簽名校驗通過,任何一步失敗都將導致校驗失敗。這個過程能保證apk不可被篡改嗎?我們來看看篡改apk內容會發生什麼:
篡改apk內容
校驗apk中每個檔案的完整性時失敗;如果是新增新檔案,因為此檔案的hash值在.mf和.sf中無記錄,同樣校驗失敗;
篡改apk內容,同時篡改manifest.mf檔案相應的摘要
校驗manifest.mf檔案的摘要會失敗;
篡改apk內容,同時篡改manifest.mf檔案相應的摘要,以及cert.sf檔案的內容
校驗cert.sf檔案的簽名會失敗;
把apk內容和簽名信息一同全部篡改
這相當於對apk進行了重新簽名,在此apk沒有安裝到系統中的情況下,是可以正常安裝的,這相當於是一個新的app;但如果進行覆蓋安裝,則證書不一證,安裝失敗。
從這裡可以看出只要篡改了apk中的任何內容,都會使得簽名校驗失敗。
3. 簽名校驗程式碼分析
在這方法中構造了一個PackageParser物件,這個類是用來解析apk檔案的,具體的簽名校驗在這個物件的collectCertificates方法中。
private void installPackageLI(InstallArgs args, PackageInstalledInfo res) {
    ......
    PackageParser pp = new PackageParser();
    pp.setSeparateProcesses(mSeparateProcesses);
    pp.setDisplayMetrics(mMetrics);
    final PackageParser.Package pkg;
    try {
        pkg = pp.parsePackage(tmpPackageFile, parseFlags);
    } catch (PackageParserException e) {
        res.setError("Failed parse during installPackageLI", e);
        return;
    }

    // Mark that we have an install time CPU ABI override.
    pkg.cpuAbiOverride = args.abiOverride;
    String pkgName = res.name = pkg.packageName;
    if ((pkg.applicationInfo.flags&ApplicationInfo.FLAG_TEST_ONLY) != 0) {
        if ((installFlags & PackageManager.INSTALL_ALLOW_TEST) == 0) {
            res.setError(INSTALL_FAILED_TEST_ONLY, "installPackageLI");
            return;
        }
    }

    try {
        pp.collectCertificates(pkg, parseFlags);
        pp.collectManifestDigest(pkg);
    } catch (PackageParserException e) {
        res.setError("Failed collect during installPackageLI", e);
        return;
    }
3.1 校驗.SF檔案簽名
private static void collectCertificates(Package pkg, File apkFile, int flags) throws PackageParserException {
    final String apkPath = apkFile.getAbsolutePath();
    StrictJarFile jarFile = null;
    try {
        jarFile = new StrictJarFile(apkPath);
    ......
}
這個方法中建立了一個StrictJarFile物件,在StrictJarFile的構造方法中完成了CERT.SF檔案的簽名校驗和MANIFEST.MF檔案的hash校驗,校驗的結果儲存在了isSigned成員變數中。
public StrictJarFile(String fileName) throws IOException {
    this.nativeHandle = nativeOpenJarFile(fileName);
    this.raf = new RandomAccessFile(fileName, "r");

    try {
        // Read the MANIFEST and signature files up front and try to
        // parse them. We never want to accept a JAR File with broken signatures
        // or manifests, so it's best to throw as early as possible.
        HashMap<String, byte[]> metaEntries = getMetaEntries();
        this.manifest = new Manifest(metaEntries.get(JarFile.MANIFEST_NAME), true);
        this.verifier = new JarVerifier(fileName, manifest, metaEntries);
        //校驗.SF檔案簽名和.MF hash
        isSigned = verifier.readCertificates() && verifier.isSignedJar();
    } catch (IOException ioe) {
        nativeClose(this.nativeHandle);
        throw ioe;
    }

    guard.open("close");
}
StrictJarFile中構造了Manifest和JarVerifier物件,具體校驗過程是中在readCertificates方法中實現的,校驗成功後將證書儲存到了certificates集合中。來看readCertificates方法的具體實現:
synchronized boolean readCertificates() {
    if (metaEntries.isEmpty()) {
        return false;
    }

    Iterator<String> it = metaEntries.keySet().iterator();
    while (it.hasNext()) {
        String key = it.next();
        if (key.endsWith(".DSA") || key.endsWith(".RSA") || key.endsWith(".EC")) {
            verifyCertificate(key);
            it.remove();
        }
    }
    return true;
}
如果meta條目為空,則直接返回false;如果存在,則遍歷找到簽名塊檔案(.DSA/.RSA/.EC),依次進行校驗。apk簽名通常使用RSA演算法,所以找到的是.RSA檔案,從這裡可以看出,.RSA檔名並不是固定的,校驗過程中是通常字尾查詢的。這裡是一個while迴圈,從這裡可以看出,是可以有多個簽名者對apk進行簽名的,readCertificates會依次對每一個簽名進行校驗。
繼續看verifyCertificate的實現:
private void verifyCertificate(String certFile) {
    // Found Digital Sig, .SF should already have been read
    String signatureFile = certFile.substring(0, certFile.lastIndexOf('.')) + ".SF";
    byte[] sfBytes = metaEntries.get(signatureFile);
    if (sfBytes == null) {
        return;
    }

    byte[] manifestBytes = metaEntries.get(JarFile.MANIFEST_NAME);
    // Manifest entry is required for any verifications.
    if (manifestBytes == null) {
        return;
    }

    byte[] sBlockBytes = metaEntries.get(certFile);
    try {
        //校驗sf檔案簽名
        Certificate[] signerCertChain = JarUtils.verifySignature(
            new ByteArrayInputStream(sfBytes),
            new ByteArrayInputStream(sBlockBytes));
        if (signerCertChain != null) {
            certificates.put(signatureFile, signerCertChain);
        }
    ....
}
首先通過.RSA檔名找到.SF檔案,然後通過JarUtils類的verifySignature方法校驗.SF檔案簽名。校驗過後把相應證書儲存到了certificates成員變數。
public static Certificate[] verifySignature(InputStream signature, InputStream signatureBlock) throws IOException, GeneralSecurityException {
        ......
        byte[] computedDigest = md.digest(sfBytes);
        if (!Arrays.equals(existingDigest, computedDigest)) {
            throw new SecurityException("Incorrect MD");
        }
        if (!sig.verify(sigInfo.getEncryptedDigest())) {
            throw new SecurityException("Incorrect signature");
        }
        return createChain(certs[issuerSertIndex], certs);
    }
verifySignature方法入參分別是.SF檔案和簽名塊(.RSA檔案)的二進位制流,這個方法中計算了.SF檔案的摘要,對其簽名做了校驗。
3.2 校驗.MF檔案hash及.MF檔案各條目hash
繼續看verifyCertificate方法的後半段實現:
private void verifyCertificate(String certFile) {
    ......
    // Use .SF to verify the whole manifest.
    String digestAttribute = createdBySigntool ? "-Digest" : "-Digest-Manifest";
    if (!verify(attributes, digestAttribute, manifestBytes, 0, manifestBytes.length, false, false)) {
        Iterator<Map.Entry<String, Attributes>> it = entries.entrySet().iterator();
        while (it.hasNext()) {
            Map.Entry<String, Attributes> entry = it.next();
            Manifest.Chunk chunk = manifest.getChunk(entry.getKey());
            if (chunk == null) {
                return;
            }
            if (!verify(entry.getValue(), "-Digest", manifestBytes,
                        chunk.start, chunk.end, createdBySigntool, false)) {
                throw invalidDigest(signatureFile, entry.getKey(), jarName);
            }
        }
    }
    metaEntries.put(signatureFile, null);
    signatures.put(signatureFile, entries);
}
verifyCertificate方法的後半段做了2個事情:第一件是找到.SF檔案的SHA1-Digest-Manifest屬性值,校驗.MF檔案hash的正確性;第二件是針對.SF檔案中的每個條目,校驗.MF檔案相應條目hash的正確性。具體校驗的工作在verify方法中完成:
private boolean verify(Attributes attributes, String entry, byte[] data, int start, int end, boolean ignoreSecondEndline, boolean ignorable) {
    for (int i = 0; i < DIGEST_ALGORITHMS.length; i++) {
        String algorithm = DIGEST_ALGORITHMS[i];
        String hash = attributes.getValue(algorithm + entry);
        if (hash == null) {
            continue;
        }

        MessageDigest md;
        try {
            md = MessageDigest.getInstance(algorithm);
        } catch (NoSuchAlgorithmException e) {
            continue;
        }
        if (ignoreSecondEndline && data[end - 1] == '\n' && data[end - 2] == '\n') {
            md.update(data, start, end - 1 - start);
        } else {
            md.update(data, start, end - start);
        }
        byte[] b = md.digest();
        byte[] hashBytes = hash.getBytes(StandardCharsets.ISO_8859_1);
        return MessageDigest.isEqual(b, Base64.decode(hashBytes));
    }
    return ignorable;
}
這裡進行了一次for迴圈來找到.SF檔案使用的hash演算法,校驗的過程很簡單,用相應hash演算法計算.MF檔案相應條目的摘要,比較是否一致即可。至此完成了對.MF檔案hash及.MF檔案各條目hash的校驗。
3.3 校驗apk中各檔案的hash
繼續看的PackageParser collectCertificates方法:
private static void collectCertificates(Package pkg, File apkFile, int flags)
    throws PackageParserException {
    final String apkPath = apkFile.getAbsolutePath();

    StrictJarFile jarFile = null;
    try {
        jarFile = new StrictJarFile(apkPath);

        // Always verify manifest, regardless of source
        final ZipEntry manifestEntry = jarFile.findEntry(ANDROID_MANIFEST_FILENAME);
        if (manifestEntry == null) {
            throw new PackageParserException(INSTALL_PARSE_FAILED_BAD_MANIFEST,
                                             "Package " + apkPath + " has no manifest");
        }

        final List<ZipEntry> toVerify = new ArrayList<>();
        toVerify.add(manifestEntry);

        // If we're parsing an untrusted package, verify all contents
        if ((flags & PARSE_IS_SYSTEM) == 0) {
            final Iterator<ZipEntry> i = jarFile.iterator();
            while (i.hasNext()) {
                final ZipEntry entry = i.next();

                if (entry.isDirectory()) continue;
                if (entry.getName().startsWith("META-INF/")) continue;
                if (entry.getName().equals(ANDROID_MANIFEST_FILENAME)) continue;

                toVerify.add(entry);
            }
        }

        // Verify that entries are signed consistently with the first entry
        // we encountered. Note that for splits, certificates may have
        // already been populated during an earlier parse of a base APK.
        for (ZipEntry entry : toVerify) {
            final Certificate[][] entryCerts = loadCertificates(jarFile, entry);
            if (ArrayUtils.isEmpty(entryCerts)) {
                throw new PackageParserException(INSTALL_PARSE_FAILED_NO_CERTIFICATES,
                                                 "Package " + apkPath + " has no certificates at entry "
                                                 + entry.getName());
            }
            final Signature[] entrySignatures = convertToSignatures(entryCerts);

            if (pkg.mCertificates == null) {
                pkg.mCertificates = entryCerts;
                pkg.mSignatures = entrySignatures;
                pkg.mSigningKeys = new ArraySet<PublicKey>();
                for (int i=0; i < entryCerts.length; i++) {
                    pkg.mSigningKeys.add(entryCerts[i][0].getPublicKey());
                }
            } else {
                if (!Signature.areExactMatch(pkg.mSignatures, entrySignatures)) {
                    throw new PackageParserException(
                        INSTALL_PARSE_FAILED_INCONSISTENT_CERTIFICATES, "Package " + apkPath
                        + " has mismatched certificates at entry "
                        + entry.getName());
                }
            }
        }
    ......
}
在通過StrictJarFile構造方法完成.SF和.MF檔案的校驗之後,首先查詢AndroidManifest.xml檔案是否存在,不存在則直接丟擲異常;然後遍歷apk中的條個檔案,把除META-INF目錄之外的檔案加入toVerify集合,然後對toVerity集合中的每一個檔案進行校驗。先來看loadCertificates方法:
private static Certificate[][] loadCertificates(StrictJarFile jarFile, ZipEntry entry)
    throws PackageParserException {
    InputStream is = null;
    try {
        // We must read the stream for the JarEntry to retrieve its certificates.
        is = jarFile.getInputStream(entry);
        readFullyIgnoringContents(is);
        return jarFile.getCertificateChains(entry);
    } catch (IOException | RuntimeException e) {
        throw new PackageParserException(INSTALL_PARSE_FAILED_UNEXPECTED_EXCEPTION, "Failed reading " + entry.getName() + " in " + jarFile, e);
    } finally {
        IoUtils.closeQuietly(is);
    }
}
再看StrictJarFile的getInputStream方法:
public InputStream getInputStream(ZipEntry ze) {
    final InputStream is = getZipInputStream(ze);
    if (isSigned) {
        JarVerifier.VerifierEntry entry = verifier.initEntry(ze.getName());
        if (entry == null) {
            return is;
        }
        return new JarFile.JarFileInputStream(is, ze.getSize(), entry);
    }
    return is;
}
在getInputStream判斷了isSigned,這個欄位在StrictJarFile構造方法中校驗.SF檔案和.MF後賦值為true。通過JarVerifier的initEntry方法拿到了VerifierEntry物件,再來看initEntry的實現:
VerifierEntry initEntry(String name) {
    // If no manifest is present by the time an entry is found,
    // verification cannot occur. If no signature files have
    // been found, do not verify.
    if (manifest == null || signatures.isEmpty()) {
        return null;
    }

    Attributes attributes = manifest.getAttributes(name);
    // entry has no digest
    if (attributes == null) {
        return null;
    }

    ArrayList<Certificate[]> certChains = new ArrayList<Certificate[]>();
    Iterator<Map.Entry<String, HashMap<String, Attributes>>> it = signatures.entrySet().iterator();
    while (it.hasNext()) {
        Map.Entry<String, HashMap<String, Attributes>> entry = it.next();
        HashMap<String, Attributes> hm = entry.getValue();
        if (hm.get(name) != null) {
            // Found an entry for entry name in .SF file
            String signatureFile = entry.getKey();
            Certificate[] certChain = certificates.get(signatureFile);
            if (certChain != null) {
                certChains.add(certChain);
            }
        }
    }

    // entry is not signed
    if (certChains.isEmpty()) {
        return null;
    }
    Certificate[][] certChainsArray = certChains.toArray(new Certificate[certChains.size()][]);

    for (int i = 0; i < DIGEST_ALGORITHMS.length; i++) {
        final String algorithm = DIGEST_ALGORITHMS[i];
        final String hash = attributes.getValue(algorithm + "-Digest");
        if (hash == null) {
            continue;
        }
        byte[] hashBytes = hash.getBytes(StandardCharsets.ISO_8859_1);

        try {
            return new VerifierEntry(name, MessageDigest.getInstance(algorithm), hashBytes,
                                     certChainsArray, verifiedEntries);
        } catch (NoSuchAlgorithmException ignored) {
        }
    }
    return null;
}
這個方法做了2件事情:一是遍歷.SF檔案中已經過簽名校驗的條目(signatures map是在verifyCertificate中校驗.SF檔案後儲存的),查詢是否存在方法入參指定的檔名,不存在則說明是新增檔案,直接返回null;第二件事是構造VerifierEntry物件,引數分別是 檔名、hash演算法、.MF檔案中相應檔名對應的hash值、證書鏈、已簽名的檔案列表。
getInputStream在建立VerifierEntry物件後,進行了一次封裝,返回了JarFile.JarFileInputStream物件。再回頭來看PackageParser的loadCertificates中呼叫的readFullyIgnoringContents方法:
public static long readFullyIgnoringContents(InputStream in) throws IOException {
    byte[] buffer = sBuffer.getAndSet(null);
    if (buffer == null) {
        buffer = new byte[4096];
    }
    int n = 0;
    int count = 0;
    while ((n = in.read(buffer, 0, buffer.length)) != -1) {
        count += n;
    }
    sBuffer.set(buffer);
    return count;
}
這個方法看上去只是讀取檔案流,但實際上in是JarFileInputStream,來看JarFileInputStream中read方法的實現:
public int read() throws IOException {
    if (done) {
        return -1;
    }
    if (count > 0) {
        int r = super.read();
        if (r != -1) {
            entry.write(r);
            count--;
        } else {
            count = 0;
        }
        if (count == 0) {
            done = true;
            entry.verify();
        }
        return r;
    } else {
        done = true;
        entry.verify();
        return -1;
    }
}
可以看到,read方法中呼叫了VerifierEntry的verify方法,最終在verify方法中完成了apk中相應檔案的hash校驗,也就比較apk中各檔案的hash與.MF檔案中對應的值是否一致。
void verify() {
    byte[] d = digest.digest();
    if (!MessageDigest.isEqual(d, Base64.decode(hash))) {
        throw invalidDigest(JarFile.MANIFEST_NAME, name, name);
    }
    verifiedEntries.put(name, certChains);
}
再回頭來看collectCertificates方法的剩餘部分:
private static void collectCertificates(Package pkg, File apkFile, int flags)
    throws PackageParserException {
    ......
    // Verify that entries are signed consistently with the first entry
    // we encountered. Note that for splits, certificates may have
    // already been populated during an earlier parse of a base APK.
    for (ZipEntry entry : toVerify) {
        final Certificate[][] entryCerts = loadCertificates(jarFile, entry);
        if (ArrayUtils.isEmpty(entryCerts)) {
            throw new PackageParserException(INSTALL_PARSE_FAILED_NO_CERTIFICATES,
                                             "Package " + apkPath + " has no certificates at entry "
                                             + entry.getName());
        }
        final Signature[] entrySignatures = convertToSignatures(entryCerts);

        if (pkg.mCertificates == null) {
            pkg.mCertificates = entryCerts;
            pkg.mSignatures = entrySignatures;
            pkg.mSigningKeys = new ArraySet<PublicKey>();
            for (int i=0; i < entryCerts.length; i++) {
                pkg.mSigningKeys.add(entryCerts[i][0].getPublicKey());
            }
        } else {
            if (!Signature.areExactMatch(pkg.mSignatures, entrySignatures)) {
                throw new PackageParserException(
                    INSTALL_PARSE_FAILED_INCONSISTENT_CERTIFICATES, "Package " + apkPath
                    + " has mismatched certificates at entry "
                    + entry.getName());
            }
        }
    }
   ......
}
遍歷toVerify集合時,如果loadCertificates返回null,說明該檔案是在對apk簽名過後新增的檔案,丟擲異常。緊接著後面再次作了校驗,對比後續檔案的證書籤名和第一個檔案的證書籤名是否一致,如有不一致仍然丟擲異常。
到這一步為止,簽名校驗的工作基本就結束了,PackageManagerService.java的installPackageLI方法還有一步是針對升級安裝的場景,校驗證書公鑰是否一致。
private void installPackageLI(InstallArgs args, PackageInstalledInfo res) {
......
if (!checkUpgradeKeySetLP(ps, pkg)) {
res.setError(INSTALL_FAILED_UPDATE_INCOMPATIBLE, "Package " + pkg.packageName + " upgrade keys do not match the " + "previously installed version");
return;
}
......
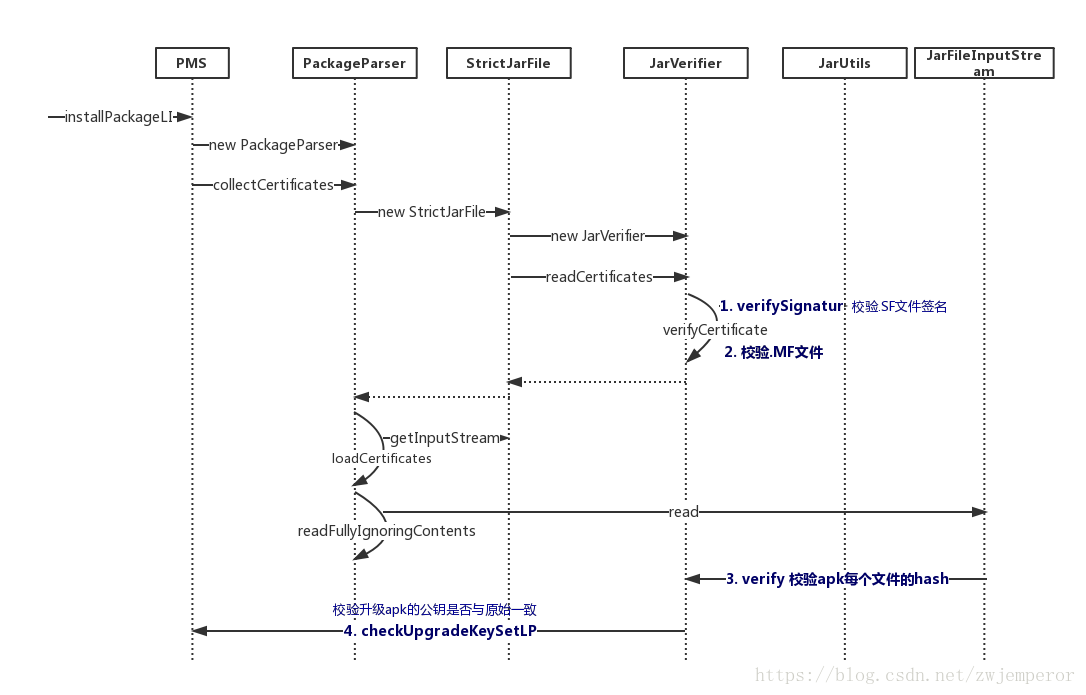
}3.4 簽名校驗時序圖
好了,到這裡簽名校驗的程式碼介紹就結束了,程式碼比較亂,梳理一下時序圖:
4. JAR簽名機制的劣勢
從Android 7.0開始,Android支援了一套全新的V2簽名機制,為什麼要推出新的簽名機制呢?通過前面的分析,可以發現JAR簽名有兩個地方可以改進:
簽名校驗速度慢
校驗過程中需要對apk中所有檔案進行摘要計算,在apk資源很多、效能較差的機器上簽名校驗會花費較長時間,導致安裝速度慢;
完整性保障不夠
META-INF目錄用來存放簽名,自然此目錄本身是不計入簽名校驗過程的,可以隨意在這個目錄中新增檔案,比如一些快速批量打包方案就選擇在這個目錄中新增渠道檔案。
為了解決這兩個問題,Android 7.0推出了全新的簽名方案V2,關於V2簽名機制的詳解參見下一篇文章Apk簽名機制之——V2簽名機制詳解