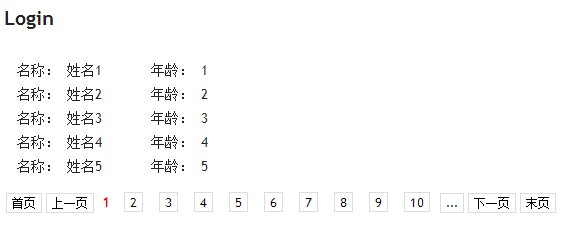
MVC3使用MvcPager實現簡單分頁功能
阿新 • • 發佈:2019-01-26
使用MvcPager分頁,操作簡單,更多內容參考MvcPager(http://www.webdiyer.com/),下面實現簡單的分頁。
四、建立Login.cshtml,樣式可以根據個人喜好進行調整,程式碼如下。
五、更改路由設定。

一、新建Mvc3空專案MvcPagerDemo。
二、建立PersonModel,姓名和年齡兩個屬性,程式碼如下。
using System;
using System.Collections.Generic;
using System.Linq;
using System.Web;

namespace MvcPagerDemo.Models
{
    public class PersonModel
    {
        /// <summary>
        /// 姓名
        /// </summary>
        public string UserName { get; set; }

        /// <summary>
        /// 年齡
        /// </summary>
        public string Age { get; set; }
    }
}
三、建立IndexController,本文只注重講分頁功能,所以資料來源是迴圈生成,可自行改造,程式碼如下。
using System;
using System.Collections.Generic;
using System.Linq;
using System.Web;
using System.Web.Mvc;
using MvcPagerDemo.Models;
using Webdiyer.WebControls.Mvc;

namespace MvcPagerDemo.Controllers
{
    public class IndexController : Controller
    {
        //
        // GET: /Index/

        public ActionResult Index()
        {
            return View();
        }

        public ActionResult Login(int pageIndex = 1)
        {
            int totalCount = 100;
            int pageSize = 5;

            List<PersonModel> userList = new List<PersonModel>();
            for (int i = 1; i <= totalCount; i++)
            {
                PersonModel model = new PersonModel();
                model.UserName = "姓名" + i;
                model.Age = i.ToString();
                userList.Add(model);
            }
//將結果改造成mvcpager接受的格式。PagedList<PersonModel> pList = new PagedList<PersonModel>(userList, pageIndex, pageSize); pList.PageSize = pageSize; pList.TotalItemCount = totalCount; pList.CurrentPageIndex = pageIndex; return View(pList); } } }
四、建立Login.cshtml,樣式可以根據個人喜好進行調整,程式碼如下。
@using Webdiyer.WebControls.Mvc;
@using MvcPagerDemo.Models;
@model PagedList<PersonModel>

@{
    ViewBag.Title = "Login";
}

<h2>Login</h2>
<style type="text/css">
    .pages
    {
        color: red;
        font-size: 11px;
        font-weight: bold;
        height: 40px;
        padding-top: 5px;
    }

    .pages .item
    {
        font-size: 13px;
        height: 20px;
        padding: 2px 6px;
    }

    .pages .cpb
    {
        color: red;
        font-size: 13px;
        padding: 1px 6px;
    }

    .pages a
    {
        border: 1px solid #DDDDDD;
        color: #000000;
        font-weight: normal;
        margin: 1pt 2px;
        padding: 0pt 5px;
        text-decoration: none;
    }

    .pages a:hover
    {
        background-color: #E61636;
        border: 1px solid #E61636;
        color: #FFFFFF;
        font-weight: normal;
        text-decoration: none;
    }
</style>

<div style="padding:10px;">
        @foreach(var item in Model)
        {
            <table>
                <tr>
                    <td style="width:130px;">
                        名稱:  @item.UserName
                    </td>
                    <td>
                        年齡:  @item.Age
                    </td>
                </tr>
            </table>
        }
    </div>

    @Html.Pager(Model,
new PagerOptions
{
    PageIndexParameterName = "pageIndex",
    FirstPageText = "首頁",
    LastPageText = "末頁",
    PrevPageText = "上一頁",
    NextPageText = "下一頁",
    CurrentPagerItemWrapperFormatString = "<span class=\"cpb\">{0}</span>",
    NumericPagerItemWrapperFormatString = "<span class=\"item\">{0}</span>",
    CssClass = "pages",
    SeparatorHtml = "",
    ShowPageIndexBox = false, //改為true顯示跳轉頁面功能
    PageIndexBoxType = PageIndexBoxType.TextBox,
    ShowGoButton = false //跳轉按鈕
})
五、更改路由設定。
public static void RegisterRoutes(RouteCollection routes)
        {
            routes.IgnoreRoute("{resource}.axd/{*pathInfo}");

            routes.MapRoute(
                "Default", // Route name
                "{controller}/{action}/{id}", // URL with parameters
                new { controller = "Index", action = "Login", id = UrlParameter.Optional } // Parameter defaults
            );

        }
