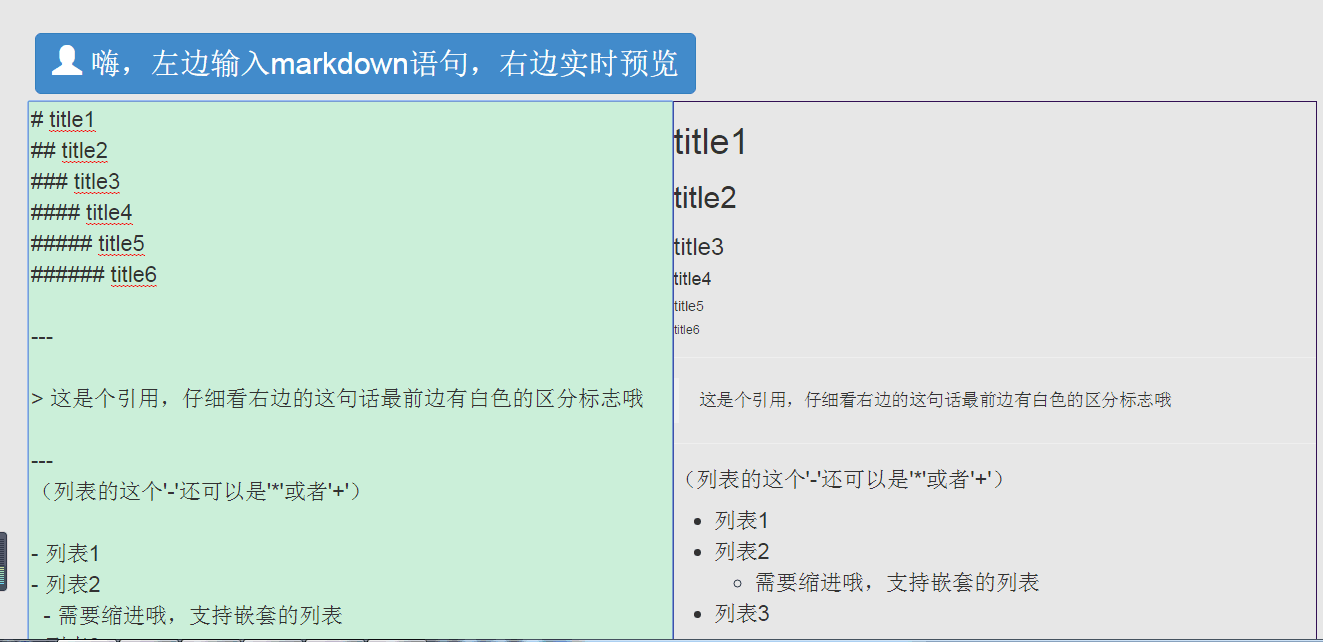
自己寫一個網頁版的Markdown實時編輯器
這幾天忙著使用Python+Django+sqlite 搭建自己的博客系統,但是單純的使用H5的TextArea,簡直太挫了有木有。所以,就想模仿一下人家內嵌到網頁上的Markdown編輯器,從而讓自己的博客系統更加美觀一點。
準備
需要什麽
-
Markdown“解釋器”:便於處理文本輸入以及實時預覽
-
Bootstrap模板 :建議的H5界面看起來並不好看,所以使用這個框架美化一下。
-
Sublime Text:當然也可以是記事本或者其他的文本編輯器,這就是我們編寫處理邏輯的工具而已。
下載及安裝
-
首先我們需要下載一個“解釋器”,到下面的這個網址,點擊
markdown-browser-0.6.0-beta1.tgz,完成下載即可。
https://github.com/evilstreak/markdown-js/releases -
然後下載Bootstrap,為了方便,這裏就不下載了,而是使用CDN的方式加載。詳細的中文版幫助文檔如下http://www.runoob.com/bootstrap/bootstrap-tutorial.html
-
下載安裝Sublime Text,這個可以參考我之前的這篇文章。大家只需要看完怎麽安裝SublimeText的那部分就足夠了。
http://blog.csdn.net/marksinoberg/article/details/50993456
簡單版
我們可以在桌面上創建一個文件夾,方便我們進行管理。
然後將剛才下載的那個markdown-js/releases解壓咯,把裏面的js文件放到這個文件夾下面即可。
然後在創建一個html文件即可,大致可以如下:
<!DOCTYPE html>
<html>
<body>
<textarea id="text-input" oninput="this.editor.update()"
rows="6" cols="60">Type **Markdown** here.</textarea>
<div id="preview"> </div - 1
- 2
- 3
- 4
- 5
- 6
- 7
- 8
- 9
- 10
- 11
- 12
- 13
- 14
- 15
- 16
- 17
- 18
- 19
- 20
效果如下:
美化版
這個界面確實是不好看,所以加點美化效果。這裏使用的是Bootstrap。
<!DOCTYPE html>
<html>
<head>
<link href="http://cdn.bootcss.com/bootstrap/3.3.1/css/bootstrap.min.css" rel="stylesheet">
</head>
  <body style="padding:30px">
    <textarea id="text-input" oninput="this.editor.update()"
              rows="6" cols="60">Type **Markdown** here.</textarea>
    <div id="preview"> </div>
    <script src="markdown.js"></script>
    <script>
      function Editor(input, preview) {
        this.update = function () {
          preview.innerHTML = markdown.toHTML(input.value);
        };
        input.editor = this;
        this.update();
      }
      var $ = function (id) { return document.getElementById(id); };
      new Editor($("text-input"), $("preview"));
    </script>
  </body>
</html>- 1
- 2
- 3
- 4
- 5
- 6
- 7
- 8
- 9
- 10
- 11
- 12
- 13
- 14
- 15
- 16
- 17
- 18
- 19
- 20
- 21
- 22
- 23
效果如下圖:

增強版
這樣看著布局什麽的也不夠好看,所以我就多加了點元素。
<!DOCTYPE html>
<html>
<head>
    <meta charset="utf-8">
    <title>Markdown本地練習</title>
    <meta name="viewport" content="width=device-width, initial-scale=1">
     <link rel="stylesheet" href="http://apps.bdimg.com/libs/bootstrap/3.3.0/css/bootstrap.min.css">
     <script src="http://apps.bdimg.com/libs/jquery/2.1.1/jquery.min.js"></script>
     <script src="http://apps.bdimg.com/libs/bootstrap/3.3.0/js/bootstrap.min.js"></script>
</head>
<body style="padding:30px;background:#e6e6e6;">
<div style="width:100%;padding:7px;">
<button type="button" align="center" class="btn btn-primary btn-lg" style="font-size:30px;">
  <span class="glyphicon glyphicon-user"></span> 嗨,左邊輸入markdown語句,右邊實時預覽
</button>
</div>
<textarea id="text-input" oninput="this.editer.update()" style="width:50%;height:768px; background:#CBEFD9;font-size:22px;">
</textarea>
<div id="preview" style="float:right;width:50%;height:100%; border:0.5px solid #315;background:#e6e6e6;"></div>
<script src=‘markdown.js‘></script>
<script type="text/javascript">
    function Editor(input , preview){
        this.update = function(){
            preview.innerHTML = markdown.toHTML(input.value);
        };
        input.editer = this
        this.update()
    }

    var $ = function(id) {
        return document.getElementById(id)
    }
    new Editor($("text-input"),$("preview"))
</script>
<!-- jQuery (necessary for Bootstrap‘s JavaScript plugins) -->
    <script src="http://lib.sinaapp.com/js/jquery/1.9.1/jquery-1.9.1.min.js"></script>
    <!-- Include all compiled plugins (below), or include individual files as needed -->
    <script src="js/bootstrap.min.js"></script>
</body>
</html>- 1
- 2
- 3
- 4
- 5
- 6
- 7
- 8
- 9
- 10
- 11
- 12
- 13
- 14
- 15
- 16
- 17
- 18
- 19
- 20
- 21
- 22
- 23
- 24
- 25
- 26
- 27
- 28
- 29
- 30
- 31
- 32
- 33
- 34
- 35
- 36
- 37
- 38
- 39
- 40
效果如下:
總結
相信大家也看出來了,雖然已經是增強版了,但是這並不是這個小程序的極限。我們可以利用JavaScript以及Bootstrap實現更好看的頁面效果。
我們可以在本地練習Markdown的語法,同時也可以將這個代碼放到我們的博客系統上,來提升用戶體驗!
再分享一下我老師大神的人工智能教程吧。零基礎!通俗易懂!風趣幽默!還帶黃段子!希望你也加入到我們人工智能的隊伍中來!https://blog.csdn.net/jiangjunshow
自己寫一個網頁版的Markdown實時編輯器

