SpringMVC之檔案上傳功能實現
在客戶端傳送上傳檔案請求時,一般會與普通請求一樣,將請求傳送給SpringMVC的前端控制器DispatcherServlet,然後由DispatcherServlet呼叫HandlerMapping找到處理該請求的Controller。然後DispatcherServlet將請求提交給Controller(如果不適用可以會自動呼叫HandlerAdapter適配)。Controller呼叫業務邏輯進行處理,返回一個值。DispatcherServlet查詢一個或多個viewResolver檢視解析器,找到返回值對應的檢視。只不過檔案上傳功能實現需要對springmvc配置檔案新增檔案上傳相關的配置,同時注意引入相關的包。在編寫jsp檔案以及controller類時,需要將表單元素與對應的controller方法的傳入引數進行相關聯,從而將兩者繫結,以下進行檔案上傳功能的具體實現。
1.配置
本文是利用SpringMVC實現檔案上傳功能的,因此首先對其進行一些必要的配置,比如springmvc.xml,主要做如下配置:首先該例項都是基於註解實現的,所以需要啟用spring基於註解的DI;既然是使用註解的,那就需要對自動掃描相應的包;又因為在處理請求的時候需要將請求引數繫結到控制器引數,所以需要啟用註解驅動;最後需要配置檢視解析器,本文配置的解析器是InternalResolverViewResolver。以上是基本的配置,由於本文需要實現的功能是檔案上傳,那麼需要配置檔案上傳需要的配置,即檔案上傳解析器(CommonsMultipartResolver)。具體配置內容如下所示:
<?xml version="1.0" encoding="UTF-8"?>
<beans xmlns="http://www.springframework.org/schema/beans"
    xmlns:xsi="http://www.w3.org/2001/XMLSchema-instance" xmlns:aop="http://www.springframework.org/schema/aop"
    xmlns:tx="http://www.springframework.org/schema/tx" xmlns:jdbc="http://www.springframework.org/schema/jdbc"
    xmlns:context="http://www.springframework.org/schema/context"
    xmlns:mvc="http://www.springframework.org/schema/mvc"
    xsi:schemaLocation="http://www.springframework.org/schema/jdbc http://www.springframework.org/schema/jdbc/spring-jdbc-3.0.xsd
        http://www.springframework.org/schema/aop http://www.springframework.org/schema/aop/spring-aop-3.0.xsd
        http://www.springframework.org/schema/beans http://www.springframework.org/schema/beans/spring-beans-3.0.xsd
        http://www.springframework.org/schema/context http://www.springframework.org/schema/context/spring-context-3.0.xsd
        http://www.springframework.org/schema/tx http://www.springframework.org/schema/tx/spring-tx-3.0.xsd
        http://www.springframework.org/schema/mvc http://www.springframework.org/schema/mvc/spring-mvc-3.2.xsd">
	<!-- 啟用基於註解的DI -->
    <context:annotation-config/>

	<!-- 掃描控制層@Controller註解的檔案 -->
    <context:component-scan base-package="springmvc">
          <context:include-filter type="annotation"
          expression="org.springframework.stereotype.Controller"/>
    </context:component-scan>

	<!-- 開啟註釋驅動,可以將請求引數繫結到控制器引數 -->
    <mvc:annotation-driven />


    <mvc:default-servlet-handler />


    <!-- 配置jsp檢視解析器 ,需要有jstl這個jar包,否則不能對映-->
    <bean id="viewResolver" class="org.springframework.web.servlet.view.InternalResourceViewResolver">
        <property name="viewClass" value="org.springframework.web.servlet.view.JstlView"/>
        <property name="prefix" value="/WEB-INF/jsp/"/>
        <property name="suffix" value=".jsp"/>
	</bean>
    <bean id="multipartResolver" class="org.springframework.web.multipart.commons.CommonsMultipartResolver">
    	<property name="maxUploadSize" value="209715200"/>
    	<property name="defaultEncoding" value="UTF-8"/>
    	<property name="resolveLazily" value="true"/>
    </bean>
</beans>
對於web.xml只需要配置springmvc上下文即可,配置內容如下所示:
<?xml version="1.0" encoding="UTF-8"?>
<web-app xmlns:xsi="http://www.w3.org/2001/XMLSchema-instance" xmlns="http://java.sun.com/xml/ns/javaee" xsi:schemaLocation="http://java.sun.com/xml/ns/javaee http://java.sun.com/xml/ns/javaee/web-app_3_0.xsd" id="WebApp_ID" version="3.0">


 <!-- The front controller of this Spring Web application, responsible for handling all application requests -->
    <servlet>
        <servlet-name>springDispatcherServlet</servlet-name>
        <servlet-class>org.springframework.web.servlet.DispatcherServlet</servlet-class>
        <init-param>
            <param-name>contextConfigLocation</param-name>
            <param-value>classpath:springMVC-servlet.xml</param-value>
<!-- param-value中的是Spring的配置檔案,這個是放在src目錄下的配置檔案,如果放在其他位置可以使用路徑+檔名
例如在WEB-INF  資料夾下面springmvc.xml 那麼就可以寫為<param-value>/WEB-INF/springmvc.xml</param-value>  -->
		</init-param>
        <load-on-startup>1</load-on-startup>
    </servlet>

    <!-- Map all requests to the DispatcherServlet for handling -->
    <servlet-mapping>
        <servlet-name>springDispatcherServlet</servlet-name>
        <url-pattern>/</url-pattern>
<!--過濾全部檔案-->
 	</servlet-mapping>
 	<welcome-file-list>
    <welcome-file>index.html</welcome-file>
    <welcome-file>index.htm</welcome-file>
    <welcome-file>index.jsp</welcome-file>
    <welcome-file>default.html</welcome-file>
    <welcome-file>default.htm</welcome-file>
    <welcome-file>default.jsp</welcome-file>
  </welcome-file-list>
 </web-app>
2.Controller類
假定檔案上傳功能需要兩個頁面,即一個上傳頁面,一個為上傳成功頁面。因此對應了兩個url,也就對應了兩個相應的方法。這裡兩個方法分別是:showUpload和doUpload,具體程式碼如下:
import java.io.File;
import java.io.IOException;

import org.apache.commons.io.FileUtils;
import org.apache.commons.logging.*;

import org.springframework.stereotype.Controller;
import org.springframework.web.bind.annotation.RequestMapping;
import org.springframework.web.bind.annotation.RequestMethod;
import org.springframework.web.bind.annotation.RequestParam;
import org.springframework.web.bind.annotation.ResponseBody;
import org.springframework.web.multipart.MultipartFile;
import org.springframework.web.servlet.ModelAndView;

import com.sun.istack.internal.logging.Logger;

@Controller
public class UpLoadController {
	private static final Log logger=LogFactory.getLog(UpLoadController.class);
	@RequestMapping(value="/upload",method=RequestMethod.GET)
	public String showLoad() {


		return "upload";

	}

	@RequestMapping(value="/doUpload",method=RequestMethod.POST)
	public String doUpLoad(@RequestParam("file")MultipartFile file,@RequestParam("name")String name) throws IOException {
		logger.debug("當前輸入檔案是:"+file.getOriginalFilename());
		String original=file.getOriginalFilename();
		{
			FileUtils.copyInputStreamToFile(file.getInputStream(),new File("C:\\Users\\carson0408\\Desktop\\photo",name+original));
		}

		return "success";

	}


}
3.jsp檔案
根據controller類編寫檢視層,首先是上傳介面,需要用到file控制元件用於檔案的上傳,具體如下:
upload.jsp:
<%@ page language="java" contentType="text/html; charset=ISO-8859-1"
    pageEncoding="ISO-8859-1"%>
<!DOCTYPE html PUBLIC "-//W3C//DTD HTML 4.01 Transitional//EN" "http://www.w3.org/TR/html4/loose.dtd">
<html>
<head>
<meta http-equiv="Content-Type" content="text/html; charset=ISO-8859-1">
<title>Insert title here</title>
</head>
<div>
<center>
<body>
<h1>hello,carson!welcome to this page!</h1>
<br/>
<br/>
</center>
</div>
<form align="center" method="post" action="doUpload" enctype="multipart/form-data">
<table width="100%">
<tr>
	<td align="right">File Name:</td>
	<td><input type="text" name="name"></td>
</tr>
<tr>
    <td align="right">Select File</td>
	<td ><input type="file" name="file"/></td>

</tr>
<tr>
	<td align="right"><input type="submit" /></td>
</tr>
</form>
</body>

</html>
接下來就是上傳成功的頁面:
success.jsp:
<%@ page language="java" contentType="text/html; charset=ISO-8859-1"
    pageEncoding="ISO-8859-1"%>
<!DOCTYPE html PUBLIC "-//W3C//DTD HTML 4.01 Transitional//EN" "http://www.w3.org/TR/html4/loose.dtd">
<html>
<head>
<meta http-equiv="Content-Type" content="text/html" charset="UTF-8">
<title>Insert title here</title>
</head>
<body>
<center><h1>Congratulation!Succeed to upload the file!</h1></center>
</body>
</html>
接著根據controller類和jsp檔案進行例項講解,首先controller類中的showUpload方法返回的是upload字串,對應upload.jsp頁面,即輸入/upload URL響應到upload.jsp頁面。從upload.jsp可以看出該頁面主要由一個file控制元件還有一個提交控制元件以及一個文字控制元件構成,文字控制元件主要填寫一個name,用於檔案儲存使用;file控制元件用於檔案的上傳,而提交控制元件則用於請求的上傳。最後可以看出該表單的action對應的url是"doUpload",則對應應該有個用@RequestMapping(value="doUpload")修飾的方法,即doUpload方法,該方法有兩個變數一個file,一個name,那麼如何將變數與表單元素繫結在一起呢,首先對應的變數與元素名字一致,其次就是用@RequestParam()在引數前修飾。其中如何將file元素傳遞出來呢,這時候需要一個MultipartFile介面,將file元素傳遞出來。file物件有一些引數可以用於儲存檔案:
isEmpty():用於判斷檔案是否為空。
getInputStream():獲取檔案輸入,獲取檔案源
getOrignalName():獲取原始命名。
這裡還需要一個Commons.io包下的一個類FileUtils的copyInputStreamToFile用於檔案的儲存。
copyInputStreamToFile(InputStream arg0,File arg1);第一個引數表示輸入流,即讀取檔案的輸入流,第二個引數是一個File物件,這裡用new File(儲存地址,檔案命名)來建立物件。
4.執行專案
1.首先啟用tomcat執行專案。
2.在瀏覽器輸入:http://localhost:8080/FirstSpringMVC/upload
3.得到如下頁面:
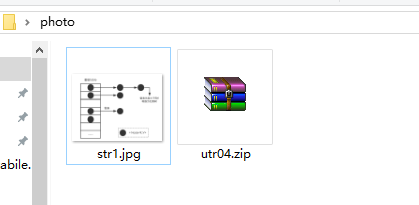
4.上傳兩個檔案,一個命名str,另一個utr
上傳成功頁面:
兩個檔案上傳之後:
檢視相應的資料夾:C:\\Users\\carson0408\\Desktop\\photo
5.總結
檔案上傳實現主要以下幾方面:
1.配置檔案上傳配置CommonsMultipartResolver
2.匯入需要的包
3.注意jsp元素與Controller引數之間的繫結。


