
Spring-02-詳細配置
4、 IOC容器概述
在 Spring IOC 容器 讀取 Bean 配置建立 Bean 例項之前, 必須對它進行例項化. 只有在容器例項化後, 才可以從 IOC 容器裡獲取 Bean 例項並使用.
Spring 提供了兩種型別的 IOC 容器實現.
- BeanFactory: IOC 容器的基本實現.
- ApplicationContext: 提供了更多的高階特性. 是 BeanFactory 的子介面.
- BeanFactory 是 Spring 框架的基礎設施,面向 Spring 本身;ApplicationContext 面向使用 Spring 框架的開發者,幾乎所有的應用場合都直接使用 ApplicationContext 而非底層的 BeanFactory
- 無論使用何種方式, 配置檔案時相同的.
ApplicationContext 繼承關係圖
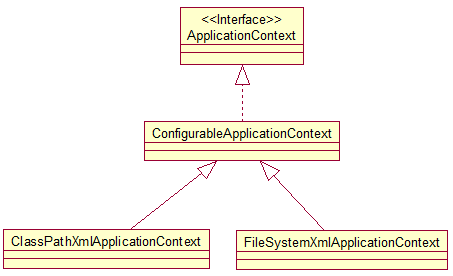
• ApplicationContext 的主要實現類:
– ClassPathXmlApplicationContext 從 類路徑下載入配置檔案
– FileSystemXmlApplicationContext 從檔案系統中載入配置檔案
• ConfigurableApplicationContext 擴充套件於 ApplicationContext,新增加兩個主要方法:refresh() 和 close(), 讓 ApplicationContext 具有啟動、重新整理和關閉上下文的能力
• ApplicationContext 在初始化上下文時就例項化所有單例的 Bean。
• WebApplicationContext 是專門為 WEB 應用而準備的,它允許從相對於 WEB 根目錄的路徑中完成初始化工作
5、 Spring 的依賴注入
1、 屬性注入
2、 構造器注入
3、 工廠方法注入(很少使用, 不推薦)
(1) 屬性注入
- 屬性注入即通過 setter 方法 注入Bean 的屬性值或依賴的物件
- 屬性注入使用 元素, 使用 name 屬性指定 Bean 的屬性名稱,value 屬性或 子節點指定屬性值
- 屬性注入是實際應用中最常用的注入方式
<bean id="hello" class="ice.mimosa.a_helloworld.Hello">
<property name="hello" value="mimosa" (2) 構造器注入
- 通過構造方法注入Bean 的屬性值或依賴的物件,它保證了 Bean 例項在例項化後就可以使用。
- 構造器注入在
<constructor-arg>元素裡宣告屬性,<constructor-arg>中沒有 name 屬性 - 構造器匹配的兩種方式(可混合使用)
<1>按索引匹配

<bean id="car" class="ice.mimosa.b_inject.Car">
    <constructor-arg value="car_Audi" index="0"></constructor-arg>
    <constructor-arg value="100" index="1"></constructor-arg>
    <constructor-arg value="100" index="2"></constructor-arg>
</bean><2>按型別匹配
<bean id="car1" class="ice.mimosa.b_inject.Car">
<constructor-arg value="car1_Audi" type="java.lang.String"></constructor-arg>
<constructor-arg value="100" type="java.lang.Long"></constructor-arg>
<constructor-arg value="100" type="java.lang.Double"></constructor-arg>
</bean>注意:value的值也可以使用<value>...</value>子節點的格式,如果值中包含特殊字元可以使用<![CDATA[ ... ]]>包裹起來。
6、Spring的配置
(1)引用其他Bean
- 組成應用程式的 Bean 經常需要相互協作以完成應用程式的功能. 要使 Bean 能夠相互訪問, 就必須在 Bean 配置檔案中指定對 Bean 的引用
- 在 Bean 的配置檔案中, 可以通過
<ref>元素或ref 屬性為 Bean 的屬性或構造器引數指定對 Bean 的引用.
<!-- 配置Person 引用car bean -->
<bean id="person" class="ice.mimosa.b_inject.Person">
    <property name="name" value="mimosa"></property>
    <property name="age" value="20"></property>
    <property name="car" ref="car"></property>
</bean>- 也可以在
屬性或構造器裡包含 Bean 的宣告, 這樣的 Bean 稱為內部 Bean - 當 Bean 例項僅僅給一個特定的屬性使用時, 可以將其宣告為內部 Bean. 內部 Bean 宣告直接包含在
<property>或<constructor-arg>元素裡, 不需要設定任何 id 或 name 屬性 - 內部 Bean 不能使用在任何其他地方
<!-- 配置內部bean -->
<bean id="in_person" class="ice.mimosa.b_inject.Person">
    <property name="name" value="in_mimosa"></property>
    <property name="age" value="20"></property>
    <property name="car">
        <bean class="ice.mimosa.b_inject.Car">
            <constructor-arg value="in_car_Audi" index="0"></constructor-arg>
            <constructor-arg value="100" index="1"></constructor-arg>
            <constructor-arg value="100" index="2"></constructor-arg>
        </bean>
    </property>
</bean>
(2)null值和級聯屬性
- 可以使用專用的
<null/>元素標籤為 Bean 的字串或其它物件型別的屬性注入 null 值 - 和 Struts、Hiberante 等框架一樣,Spring 支援級聯屬性的配置。(很少使用)
<!-- 級聯賦值 -->
<bean id="cascade_person" class="ice.mimosa.b_inject.Person">
        <property name="name" value="cascade_mimosa"></property>
        <property name="age" value="20"></property>
        <!-- 使用級聯屬性 需要對car進行初始化,建立一個物件 ,否則會拋異常-->
        <property name="car" ref="car1"></property>
        <!-- 然後才能對 物件的值進行賦值 -->
        <property name="car.name" value="cascade_Audi"></property>
        <property name="car.price" value="10000"></property>
        <property name="car.speed" value="200"></property>
</bean>
(3)集合屬性
- 在 Spring中可以通過一組內建的 xml 標籤(例如:
<list>, <set> 或 <map>) 來配置集合屬性. - 配置 java.util.List 型別的屬性, 需要指定
<list>標籤, 在標籤裡包含一些元素. 這些標籤可以通過<value>指定簡單的常量值, 通過<ref>指定對其他 Bean 的引用. 通過<bean>指定內建 Bean 定義. 通過<null/>指定空元素. 甚至可以內嵌其他集合. - 陣列的定義和 List 一樣, 都使用
<list> - 配置 java.util.Set 需要使用
<set>標籤, 定義元素的方法與 List 一樣.
<!-- 集合List 屬性 -->
<bean id="list_person" class="ice.mimosa.b_inject.Person">
    <property name="name" value="list_mimosa"></property>
    <property name="age" value="20"></property>
    <property name="car" ref="car"></property>
    <property name="listCars">
        <list>
            <ref bean="car1"/>
            <ref bean="car"/>
            <ref bean="car1"/>
        </list>
    </property>
</bean>- Java.util.Map 通過
<map>標籤定義,<map>標籤裡可以使用多個<entry>作為子標籤. 每個條目包含一個鍵和一個值. - 必須在
<key>標籤裡定義鍵 - 因為鍵和值的型別沒有限制, 所以可以自由地為它們指定
<value>, <ref>, <bean> 或 <null>元素. - 可以將 Map 的鍵和值作為
<entry>的屬性定義: 簡單常量使用 key 和 value 來定義; Bean 引用通過 key-ref 和 value-ref 屬性定義
<!-- 集合Map 屬性 -->
<bean id="Map_person" class="ice.mimosa.b_inject.Person">
    <property name="name" value="Map_mimosa"></property>
    <property name="age" value="20"></property>
    <property name="car" ref="car"></property>
    <property name="map">
        <map>
            <entry key="01" value-ref="car"></entry>
            <entry key="02" value-ref="car1"></entry>
        </map>
    </property>
</bean>
- 使用
<props>定義 java.util.Properties, 該標籤使用多個<prop>作為子標籤. 每個<prop>標籤必須定義 key 屬性.
<!-- 配置Properties 屬性 -->
<bean id="dataSource" class="ice.mimosa.b_inject.DataSource">
    <property name="properties">
        <props>
            <prop key="user">root</prop>
            <prop key="password">root</prop>
            <prop key="jdbcUrl">jdbc:mysql:///test</prop>
            <prop key="driverClass">com.mysql.jdbc.Driver</prop>
        </props>
    </property>
</bean>
(4)使用utility scheme 定義集合
- 使用基本的集合標籤定義集合時, 不能將集合作為獨立的 Bean 定義, 導致其他 Bean 無法引用該集合, 所以無法在不同 Bean 之間共享集合.
- 可以使用
util schema裡的集合標籤定義獨立的集合 Bean. 需要注意的是, 必須在<beans>根元素裡新增 util schema 定義
<util:list id="cars">
    <ref bean="car"/>
    <ref bean="car1"/>
</util:list>
(5)使用 P 名稱空間
- 為了簡化 XML 檔案的配置,越來越多的 XML 檔案採用屬性而非子元素配置資訊。
- Spring 從 2.5 版本開始引入了一個新的 p 名稱空間,可以通過
<bean>元素屬性的方式配置 Bean 的屬性。 - 使用 p 名稱空間後,基於 XML 的配置方式將進一步簡化
<!-- 使用 P 名稱空間 -->
<bean id="p_person" class="ice.mimosa.b_inject.Person"
    p:name="p_mimosa" p:age="20" p:listCars-ref="cars"
></bean>
(6)Bean 自動裝配
- Spring IOC 容器可以自動裝配 Bean. 需要做的僅僅是在
<bean>的autowire 屬性裡指定自動裝配的模式 - byType(根據型別自動裝配): 若 IOC 容器中有多個與目標 Bean 型別一致的 Bean. 在這種情況下,Spring 將無法判定哪個Bean最合適該屬性, 所以不能執行自動裝配.
- byName(根據名稱自動裝配): 必須將目標 Bean 的名稱和屬性名設定的完全相同, 或者說是和bean 屬性的setter 風格一致.
- constructor(通過構造器自動裝配): 當 Bean 中存在多個構造器時, 此種自動裝配方式將會很複雜. 不推薦使用
自動裝配缺點 :
- 在 Bean 配置檔案裡設定 autowire 屬性進行自動裝配將會裝配 Bean 的所有屬性. 然而, 若只希望裝配個別屬性時, autowire 屬性就不夠靈活了.
- autowire 屬性要麼根據型別自動裝配, 要麼根據名稱自動裝配, 不能兩者兼而有之.
- 一般情況下,在實際的專案中很少使用自動裝配功能,因為和自動裝配功能所帶來的好處比起來,明確清晰的配置文件更有說服力一些
(7)Bean 繼承配置
Spring 允許繼承 bean 的配置, 被繼承的 bean 稱為父 bean. 繼承這個父 Bean 的 Bean 稱為子 Bean- 子 Bean 從父 Bean 中繼承配置, 包括 Bean 的屬性配置
- 子 Bean 也可以覆蓋從父 Bean 繼承過來的配置
- 父 Bean 可以作為配置模板, 也可以作為 Bean 例項. 若只想把父 Bean 作為模板, 可以設定
<bean>的abstract 屬性為true,這樣 Spring 將不會例項化這個 Bean - 並不是
<bean>元素裡的所有屬性都會被繼承. 比如: autowire, abstract 等. - 也
可以忽略父 Bean 的 class 屬性, 讓子 Bean 指定自己的類, 而共享相同的屬性配置. 但此時 abstract 必須設為 true
(8)Bean 依賴配置
- Spring 允許使用者通過
depends-on屬性設定 Bean 前置依賴的Bean,前置依賴的 Bean 會在本 Bean 例項化之前建立好 - 如果前置依賴於多個 Bean,則可以通過
逗號,空格的方式配置 Bean 的名稱
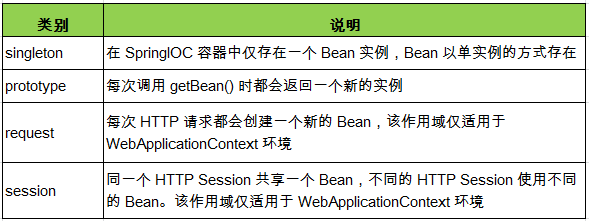
(9)Bean 的作用域
- 在 Spring 中, 可以在
<bean>元素的scope 屬性裡設定 Bean 的作用域. - 預設情況下, Spring 只為每個在 IOC 容器裡宣告的 Bean 建立唯一一個例項, 整個 IOC 容器範圍內都能共享該例項:所有後續的 getBean() 呼叫和 Bean 引用都將返回這個唯一的 Bean 例項.該作用域被稱為 singleton, 它是所有 Bean 的預設作用域.
(10)使用外部屬性檔案
- 在配置檔案裡配置 Bean 時, 有時需要在 Bean 的配置裡混入系統部署的細節資訊(例如: 檔案路徑, 資料來源配置資訊等). 而這些部署細節實際上需要和 Bean 配置相分離
- Spring 提供了一個 PropertyPlaceholderConfigurer 的 BeanFactory 後置處理器, 這個處理器允許使用者將 Bean 配置的部分內容外移到屬性檔案中. 可以在 Bean 配置檔案裡使用形式為
${var}的變數, PropertyPlaceholderConfigurer 從屬性檔案里加載屬性, 並使用這些屬性來替換變數. - Spring 還允許在屬性檔案中使用
${propName},以實現屬性之間的相互引用。
Spring 2.5 之後: 可通過<context:property-placeholder>元素簡化:
–<beans>中新增 context Schema 定義
– 在配置檔案中加入如下配置:
<!-- 新增類路徑下的 db 的properties引數檔案 -->
<context:property-placeholder location="classpath:db.properties"/>
(11)Spring表示式語言:SpEL
- Spring 表示式語言(簡稱SpEL):是一個支援執行時查詢和操作物件圖的強大的表示式語言。
- 語法類似於 EL:SpEL 使用 #{…} 作為定界符,所有在大框號中的字元都將被認為是 SpEL
- SpEL 為 bean 的屬性進行動態賦值提供了便利
- 通過 SpEL 可以實現:
– 通過 bean 的 id 對 bean 進行引用
– 呼叫方法以及引用物件中的屬性
– 計算表示式的值
– 正則表示式的匹配
(1) SpEL:字面量
字面量的表示:
–   整數:<property name="count" value="#{5}"/>
–   小數:<property name="frequency" value="#{89.7}"/>
–   科學計數法:<property name="capacity" value="#{1e4}"/>
–   String可以使用單引號或者雙引號作為字串的定界符號:
    <property name="name" value="#{'Chuck'}"/> 或
    <property name='name' value='#{"Chuck"}'/>
–   Boolean:<property name="enabled" value="#{false}"/>
(2) SpEL:引用 Bean、屬性和方法
引用其他物件
<!-- 通過value屬性和SpEL配置bean之間的關係 -->
<property name="car" value="#{carRef}"></property>

引用其他物件的屬性
<!-- 通過value屬性和SpEL配置bean屬性的值為另一個Bean屬性的值 -->
<property name="carName" value="#{carRef.name}"></property>

呼叫其他方法, 還可以鏈式操作
<!-- 通過value屬性和SpEL配置bean屬性值為另一個Bean方法的返回值 -->
<property name="carStr" value="#{carRef.toString()}"></property>
<!-- 方法鏈式操作 -->
<property name="carStr" value="#{carRef.toString().toUpperCase()}"></property>

呼叫靜態方法或靜態屬性:通過 T() 呼叫一個類的靜態方法,它將返回一個 Class Object,然後再呼叫相應的方法或屬性:
<property name="pi" value="#{T(java.lang.Math).PI}"></property>
(3) SpEL支援的運算子號
算數運算子:+, -, *, /, %, ^:
<property name="prop" value="#{ref.total + 20}"></property>
<property name="prop" value="#{ref.total - 20}"></property>
<property name="circumference" value="#{2 * T(java.lang.Math).PI * circle.radius}"></property>
<property name="average" value="#{ref.total / ref.count}"></property>
<property name="remainder" value="#{ref.total % ref.count}"></property>
<property name="area" value="#{T(java.lang.Math).PI * circle.radius ^ 2}"></property>


加號還可以用作字串連線:
<property name="prop" value="#{ref.first + ' ' + ref.second}"></property>

比較運算子: <, >, ==, <=, >=, lt, gt, eq, le, ge
<property name="equal" value="#{ref.total == 100}"></property>
<property name="hasCapacity" value="#{ref.total le 100000}"></property>

邏輯運算子號: and, or, not, |
<property name="and" value="#{ref.total == 100 and ref.count gt 10000}"></property>
<property name="not" value="#{!ref.booleanValue}"></property>
<property name="not" value="#{not ref.booleanValue}"></property>

if-else 運算子:?: (ternary), ?: (Elvis)
<property name="prop" value="#{ref.total == 100 ? 'first':'second'}"></property>

正則表示式:matches
<property name="regpre" value="#{ref.email matches '[a-zA-Z0-9._%+-][email protected][a-zA-Z0-9.-]+\\.[a-zA-Z]{2,4}'}"></property>
(12)IOC 容器中 Bean 的生命週期方法
Bean 的生命週期方法
- Spring IOC 容器可以管理 Bean 的生命週期, Spring 允許在 Bean 生命週期的特定點執行定製的任務.
- Spring IOC 容器對 Bean 的生命週期進行管理的過程:
– 通過構造器或工廠方法建立 Bean 例項
– 為 Bean 的屬性設定值和對其他 Bean 的引用
– 呼叫 Bean 的初始化方法
– Bean 可以使用了
– 當容器關閉時, 呼叫 Bean 的銷燬方法
– 在 Bean 的聲明裡設定 init-method 和 destroy-method 屬性, 為 Bean 指定初始化和銷燬方法. 屬性對應相應 bean 的方法名稱.
新增 Bean 後置處理器
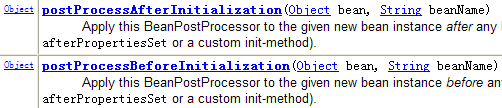
– Bean 後置處理器允許在呼叫初始化方法前後對 Bean 進行額外的處理.
– Bean 後置處理器對 IOC 容器裡的所有 Bean 例項逐一處理, 而非單一例項. 其典型應用是: 檢查 Bean 屬性的正確性或根據特定的標準更改 Bean 的屬性.
– 對Bean 後置處理器而言, 需要實現
org.springframework.beans.factory.config.BeanPostProcessor 介面. 在初始化方法被呼叫前後, Spring 將把每個 Bean 例項分別傳遞給上述介面的以下兩個方法:
新增 Bean 後置處理器後 Bean 的生命週期
- Spring IOC 容器對 Bean 的生命週期進行管理的過程:
– 通過構造器或工廠方法建立 Bean 例項
– 為 Bean 的屬性設定值和對其他 Bean 的引用
– 將 Bean 例項傳遞給 Bean 前置處理器的 postProcessBeforeInitialization 方法
– 呼叫 Bean 的初始化方法
– 將 Bean 例項傳遞給 Bean 後置處理器的 postProcessAfterInitialization方法
– Bean 可以使用了
– 當容器關閉時, 呼叫 Bean 的銷燬方法
(13)通過工廠方法建立bean
(1)通過呼叫靜態工廠方法
- 呼叫靜態工廠方法建立 Bean是將物件建立的過程封裝到靜態方法中. 當客戶端需要物件時, 只需要簡單地呼叫靜態方法, 而不同關心建立物件的細節.
- 要宣告通過靜態方法建立的 Bean, 需要在 Bean 的 class 屬性裡指定擁有該工廠的方法的類, 同時在 factory-method 屬性裡指定工廠方法的名稱. 最後, 使用
<constrctor-arg>元素為該方法傳遞方法引數.
public class StaticBeanFactory {
    private static Map<String, Car> map = new HashMap<String, Car>();
    static{
        map.put("Audi", new Car("Audi",10000L));
        map.put("Fode",  new Car("Fode",20000L));
    }
    public static Car getCar(String name) {
        return map.get(name);
    }
}
<!-- 通過靜態工廠方法配置bean
        factory-method : 指向工廠方法的名稱
        constructor-arg: 如果工廠方法需要傳入引數,則需配置引數
-->
<bean id="car" class="ice.mimosa.c_factory.StaticBeanFactory"
    factory-method="getCar">
        <constructor-arg value="Audi"></constructor-arg>
</bean>
(2)通過呼叫例項工廠方法
- 例項工廠方法: 將物件的建立過程封裝到另外一個物件例項的方法裡. 當客戶端需要請求物件時, 只需要簡單的呼叫該例項方法而不需要關心物件的建立細節.
- 要宣告通過例項工廠方法建立的 Bean
– 在 bean 的 factory-bean 屬性裡指定擁有該工廠方法的 Bean
– 在 factory-method 屬性裡指定該工廠方法的名稱
– 使用 construtor-arg 元素為工廠方法傳遞方法引數
public class BeanFactory {
    private Map<String, Car> map = new HashMap<String, Car>();
    public BeanFactory() {
        map.put("Audi", new Car("Audi",20000L));
        map.put("Fode",  new Car("Fode",30000L));
    }
    public Car getCar(String name){
        return map.get(name);
    }
}
<!-- 建立例項工廠的例項 -->
<bean id="beanFactory" class="ice.mimosa.c_factory.BeanFactory"></bean>
<!-- 通過例項工廠方法配置bean
factory-bean : 指向例項工廠的全類名
factory-method : 指向工廠方法的名稱
constructor-arg: 如果工廠方法需要傳入引數,則需配置引數
-->
<bean id="car1"
factory-bean="beanFactory"
factory-method="getCar">
<constructor-arg value="Audi"></constructor-arg>
</bean>(3) 實現FactoryBean介面Spring IOC容器中配置Bean
- Spring中有兩種型別的Bean,一種是普通Bean,另一種是工廠Bean,即FactoryBean.
- 工廠 Bean 跟普通Bean不同, 其返回的物件不是指定類的一個例項, 其返回的是該工廠 Bean 的 getObject 方法所返回的物件
public interface FactoryBean {
    // 返回的例項
    public abstract Object getObject() throws Exception;
    // 返回的型別
    public abstract Class getObjectType();
    // 返回的例項是否為單例
    public abstract boolean isSingleton();
}
(14)基於註解配置 Bean
在 classpath 中掃描元件
- 元件掃描(component scanning): Spring 能夠從 classpath 下自動掃描, 偵測和例項化具有特定註解的元件.
- 特定元件包括:
– @Component: 基本註解, 標識了一個受 Spring 管理的元件
– @Respository: 標識持久層元件
– @Service: 標識服務層(業務層)元件
– @Controller: 標識表現層元件 - 對於掃描到的元件, Spring 有預設的命名策略: 使用非限定類名, 第一個字母小寫. 也可以在註解中通過 value 屬性值標識元件的名稱
- 當在元件類上使用了特定的註解之後, 還需要在 Spring 的配置檔案中宣告
<context:component-scan>:
– base-package 屬性指定一個需要掃描的基類包,Spring 容器將會掃描這個基類包裡及其子包中的所有類.
– 當需要掃描多個包時, 可以使用逗號分隔.
– 如果僅希望掃描特定的類而非基包下的所有類,可使用 resource-pattern 屬性過濾特定的類
–<context:include-filter>子節點表示要包含的目標類
–<context:exclude-filter>子節點表示要排除在外的目標類
–<context:component-scan>下可以擁有若干個<context:include-filter>和<context:exclude-filter>子節點
–<context:include-filter>和<context:exclude-filter>子節點支援多種型別的過濾表示式:
使用 @Autowired 自動裝配 Bean
- @Autowired 註解自動裝配具有相容型別的單個 Bean屬性
– 構造器, 普通欄位(即使是非 public), 一切具有引數的方法都可以應用@Authwired 註解
– 預設情況下, 所有使用 @Authwired 註解的屬性都需要被設定. 當 Spring 找不到匹配的 Bean 裝配屬性時, 會丟擲異常, 若某一屬性允許不被設定, 可以設定 @Authwired 註解的 required 屬性為 false
– 預設情況下, 當 IOC 容器裡存在多個型別相容的 Bean 時, 通過型別的自動裝配將無法工作. 此時可以在 @Qualifier 註解裡提供 Bean 的名稱. Spring 允許對方法的入參標註 @Qualifiter 已指定注入 Bean 的名稱
– @Authwired 註解也可以應用在陣列型別的屬性上, 此時 Spring 將會把所有匹配的 Bean 進行自動裝配.
– @Authwired 註解也可以應用在集合屬性上, 此時 Spring 讀取該集合的型別資訊, 然後自動裝配所有與之相容的 Bean.
– @Authwired 註解用在 java.util.Map 上時, 若該 Map 的鍵值為 String, 那麼 Spring 將自動裝配與之 Map 值型別相容的 Bean, 此時 Bean 的名稱作為鍵值 - Spring 還支援 @Resource 和 @Inject 註解自動裝配 bean,這兩個註解和 @Autowired 註解的功用類似
- @Resource 註解要求提供一個 Bean 名稱的屬性,若該屬性為空,則自動採用標註處的變數或方法名作為 Bean 的名稱
- @Inject 和 @Autowired 註解一樣也是按型別匹配注入的 Bean, 但沒有 reqired 屬性
- 建議使用 @Autowired 註解
相關推薦
Spring-02-詳細配置
4、 IOC容器概述 在 Spring IOC 容器 讀取 Bean 配置建立 Bean 例項之前, 必須對它進行例項化. 只有在容器例項化後, 才可以從 IOC 容器裡獲取 Bean 例項並使用. Spring 提供了兩種型別的 IOC 容器實現
Spring IOC詳細配置與使用
前言:複習瞭解下Spring,順便記錄下這個過程以供日後翻閱。本篇將從Spring IOC的xml以及annotation兩種配置進行。SpringIOC: 按照我個人的理解來說,SpringIOC(Inversion of Control)控制反轉:指就是說原先在物件
spring security4 詳細配置
在使用Spring Security之前首先要有個spring的web專案,這裡不再多說。 第一步:新增spring security依賴 <dependency> <groupId>org.springframe
spring boot整合mybatis深坑之c3p0的詳細配置
text context ati reat source ast type fig oot 項目地址:https://gitee.com/zhangjunqing/spring-boot/tree/master/springboot-mybatis-notice 本人在c3
02-spring學習-屬性配置細節
學習 com type tor rri spring 例子 n) 例如 配置bean的一些細節 字面值 如果包含特殊符號,直接寫會報錯。可以用這個<![CDATA[]]>包裹起來。 比如這裏的配置屬性裏面的value值包含<>等特殊符號,直接寫會報
maven中spring+springmvc+mybatis整合詳細配置
首先配置mybatis,可以參考這篇部落格的前期基礎配置使用。 https://blog.csdn.net/qq_41520636/article/details/84146699 下面配置結構: 需要的jar,在pom.xml中引入 <!--統一j
Spring Boot 日誌配置方法(超詳細)
預設日誌 Logback : 預設情況下,Spring Boot會用Logback來記錄日誌,並用INFO級別輸出到控制檯。在執行應用程式和其他例子時,你應該已經看到很多INFO級別的日誌了。 從上圖可以看到,日誌輸出內容元素具體如下: 時間日期:精確到毫秒 日誌
Spring Cloud Eureka配置檔案例子與較為詳細說明
Eureka服務端: application.yml # eureka(最)簡單單點開發配置。支援yml與properties兩種,yml檔案字尾必須為yml,不能是yaml,否則找不到該檔案,使用預設配置。 # yml檔案大小寫敏感; # 每個級別至少用1個空格縮排,也可
Spring Boot 日誌配置(超詳細)
Spring Boot-日誌配置(超詳細) 更新日誌: 20170810 更新通過 application.yml傳遞引數到 logback 中。 預設日誌 Logback: 預設情況下,Spring Boot會用Logback來記錄日誌,並用
Spring Session實現Session管理的原理與詳細配置
原理請參考這篇文章很詳細:點選檢視 以下是我的在開發中使用配置 如果是maven工程,加入如下依賴: <!-- spring-session --> <dependency> <groupId>
Spring整合ActiveMQ(topic 詳細配置步驟)
maven工程新增依賴<dependencies> <!-- Spring --> <dependency> <groupId>org.springframework</groupId>
基於spring+hibernate+cxf寫的webservice服務,詳細配置
1.首先下載Apache-cxf的jar包 2.搭建好spring+hibernate環境 搭建好spring+hibernate環境,確保可以正常執行!這裡具體省略! 3.引入cxf的jar包到專案 這裡我們選擇將所有jar包匯入 4.完成Web
Swagger2 在spring boot中的運用- API Docs在spring boot中詳細配置生成及各個平臺介面網路請求程式碼生成Swagger-codegen-cli運用
好久沒有寫學習部落格了。在最近的工作中,學習到了一些比較好的工具。可以提高前後臺工作人員,測試人員的工作效率。甚至可以給產品提供相關直觀的參考。也利於版本迭代api的系統管理,現部落格記錄下來,有什麼不足之處請各位大牛指正!有很多因素促成了Swagger在構建RESTful
ssm(spring+springmvc+mybatis)的詳細配置
pom.xml <properties> <spring.version>4.3.10.RELEASE</spring.version> <mybatis.version>3.4.5</mybatis.vers
spring boot環境配置
project fda new 信息 fig 比較 fab imp image Eclipse+Maven創建webapp項目<一> 1、開啟eclipse,右鍵new——》other,如下圖找到maven project 2、選
Spring MVC 零配置
只有一個 col 純粹 相同 如果 http 註冊 name 指定 1. pring MVC的核心就是DispatcherServlet類,Spring MVC處理請求的流程如下圖所示: 2. Spring MVC中典型的上下文層次 當我們初始化一個Dispat
如何編寫Spring-Boot自動配置
not 做的 mage 沒有 stat oot classname ger 內容 摘要 本文主要介紹如何把一個spring的項目(特別是一些公共工具類項目),基於spring boot的自動配置的思想封裝起來,使其他Spring-Boot項目引入後能夠進行快速配置。 Aut
Spring註解詳細
組件 ostc use stc 註入 pac 管理 類名 初始 [email protected]/* */ 控制器(註入服務) [email protected]/* */ 服務(註入dao) [email protected]/* *
使用 sitemesh/decorator裝飾器裝飾jsp頁面(原理及詳細配置)
sa一、SiteMesh介紹SiteMesh是一個Java WEB項目的網頁布局和修飾框架。使用SiteMesh後就不再需要在每個頁面中都用<jsp:include>標簽引入頁頭、頁尾、導航等其他公用頁面了。可以將網頁的內容和頁面結構分離,達到頁面結構共享的目的。頁面裝飾效果耦合在目標頁面中,無需
Spring Boot 屬性配置和使用
系統環境 itl class location web ron hashmap 驗證 ssp spring Boot 允許通過外部配置讓你在不同的環境使用同一應用程序的代碼,簡單說就是可以通過配置文件來註入屬性或者修改默認的配置。 Spring Boot 系列