
在 Webpack 中執行程式碼分割
有三種常用的程式碼分離方法:
- 入口起點:使用
entry配置手動地分離程式碼。 - 動態匯入:通過模組的行內函數呼叫來分離程式碼。
1、入口起點
這是迄今為止最簡單、最直觀的分離程式碼的方式。不過,這種方式手動配置較多
webpack.config.js
const path = require('path');
const HTMLWebpackPlugin = require('html-webpack-plugin');

module.exports = {
  entry: {
    index: './src/index.js',
    another: './src/another-module.js'
  },
  plugins: [
    new HTMLWebpackPlugin({
      title: 'Code Splitting'
    })
  ],
  output: {
    filename: '[name].bundle.js',
    path: path.resolve(__dirname, 'dist')
  }
};
這將生成如下構建結果Hash: 309402710a14167f42a8 Version: webpack 2.6.1 Time: 570ms Asset Size Chunks Chunk Names index.bundle.js 544 kB 0 [emitted] [big] index another.bundle.js 544 kB 1 [emitted] [big] another [0] ./~/lodash/lodash.js 540 kB {0} {1} [built] [1] (webpack)/buildin/global.js 509 bytes {0} {1} [built] [2] (webpack)/buildin/module.js 517 bytes {0} {1} [built] [3] ./src/another-module.js 87 bytes {1} [built] [4] ./src/index.js 216 bytes {0} [built]
正如前面提到的,這種方法存在一些問題:
- 如果入口 chunks 之間包含重複的模組,那些重複模組都會被引入到各個 bundle 中。
- 這種方法不夠靈活,並且不能將核心應用程式邏輯進行動態拆分程式碼。
2、防止重複
CommonsChunkPlugin 外掛可以將公共的依賴模組提取到已有的入口 chunk 中,或者提取到一個新生成的 chunk。讓我們使用這個外掛,將之前的示例中重複的 lodash 模組去除:
webpack.config.js
  const path = require('path');
+ const webpack = require('webpack');
  const HTMLWebpackPlugin = require('html-webpack-plugin');

  module.exports = {
    entry: {
      index: './src/index.js',
      another: './src/another-module.js'
    },
    plugins: [
      new HTMLWebpackPlugin({
        title: 'Code Splitting'
- })
+ }),
+ new webpack.optimize.CommonsChunkPlugin({
+ name: 'common' // 指定公共 bundle 的名稱。
+ })
    ],
    output: {
      filename: '[name].bundle.js',
      path: path.resolve(__dirname, 'dist')
    }
  };
這裡我們使用 CommonsChunkPlugin 之後,現在應該可以看出,index.bundle.js 中已經移除了重複的依賴模組。需要注意的是,CommonsChunkPlugin 外掛將 lodash 分離到單獨的 chunk,並且將其從 main bundle 中移除,減輕了大小。執行 npm run build 檢視效果:
Hash: 70a59f8d46ff12575481
Version: webpack 2.6.1
Time: 510ms
            Asset       Size  Chunks                    Chunk Names
  index.bundle.js  665 bytes       0  [emitted]         index
another.bundle.js  537 bytes       1  [emitted]         another
 common.bundle.js     547 kB       2  [emitted]  [big]  common
   [0] ./~/lodash/lodash.js 540 kB {2} [built]
   [1] (webpack)/buildin/global.js 509 bytes {2} [built]
   [2] (webpack)/buildin/module.js 517 bytes {2} [built]
   [3] ./src/another-module.js 87 bytes {1} [built]
   [4] ./src/index.js 216 bytes {0} [built]
以下是由社群提供的,一些對於程式碼分離很有幫助的外掛和 loaders:
bundle-loader: 用於分離程式碼和延遲載入生成的 bundle。promise-loader: 類似於bundle-loader,但是使用的是 promises。
3、動態匯入
new Vue({
  el: '#app',
  components: {
    AsyncComponent: () => import('./AsyncComponent.vue')
  }
});
實施程式碼分割並不難,難在搞清楚在什麼時候、什麼地方進行。
Vue.js 單頁應用進行程式碼分割有三種思路:
- 按頁面分割
- 使用摺疊
- 按條件分割
1. 按頁面
按頁面來進行程式碼分割,是最明顯的一種方式。
如果能確保每個單檔案元件代表一個頁面,如 Home.vue, About.vue 以及 Contact.vue,那麼我們就可以使用 Webpack 的 "動態匯入" 函式 (import) 來將它們分割至單獨的構建檔案中。之後後,當用戶訪問一個新頁面的時候,Webpack 將非同步載入該請求的頁面檔案。
如果用到了 vue-router,由於頁面已經分割成了單獨的元件,實施起來會非常方便。
 const Home = () => import(/* webpackChunkName: "home" */ './Home.vue');
 const About = () => import(/* webpackChunkName: "about" */ './About.vue');
 const Contact = () => import(/* webpackChunkName: "contact" */ './Contact.vue');
 const routes = [
 { path: '/', name: 'home', component: Home },
 { path: '/about', name: 'about', component: About },
 { path: '/contact', name: 'contact', component: Contact }
 ];
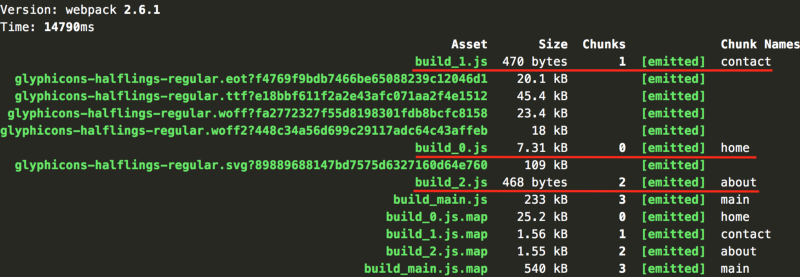
程式碼編譯完成後,通過檢視生成的統計資料得知:每個頁面都有自己單獨的檔案,同時有多出來一個名為 build_main.js 的打包檔案。裡面包含一些公共的程式碼以及邏輯,用來非同步載入其它檔案,因此它需要在使用者訪問路由之前載入完成。
2. 摺疊
“摺疊” 是指頁面初次載入時,檢視的不可見部分。使用者通常會花費 1~2 秒來瀏覽可視區域,特別是第一次訪問網站的時候(可能更久),之後才開始向下滑動頁面。這個時候,可以非同步載入剩餘的內容。
3. 條件展示內容
程式碼分割另一種比較好的備選方式,是按條件展示。比如:模態框、標籤頁、下拉選單之類。
如果我們需要一個模態框,給模態框設定 v-if 屬性,綁定了 show 變數。一方面用來控制模態框是否顯示,同時也決定了是否應該渲染模態框元件。當頁面載入的時候,它的值為 false,模態框的程式碼只有當它顯示的時候才會被載入。如果使用者永遠不開啟這個模態框,這部分程式碼就永遠不會被下載。缺點是,可能會增加很小的使用者體驗成本:使用者點選按鈕後,需要等待程式碼檔案下載完成。