
免費申請https網站ssl證書--支援萬用字元
眾所周知從某些公司購買HTTPS證書,一個域名每年都要幾千個大洋(不是一般的黑)。那麼有沒有免費,答案是有。現隆重推薦(Let’s Encrypt 免費證書)
EEF 電子前哨基金會、 Mozilla 基金會和美國密歇根大學成立了一個公益組織叫 ISRG ( Internet Security Research Group ),這個組織從 2015 年開始推出了 Let’s Encrypt 免費證書。這個免費證書不僅免費,而且還相當好用,所以我們就可以利用 Let’s Encrypt 提供的免費證書部署 https 了。
Let’s Encrypt 證書除了免費,還支援域名萬用字元或泛域名。好東西必須分享,走起。
準備工作
安裝Certbot
以 centos7 為例
Certbot 的官方網站是 https://certbot.eff.org/ ,開啟這個連結選擇自己使用的 web server 和作業系統,EFF 官方會給出詳細的使用方法。
下載certbot
wget https://dl.eff.org/certbot-auto
chmod a+x certbot-auto
注意:也可採用certbot官方 yum安裝方式
申請萬用字元域名
./certbot-auto certonly -d *.example.com --manual --preferred-challenges dns --server https://acme-v02.api 當然你也可以將多個泛域名,放到一個證書裡(親測可行),將example.com 換成你自己的域名。
./certbot-auto certonly -d *.example.com -d *.a.com --manual --preferred-challenges dns --server https://acme-v02.api.letsencrypt.org/directory這裡我只用了一個泛域域名
執行以上命令得到如下
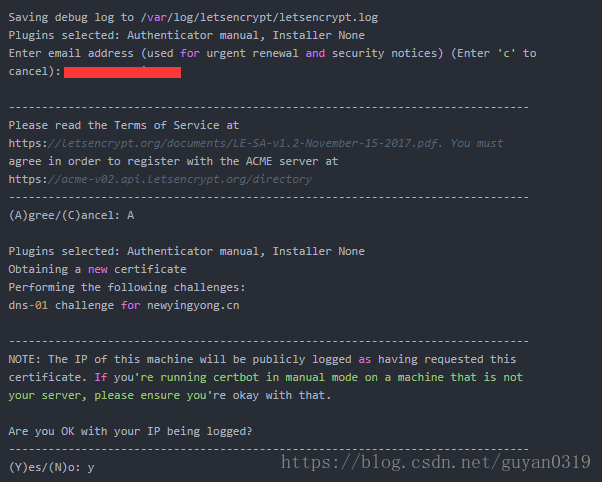
依次 輸入 你的郵箱
再輸入“A” 同意,“Y” 開始
最後出現如下圖,此處先不動,很重要。
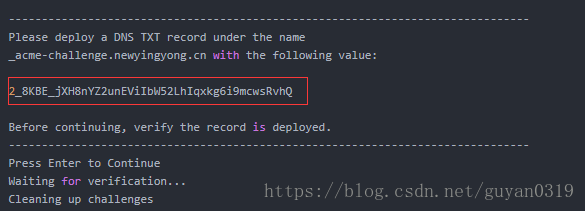
配置DNS
要求配置 DNS TXT 記錄,從而校驗域名所有權,也就是判斷證書申請者是否有域名的所有權。
給 _acme-challenge.example.com 配置一條 TXT 記錄.
測試txt記錄是否生效
$ dig  -t txt  _acme-challenge.example.com @8.8.8.8

;; OPT PSEUDOSECTION:
; EDNS: version: 0, flags:; udp: 512
;; QUESTION SECTION:
;_acme-challenge.example.com.        IN      TXT

;; ANSWER SECTION:
_acme-challenge.example.com. 599 IN  TXT     "kd9kdjjXH8nYZ2unEViIbW52LhIqxkg6i9mcwsRvhQ"
確認生效後,回車執行,輸出如下:
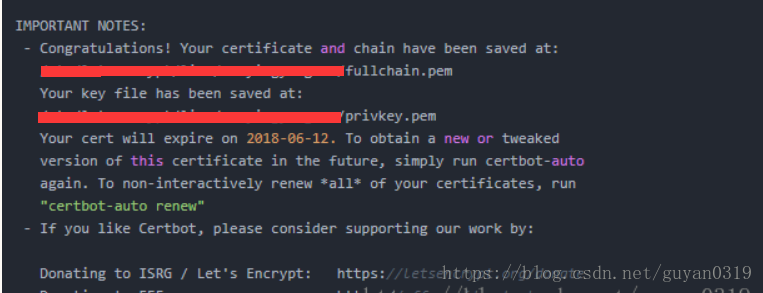
恭喜您,證書申請成功,證書和金鑰儲存在下列目錄:
ll  /etc/letsencrypt/live/example.com

lrwxrwxrwx 1 root root  35 Jun  1 14:43 cert.pem -> ../../archive/duiniya.com/cert1.pem
lrwxrwxrwx 1 root root  36 Jun  1 14:43 chain.pem -> ../../archive/duiniya.com/chain1.pem
lrwxrwxrwx 1 root root  40 Jun  1 14:43 fullchain.pem -> ../../archive/duiniya.com/fullchain1.pem
lrwxrwxrwx 1 root root  38 Jun  1 14:43 privkey.pem -> ../../archive/duiniya.com/privkey1.pem
然後校驗證書資訊,輸入如下命令:
openssl x509 -in /etc/letsencrypt/archive/example.com/cert1.pem -noout -text 如果輸出中有
X509v3 Subject Alternative Name:
    DNS:*.example.com
證明成功
也可以同過
./certbot-auto certificates

配置Nginx
    server {
           server_name  www.example.com;
           listen 443 http2 ssl;
           ssl on;
           ssl_certificate /etc/letsencrypt/live/example.com/fullchain.pem;
           ssl_certificate_key /etc/letsencrypt/live/example.com/privkey.pem;
        #access_log  logs/host.access.log  main;
        root   /var/www/demo;
        location / {
            index  index.html index.htm index.php l.php;
           autoindex  off;

        }
        # proxy the PHP scripts to Apache listening on 127.0.0.1:80
        #
        #location ~ \.php$ {
        #    proxy_pass   http://127.0.0.1;
        #}

        # pass the PHP scripts to FastCGI server listening on 127.0.0.1:9000
        #
        location ~ \.php(.*)$  {
              fastcgi_pass 127.0.0.1:9000;
              fastcgi_index index.php;
              fastcgi_param SCRIPT_FILENAME $document_root$fastcgi_script_name;
              include fastcgi_params;
        }
    }
證書續期
一般Let’s Encrypt 證書有效期為3個月,如果想續期執行如下命令
./certbot-auto renew如果嫌麻煩,可以寫到定時任務裡,每天執行一次。
crontab -e

0 0 * * * /root/tar/certbot-auto renew --renew-hook "systemctl reload nginx"
續期說明:只用renew的話,會先檢查證書是否需要更新,大概是距離到期還有三天或者十幾天之內才會執行更新,否則會提示不需要更新。(昨天更新了證書,今天直接用renew,提示不允許更新)
注意:人總有犯暈的時候,比如你沒有放開443埠,還想訪問HTTPS網站。
錯誤解決
如果執行續訂,出現
ReadTimeoutError: HTTPSConnectionPool(host=’files.pythonhosted.org’, port=443): Read timed out.
這個是pip下載國內站點超時或被限造成的,可通過配置pip.conf解決。
vim /root/.pip/pip.conf
#內容
[global]
timeout = 6000
index-url = http://e.pypi.python.org/simple
trusted-host = pypi.douban.com