
gnuradio安裝指南——詳解ubuntu16.04下使用指令碼安裝gnuradio&uhd全過程
一、下載篇
在ubuntu下安裝gnuradio有很多方法,gnuradio官網中對不同下載安裝方法進行了詳細的說明
http://gnuradio.org/redmine/projects/gnuradio/wiki/InstallingGR
其中官網推薦在ubuntu下使用方法
apt-get install gnuradio
這種方法主要可以使用模擬的功能,對大多數使用者來說已經足夠了,但是博主考慮到今後有可能會根據需要修改一些關鍵程式碼等,所以決定Download From Source從原始檔下載
http://gnuradio.org/redmine/projects/gnuradio/wiki/InstallingGRFromSource
轉到網頁發現從原始檔下載安裝也有好幾種方法,綜合對比還是選擇比較簡單的方法——Using the build-gnuradio script直接使用指令碼進行下載和安裝(會自動安裝uhd),即使用命令
wget http://www.sbrac.org/files/build-gnuradio && chmod a+x build-gnuradio && ./build-gnuradio 執行指令碼之前先切換到任意一個目錄即可,最好建立一個單獨的資料夾,需要聯網,中途需要輸入幾次選擇(y|Y|Yes|N之類的),所以比較漫長,博主嘗試之後注意到chmod命令是需要加sudo的,沒加的話會報錯,所以上述命令改一下比較好
wget http://www.sbrac.org/files/build-gnuradio && sudo chmod a+x build-gnuradio && ./build-gnuradio二、異常處理篇
這個指令碼使用非常方便,它會自動檢查依賴的檔案是否具備,不具備的話會自動下載,所以基本不需要我們額外去做任何安裝。如果中途提示有幾個檔案不能獲取到,會提示最終構造出的gnuradio可能會存在某些問題,所以有條件的話可以根據提示自己先提前下載到這些不能自動下載的檔案重新執行指令碼。但是不下載也能繼續往下執行,只是可能今後會有什麼bug吧,暫時也不太清楚。
博主的指令碼檢測到兩個不具備
Failed to find package 'python-wxgtk2.8' in known package repositories
SOME THINGS MAY NOT BUILD AS A RESULT
Failed to 依賴檢測執行完之後,指令碼自動從Git下載缺少的依賴檔案、gnuradio和uhd和image並構造,這段時間不能斷網,而且用時很長,得耐心等待,基本上沒什麼問題。
三、測試篇
最後提示安裝好了,並且提示設定python的路徑環境變數(這個可以先不管,如果不行再新增就好)
You should probably set your PYTHONPATH to:
     /usr/local/lib/python2.7/dist-packages
然後提示需要先登出系統再登入,所以可以登出後登入也可以重啟,
然後執行音效卡測試程式安裝是否完成,進入音效卡例項目錄
cd /usr/local/share/gnuradio/examples/audio
然後檢視對應目錄下的檔案
ls
顯示如下

執行dial_tone.py,即在終端輸入
./dial_tone.py
顯示如圖

如果電腦音效卡發出聲音,那麼恭喜你,說明PYTHONPATH的路徑不用設定了,只需要輸入Ctrl+C即可停止執行,如果這一步報錯就需要定義環境變數PYTHONPATH路徑,方法參考指令碼原始碼如下
if [ -d /usr/local/lib${type}/python${PYVER}/site-packages/gnuradio ]
            then
                PYTHONPATH=/usr/local/lib${type}/python${PYVER}/site-packages
            fi
            if [ -d /usr/local/lib${type}/python${PYVER}/dist-packages/gnuradio ]
            then
                PYTHONPATH=/usr/local/lib${type}/python${PYVER}/dist-packages
            fi
博主的對應路徑如下

所以設定成對應值即可(環境變數設定不會的話就百度一下)。
最後,輸入
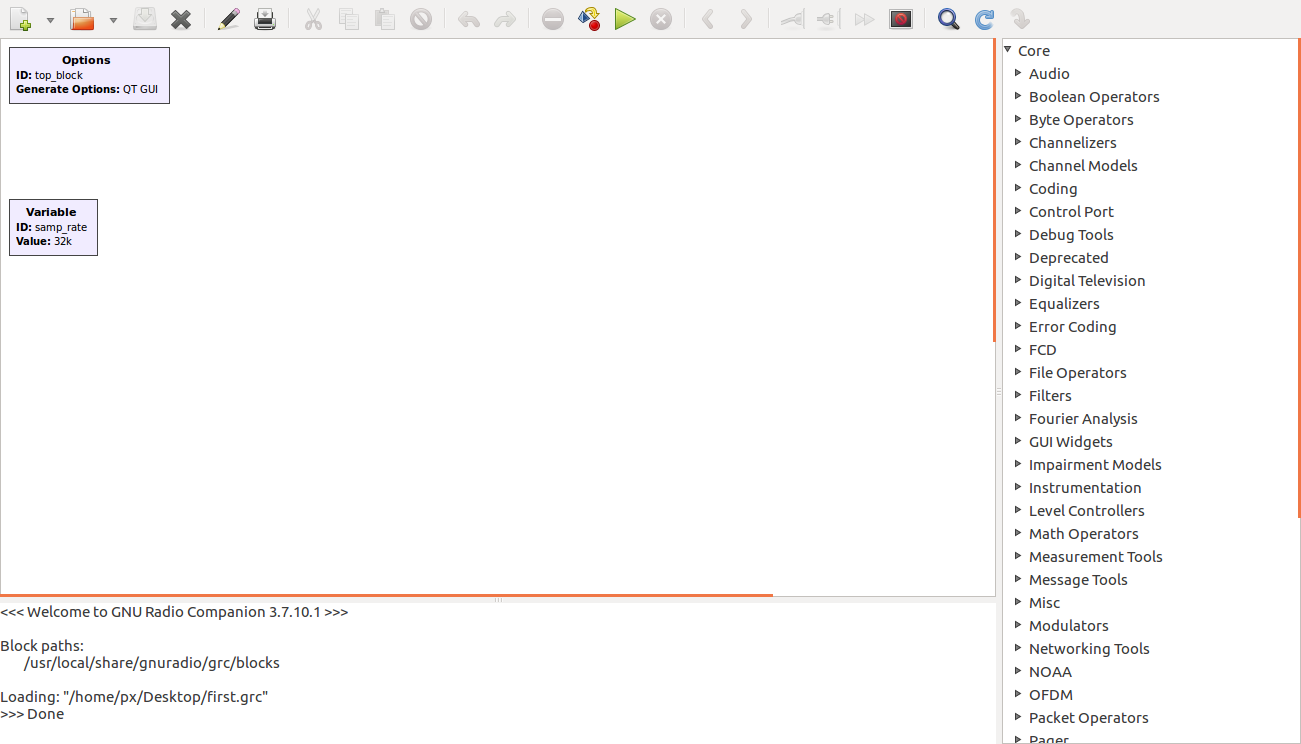
gnuradio-companion
就可以進入圖形介面了

到此為止就實現了在ubuntu下使用指令碼安裝gnuradio了。
四、安裝過程中的指令碼輸出結果
[email protected]:~$ cd Desktop/build-gnuradio/
[email protected]:~/Desktop/build-gnuradio$ ls
[email protected]:~/Desktop/build-gnuradio$ sudo wget http://www.sbrac.org/files/build-gnuradio && sudo chmod a+x build-gnuradio && ./build-gnuradio
[sudo] password for px:
--2016-10-09 22:03:47--  http://www.sbrac.org/files/build-gnuradio
Resolving www.sbrac.org (www.sbrac.org)... 67.212.80.242
Connecting to www.sbrac.org (www.sbrac.org)|67.212.80.242|:80... connected.
HTTP request sent, awaiting response... 200 OK
Length: 41528 (41K) [text/plain]
Saving to: ‘build-gnuradio’

build-gnuradio      100%[===================>]  40.55K  62.6KB/s    in 0.6s

2016-10-09 22:03:49 (62.6 KB/s) - ‘build-gnuradio’ saved [41528/41528]

This script will install Gnu Radio from current GIT sources
You will require Internet access from the computer on which this
script runs. You will also require SUDO access. You will require
approximately 500MB of free disk space to perform the build.

This script will, as a side-effect, remove any existing Gnu Radio
installation that was installed from your Linux distribution packages.
It must do this to prevent problems due to interference between
a linux-distribution-installed Gnu Radio/UHD and one installed from GIT source.

The whole process may take up to two hours to complete, depending on the
capabilities of your system.

!!!!!!!!!!!!!!!!!!!!!!!!!!!!!!!!!!!!!!!!!!!!!!!!!!!!!!!!!!!!!!!!!!!!!!!!!!!!!!!!
NOTE: if you run into problems while running this script, you can re-run it with
the --verbose option to produce lots of diagnostic output to help debug problems.
This script has been written to anticipate some of the more common problems one might
encounter building ANY large, complex software package. But it is not pefect, and
there are certainly some situations it could encounter that it cannot deal with
gracefully. Altering the system configuration from something reasonably standard,
removing parts of the filesystem, moving system libraries around arbitrarily, etc,
it likely cannot cope with. It is just a script. It isn't intuitive or artificially
intelligent. It tries to make life a little easier for you, but at the end of the day
if it runs into trouble, a certain amount of knowledge on your part about
system configuration and idiosyncrasies will inevitably be necessary.


Proceed?y
Starting all functions at: Sun Oct 9 22:03:50 CST 2016
SUDO privileges are required
Do you have SUDO privileges?y
Continuing with script
Installing prerequisites.
====> THIS MAY TAKE QUITE SOME TIME <=====
Checking for package libqwt6
Checking for package libfontconfig1-dev
Checking for package libxrender-dev
Checking for package libpulse-dev
Checking for package swig
Checking for package g++
Checking for package automake
Checking for package autoconf
Checking for package libtool
Checking for package python-dev
Checking for package libfftw3-dev
Checking for package libcppunit-dev
Checking for package libboost-all-dev
Checking for package libusb-dev
Checking for package libusb-1.0-0-dev
Checking for package fort77
Checking for package libsdl1.2-dev
Checking for package python-wxgtk2.8
Failed to find package 'python-wxgtk2.8' in known package repositories
SOME THINGS MAY NOT BUILD AS A RESULT
Checking for package git-core
Checking for package libqt4-dev
Checking for package python-numpy
Checking for package ccache
Checking for package python-opengl
Checking for package libgsl0-dev
Checking for package python-cheetah
Checking for package python-mako
Checking for package python-lxml
Checking for package doxygen
Checking for package qt4-default
Checking for package qt4-dev-tools
Checking for package libusb-1.0-0-dev
Checking for package libqwt5-qt4-dev
Checking for package libqwtplot3d-qt4-dev
Checking for package pyqt4-dev-tools
Checking for package python-qwt5-qt4
Checking for package cmake
Checking for package git-core
Checking for package wget
Checking for package libxi-dev
Checking for package python-docutils
Checking for package gtk2-engines-pixbuf
Checking for package r-base-dev
Checking for package python-tk
Checking for package liborc-0.4-0
Checking for package liborc-0.4-dev
Checking for package libasound2-dev
Checking for package python-gtk2
Checking for package libzmq
Checking for package libzmq-dev
Checking for package libzmq1
Checking for package libzmq1-dev
Failed to find package 'libzmq1-dev' in known package repositories
SOME THINGS MAY NOT BUILD AS A RESULT
Checking for package python-requests
Checking for package python-sphinx
Checking for package comedi-dev
Checking for package python-zmq
Checking for package libncurses5
Checking for package libncurses5-dev
Checking for package python-wxgtk3.0
Done checking packages
Checking for library libusb ...Found library libusb
Checking for library libboost ...Found library libboost
Checking for library libcppunit ...Found library libcppunit
Checking for library libfftw ...Found library libfftw
Checking for library libgsl ...Found library libgsl
Done
This script will fetch Gnu Radio version 3.7/maint from the repositories, along with compatible
extras.
Is this OK?y
Fetching various packages (Gnu Radio, UHD, gr-osmosdr, gr-iqbal, etc)
via the Internet
=======> THIS MAY TAKE QUITE SOME TIME <=========
Fetching Gnu Radio via GIT...Done
Fetching UHD via GIT...Fetching rtl-sdr (rtl-sdr, gr-osmosdr, gr-iqbal, hackrf, bladeRF and airspy) via GIT
Done
Starting function uhd_build at: Sun Oct 9 22:19:20 CST 2016
Building UHD...
=============> THIS WILL TAKE SOME TIME <=============

Done building/installing UHD
Done function uhd_build at: Sun Oct 9 22:41:51 CST 2016
Starting function firmware at: Sun Oct 9 22:41:51 CST 2016
Images destination:      /usr/local/share/uhd/images
Downloading images from: http://files.ettus.com/binaries/images/uhd-images_003.010.000.000-36-g967897e0.zip
Downloading images to:   /tmp/tmpIPdGH_/uhd-images_003.010.000.000-36-g967897e0.zip
59860 kB / 59860 kB (100%)

Images successfully installed to: /usr/local/share/uhd/images
Done function firmware at: Sun Oct 9 22:42:33 CST 2016
Starting function gnuradio_build at: Sun Oct 9 22:42:33 CST 2016
/usr/local/lib already in ld.so.conf.d
Doing ldconfig...
Building Gnu Radio...
=========> THIS WILL TAKE QUITE A WHILE <=============

...Doing cmake
...Cmaking
...Building

...Installing
Done building and installing Gnu Radio
GRC freedesktop icons install ...Done
Done function gnuradio_build at: Mon Oct 10 00:03:17 CST 2016
Starting function rtl_build at: Mon Oct 10 00:03:17 CST 2016
Building rtl-sdr...Done building rtl-sdr
Building hackrf...Done building hackrf
Building gr-iqbal...Done building gr-iqbal
Building bladeRF...Done building bladeRF
Done building airspy
Building gr-osmosdr...Done building gr-osmosdr
Done building/installing rtl-sdr/gr-osmosdr
Done function rtl_build at: Mon Oct 10 00:06:15 CST 2016
Starting function mod_groups at: Mon Oct 10 00:06:15 CST 2016
********************************************************************************
This script has just modified /etc/group to place your userid '('$USER')' into group 'usrp'
In order for this change to take effect, you will need to log-out and log back
in again.  You will not be able to access your USRP1 device until you do this.

If you wish to allow others on your system to use the USRP1 device, you will need to use:

  sudo usermod -a -G usrp userid

For each userid you wish to allow access to the usrp

********************************************************************************

Further
Done function mod_groups at: Mon Oct 10 00:06:16 CST 2016
Starting function mod_udev at: Mon Oct 10 00:06:16 CST 2016
udevd: no process found
Done function mod_udev at: Mon Oct 10 00:06:16 CST 2016
Starting function mod_sysctl at: Mon Oct 10 00:06:16 CST 2016
Applying updates to /etc/sysctl.conf
Group 'usrp' now has real-time scheduling privileges
You will need to log-out and back in again for this to
take effect
Done function mod_sysctl at: Mon Oct 10 00:06:16 CST 2016
Starting function pythonpath at: Mon Oct 10 00:06:16 CST 2016


************************************************************
You should probably set your PYTHONPATH to:

     /usr/local/lib/python2.7/dist-packages

Using:

export PYTHONPATH=/usr/local/lib/python2.7/dist-packages

in your .bashrc or equivalent file prior to attempting to run
any Gnu Radio applications or Gnu Radio Companion.
*************************************************************
Done function pythonpath at: Mon Oct 10 00:06:16 CST 2016
Starting function extras at: Mon Oct 10 00:06:16 CST 2016
Done function extras at: Mon Oct 10 00:06:16 CST 2016
Done all functions at: Mon Oct 10 00:06:16 CST 2016
All Done

=======================================================================
If you have found this script useful and time-saving, consider a
donation to help me keep build-gnuradio, simple_ra, SIDsuite,
meteor_detector, simple_fm_rcv, and multimode maintained and up to date.
A simple paypal transfer to [email protected] is all you need to do.
======================================================================
Send success/fail info to sbrac.org?n
[email protected]:~/Desktop/build-gnuradio$
相關推薦
gnuradio安裝指南——詳解ubuntu16.04下使用指令碼安裝gnuradio&uhd全過程
一、下載篇 在ubuntu下安裝gnuradio有很多方法,gnuradio官網中對不同下載安裝方法進行了詳細的說明 http://gnuradio.org/redmine/projects/gnuradio/wiki/InstallingGR 其中官網推
[安裝教程] Win10和Ubuntu16.04雙系統安裝詳解
準備材料:U盤(容量>8G)、UltraISO燒錄軟體、Ubuntu 16.04映象檔案(更新:根據讀者的反饋和筆者的親身體驗,Ubuntu16.04在使用安裝和使用的時候存在不穩定因素,所以推薦使用Ubuntu15或者Ubuntu14,安裝步驟如下不變)一、【Ubuntu系統空間準備】在Windows
Ubuntu16.04下同時安裝Anaconda2與Anaconda3
tps tools strong 安裝 a* 根據 tails environ 自動更新 轉自:http://blog.csdn.net/juezhanangle/article/details/78922888 由於編程時同時需要有python2/3的環境和大量的依賴包,
Ubuntu16.04 下如何安裝搜狗拼音輸入法【親測有效】
tor 有效 設置 添加 tro 如何 Go lin sta 一.添加fcitx鍵盤輸入法系統【系統默認是iBus】 1.將下載源添加至系統源: sudo add-apt-repository ppa:fcitx-team/nightly 2.更新系統列表獲得最新
ubuntu16.04下g++安裝及使用
log 安裝 blog vim clas nbsp -- sudo su apt 1)首先在虛擬機中安裝Ubuntu16.04,網絡模式設置為NAT模式,安裝完成後在虛擬機中測試是否能夠上網。 2)進入Ubuntu,按Ctrl+alt+T,調出終端,輸入sudo su,輸
ubuntu16.04下hive安裝與配置
cep ted dir mave value usr ubunt java HA 下載 wget http://mirrors.hust.edu.cn/apache/hive/hive-2.3.2/apache-hive-2.3.2-bin.tar.gz 解壓到指定
ubuntu16.04下docker安裝和簡單使用
purge 條件 service user amd rop pac pub bytes 前提條件 操作系統 docker-ce支持的ubuntu版本: Bionic 18.04 (LTS) Xenial 16.04 (LTS) Trusty 14.04 (LTS) 卸載
ubuntu16.04下TensorFlow安裝
ubuntu 16.04、Python 2.7 1、安裝pip sudo apt-get install python-pip python-dev 2、安裝TensorFlow sudo pip install --upgrade https://storage.googleapi
ubuntu16.04下go安裝
1、安裝go sudo apt-get install golang-go 2、設定go環境變數 export GOROOT=$HOME/go export PATH=$GOROOT/bin:$PATHU 3、新建一個檔案hello.go,在裡面寫入內容 package mai
機器視覺(一) : ubuntu16.04下ORBSLAM2安裝除錯
轉載:Ubuntu16.04+Ros+Usb攝像頭跑ORB SLAM2 又好久沒有碰部落格了,估計草都兩米高了,來鋤鋤草. - 2018.7.22 簡單列一下已有配置 Ubuntu 16.04 ROS Kinetic Opencv 3.4.1
Ubuntu16.04 下如何安裝和解除安裝Google Chrome
參考文章: https://www.aliyun.com/jiaocheng/141917.html https://blog.csdn.net/luohuiwu/article/details/80722075 安裝 1.將下載源新增到系統源中。 sudo wget https
Ubuntu16.04下 編譯安裝 Tensorflow
安裝bazel sudo ./bazel***.sh 輸入bazel version 檢查是否安裝。 編譯tensorflow 1)./configure 除了選擇支援cuda是y,其餘的都選擇n。 2) bazel build --config=opt //tensorflow:libtensor
ubuntu16.04下opencv安裝專欄,問題集錦,包括GPU加速
參考:https://blog.csdn.net/cocoaqin/article/details/78163171 參考:https://blog.csdn.net/cocoaqin/article/details/78376382?utm_source=debugrun&utm_me
平行計算(一)之Ubuntu16.04下MPICH安裝
安裝步驟如下: 1.下載。從mpi官網下載mpich版本,我下載的是mpich-3.2.1。 2.解壓。sudo tar -xzvf mpich-3.2.1.tar.gz,這時可以看到有mpich-3.2.1資料夾,然後cd mpich-3.2.1,進入該
ubuntu16.04下CMake安裝方法
檔案下載: sudo wget https://cmake.org/files/v3.9/cmake-3.9.1-Linux-x86_64.tar.gz 解壓: sudo tar zxvf cmake-3.9.1-Linux-x86_64.tar.gz
PCL1.8.0在Ubuntu16.04下的安裝及測試
1、安裝PCL之前,需要先安裝以下依賴項: sudo apt-get update sudo apt-get install git build-essential linux-libc-dev sudo apt-get install cmake cmake-gui
ubuntu16.04下解除安裝Anaconda,升級python為3.5,安裝pip3,安裝tensorflow==1.0.0
解除安裝Anaconda (一)刪除整個anaconda目錄: 由於Anaconda的安裝檔案都包含在一個目錄中,所以直接將該目錄刪除即可。到包含整個anaconda目錄的資料夾下,刪除整個Anaconda目錄: sudo rm -rf anaconda資料夾名 (二)建議
Ubuntu16.04下caffe2安裝-解決各種錯誤的過程
記錄一下裝了兩天的caffe21、Ubuntu預設為python2.7,首先需要把python環境切換到python3.5,依次執行如下命令:cd /usr/bin sudo rm python sudo ln -s python3.5m python輸入python命令,檢
[環境配置]Ubuntu16.04下編譯安裝gcc6.3.0
上一篇的SVS要用gcc6.3編譯,否則結果不正確,本來以為gcc很好裝,結果發現用apt-get安裝gcc6只能安裝6.5版本,程式碼作者奇特的要求只能用gcc6.3,沒辦法只能用原始碼裝了,期間碰見了各種各樣的問題,特此記錄。 1.環境要求 安裝gcc之前要安裝gmp,mpfr,mpc,isl這幾個庫
ubuntu16.04下OpenBLAS安裝步驟
安裝的步驟如下: (1)git clone git://github.com/xianyi/OpenBLAS (2)cd OpenBLAS (3)sudo make FC=gfortran (如果沒有安裝gfortran,執行sudo apt-get install