iOS開發 ----- 載入動畫之牛頓擺的實現
牛頓擺動畫
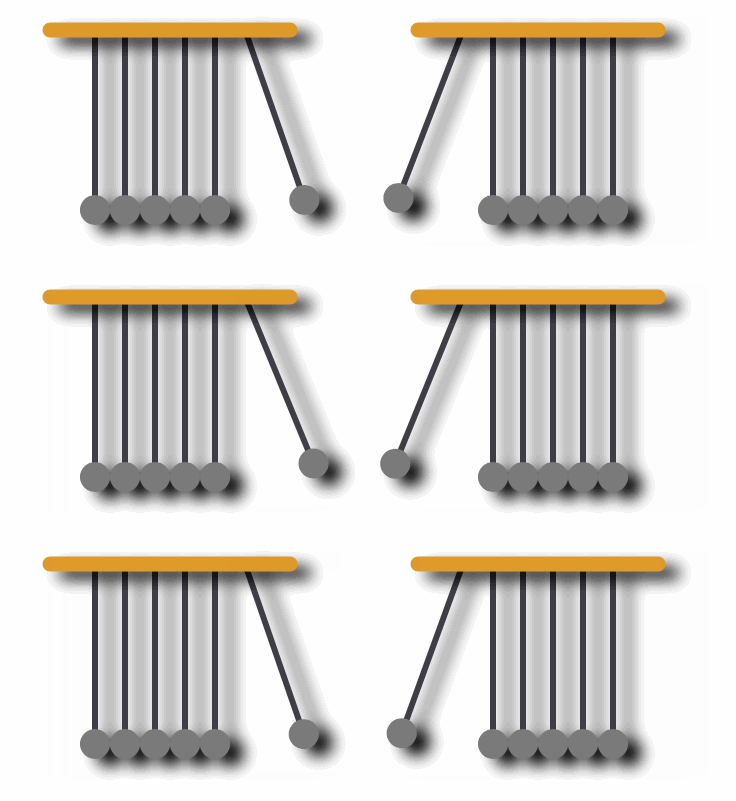
自己看動畫有一段時間了,但是還是不是很能理解其中的一些屬性方法之類的東西,琢磨了一下午寫了一個牛頓擺的動畫,這裡記錄一下,一遍以後檢視先上圖
先說下思路
說下牛頓擺的大致運動過程
根據牛頓擺的原理,中間是不動得,只有兩邊在動
兩邊運動是一個以這條線的上方位原點,長為半徑,然後做半圓運動
運動模式是先快後慢
當左邊的擺下來的時候,右邊的開始向上擺動,右邊的擺下來的時候,左邊的開始向上擺動,一直迴圈下去
這樣的話,我們用CAShapeLayer來進行畫圖,然後用CAAnimation來實現上述的運動過程
下邊說流程
- 整體用CAShaepLayer + CAAnimation實現上述效果
- 圖形全是畫出來
- 劃中間的四條線
- 劃下邊的四個圓
- 劃左邊的線
- 劃左邊的圓
- 劃右邊的線
- 劃右邊的圓
- 最後劃上邊的橫線
- 加陰影
- 做動畫
一步一來
1. 畫線
1.1 全域性變數
做成全域性變數,方便後邊使用
由於上邊的大橫線是不用動得,所以可以位區域性變數
還有一個問題就是,如果直接用
[self.layer subLayers]來取值的話,會取到多一些其他的layer,之前自己新增的layer是subLyaer的第一個,現在貌似是第三個,預設多了兩個,這個具體原因不詳,自己建立一個數組,來存放所有用到的layer,動畫結束後,移除他們動畫結束後,需要回調一個block來做一些事情,下邊會說到
//自身的寬高
CGFloat _height;
CGFloat _width;
//左邊的豎線,左邊的圓,左邊的旋轉路徑
CAShapeLayer * _leftLine;
CAShapeLayer * _leftCircle;
CGMutablePathRef _leftPath;
//右邊的豎線,右邊的圓,右邊的旋轉路徑
CAShapeLayer * _rightLine;
CAShapeLayer * _rightCircle;
CGMutablePathRef _rightPath;
//左邊的動畫 1.2 初始化
初始化寬,高,陣列
- (instancetype)initWithFrame:(CGRect)frame
{
    self = [super initWithFrame:frame];
    if (self) {

        //初始化
        _height = self.frame.size.height;
        _width = self.frame.size.width;

        _array = [[NSMutableArray alloc]init];


    }
    return self;
}
1.3 建立中間的四個橫線和圓
因為在初始化的時候設定的寬高都是100,所以,迴圈建立中間者四個檢視,使他們的位置依次排列,然後放在中間
然後新增到self.layer上
同樣也新增到陣列中
至於怎麼算,額..數學不太好,自己琢磨琢磨把
-(void)creatLayer
{
    for (int i = 0; i < 6; i++) {

        if (i >=1 && i<=4 )
        {
            CAShapeLayer * layer = [self creatFourLineX:i*10+25 andY:10];
            CAShapeLayer * layer2 = [self creatRoundLayerX:i*10+25 andY:70];
            [self.layer addSublayer:layer];
            [self.layer addSublayer:layer2];
            [_array addObject:layer];
            [_array addObject:layer2];
        }


    }
}
1.4 建立四個線
-(CAShapeLayer *)creatFourLineX:(CGFloat)x andY:(CGFloat)y
{
    CAShapeLayer * layer = [CAShapeLayer layer];
    //首先,根據傳遞過來的引數,佈局,然後設定寬位2 高為70
    layer.frame = CGRectMake(x, y, 2, 70);
    //建立路徑
    CGMutablePathRef path = CGPathCreateMutable();
    //移動到 (0,0)的位置
    CGPathMoveToPoint(path, nil, 0, 0);
    //然後話一條60長度的線
    CGPathAddLineToPoint(path, nil, 0, 60);
    //設定layer的路徑位劃的路徑
    layer.path = path;
    //填充顏色,這裡的顏色要轉化位CGColor
    layer.strokeColor = [UIColor colorWithRed:0.188  green:0.188  blue:0.216 alpha:1].CGColor;
    //設定線寬
    layer.lineWidth = 2;
    //設定lineCape(不知道怎麼說了)就是那個線的端點的樣式,這裡是圓形,
    layer.lineCap = kCALineCapRound;
    //然後設定下陰影
    [self setShadow:layer];
    //返回layer
    return layer;
}
1.5 建立四個圓
-(CAShapeLayer *)creatRoundLayerX:(CGFloat)x andY:(CGFloat)y
{
    CAShapeLayer * layer = [CAShapeLayer layer];
    //設定位置,我們的圓是半徑位5的圓,所以寬度是10就夠了
    layer.frame = CGRectMake(x, y, 10, 10);

    //然後繪製路徑
    CGMutablePathRef path = CGPathCreateMutable();
    //引數依次是
    //1. 路徑
    //2. 變換
    //3. 圓心的x
    //4. 圓心的y
    //5. 起始角度
    //6. 結束角度
    //7. 是否順時針
    //關於這個,大家自己體會下就知道,畫圖嘛,畫出來什麼樣子看看是最清楚的
    CGPathAddArc(path, nil, 0, 0, 5, 0, M_PI*2, YES);
    //然後設定路徑
    layer.path = path;

    //然後填充顏色,這裡和上邊的`layer.strokeColor`不一樣,上邊的`layer.strokeColor`這是是邊框的顏色,也就數畫筆的顏色
    //而這個`layer.fillColor`則是填充的顏色

    layer.fillColor = [UIColor colorWithRed:0.404  green:0.404  blue:0.404 alpha:1].CGColor;
    //然後設定下陰影
    [self setShadow:layer];

    return layer;
}
1.6 畫左邊的線
這裡大致說下
anchorPoint這個是錨點,所謂錨點就是類似你把一張紙,用圖釘固定在了牆上,當不太緊的時候,紙是可以旋轉的,旋轉的中心就是錨點錨點和
position都可以改變這個layer的位置,具體細節大家可以去這裡檢視由於我們在動畫的時候,會對左邊的線進行旋轉,而且是圍繞者頂部開始旋轉的,所以我們把錨點設為(0,0),這樣的話,我們旋轉的時候,就以(0,0)為中心點,進行旋轉
根據位置不同,我們這是了position的anchorPoint,然後和上邊一樣,畫一條60長的線,同樣設定一下相關的屬性
-(void)creatLeftLine
{

    _leftLine = [CAShapeLayer layer];
    _leftLine.frame = CGRectMake(25, 10, 100, 100);

    _leftLine.position = CGPointMake(25, 10);
    _leftLine.anchorPoint = CGPointMake(0,0);
    CGMutablePathRef path = CGPathCreateMutable();
    CGPathMoveToPoint(path, nil, 0, 0);
    CGPathAddLineToPoint(path, nil, 0, 60);
    _leftLine.strokeColor = [UIColor colorWithRed:0.188  green:0.188  blue:0.216 alpha:1].CGColor;
    _leftLine.lineWidth = 2;
    _leftLine.lineCap = kCALineCapRound;
    _leftLine.path = path;
    [self setShadow:_leftLine];
    [self.layer addSublayer:_leftLine];
    [_array addObject:_leftLine];


}
1.7 畫左邊的圓
和上邊類似,我們也要畫一個圓,這裡我們設定一下frame和position,使我們的圓的中心,就線上的下邊,這樣的話,我們在做動畫的時候,從視覺效果來說,是一起的
→_→ 其實是兩個
-(void)creatLeftRound
{


    _leftCircle = [CAShapeLayer layer];
    _leftCircle.position = CGPointMake(25, 70);
    _leftCircle.frame = CGRectMake(20, 65, 10, 10);
    CGMutablePathRef path = CGPathCreateMutable();

    CGPathAddArc(path, nil, 5, 5, 5, 0, M_PI*2, YES);

    _leftCircle.path = path;
    _leftCircle.fillColor = [UIColor colorWithRed:0.404  green:0.404  blue:0.404 alpha:1].CGColor;
    [self setShadow:_leftCircle];


    [self.layer addSublayer:_leftCircle];
    [_array addObject:_leftCircle];


}
1.8 畫右邊的線
同樣和上邊類似,要圍繞上邊進行旋轉,所以,要設定下錨點,然後和相關屬性
錨點很重要,錨點很重要,錨點很重要,重要的事要說三遍,說三遍,三遍,遍
-(void)creatRightLine
{

    _rightLine = [CAShapeLayer layer];
    _rightLine.frame = CGRectMake(75, 10, 100, 100);

    _rightLine.position = CGPointMake(75, 10);
    _rightLine.anchorPoint = CGPointMake(0,0);
    CGMutablePathRef path = CGPathCreateMutable();
    CGPathMoveToPoint(path, nil, 0, 0);
    CGPathAddLineToPoint(path, nil, 0, 60);
    _rightLine.strokeColor = [UIColor colorWithRed:0.188  green:0.188  blue:0.216 alpha:1].CGColor;
    _rightLine.lineWidth = 2;
    _rightLine.lineCap = kCALineCapRound;
    _rightLine.path = path;
    [self setShadow:_rightLine];
    [self.layer addSublayer:_rightLine];
    [_array addObject:_rightLine];


}
1.9 畫右邊的圓
和上邊是一樣的,要是再多的話,我就封裝啦,別逼我發自拍
-(void)creatRightRound
{

    _rightCircle = [CAShapeLayer layer];
    _rightCircle.position = CGPointMake(75, 70);
    _rightCircle.frame = CGRectMake(70, 65, 10, 10);

    CGMutablePathRef path = CGPathCreateMutable();

    CGPathAddArc(path, nil, 5, 5, 5, 0, M_PI*2, YES);

    _rightCircle.path = path;
    _rightCircle.fillColor = [UIColor colorWithRed:0.404  green:0.404  blue:0.404 alpha:1].CGColor;

    [self setShadow:_rightCircle];
    [self.layer addSublayer:_rightCircle];
    [_array addObject:_rightCircle];


}
1.10 設定陰影
呼叫了這麼多次,終於出現了,設定下圓角,陰影的顏色,偏移量和 … 這個不知道怎麼說,自己體會一下吧
-(void)setShadow:(CALayer *)layer
{
    layer.cornerRadius = 5;
    layer.shadowColor = [UIColor blackColor].CGColor;
    layer.shadowOffset = CGSizeMake(5, 3);
    layer.shadowOpacity = 3.0f;
}
1.11 畫最上邊的線
類似,類似,類似 →_→
-(void)reatTopLineLayer
{
    CAShapeLayer * topLine = [CAShapeLayer layer];


    CGMutablePathRef path = CGPathCreateMutable();

    CGPathMoveToPoint(path, nil, 10, 10);
    CGPathAddLineToPoint(path, nil, 90, 10);
    topLine.path = path;
    topLine.strokeColor = [UIColor colorWithRed:0.831  green:0.529  blue:0.086 alpha:1].CGColor;
    topLine.lineWidth = 5;
    topLine.lineCap = kCALineCapRound;
    [self setShadow:topLine];
    [self.layer addSublayer:topLine];
    [_array addObject:topLine];

}
!!!!!終於,終於畫完了,封裝,封裝,不然會累死
2 開始動畫
2.1 左邊的動畫
終於開始動畫了,先來大致說一下,CAAnimation中,有CABasicAnimation,有CAKeyframeAnimation,還有CAGroupAnimation
一般這幾個夠用了,他們都有
keyPath屬性當是在看的時候,發現這是個字串物件,尼瑪,字串,我知道這是個毛啊,網上扒了幾篇部落格,也沒發現什麼規律
後來,後來,終於得到了一本祕籍,可以拯救世界的祕籍,然後我就基本上知道了這貨應該怎麼填
其實在CAAnimation,幾乎所有的屬性都是可以動畫的,位置,顏色,等等,都可以改變,想怎麼動,動什麼屬性,就寫什麼屬性
比如這裡的左邊的線,我們要旋轉,Z 軸的旋轉,那就寫唄
transform.rotation.z,嗯,就是這貨然後就是持續時間,這裡是0.4s
旋轉的角度呢,這裡有fromeValue和toValue,開始,結束,想怎麼寫,怎麼寫
這裡從0轉到到,π/8的位置, π是180°,π/2是90° π/4是45°,π/8是 22.5°,嗯,體育老師教的數學看來還夠用
_leftBaseAnimation.timingFunction這個貨是設定運動的模式的,是先快後慢,還是先慢後快,還是一開始慢後來加速,然後在減速…這個曲線可以自定義這裡用系統的,因為是向上擺動,所以一開始比較快,然後減速到0
然後
_leftBaseAnimation.autoreverses這個是設定是否完成動畫後反向在執行一遍,我們還要回來啊,妥妥的YES
_leftBaseAnimation.fillMod這個無所謂了,我們最終還要回到起點然後就是把這個動畫新增到_leftLine上 ,後邊的key可以不設定,不影響
-(void)leftAnimation
{

    //leftLine

    _leftBaseAnimation = [CABasicAnimation animation];
    _leftBaseAnimation.keyPath = @"transform.rotation.z";
    _leftBaseAnimation.duration = 0.4;
    _leftBaseAnimation.fromValue = [NSNumber numberWithFloat:0];
    _leftBaseAnimation.toValue = [NSNumber numberWithFloat:M_PI_4/2];
    _leftBaseAnimation.timingFunction =[CAMediaTimingFunction functionWithName: kCAMediaTimingFunctionEaseOut];
    _leftBaseAnimation.autoreverses = YES;
    _leftBaseAnimation.delegate = self;
    _leftBaseAnimation.fillMode = kCAFillModeForwards;
    [_leftLine addAnimation:_leftBaseAnimation forKey:@"leftBaseAnimation"];


    //leftCircle

    //因為這裡要使圓球,按照一個曲線與運動, CAKeyframeAnimation正好滿足我們的需求
    //先建立一個路徑,畫一個22.5°的圓弧
    _leftPath = CGPathCreateMutable();
    CGPathAddArc(_leftPath, nil, 25, 10, 60, M_PI_2,M_PI_2+M_PI_4/2, NO);
    _leftKeyframeAnimation = [CAKeyframeAnimation animation];
    //自己本身要運動,所以肯定是position了,還記得上邊設定的時候,position的位置要設為豎線的一端,這就是原因,這樣才能按照曲線運動,
    _leftKeyframeAnimation.keyPath = @"position";
    //計算模式,可以不寫,對我們的動畫沒有影響
    _leftKeyframeAnimation.calculationMode = kCAAnimationCubic;
    //設定動畫的路徑,然後小球就會跟著動
    _leftKeyframeAnimation.path = _leftPath;
    //持續時間是0.4s
    _leftKeyframeAnimation.duration = 0.4f;
    //運動模式,先快後慢
    _leftKeyframeAnimation.timingFunction = [CAMediaTimingFunction functionWithName:kCAMediaTimingFunctionEaseOut];
    //結束之後,在反過來繼續執行
    _leftKeyframeAnimation.autoreverses = YES;
    //基本沒什麼卵用
    _leftKeyframeAnimation.fillMode = kCAFillModeForwards;
    //設定代理,監聽動畫結束
    _leftKeyframeAnimation.delegate = self;
    //這裡設定一下value方便動畫結束之後可以檢測到,是這個動畫
    [_leftKeyframeAnimation setValue:@"left" forKey:@"left"];
    //新增動畫
    [_leftCircle addAnimation:_leftKeyframeAnimation forKey:@"leftKeyframeAnimation"];


}
2.2 右邊的動畫
基本上是一樣的,就是旋轉的角度不一樣,一個向左,一個向右,參照上邊的註釋即可
-(void)rightAnimation
{

    //RightLine

    _rightBaseAnimation = [CABasicAnimation animation];
    _rightBaseAnimation.keyPath = @"transform.rotation.z";
    _rightBaseAnimation.duration = 0.4;
    _rightBaseAnimation.fromValue = [NSNumber numberWithFloat:0];
    _rightBaseAnimation.toValue = [NSNumber numberWithFloat:-M_PI_4/2];
    _rightBaseAnimation.timingFunction =[CAMediaTimingFunction functionWithName: kCAMediaTimingFunctionEaseOut];
    _rightBaseAnimation.autoreverses = YES;
    _rightBaseAnimation.fillMode = kCAFillModeForwards;
    _rightBaseAnimation.delegate = self;
    [_rightLine addAnimation:_rightBaseAnimation forKey:@"rightBaseAnimation"];


    //RightCircle

    _rightPath = CGPathCreateMutable();
    CGPathAddArc(_rightPath, nil, 75, 10, 60, M_PI_2,M_PI_2-M_PI_4/2, YES);
    _rightKeyframeAnimation = [CAKeyframeAnimation animation];
    _rightKeyframeAnimation.keyPath = @"position";
    _rightKeyframeAnimation.calculationMode = kCAAnimationCubic;
    _rightKeyframeAnimation.path = _rightPath;
    _rightKeyframeAnimation.duration = 0.4f;
    _rightKeyframeAnimation.timingFunction = [CAMediaTimingFunction functionWithName:kCAMediaTimingFunctionEaseOut];
    _rightKeyframeAnimation.autoreverses = YES;
    _rightKeyframeAnimation.fillMode = kCAFillModeForwards;
    _rightKeyframeAnimation.delegate = self;
    [_rightKeyframeAnimation setValue:@"right" forKey:@"right"];
    [_rightCircle addAnimation:_rightKeyframeAnimation forKey:@"rightKeyframeAnimation"];
}
3. 控制動畫的執行
大致流程是這樣的
- 我們應該這樣處理動畫
- 先開始左邊的動畫
- 左邊的動畫完成之後,也就是擺上去之後,在擺下來
- 開始右邊的動畫
- 右邊的動畫擺上去,在擺下來之後
- 在開始左邊的動畫
3.1 現在在.h檔案中寫兩個方法
一個開始動畫,一個結束動畫
名字寫的不好,隨便吧
#import <UIKit/UIKit.h>

@interface LoaddingAnimation : UIView


-(void)showAnimation;

-(void)hideAnimation;

@end
3.2 開始動畫
我們在開始動畫的方法中,建立所有必須得layer,然後開始做動畫
還記得我們一開始的時候,定義的那個block麼,現在就要排上用場了
我們會這麼做,一開始就是一個空白的檢視,我們呼叫showAnimation的時候,建立,然後開始動畫
結束的時候,我們把所有layer全部移除
-(void)showAnimation
{


    [self creatLeftLine];
    [self creatLeftRound];
    [self creatLayer];

    [self creatRightLine];
    [self creatRightRound];
    [self reatTopLineLayer];

    [self leftAnimation];


    //為了防止Block中迴圈引用,我們要這麼處理

    //    [_rightKeyframeAnimation setValue:@"right" forKey:@"right"];
     //    [_leftKeyframeAnimation setValue:@"left" forKey:@"left"];
     //還記得我們上邊這兩句麼,這樣的話,我們就可以監聽到到底是那個動畫完成了
     //因為我們是在動畫結束之後呼叫的,所以按照上邊的邏輯,我們就在檢測到左邊完成的時候
     //讓右邊去動畫
     //同樣,右邊完成之後,讓左邊去動畫
    __weak LoaddingAnimation * load = self;

    animationFinishBlock = ^(CAAnimation * animation){

        if ([[animation valueForKey:@"left"] isEqualToString:@"left"]) {
                //檢測到左邊結束後,開始右邊的動畫
            [load rightAnimation];
        }else if([[animation valueForKey:@"right"] isEqualToString:@"right"])
        {
                //檢測到右邊動畫的時候,開始左邊的動畫
            [load leftAnimation];
        }
    };

}
3.3 結束動畫
當結束動畫的時候,block什麼都不幹
還記得我們一開始宣告的陣列麼,我們把所有的layer都新增進去了
現在我們就可以在動畫結束之後,把他們移除了
-(void)hideAnimation
{
    NSLog(@"結束動畫");

    animationFinishBlock = ^(CAAnimation * animation){


    };

    for (CALayer * layer in _array) {

        [layer removeFromSuperlayer];
    }


}
3.4 動畫結束的代理方法
-(void)animationDidStop:(CAAnimation *)anim finished:(BOOL)flag
{


    animationFinishBlock(anim);


}
動畫結束後,我們呼叫這個block就行了,其實相當於下邊的兩種情況
3.4.1 顯示動畫的時候
-(void)animationDidStop:(CAAnimation *)anim finished:(BOOL)flag
{


     if ([[anim valueForKey:@"left"] isEqualToString:@"left"]) {

            [load rightAnimation];
        }else if([[anim valueForKey:@"right"] isEqualToString:@"right"])
        {
            [load leftAnimation];
        }


}
3.4.2 隱藏動畫的時候
-(void)animationDidStop:(CAAnimation *)anim finished:(BOOL)flag
{


}
