
CentOS7安裝iptables防火牆(禁用/停止自帶的firewalld服務)
使用背景:
1,CentOS7 預設的防火牆 不是iptables, 而是firewalle.
2,一些軟體的埠號要放開來提供服務,如:22,80等常用埠
3,提供web服務的需要
使用步驟:
一,安裝centos7,自行百度
三,CentOS7安裝iptables防火牆:
0,CentOS7預設的防火牆不是iptables,而是firewalle.
檢視: 開啟/etc/sysconfig/目錄後,並未發現iptables文件(可能會有iptables-config文件等,別混淆了)
1, 安裝 iptable 與 iptable-service
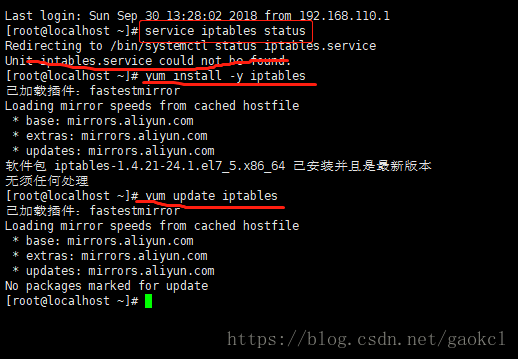
#先檢查是否安裝了iptables
[[email protected] ~]# service iptables status
#安裝iptables
[[email protected] ~]# yum install -y iptables #通常情況下是安裝好了的
#升級iptables
[
#安裝iptables-services
[[email protected] ~]# yum install iptables-services #通常情況下沒有安裝
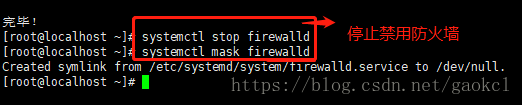
2,禁用/停止自帶的firewalld服務
#停止firewalld服務
[[email protected] ~]# systemctl stop firewalld
#禁用firewalld服務
[
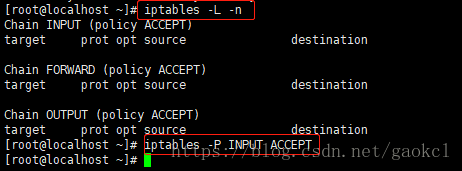
#檢視iptables現有規則
[[email protected] ~]# iptables -L -n
#先允許所有,不然有可能會杯具
[[email protected] ~]# iptables -P INPUT ACCEPT
[[email protected] ~]# systemctl enable iptables.service # 設定防火牆開機啟動

--------------------- 啟動/關閉/重啟 iptables ------------------------------------
[[email protected] ~]# systemctl stop iptables
[[email protected] ~]# systemctl start iptables
[[email protected] ~]# systemctl restart iptables
--------------------------------------------------------------------------------------------
# @1,手動新增埠號 (方法一)
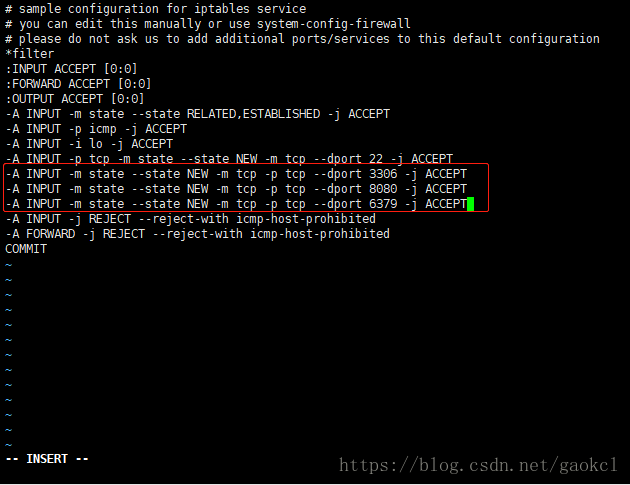
[[email protected] ~]# vi /etc/sysconfig/iptables #配置防火牆埠
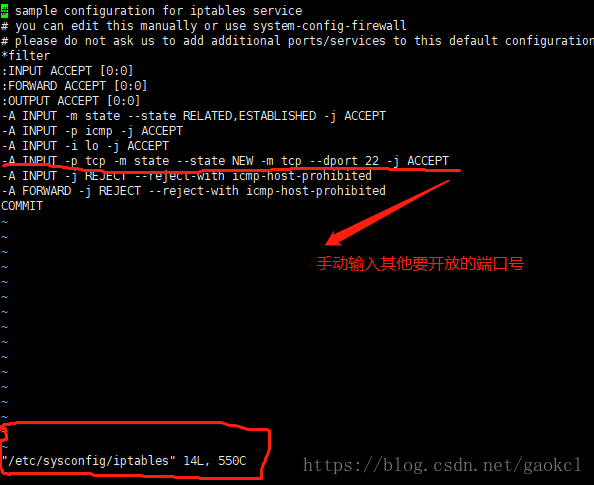
-A INPUT -m state --state NEW -m tcp -p tcp --dport 3306 -j ACCEPT
-A INPUT -m state --state NEW -m tcp -p tcp --dport 8080 -j ACCEPT
-A INPUT -m state --state NEW -m tcp -p tcp --dport 6379 -j ACCEPT
[[email protected] ~]# service iptables save #儲存防火牆配置
--end
################################### 具體配置說明 ######################################
@ 2,命令 新增埠號 ( 方法二 ):
一,安裝iptable iptable-service
1,先檢查是否安裝了iptables
[[email protected] ~]# service iptables status
2,安裝iptables
[[email protected] ~]# yum install -y iptables
3,升級iptables
[[email protected] ~]# yum update iptables
4,安裝iptables-services
[[email protected] ~]# yum install iptables-services
二,禁用/停止自帶的firewalld服務
1,停止firewalld服務
[[email protected] ~]# systemctl stop firewalld
2,禁用firewalld服務
[[email protected] ~]# systemctl mask firewalld
三,設定現有規則
  #檢視iptables現有規則
  [[email protected] ~]# iptables -L -n

  #先允許所有,不然有可能會杯具
  [[email protected] ~]# iptables -P INPUT ACCEPT

  #清空所有預設規則
  [[email protected] ~]# iptables -F

  #清空所有自定義規則
  [[email protected] ~]# iptables -X

  #所有計數器歸0
  [[email protected] ~]# iptables -Z

  #允許來自於lo介面的資料包(本地訪問)
  [[email protected] ~]# iptables -A INPUT -i lo -j ACCEPT

  #開放22埠
  iptables -A INPUT -p tcp --dport 22 -j ACCEPT

  #開放21埠(FTP)
  iptables -A INPUT -p tcp --dport 21 -j ACCEPT

  #開放80埠(HTTP)
  iptables -A INPUT -p tcp --dport 80 -j ACCEPT

  #開放443埠(HTTPS)
  iptables -A INPUT -p tcp --dport 443 -j ACCEPT

  ...

   ====>  按照實際要求:是否加下面的:
  -------------------------------------------------------------------

  #允許ping
  iptables -A INPUT -p icmp --icmp-type 8 -j ACCEPT

  #允許接受本機請求之後的返回資料 RELATED,是為FTP設定的
  iptables -A INPUT -m state --state  RELATED,ESTABLISHED -j ACCEPT

  #其他入站一律丟棄
  iptables -P INPUT DROP

  #所有出站一律綠燈
  iptables -P OUTPUT ACCEPT

  #所有轉發一律丟棄
  iptables -P FORWARD DROP

   -------------------------------------------------------------------
四,其他規則設定
 #如果要新增內網ip信任(接受其所有TCP請求)
 iptables -A INPUT -p tcp -s 45.96.174.68 -j ACCEPT

 #過濾所有非以上規則的請求
 iptables -P INPUT DROP

 #要封停一個IP,使用下面這條命令:
 iptables -I INPUT -s ***.***.***.*** -j DROP

 #要解封一個IP,使用下面這條命令:
 iptables -D INPUT -s ***.***.***.*** -j DROP
五,儲存規則設定
#儲存上述規則
service iptables save
六,開啟iptables服務
#註冊iptables服務
#相當於以前的chkconfig iptables on
systemctl enable iptables.service

#開啟服務
systemctl start iptables.service

#檢視狀態
systemctl status iptables.service
----------------------------------------------------------------------------------------------------
問題
-----------------------------------------------------------------------------------------------------
問題:解決vsftpd在iptables開啟後,無法使用被動模式的問題
1.首先在/etc/sysconfig/iptables-config中修改或者新增以下內容
#新增以下內容,注意順序不能調換

IPTABLES_MODULES="ip_conntrack_ftp"

IPTABLES_MODULES="ip_nat_ftp"
2.重新設定iptables設定
iptables -A INPUT -m state --state RELATED,ESTABLISHED -j ACCEPT
以下為完整設定指令碼
#!/bin/sh
iptables -P INPUT ACCEPT
iptables -F
iptables -X
iptables -Z
iptables -A INPUT -i lo -j ACCEPT
iptables -A INPUT -p tcp --dport 22 -j ACCEPT
iptables -A INPUT -p tcp --dport 21 -j ACCEPT
iptables -A INPUT -p tcp --dport 80 -j ACCEPT
iptables -A INPUT -p tcp --dport 443 -j ACCEPT
iptables -A INPUT -p icmp --icmp-type 8 -j ACCEPT
iptables -A INPUT -m state --state RELATED,ESTABLISHED -j ACCEPT
iptables -P INPUT DROP
iptables -P OUTPUT ACCEPT
iptables -P FORWARD DROP
service iptables save
systemctl restart iptables.service
CentOS7
[[email protected] ~]# cat /etc/redhat-release # 檢視centos版本
CentOS Linux release 7.2.1511 (Core)1.關閉firewall
[[email protected] ~]# systemctl stop firewalld.service # 停止firewall
[[email protected] ~]# systemctl disable firewalld.service # 禁止firewall開機啟動2.安裝iptables
[[email protected] ~]# yum install iptables-services # 安裝
[[email protected] ~]# systemctl restart iptables.service # 重啟防火牆使配置生效
[[email protected] ~]# systemctl enable iptables.service # 設定防火牆開機啟動
[[email protected] ~]# systemctl disable iptables.service # 禁止防火牆開機啟動
CentOS6
[[email protected] ~]# service iptable status --檢視防火牆狀態
[[email protected] ~]# servcie iptables stop --臨時關閉防火牆
[[email protected] ~]# service iptables start --臨時啟動防火牆
[[email protected] ~]# service iptables restart --重啟防火牆
[[email protected] ~]# chkconfig iptables off --永久關閉防火牆
[[email protected] ~]# chkconfig iptables on --永久開啟防火牆
相關推薦
CentOS7安裝iptables防火牆(禁用/停止自帶的firewalld服務)
使用背景: 1,CentOS7 預設的防火牆 不是iptables, 而是firewalle. 2,一些軟體的埠號要放開來提供服務,如:22,80等常用埠 3,提供web服務的需要 使用步驟: 一,安裝centos7,自行百度 三,CentOS7安裝ipt
CentOS7安裝iptables防火牆
CentOS7預設的防火牆不是iptables,而是firewalle. 1、安裝iptable iptable-service #先檢查是否安裝了iptables service iptables status #安裝iptables yum install -y ip
ubuntu下安裝python3.5(系統預設自帶的是python2.7)
正常情況下你的ubuntu系統是已經自帶了python的,不過自帶的版本是2.7的,而現在的Python3.5和2.7其實已經非常不同了,作為開發學習的話還是新版本的Python3.5吧。下面是安裝過
Caffe視覺化(一):網路結構視覺化(用Caffe自帶程式實現)
Caffe視覺化(一):網路結構視覺化(用Caffe自帶程式實現) 本文記錄瞭如何利用Caffe自帶的程式實現網路的視覺化,包括可能遇到的問題和解決方案。更新於2018.10.25。 文章目錄 Caffe視覺化(一):網路結構視覺化(用Caffe自帶程式實現
ZOJ 3963 Heap Partition(multiset + stl自帶二分 + 貪心)題解
題意:給你n個數字s1~sn,要你把它們組成一棵棵二叉樹,對這棵二叉樹來說,所有節點來自S,並且父節點si<=子節點sj,並且i<j,問你樹最少幾棵二叉數、樹 思路:貪心。我們往multiset加還能加子節點的節點,二分查詢一個個大於等於當前插入節點的節點,然後插入,若找不到則重新建一棵樹。
【Unity】實現“擠開”效果(不使用自帶物理引擎)【改】
今天發現被撞擊的小球移動有些生硬,所以改了一下被撞擊之後小球的移動方式。 using System.Collections; using System.Collections.Generic; using UnityEngine; public class Player : MonoB
【Unity】實現“擠開”效果(不使用自帶物理引擎)
using System.Collections; using System.Collections.Generic; using UnityEngine; using UnityEngine.UI; public class Player : MonoBehaviour { //
Kafka叢集搭建(使用kafka自帶的zookeeper)
Kafka叢集搭建 本文使用的zookeeper是kafka自帶的,最好不要用kafka自帶的,可以先搭建好zookeeper叢集 1、 Kafka的安裝需要java環境,cent os 7自帶java1.6版本,可以不用重新安裝,直接使用自帶的jdk 即可;如果覺得
Android監聽軟鍵盤開啟收起事件(軟鍵盤自帶收起按鈕)
最近在公司開發cocos2dx上的Android輸入框控制元件,遇到軟鍵盤的事件監聽,通常軟鍵盤的收起方式大致3種: 1.點選軟鍵盤右下角的Return按鈕(系統收起) 2.輸入框焦點時按返回按鈕(系統收起) 3.點選軟鍵盤和輸入框的外部(自發收起) 4.點選軟
centos7下安裝docker(17docker監控---docker自帶監控命令)
img 數據 spa 查看 監控 pan top 可用 mage Docker自帶的監控子命令 1.docker ps;docker ps -a這是我們常用的查看容器狀態的命令 docker container ls和docker ps的功能一樣 2.docker to
CentOS7安裝redis,並設定開機自啟動(Redis安裝、Redis自啟動、Redis設定開機自啟動)
1、下載 redis https://redis.io/download 2、解壓安裝 tar -zxvf redis-3.2.9.tar.gzcd redis-3.2.9makemak
CentOS7安裝詳解(自定義安裝)
本文基於vmware workstations進行CentOS7安裝過程展示,關於vmware workstations安裝配置本人這裡不再介紹,基本過程相當於windows下安裝個軟體而已。 1、開啟vmware workstations,檔案->新建虛擬機器,出現如下介面,選擇“自定義(高階)”選項
centos7 安裝pptp vpn(使用iptbales防火墻)
centos7 pptpd iptables一.系統設置關閉selinux[[email protected] system]# cat /etc/selinux/config SELINUX=disabled檢查是否支持[[email protected] system]# modpro
Centos7安裝iptables防火墻
centos7安裝iptables防火墻安裝iptable iptable-service#先檢查是否安裝了iptables service iptables status #安裝iptables yum install -y iptables #升級iptables yum update
centos7安裝配置apache(httpd)
centos7安裝配置apache(ht安裝: yum -y install httpd 支持目錄索引:a. 首頁索引:vim /etc/httpd/conf.d/welcome.confb. 自定義索引樣式:vim /etc/httpd/conf/httpd.conf 支持php: 開啟pathin
centos7安裝配置coreseek(sphinx)
centos7安裝配置coreseek(安裝依賴: yum -y install make gcc gcc-c++ libtool autoconf automake imake mariadb mariadb-server mariadb-devel libxml2-devel ex
CentOS7 安裝mysql8.0(YUM方式)
show 5.7 nbsp mysql8 連接 技術分享 註意 alter 源安裝 1.下載mysql源安裝包 shell> wget http://dev.mysql.com/get/mysql80-community-release-el7-1.noarch.
Centos7安裝部署Kubernetes(K8s)集群
signed node use ots 新的 b- 分區 str ext Kubernetes集群的安裝有多種方式:下載源碼包編譯安裝、下載編譯好的二進制包安裝、使用kubeadm工具安裝等。本文是以二進制文件方式安裝Kubernetes集群。系統環境 主機名 IP地
阿里雲 centos7 系統下 外網kafka(用自帶的zookeeper) 搭建筆記
kafka 下載 http://kafka.apache.org/downloads 你可以選擇 用xshell 來安裝檔案上傳外掛 在xshell 中執行命令 yum install lrzsz -y 然後進入放你kakfa的目錄 我k
阿里雲Centos7 安裝 k8s 叢集(使用過程中的坑)
個人備忘 下面這個地址能滿足大部分需求 : 上文:5.2 的配置三臺伺服器都要修改 ,5.3 的命令 [[email protected] ~]# etcdctl mk /atomic.io/network/config '{ "Network": "1