
CEPH CRUSH 演算法原始碼分析 原文CEPH CRUSH algorithm source code analysis
文章比較深入的寫了CRUSH演算法的原理和過程.通過除錯深入的介紹了CRUSH計算的過程.文章中添加了些內容.
寫在前面
讀本文前,你需要對ceph的基本操作,pool和CRUSH map非常熟悉.並且較深入的讀過原始碼.
分析的方法
首先,我們寫了個c程式呼叫librados向pool中寫入一個物件.然後使用 GDB(CGDB is recommended)來追蹤CRUSH的執行過程.同時我們將會關注CRUSH相關的幾個重要變數.以便於我們完全知道CRUSH原始碼是如何執行.
目錄
- 如何追蹤
- 編譯CEPH
- 得到函式stack
- 追蹤過程
- input —> PGID
- PGID —> OSD set
1 如何追蹤
1.1 編譯CEPH
首先通過原始碼安裝CEPH,然後使用./configure.如下新增編譯引數/configure CFLAGS='-g3 –O0' CXXFLAGS='-g3 –O0'
-g3 意味著會產生大量的除錯資訊.-O0 非常重要, 它意味著關閉編譯器的優化,如果沒有,使用GDB追蹤程式時,大多數變數被優化,無法顯示。配置後,make and sudo make install。附: -O0只適合用於實驗情況,在生產環境中編譯器優化是必須進行的。
1.2 得到函式stack
眾所周知,CRSUSH的核心函式是 crush_do_rule
/**
* crush_do_rule - calculate a mapping with the given input and rule
* @map: the crush_map
* @ruleno: the rule id
* @x: hash input
* @result: pointer to result vector
* @result_max: maximum result size
* @weight: weight vector (for map leaves)
* @weight_max: size of weight vector
* @scratch 通過這個函式將crush計算過程分為兩部分:
1. input -> PGID
2. PGID -> OSD set.
第一部分,使用GDB來得到函式過程
- 通過
-g引數來編譯例子程式 - gdb來參看
rados_write - 然後,在新增斷點
b crush_do_rule前,進入GDB的介面. - 在函式
crush_do_rule處停留 - 得到函式stack,然後使用GDB log將除錯資訊輸出到檔案中 .
下面讓我們來深入的研究這個過程.
函式stack和下面的相似
#12 main
#11 rados_write
#10 librados::IoCtxImpl::write
#9 librados::IoCtxImpl::operate
#8 Objecter::op_submit
#7 Objecter::_op_submit_with_budget
#6 Objecter::_op_submit
#5 Objecter::_calc_target
#4 OSDMap::pg_to_up_acting_osds
#3 OSDMap::_pg_to_up_acting_osds
#2 OSDMap::_pg_to_osds
#1 CrushWrapper::do_rule
#0 crush_do_rule
追蹤過程
CRUSH 計算過程總結如下:
INPUT(object name & pool name) —> PGID —> OSD set.本文中主要關注 計算過程
2.1 input —> PGID
你可以按順序閱讀原始碼.最後,通過列出轉換關鍵過程
從input 到 pgid
Ceph_hash.h (include):
extern unsigned ceph_str_hash(int type, const char *s, unsigned len);OSDMap.h (osd): int ret = object_locator_to_pg(oid, loc, pg);首先從 rados_ioctx_create, 和lookup_pool 通過pool名字得到 poolid. 把poolid封裝進librados::IoCtxImpl 型別變數ctx;
然後在rados_write 物件名被封裝進oid; 然後在librados::IoCtxImpl::operate, oid 和oloc(comprising poolid) 被包裝成Objecter::Op * 型別變數objecter_op;
通過各種型別的封裝我們到到 _calc_target 這層. 我們得到不斷的oid 和poolid. 然後讀取目標 pool 的資訊.


(in my cluster, pool “neo” id is 29, name of object to write is “neo-obj”)
在object_locator_to_pg, 第一次計算從ceph_str_hash 雜湊物件名字成為一個uint32_t 型別變數,也就是所謂的 ps (placement seed)
unsigned int ceph_str_hash(int type, const char *s, unsigned int len)
 {
        switch (type) {
         case CEPH_STR_HASH_LINUX:
                 return ceph_str_hash_linux(s, len);
         case CEPH_STR_HASH_RJENKINS:
                 return ceph_str_hash_rjenkins(s, len);
         default:
                return -1;
        }
 }
然後得到 PGID. 以前我認為pgid 是單一變數,然而不是. PGID 是個包含 poolid 和 ps 的結構體變數.

//pgid  不僅僅是一個數字,還有好多資訊
// placement group id
struct pg_t
{
  uint64_t m_pool;
  uint32_t m_seed;
  int32_t m_preferred;

  pg_t() : m_pool(0), m_seed(0), m_preferred(-1) {}
  pg_t(ps_t seed, uint64_t pool, int pref=-1) :
  ...
還有很多資訊略
crush_do_rule 的輸入引數x是什麼?讓我們繼續風雨兼程. 然後在 _pg_to_osds 有一行 ps_t pps = pool.raw_pg_to_pps(pg); //placement ps. pps 就是 x.
PPS 如何計算? 在函式crush_hash32_2(CRUSH_HASH_RJENKINS1,ceph_stable_mod(pg.ps(), pgp_num, pgp_num_mask),pg.pool());
__u32 crush_hash32_2(int type, __u32 a, __u32 b)
{
    switch (type) {
    case CRUSH_HASH_RJENKINS1:
        return crush_hash32_rjenkins1_2(a, b);
    default:
        return 0;
    }
}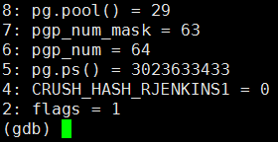
ps mod pgp_num_mask 的結果(例如 a) 和poolid(例如 b) 進行雜湊. 這就是pps,也就是x
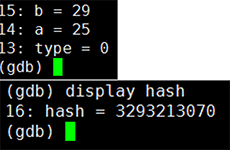
我們得到第二個過程輸入引數的 x.第一階段過程圖如下圖
第一階段過程圖
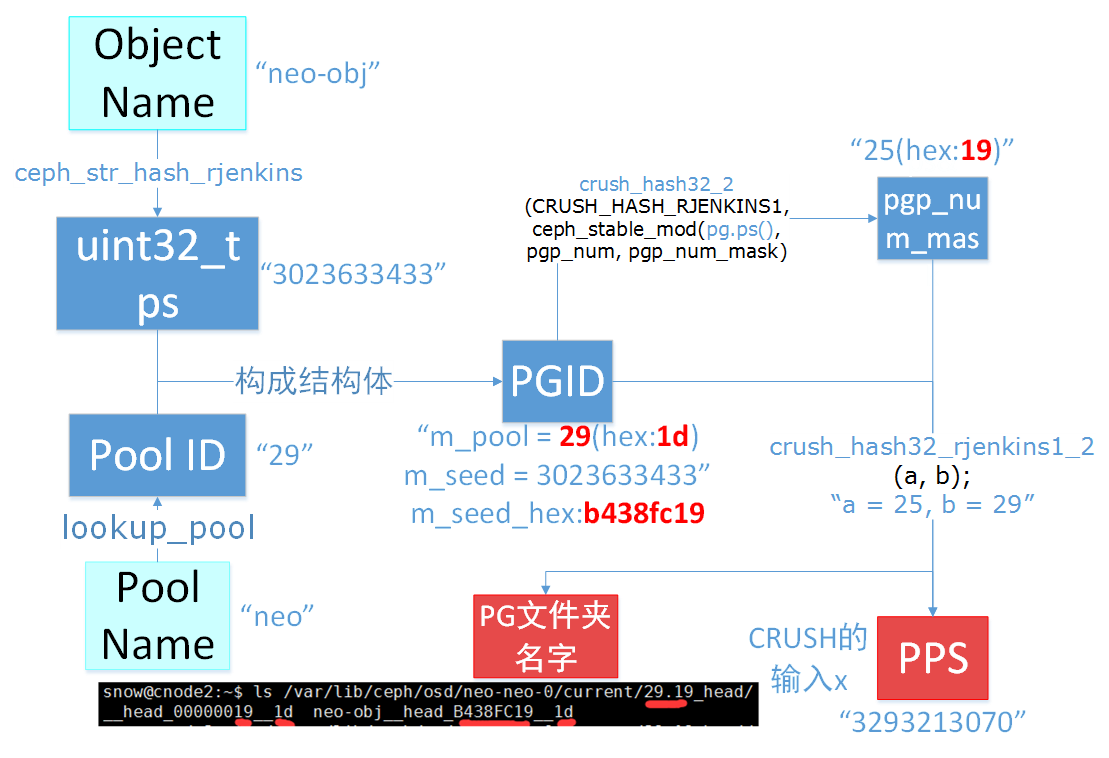
P.S. you can find something in PG’s name and object name.
2.2 PGID —> OSD set
首先需要明白幾個概念
weight VS reweight
這裡,“ceph osd crush reweight” 設定了OSD的權重weight
這個重量為任意值(通常是磁碟的TB大小,1TB設定為1),並且控制系統嘗試分配到OSD的資料量。reweight
reweight將覆蓋了weight量。這個值在0到1的範圍,並強制CRUSH重新分配資料。它不改變buckets 的權重,並且是CRUSH不正常的情況下的糾正措施。(例如,如果你的OSD中的一個是在90%以上,其餘為50%,可以減少權重,進行補償。)
primary-affinity
主親和力預設為1(即,一個OSD可以作為主OSD)。primary-affinity變化範圍從0到1.其中0意味著在OSD可能用作主OSD,設定為1則可以被用作主OSD.當其<1時,CRUSH將不太可能選擇該OSD作為主守護程序。
- PG VS PGP
pg 和 pgp的區別
- PG = Placement Group
- PGP = Placement Group for Placement purpose
- pg_num = number of placement groups mapped to an OSD
當增加每個pool的pg_num數量時,每個PG分裂成半,但他們都保持到它們的父OSD的對映。
直到這個時候,ceph不會啟動平衡策略。現在,當你增加同一池中的pgp_num值,PGs啟動從父OSD遷移到其他OSD,ceph開始啟動平衡策略。這是PGP如何起著重要的作用的過程。
pgp-num是在CRUSH演算法中使用的引數,不是 pg-num.例如pg-num = 1024 , pgp-num = 1.所有的1024個PGs都對映到同一個OSD.當您增加PG-NUM是分裂的PG,如果增加PGP-NUM將移動PGs,即改變OSD的map。PG和PGP是很重要的概念。
void do_rule(int rule, int x, vector<int>& out, int maxout,
           const vector<__u32>& weight) const {}
在瞭解了這些概念後開始第二部分
PGID -> OSD set. 現在我們在 do_rule: void do_rule(int rule, int x, vector<int>& out, int maxout, const vector<__u32>& weight)
do_rule原始碼
  void do_rule(int rule, int x, vector<int>& out, int maxout,
           const vector<__u32>& weight) const {
    Mutex::Locker l(mapper_lock);
    int rawout[maxout];
    int scratch[maxout * 3];
    int numrep = crush_do_rule(crush, rule, x, rawout, maxout, &weight[0], weight.size(), scratch);
    if (numrep < 0)
      numrep = 0;
    out.resize(numrep);
    for (int i=0; i<numrep; i++)
      out[i] = rawout[i];
  }
讓我們看下輸入引數
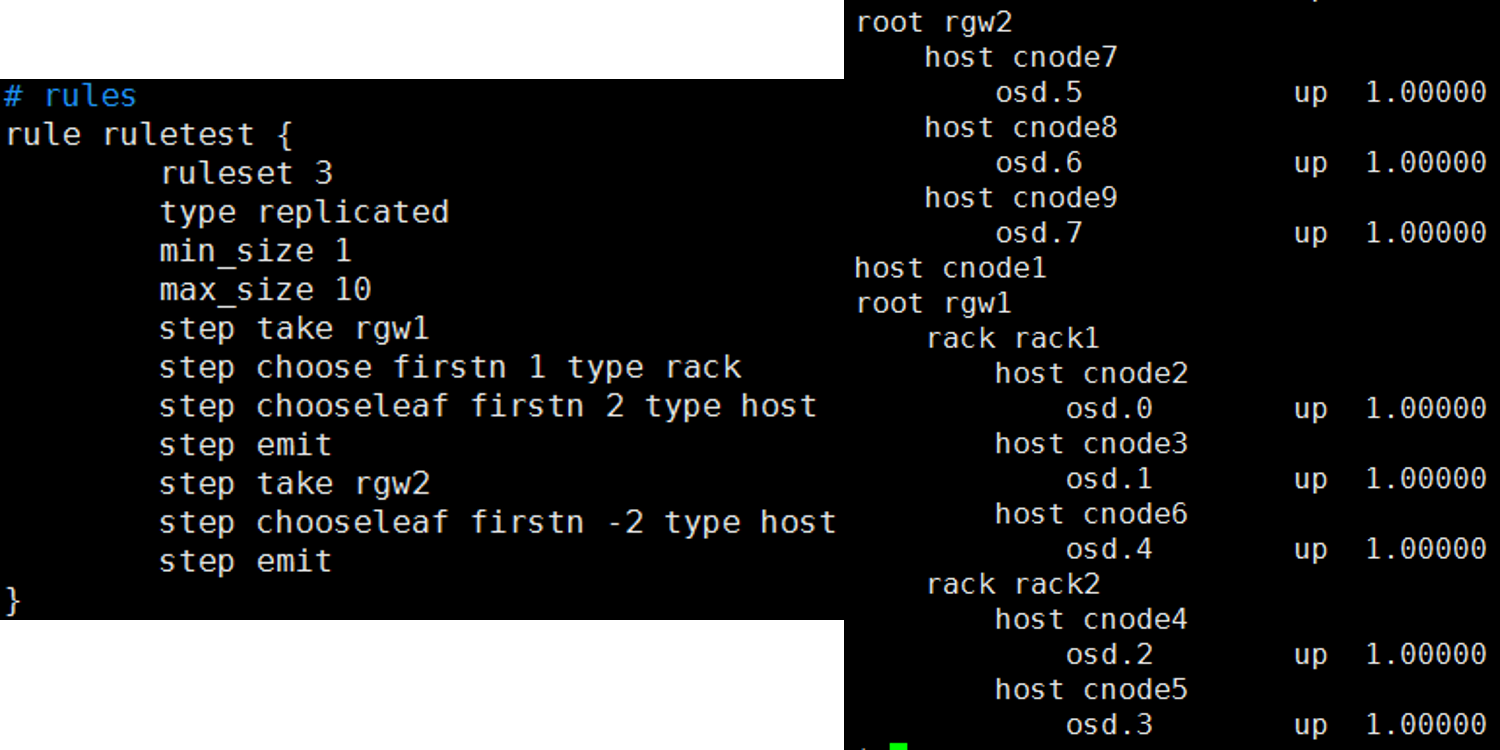
x 就是我們已經得到的 pps rule 就是記憶體中的crushrule’s number(不是 ruleid, 在我的crushrule set中, this rule’s id是 3), weight 是已經講過的 reweight 變化範圍從1 到 65536. 我們定義了 rawout[maxout] 來儲存 OSD set, scratch[maxout * 3] 為計算使用. 然後我們進入了crush_do_rule.

PGID -> OSDset OUTLINE
下面要仔細研究3個函式, firstn 意味著副本儲存, CRUSH 需要去選擇n
個osds儲存副本. indep是糾刪碼儲存過程.我們只關注副本儲存方法
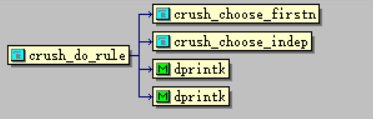
crush_do_rule: 反覆do crushrulescrush_choose_firstn: 遞迴選擇特定型別的桶或裝置crush_bucket_choose: 直接選擇bucket的子節點
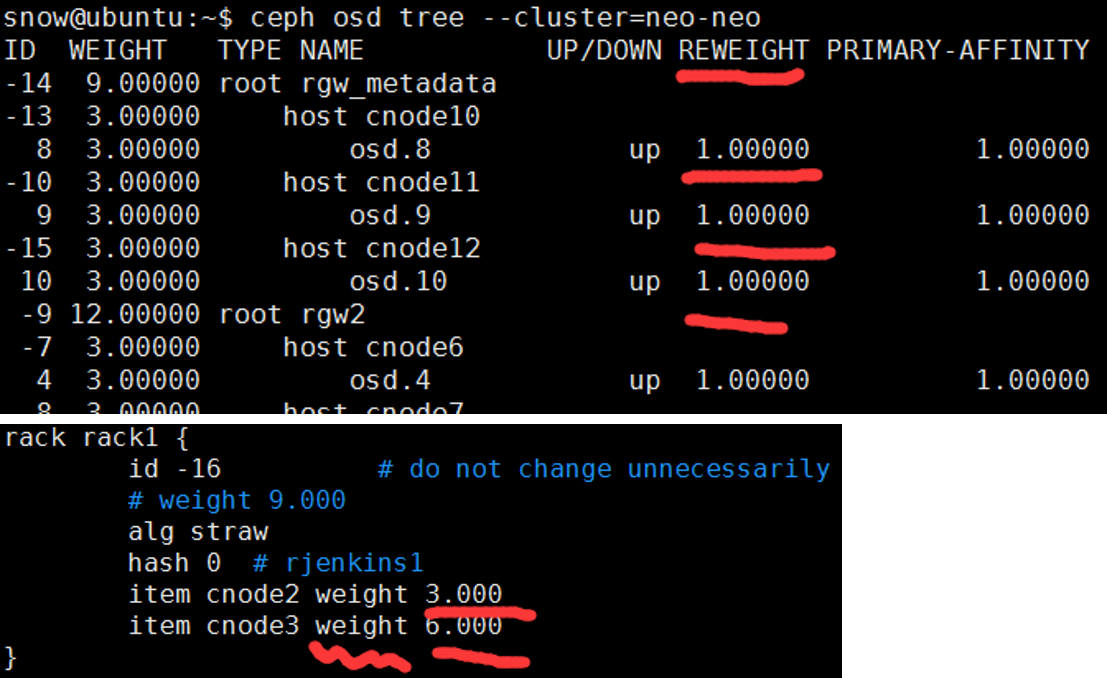
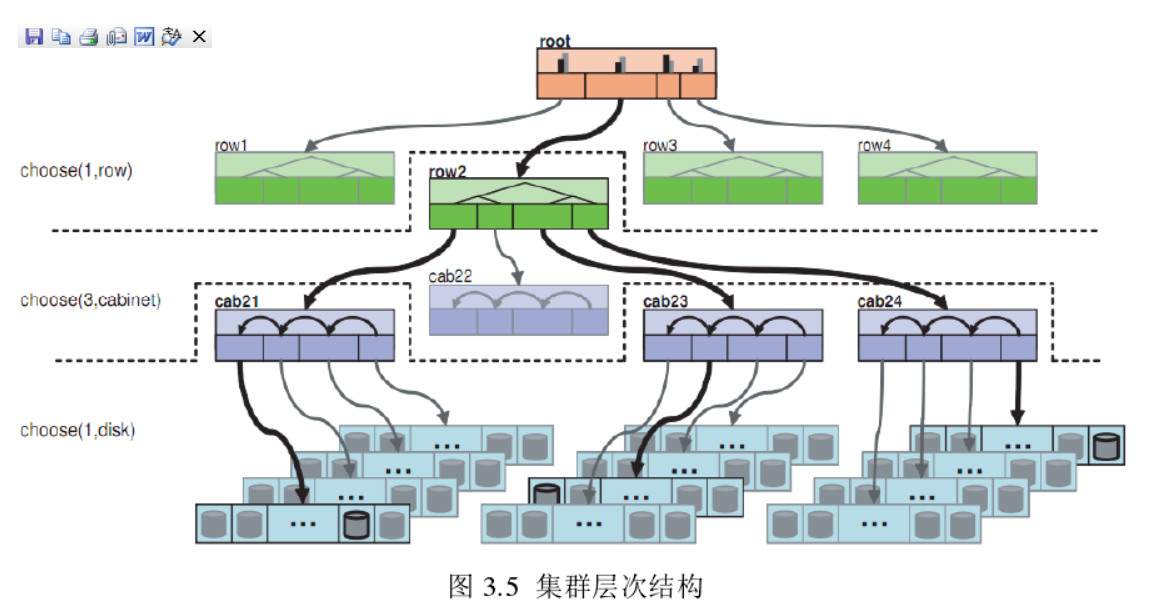
crush_do_rule
首先這是我的crushrule 和叢集的層次結構
引數
@map: the crush_map
@ruleno: the rule id
@x: hash input
@result: pointer to result vector
@result_max: maximum result size
@weight: weight vector (for map leaves)
@weight_max: size of weight vector
@scratch: scratch vector for private use; must be >= 3 * result_max
int crush_do_rule(const struct crush_map *map,
          int ruleno, int x, int *result, int result_max,
          const __u32 *weight, int weight_max,
int *scratch)值得說的變數emit 通常用在規則的結束,同時可以被用在在形相同規則下選擇不同的樹.更多詳細資訊看官網
scratch[3 * result_max]
int *a = scratch;
int *b = scratch + result_max;
int *c = scratch + result_max*2;
a, b, c 分別指向 scratch向量的0, 1/3, 2/3的位置.
w = a; o = b;
- w被用作一個先入先出佇列來在CRUSH map中進行橫向優先搜尋(BFS traversal).
- o儲存crush_choose_firstn選擇的結果.
- c儲存最終的OSD選擇結果.
crush_choose_firstn計算後如果結果不是OSD型別, o 交給w.以便於 w成為下次crush_choose_firstn的輸入引數. 如上所述, crush_do_rule 反覆進行 crushrules 迭代. 你可以在記憶體中發現規則:
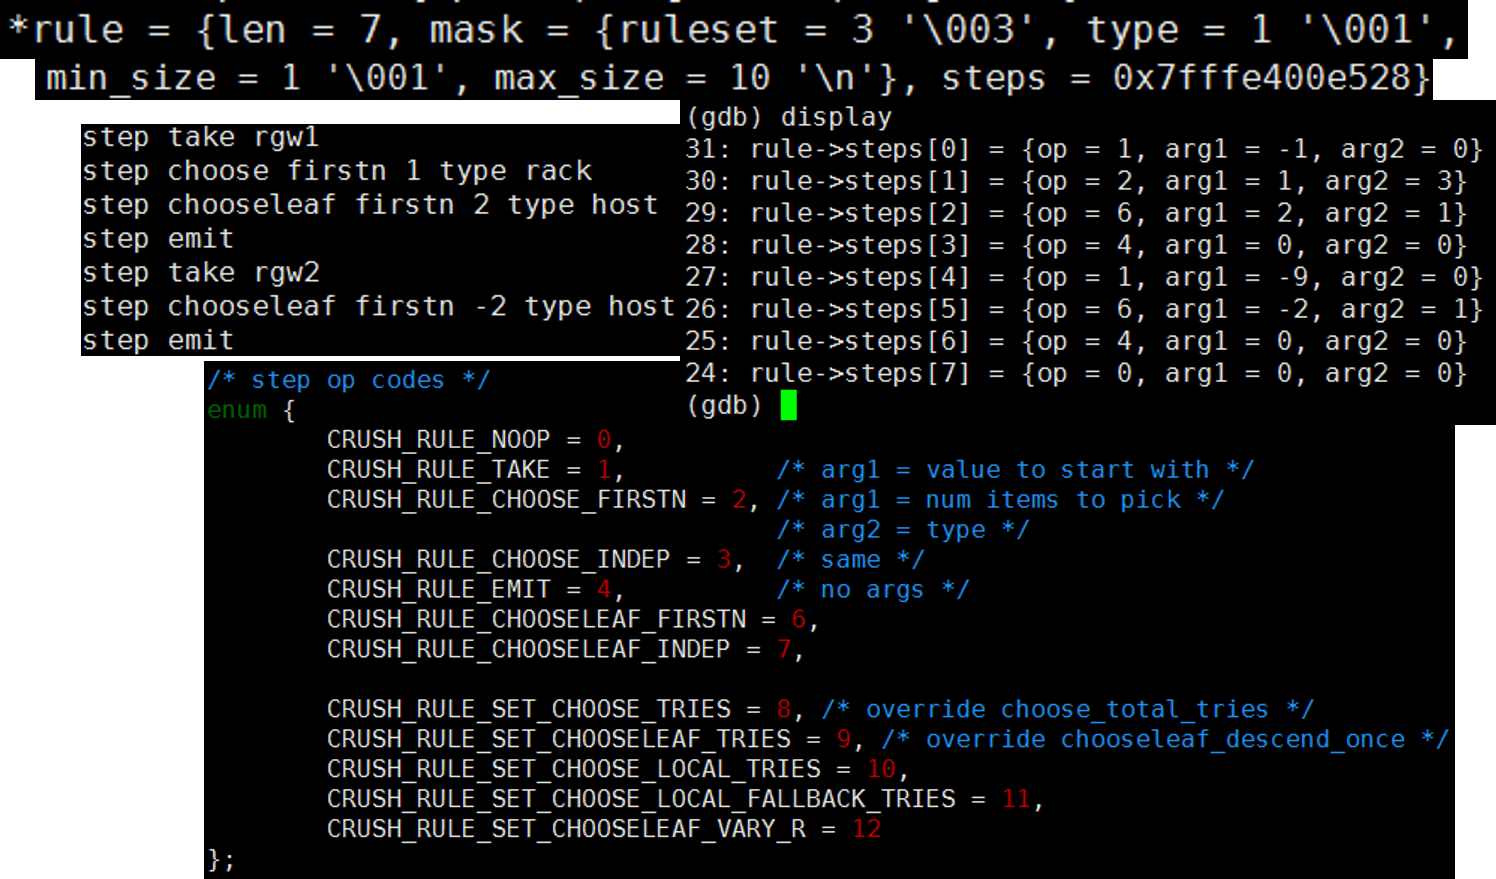
過程步驟
step 1 put root rgw1 in
w(enqueue);step 2 would run crush_choose_firstn to choose 1 rack-type bucket from root rgw1
下面分析crush_choose_firstn過程
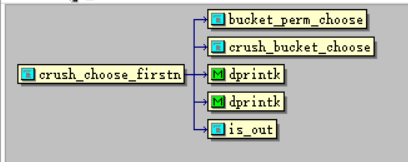
crush_choose_firstn 函式
這個函式遞迴的選擇特定bucket或者裝置,並且可以處理衝突,失敗的情況.
如果當前是choose過程,通過呼叫crush_bucket_choose來直接選擇.
如果當前是chooseleaf選擇葉子節點的過程,該函式將遞迴直到得到葉子節點.
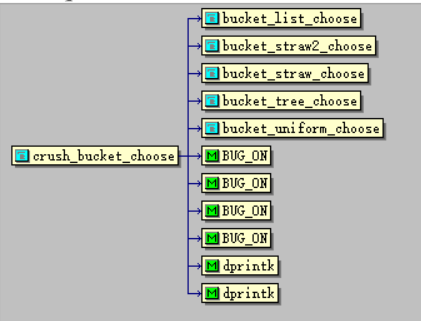
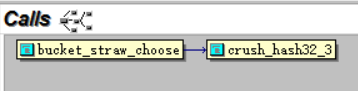
crush_bucket_choose 函式
crush_bucket_choose是CRUSH最重要的函式.應為預設的bucket型別是straw,常見的情況下我們會使用straw型別bucket,然後就會進入bucket_straw_choose
case進行跳轉
case CRUSH_BUCKET_STRAW:
return bucket_straw_choose((struct crush_bucket_straw *)in,
完整程式碼
static int crush_bucket_choose(struct crush_bucket *in, int x, int r)
{
    dprintk(" crush_bucket_choose %d x=%d r=%d\n", in->id, x, r);
    BUG_ON(in->size == 0);
    switch (in->alg) {
    case CRUSH_BUCKET_UNIFORM:
        return bucket_uniform_choose((struct crush_bucket_uniform *)in,
                      x, r);
    case CRUSH_BUCKET_LIST:
        return bucket_list_choose((struct crush_bucket_list *)in,
                      x, r);
    case CRUSH_BUCKET_TREE:
        return bucket_tree_choose((struct crush_bucket_tree *)in,
                      x, r);
    case CRUSH_BUCKET_STRAW:
        return bucket_straw_choose((struct crush_bucket_straw *)in,
                       x, r);
    case CRUSH_BUCKET_STRAW2:
        return bucket_straw2_choose((struct crush_bucket_straw2 *)in,
                        x, r);
    default:
        dprintk("unknown bucket %d alg %d\n", in->id, in->alg);
        return in->items[0];
    }
}
/* straw */
static int bucket_straw_choose(struct crush_bucket_straw *bucket,
int x, int r)
{
__u32 i;
int high = 0;
__u64 high_draw = 0;
__u64 draw;
for (i = 0; i < bucket->h.size; i++) {
draw = crush_hash32_3(bucket->h.hash, x, bucket->h.items[i], r);
draw &= 0xffff;
draw *= bucket->straws[i];
if (i == 0 || draw > high_draw) {
high = i;
high_draw = draw;
}
}
return bucket->h.items[high];
}
bucket結構體
struct crush_bucket_straw {
    struct crush_bucket h;
    __u32 *item_weights;   /* 16-bit fixed point */
    __u32 *straws;         /* 16-bit fixed point */
};
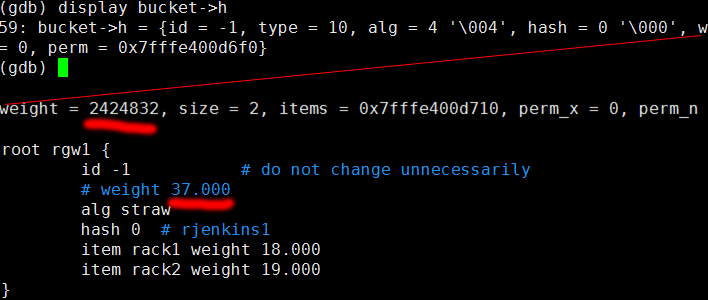
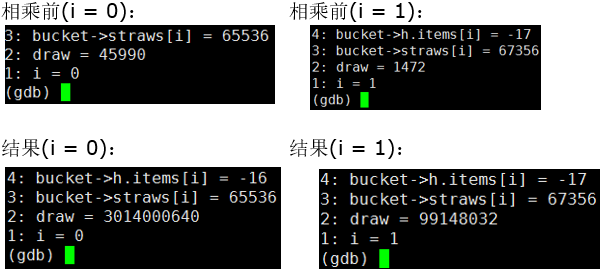
可以看到 bucket root rgw1’s id是 -1, type = 10 意味著根節點 alg = 4 意味著 straw 型別. 這裡 weight 是 OSD權重 we set scales up by 65536(i.e. 37 * 65536 = 2424832). 然後看下迴圈 T: 對每個輸入的son bucket , 例如升上圖rack1, crush_hash32_3 hashes x,bucket id(rack1’s id), r(current selection’s order number), 這3個變數是a uint32_t 型別變數, 結果 & 0xffff, 然後乘straw(rack1’s straw value, straw calculation seen below), 最後得到這個值, 在一次迴圈中, for one son bucket(rack1 here). 我們在迴圈中計算每個 son bucket然後選擇最大的 . 然後一個son bucket 被選擇 . Nice job! 下面是個計算的例子
呼叫層次,圖表描述

過程是在裝置樹種的搜尋過程
結論
我們已經研究了CRUSH計算中的重要部分,其餘的部分就是迭代和遞迴,直到選擇了所有的OSD.
關於 straw 值
詳細的程式碼在 src/crush/builder.c crush_calc_straw.
總之,straw 值總是和OSD權重正相關.straw2正在開發.
參考
本文翻譯自Jieyu Xue的文章