elasticSearch5.x與mysql資料庫同步
ElasticSearch安裝就不說了上一篇有說!
安裝logstash
官方:https://www.elastic.co/guide/en/logstash/current/installing-logstash.html
1.下載公共金鑰
rpm --import https://artifacts.elastic.co/GPG-KEY-elasticsearch
2.新增yum源
vim /etc/yum.repos.d/logstash.repo
檔案中寫入

[logstash-5.x] name=Elastic repository for 5.x packages baseurl=https://artifacts.elastic.co/packages/5.x/yumgpgcheck=1 gpgkey=https://artifacts.elastic.co/GPG-KEY-elasticsearch enabled=1 autorefresh=1 type=rpm-md

儲存退出
3.使用yum安裝
yum install logstash
4.驗證是否安裝成功
進入 logstash 安裝目錄
cd /usr/share/logstash
執行
bin/logstash -e 'input { stdin { } } output { stdout {} }'
等待幾秒鐘 出現
The stdin plugin is now waiting for input:
然後輸入
hello world
得到類似的結果
2016-11-24T08:01:55.949Z bogon hello world
安裝logstash-input-jdbc外掛
1.修改ruby倉庫映象
如果沒有安裝 gem 的話 安裝gem
yum install gem
替換國內的映象
gem sources --add https://gems.ruby-china.org/ --remove https://rubygems.org/
驗證是否成功
gem sources -l

修改Gemfile的資料來源地址
whereis logstash # 檢視logstash安裝的位置, 我的在 /usr/share/logstash目錄
cd /usr/share/logstash
vim Gemfile
修改 source 的值 為: "https://gems.ruby-china.org/"
vim Gemfile.jruby-1.9.lock # 找到 remote 修改它的值為:
https://gems.ruby-china.org/
或者直接替換源這樣你不用改你的 Gemfile 的 source。
gem install bundler


$ bundle config mirror.https://rubygems.org https://gems.ruby-china.org/
然後開始安裝
bin/logstash-plugin install logstash-input-jdbc
如果映象地址沒有改錯的話應該可以直接安裝
2.開始同步 mysql 資料
需要建立 兩個檔案 一個 .conf字尾的 一個 .sql 字尾
一個 mysql 的Java 驅動包 : mysql-connector-java-5.1.40-bin.jar
filename.conf 內容:

input {
    stdin {
    }
    jdbc {
    # 資料庫地址  埠  資料庫名
      jdbc_connection_string => "jdbc:mysql://localhost:3306/shen"
    # 資料庫使用者名稱
    jdbc_user => "root"
    # 資料庫密碼
      jdbc_password => "rootroot"
    # mysql java驅動地址
      jdbc_driver_library => "/usr/share/logstash/mysql-connector-java-5.1.40-bin.jar"
      jdbc_driver_class => "com.mysql.jdbc.Driver"
      jdbc_paging_enabled => "true"
      jdbc_page_size => "50000"
      # sql 語句檔案
      statement_filepath => "filename.sql"
      schedule => "* * * * *"
      type => "jdbc"
    }
}
output {
 stdout {
    codec => json_lines
    }
    elasticsearch {
        hosts  => "localhost:9200"
        index => "contacts"
        document_type => "contact"
        document_id => "%{id}"
    }
}

filename.sql
select * from a
注意: 在你的資料庫裡 要有一個數據庫名字和filename.conf 裡的對應就可以了 表明 和 filename.sql 裡的對應就可以了 在表中 有一個id欄位是為了和filename.conf 中document_id => "%{id}" 這個引數對應 可以執行修改
然後開始執行
bin/logstash -f fielname.conf
如果出現錯誤 或者沒有結果 可以進入 logs 目錄中檢視日誌

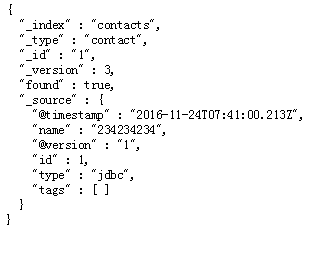
出現類似這樣的內容 就可以了
可以通過地址 http://192.168.199.115:9200/contacts/contact/1?pretty=true
檢視

url 引數說明 contacts 是對應 filename.conf 中 index => "contacts" contact 對應document_type => "contact" 1表示id為1 的資料
本文轉載自 http://www.cnblogs.com/phpshen/p/6098333.html
