
蘋果開發 筆記(33)常用元件筆記
這幾天繼續整理和熟悉一些程式碼,除了一些常用的第三方類,還要熟悉一些類別用法。
1.UIButton
CGRect frame = CGRectMake(0, 100, 80, 40);
UIButton *button = [UIButton buttonWithType:UIButtonTypeRoundedRect];
button.frame = frame;
[button setTitle:@"click" forState: UIControlStateNormal];
button.backgroundColor = [UIColor greenColor];
[button addTarget:self 2.UIAlertView
UIAlertView *alert = [[UIAlertView alloc]initWithTitle:@"標題" message:@"你的記憶體已滿" delegate:self 3.UILabel
UILabel *label =[[UILabel alloc]initWithFrame:CGRectMake(0, 10, 200, 34)];
label.textColor =[UIColor grayColor];
label.font =[UIFont systemFontOfSize:18];
label.text [email protected]"建立一個文字";
label.lineBreakMode = NSLineBreakByCharWrapping;
label 4.UITextField
 UITextField *textField =[[UITextField alloc]initWithFrame:CGRectMake(10, 44, self.view.bounds.size.width-20,30)];
 textField.borderStyle = UITextBorderStyleRoundedRect;
 textField.placeholder = @"請輸入使用者名稱";
 textField.clearButtonMode = UITextFieldViewModeAlways;
 textField.delegate = self;
 textField.textColor = [UIColor grayColor];
 textField.keyboardType = UIKeyboardTypeDefault;
 textField.returnKeyType = UIReturnKeyDone;
 textField.clearButtonMode = UITextFieldViewModeWhileEditing;
5.UISlider
  UISlider *slider =[[UISlider alloc]initWithFrame:CGRectMake(0, 100, 200, 33)];
  [slider addTarget:self action:@selector(onChangeHandler:) forControlEvents:UIControlEventValueChanged];
  [self.view addSubview:slider];

-(void) onChangeHandler:(UISlider *) slider
{
    float value = slider.value;
}
6.UISegmentedControl
   UISegmentedControl *seg= [[UISegmentedControl alloc]initWithItems:@[@"騎士",@"勇士"]];
   [self.view addSubview:seg];
   seg.frame =CGRectMake(20, 200, 200, 33);
   [seg addTarget:self action:@selector(onSelect:) forControlEvents:UIControlEventValueChanged];

-(void) onSelect:(UISegmentedControl *) control
{
   NSInteger index = control.selectedSegmentIndex;
    if (index==0)
    {
        NSLog(@"點選騎士");
    }
    else
    {
        NSLog(@"點選勇士");
    }

}

 ```
7.UIViewImage
UIImageView *imageView =[[UIImageView alloc]initWithImage:[UIImage imageNamed:@"head.png" ]];
imageView.layer.cornerRadius = 4.0;
8. UISwitch
   UISwitch *uiSwitch=[[UISwitch alloc]initWithFrame:CGRectMake(20, 200, 100, 33)];
   [self.view addSubview:uiSwitch];
   [uiSwitch setOn:YES animated:YES];
   [uiSwitch addTarget:self action:@selector(onChange:) forControlEvents:UIControlEventValueChanged];

-(void) onChange:(UISwitch *) uiswitch
{
  BOOL isOn =  uiswitch.isOn;
  //兩種方式輸出真假值
  NSLog(@"%@",  [NSNumber numberWithBool:isOn].stringValue);
  NSLog(@"%@",  isOn ? @"YES":@"NO");
}
9.UIActionSheet
操作表
UIActionSheet *actionSheet = [[UIActionSheet alloc]initWithTitle:nil delegate:self cancelButtonTitle:@"取消" destructiveButtonTitle:@"微信" otherButtonTitles:@"新浪微博",@"騰訊微博", nil];
actionSheet.actionSheetStyle = UIActionSheetStyleDefault;
[actionSheet showInView:self.view];

-(void) actionSheet:(UIActionSheet *)actionSheet clickedButtonAtIndex:(NSInteger)buttonIndex
{
    if(buttonIndex == 0)
    {
        NSLog(@"微信");
    }
    else if(buttonIndex ==1)
    {
        NSLog(@"新浪微博");
    }
    else if(buttonIndex == 2)
    {
        NSLog(@"騰訊微博");
    }
}
10.UIWindow
UIWindow *window =[[UIWindow alloc]initWithFrame:[UIScreen mainScreen].bounds];11.UIBarButtonItem
//左邊
self.navigationItem.leftBarButtonItem = [[UIBarButtonItem alloc]initWithTitle:@"話題" style:UIBarButtonItemStylePlain target:self action:@selector(showMenu)];
 //右邊
self.navigationItem.rightBarButtonItem = [[UIBarButtonItem alloc]initWithTitle:@"話題" style:UIBarButtonItemStylePlain target:self action:@selector(showMenu)];

-(void) showMenu
{
    [[NSNotificationCenter defaultCenter] postNotificationName:@"ShowMenuCmd" object:nil];
}
12. UIWebView
UIWebView 的本地載入html頁面
CGRect rect = [UIScreen mainScreen].bounds;
UIWebView *webView = [[UIWebView alloc] initWithFrame:CGRectMake(0, 0, rect .size.width,rect.size.height)];
[self.view addSubview:self.webView];
[webView setUserInteractionEnabled:YES];//是否支援互動
NSString *path =  [[NSBundle mainBundle] pathForResource:@"index" ofType:@"html"];
NSURL *url = [NSURL fileURLWithPath:path];
[webView loadRequest:[NSURLRequest requestWithURL:url]];
webView.autoresizingMask = UIViewAutoresizingFlexibleHeight | UIViewAutoresizingFlexibleWidth;
13.UIPickerView
選擇器建立與代理設定
NSArray *pickerArray [email protected][@"勇士",@"火箭",@"湖人",@"雷霆"];
UIPickerView *pickerView =[[UIPickerView alloc]init];
[self.view addSubview:self.pickerView];
pickerView.frame =(CGRect){0,self.view.frame.size.height-160,320,180};
pickerView.delegate = self;//設定代理
pickerView.dataSource = self;//設定代理
pickerView.backgroundColor = [UIColor orangeColor];

 - (NSInteger)numberOfComponentsInPickerView:(UIPickerView *)pickerView
{
    return 1;
}

- (NSInteger)pickerView:(UIPickerView *)pickerView numberOfRowsInComponent:(NSInteger)component
{
    return [pickerArray count];
}
-(NSString *) pickerView:(UIPickerView *)pickerView titleForRow:(NSInteger)row forComponent:(NSInteger)component
{
  return [pickerArray objectAtIndex:row];
}

- (void)pickerView:(UIPickerView *)pickerView didSelectRow:(NSInteger)row inComponent:(NSInteger)component
{
  NSLog(@"點選選擇了");
}
14.UIScrollView
UIScrollView *scrollView = [[UIScrollView alloc] initWithFrame:CGRectMake(0, 40, 200, 100)];
scrollView.backgroundColor =  [UIColor blueColor];

    CGFloat y=20;
    for (int i=0; i<30;i++)
    {
        UILabel *lab = [[UILabel alloc]init];
        lab.text = @"第一章 約定的開始";
        [lab sizeToFit];
        CGRect f= lab.frame;
        f.origin.y = i*22;
        lab.frame =f;
        [scrollView addSubview:lab];
        y += lab.bounds.size.height +10;
    }
    CGSize sz=scrollView.bounds.size;
    sz.height = y;
    scrollView.contentSize = sz;
15 UIProgressView
進度條
   UIProgressView *progressView =[[UIProgressView alloc]initWithProgressViewStyle:UIProgressViewStyleDefault];
    [self.view addSubview:progressView];
    [NSTimer scheduledTimerWithTimeInterval:1.0 target:self selector:@selector(onTimer:) userInfo:progressView repeats:YES];

-(void) onTimer:(NSTimer *) timer
{
  UIProgressView *progress =(UIProgressView *) timer.userInfo;
    progress.progress += 0.1;
    if(progress.progress == 1.0)
    {
        progress.progress =0;
    }
}
16 .UIActivityIndicatorView
活動指示器
   UIActivityIndicatorView *activityView= [[UIActivityIndicatorView alloc]initWithActivityIndicatorStyle:UIActivityIndicatorViewStyleWhiteLarge];
  [self.view addSubview:activityView];
  [activityView startAnimating];//播放動畫
  [activityView stopAnimating];//停止動畫
  [activityView isAnimating];//判斷是否在播放動畫
  self.view.backgroundColor=[UIColor orangeColor];//背景設定顏色方便預覽該元件
17.UINavigationBar
UINavigationBar 導航欄 需要抱一個導航欄目UINavigationItem
 UINavigationBar *navbar =[[UINavigationBar alloc]initWithFrame:CGRectMake(0, 0, self.view.frame.size.width, 44)];
  [self.view addSubview:navbar];
  UIBarButtonItem *leftButtonItem = [[UIBarButtonItem alloc]initWithTitle:@"選單" style:UIBarButtonItemStylePlain target:self action:@selector(onSelectLeft:)];
  UIBarButtonItem *rightButtonItem = [[UIBarButtonItem alloc]initWithTitle:@"設定" style:UIBarButtonItemStylePlain target:self action:@selector(onSelectRight:)];
  UINavigationItem *navigationItem =[[UINavigationItem alloc]initWithTitle:@"我愛IOS"];
  [navbar pushNavigationItem:navigationItem animated:NO];
  [navigationItem setLeftBarButtonItem:leftButtonItem];
  [navigationItem setRightBarButtonItem:rightButtonItem];

-(void) onSelectLeft:(UIBarButtonItem *) button
{
    NSLog(@"點選左邊");
}

-(void) onSelectRight:(UIBarButtonItem *) button
{
    NSLog(@"點選右邊");
}
18.UITabBar
UITabBar *tabBar =[[UITabBar alloc]initWithFrame:CGRectMake(0, [UIScreen mainScreen].bounds.size.height-44, self.view.frame.size.width, 44)];
[self.view addSubview:tabBar];
UITabBarItem *firstBarItem =[[UITabBarItem alloc]initWithTitle:@"首頁" image:nil tag:1];
UITabBarItem *secondBarItem =[[UITabBarItem alloc]initWithTitle:@"我的" image:nil tag:2];
[tabBar setItems:@[firstBarItem,secondBarItem]];
19.UIApplication
NSURL *appStoreUrl = [NSURL URLWithString:@"http://phobos.apple.com/WebObjects/MZStore.woa/wa/viewSoftware?id=291586600&amp;mt=8"];
[[UIApplication sharedApplication] openURL:appStoreUrl]; //退出編輯
[[UIApplication sharedApplication].keyWindow endEditing:YES];
//設定網路狀態
[[UIApplication sharedApplication] setNetworkActivityIndicatorVisible:YES];//開啟
[[UIApplication sharedApplication] setNetworkActivityIndicatorVisible:NO];//關閉20 UIRefreshControl
注: 重新整理元件,繼承了UITableController 有refreshControl 屬性存在
  UIRefreshControl *refreshControl = [[UIRefreshControl alloc]init];
    refreshControl.attributedTitle = [[NSAttributedString alloc]initWithString:@"重新整理中.."];
    [refreshControl addTarget:self action:@selector(refreshTableView) forControlEvents:UIControlEventValueChanged];
    self.refreshControl = refreshControl;


-(void) refreshTableView
{
    //重新整理後請求
}
21. UIImagePickerController
檢視相簿
UIImagePickerController *pickerController = [[UIImagePickerController alloc]init];
pickerController.sourceType  = UIImagePickerControllerSourceTypePhotoLibrary;
pickerController.delegate = self;
[self presentViewController:pickerController animated:YES completion:nil];

-(void) imagePickerController:(UIImagePickerController *)picker didFinishPickingMediaWithInfo:(NSDictionary *)info
{

  if([UIImagePickerController isSourceTypeAvailable:UIImagePickerControllerSourceTypePhotoLibrary])
  {
     UIImage *image =  [info objectForKey:UIImagePickerControllerOriginalImage];
     self.imageView.image = image;
  }

    [self dismissViewControllerAnimated:YES completion:nil];
}
22.UICollectionView
UICollectionViewFlowLayout* flowLayout = [[UICollectionViewFlowLayout alloc]init];
flowLayout.itemSize = CGSizeMake(120, 120);
[flowLayout setScrollDirection:UICollectionViewScrollDirectionVertical];
UICollectionView *collectionView = [[UICollectionView alloc]initWithFrame:rect collectionViewLayout:flowLayout ];
collectionView.backgroundColor = [UIColor whiteColor];
collectionView.dataSource = self;
collectionView.delegate = self;
[self.view addSubview:self.collectionView];

-(NSInteger) collectionView:(UICollectionView *)collectionView numberOfItemsInSection:(NSInteger)section
{
    return  1;
}

-(UICollectionViewCell *) collectionView:(UICollectionView *)collectionView cellForItemAtIndexPath:(NSIndexPath *)indexPath
{
    UICollectionViewCell *cell = [collectionView dequeueReusableCellWithReuseIdentifier:@"NodeCell" forIndexPath:indexPath];
    return cell;
}


-(void) collectionView:(UICollectionView *)collectionView didSelectItemAtIndexPath:(NSIndexPath *)indexPath
{
    //選中子項
}
23. MPMoviePlayerController
視訊控制
NSURL *url = [NSURL URLWithString:@"http://devimages.apple.com/iphone/samples/bipbop/bipbopall.m3u8"];
MPMoviePlayerController  *player =[[MPMoviePlayerController alloc]initWithContentURL:url];
player.fullscreen = YES;
CGRect winRect = [[UIScreen mainScreen] applicationFrame];
CGRect rect = CGRectMake(0,0,winRect.size.height, winRect.size.width);
player.controlStyle = MPMovieControlStyleDefault;
player.view.frame = rect;
player.view.center = CGPointMake(rect.size.width/2, rect.size.height/2);
[player.view setTransform:CGAffineTransformMakeRotation(M_PI/2)];
layer.scalingMode = MPMovieScalingModeAspectFill;
[player play];
[[NSNotificationCenter defaultCenter] addObserver:self selector:@selector(playCompleteFun:) name:MPMoviePlayerPlaybackDidFinishNotification object:nil];
[self.view addSubview:player.view];

-(void) playCompleteFun:(NSNotification *) notification
{

    [[NSNotificationCenter defaultCenter] removeObserver:self name:MPMoviePlayerPlaybackDidFinishNotification object:nil];

}
常用的一些程式碼片段記錄
檢視截圖
- (UIImage *) captureFromView: (UIView *) aView
{
    UIGraphicsBeginImageContext(aView.frame.size);
    CGContextRef context = UIGraphicsGetCurrentContext();
    [aView.layer renderInContext:context];
    UIImage *image= UIGraphicsGetImageFromCurrentImageContext();
    UIGraphicsEndImageContext();
    return image;
}
遇到block的情況下轉換self
__weak typeof(self)weakSelf = self;
__storng typeof(self)strongSelf = self;
常用的一些Build setting 記錄
Bitcode 的開啟和關閉
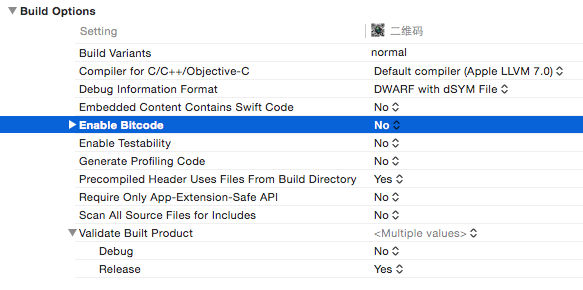
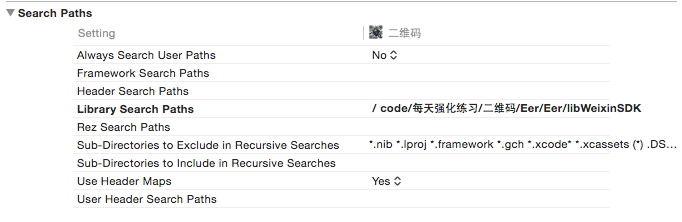
pch檔案開啟和配置路徑位置
需要則在Precompile Prefix Header 開啟 預設關閉
Prefix Header 則配置相應的路徑
例如:$(SRCROOT)/PrefixHeader.pch

Library Search Paths
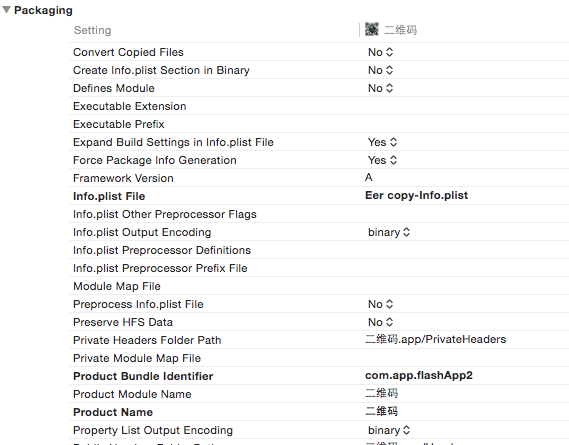
Product Name 產品名字設定
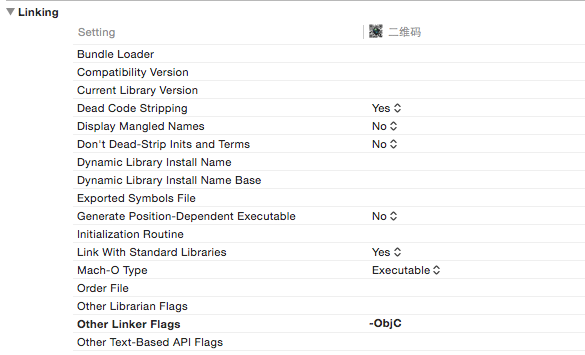
Other Linker Flags -Objc 設定
相關推薦
蘋果開發 筆記(33)常用元件筆記
這幾天繼續整理和熟悉一些程式碼,除了一些常用的第三方類,還要熟悉一些類別用法。 1.UIButton CGRect frame = CGRectMake(0, 100, 80, 40);
IDEA使用筆記(二)——常用快捷鍵
啟動服務 單行 bug 搜狗輸入法 添加 註釋 所有 類文件 ctrl+ 1:在IDEA上面找到快捷鍵都是有哪些?如下圖所示: 2:導出快捷鍵的描述文件,打印一份,慢慢看,多使用,慢慢的就記住了 3:我自己在開發中經常使用的IDEA快捷鍵,主要是導航、查找、編輯相關的,
Redis學習筆記(三)常用命令整理
mes ember nbsp end 插入 學習筆記 頻道 hash value Redis 常用命令 1.DEL key 刪除key2.EXISTS key 檢查key是否存在3.KEYS * 查看所有的key4.EXPIRE key seconds 設置key的過期時
day5-Python學習筆記(十)常用模塊
stat 結果 fig .get 文件顯示 刪除空文件 conf std 分割 import os# print(os.getcwd())#取當前工作目錄# print(os.chdir("..")) # 更改當前目錄# print(os.getcwd())#取當前工作目
bash shell學習筆記(一)—— 常用命令
排序 class $@ 幫助 row 自動 from quic 方式 一、基本的bash shell命令 1、默認bash shell 提示符是美元符號($); 2、bash手冊 使用man命令來訪問存儲在Linux系統上的手冊頁面,如: bogon:~ Mac$
Springboot學習筆記(三)-常用註入組件方式
TP 情況 生效 data lec 同時 pri select registry 本文把註入的類型分為普通類和配置文件類兩種 普通類 包掃描@ComponentScan+組件標註註解(@Controller、@Service、@Repository、@Component)
我的第一個python web開發框架(33)——後臺管理系統權限設計
style 頁面 失效 限制 路由 前後端分離 也會 其他 自己 框架底層和接口終於改造完成了,小白再次找到老菜。 小白:老大,上次你對後臺權限系統簡單的講了一下,我一點頭緒都沒有,現在有空完整的說一說嗎? 老菜:說到權限系統,要講明白真不容易,權限系統並不
Android 開發:(七)常用佈局屬性詳解
第一類:屬性值為true或false android:layout_centerHrizontal 水平居中 android:layout_centerVertical 垂直居中 android:layout_centerInparent 相對於父元素完全居中 androi
vue.js學習筆記(三)--父子元件通訊總結
部落格地址:https://fisher-zh.github.io 在使用Vue的過程中,如果需要進行父子元件間的通訊,通過查閱官方文件 我們可以瞭解到只需要在子元件要顯式地用 props選項宣告它期待獲得的資料,同時在其使用過程中傳入相應的資料即可,例如: Vu
HBase學習筆記(2)—— 常用shell 命令
1 hbase shell 命令 1.1 啟動和退出 start-hbase.sh hbase shell quit 1.2 建立表 create '表名', '列族名1',
ajax使用筆記(二)--- 常用的ajax形式
Ajax常用的兩種形式 第一種: $.get(url,params,fn,type); //可設定type:"json" $.post(url,params,fn,type); 第二種: $.ajax(選項); 選項: url: t
CUDA學習筆記(LESSON7)——常用優化策略&動態並行化
常用優化策略 下面讓我們來看看一些常用的優化策略,這些策略我們之前已經談過,現在只是對它進行一個總結。 資料佈局變換(Data layout transformation) 第一部分就是我們之前所說的coalescing存取模式,當相鄰執行緒訪問記憶體的相鄰位置的時
Python自動化學習筆記(六)——常用內置函數、os.walk了解、md5加密、連接數據庫
條件 讀取 字符 select none del 管理員 mktime rom 1.常用內置函數 print(max([1,2,3,4])) #獲取最大值print(sum([1,2,3,4])) #求和print(math.pi) #圓周率的值print(chr(6
springmvc學習筆記(33)——SimpleMappingExceptionResolver異常對映 XML檔案配置
SimpleMappingException異常對映 當異常發生時,我們可以將它對映到我們指定的介面 在springmvc中配置 <!-- 配置使用 SimpleMappingExceptionResolver 來對映異常 -->
Cocos Creator 系統學習筆記(十)AudioSouce元件使用
1:AudioSource元件是音訊源元件, 發出聲音的源頭; 2: AudioSource元件面板: clip: 聲源的播放的音訊(剪輯)物件: AudioClip, mp3, wav, ogg【直接在引擎裡拖拽或者程式碼實現】 volume: 音量大小, [0, 1]百分比
C++基礎教程面向物件(學習筆記(33))
淺層與深層複製 淺層拷貝 因為C ++對您的類知之甚少,所以它提供的預設拷貝建構函式和預設賦值運算子使用稱為成員拷貝的複製方法(也稱為淺層複製)。這意味著C ++單獨複製類的每個成員(使用賦值運算子過載operator =,並直接初始化複製建構函式)。當類很簡單
NumPy學習指南 學習筆記(二) 常用函式
1. 檔案讀寫 通常情況下,資料是以檔案形式儲存的。學會讀寫檔案是深入學習Numpy的基礎。 1.1 建立單位矩陣,並存入txt檔案i2 = np.eye(2) i2 Out[84]: array([[ 1., 0.], [ 0., 1.]]) 使用s
selenium學習筆記(3)——常用的方法
from selenium import webdriver import time path = 'D:\\Chrome下載\\chromedriver_win32/chromedriver.exe' driver = webdriver.Chrome(path)
Java學習筆記(一)--常用的DOS命令 JDK的下載和安裝 配置path環境變數
常用的DOS命令 1.碟符切換 碟符:然後回車。 2.列出當前檔案及資料夾 dir 然後回車 3.建立目錄 md 目錄名稱 4.刪除目錄 rd 目錄名稱 5.進入指定目錄 -單集目錄
Javascript高階程式設計學習筆記(33)—— 客戶端檢測(2)怪癖檢測
怪癖檢測 和能力檢測類似,但其目標不同 能力檢測的目的是判斷瀏覽器支不支援某種能力 而怪癖檢測的目的是判斷瀏覽器是否存在某些缺陷 這種時候需要我們執行一段程式碼來判斷瀏覽器是否有這樣的缺陷 或者說是怪癖(bug) 一般出現這種情況的瀏覽器當然是IE了 就以IE的某