Python-opencv之目標定位
阿新 • • 發佈:2019-01-29
最近團隊準備參加一個無人機比賽,大致的規則是這樣的:固定翼飛機從跑道起飛,然後在空中轉體360°,通過GPS粗定位飛行至一個高13米左右,寬6米左右八字形框前(距離約50米左右),這時依靠計算機視覺的方法,讓飛機準確的穿過去。(之後還有其他的動作,但是第一步大體就是這樣)。
初步的方案:①通過機載攝像機獲取影象序列
②選取關鍵幀進行處理,獲得框的中心點影象座標
③將框的中心點影象座標與影象中心座標進行比較,將偏差資訊反饋給控制系統,使其自動調節
關鍵點:如何準確地定位目標框,並提取出框中心點影象座標。
——————————————————————————————————————————————
以下是一個比較簡單的實現方案:
通過顏色提取出大致區域->形態學處理->輪廓提取->利用輪廓大小關係找到目標框->獲得中心點資訊並比較反饋
程式碼部分:
# coding:UTF-8
import cv2
import numpy as np


class Detect:
    def __init__(self, path):
        # 原始影象資訊
        self.ori_img = cv2.imread(path)
        self.gray = cv2.cvtColor(self.ori_img, cv2.COLOR_BGR2GRAY)
        self.hsv = cv2.cvtColor(self.ori_img, cv2.COLOR_BGR2HSV)
        # 獲得原始影象行列
        rows, cols = self.ori_img.shape[:2]
        # 工作影象
        self.work_img = cv2.resize(self.ori_img, (cols / 4, rows / 4))
        self.work_gray = cv2.resize(self.gray, (cols / 4, rows / 4))
        self.work_hsv = cv2.resize(self.hsv, (cols / 4, rows / 4))

    # 顏色區域提取
    def color_area(self):
        # 提取紅色區域(暫定框的顏色為紅色)
        low_red = np.array([156, 43, 46])
        high_red = np.array([180, 255, 255])
        mask = cv2.inRange(self.work_hsv, low_red, high_red)
        red = cv2.bitwise_and(self.work_hsv, self.work_hsv, mask=mask)
        return red

    # 形態學處理
    def good_thresh_img(self, img):
        # hsv空間變換到gray空間
        img = cv2.cvtColor(img, cv2.COLOR_HSV2BGR)
        img = cv2.cvtColor(img, cv2.COLOR_BGR2GRAY)
        # 閾值處理
        _, thresh = cv2.threshold(img, 0, 255, cv2.THRESH_BINARY + cv2.THRESH_OTSU)
        # 做一些形態學操作,去一些小物體干擾
        img_morph = cv2.morphologyEx(thresh, cv2.MORPH_OPEN, (3, 3))
        cv2.erode(img_morph, (3, 3), img_morph, iterations=2)
        cv2.dilate(img_morph, (3, 3), img_morph, iterations=2)
        return img_morph

    # 矩形四角點提取
    def key_points_tap(self, img):
        img_cp = img.copy()
        # 按結構樹模式找所有輪廓
        cnts, _ = cv2.findContours(img_cp, cv2.RETR_TREE, cv2.CHAIN_APPROX_SIMPLE)
        # 按區域大小排序,找到第二大輪廓
        cnt_second = sorted(cnts, key=cv2.contourArea, reverse=True)[1]
        # 找輪廓的最小外接矩形((point), (w, h))
        box = cv2.minAreaRect(cnt_second)
        # ->(points)->(l_ints)
        return np.int0(cv2.cv.BoxPoints(box))

    # 畫出關鍵輪廓的最校外接矩形
    def key_cnt_draw(self, points):
        mask = np.zeros(self.work_gray.shape, np.uint8)
        cv2.drawContours(mask, [points], -1, 255, 2)
        return mask

    # 目標框影象中心點提取
    def center_point_cal(self, points):
        pt1_x, pt1_y = points[0, 0], points[0, 1]
        pt3_x, pt3_y = points[2, 0], points[2, 1]
        center_x, center_y = (pt1_x + pt3_x) / 2, (pt1_y + pt3_y) / 2
        return center_x, center_y

    # 中心點比較,進行反饋
    def feedback(self, rect_center_point):
        # 獲取矩形框中心
        rect_center_point_x, rect_center_point_y = rect_center_point[0], rect_center_point[1]
        # 得到影象中心
        rows, cols = self.work_img.shape[:2]
        img_center_x, img_center_y = cols / 2, rows / 2
        # 相對x、y
        delta_x = rect_center_point_x - img_center_x
        delta_y = rect_center_point_y - img_center_y
        # 條件判斷
        print '-------------------'
        if delta_x > 0:
            print '->right'
        elif delta_x < 0:
            print 'left <-'
        else:
            print 'v_hold'

        if delta_y < 0:
            print '+up'
        elif delta_y > 0:
            print '-down'
        else:
            print 'h_hold'

    # 執行主函式
    def img_process_main(self):
        # 找到紅色區域
        red = self.color_area()
        # 處理得到一個比較好的二值圖
        img_morph = self.good_thresh_img(red)
        # 獲取矩形框的四個關鍵點
        points = self.key_points_tap(img_morph)
        # 找到矩形中心點
        rect_center_point = self.center_point_cal(points)
        # 畫出關鍵輪廓(除錯用,並沒有什麼卯月)
        cnt_img = self.key_cnt_draw(points)
        # 反饋資訊
        self.feedback(rect_center_point)

        # 顯示影象
        cv2.imshow('ori', self.work_img)
        cv2.imshow('red', red)
        cv2.imshow('good_thresh', img_morph)
        cv2.imshow('cnts', cnt_img)
        cv2.waitKey(0)

        cv2.destroyAllWindows()


if __name__ == '__main__':
    root_path = './201655'
    img_index = 0
    while True:
        img_index += 1
        img_path = root_path + '/' + str(img_index) + '.bmp'
        d = Detect(img_path)
        d.img_process_main()
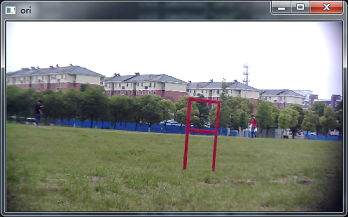
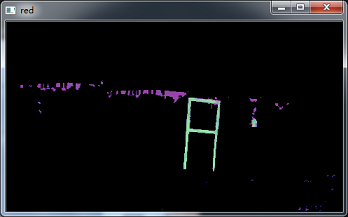
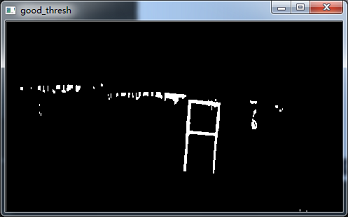
實際效果:
實驗用的是等比例縮小做的模型。