
Android個人學習筆記-底部導航切換Fragment的實現
前言:雖然經常來CSDN,但是開啟自己的部落格一看,竟然已經有一年沒有更新了,今年剛剛考上計算機研究生,生活也算是一個新的開始,但是作為一個程式設計師,這可不是一個正常頻率,所以接下來的時間還是要保持一定的更新,也算是督促自己繼續學習。這篇文章是採用markdown編寫的,剛使用沒多久,排版不好,敬請諒解。本文主要針對初學者,大牛們請忽略,因為我也是初學者(好幾年了還在原地踏步啊!!!)廢話太多,下面全是乾貨(可能會有水貨~~~)
- 底部導航思路
如果你大致瞭解該部分的思路,那請直接看程式碼實現部分。
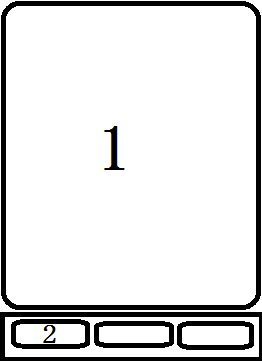
因為我是學習javaweb出身,所以在網頁端千奇百怪的導航欄可以供我們直接使用,但在Android端裡,導航的實現就需要我們一步步的實現。底部導航的實現可以借鑑微信、微博的佈局(如下圖)
圖中1部分為底部2部分切換顯示的內容,在具體的實現過程中,我們可以通過一個主佈局,該佈局包含一個底部的欄和內容顯示欄,也即是1部分和2部分。其中1部分應該用來容納不同的Fragment,2部分可以採用按鈕Button或者TextView來實現。通過監聽2部分的點選事件來切換1部分的Fragment,怎麼樣是不是很簡單,下面就開始進行實際的開發。 - 專案的建立
該部分的專案為一個小的demo,本文具體在於介紹底部導航的實現,所以命名等方面可能不是很規範,其他的方面大家自行遮蔽吧~~~
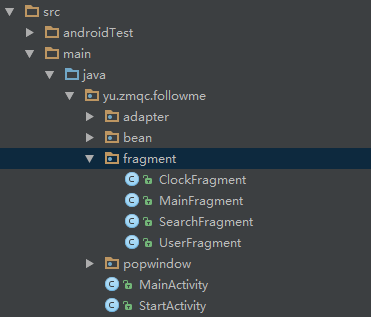
先上圖
圖中主要使用的為fragment包和MainActivity類,其中fragment包包含的是不同fragment的切換,MainActivity主要用來展示首頁和進行fragment的切換。
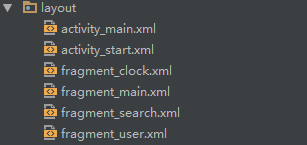
佈局檔案圖主要有activity_main.xml和四個fragment佈局。 - 程式碼實現
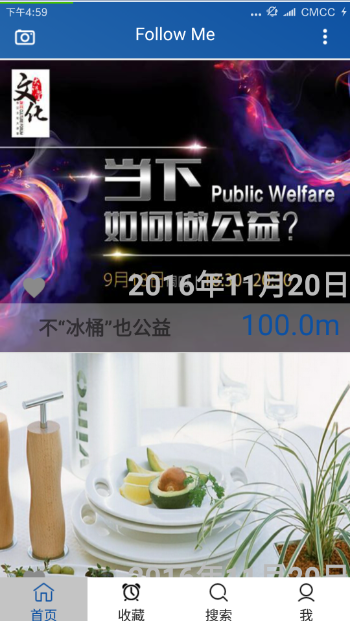
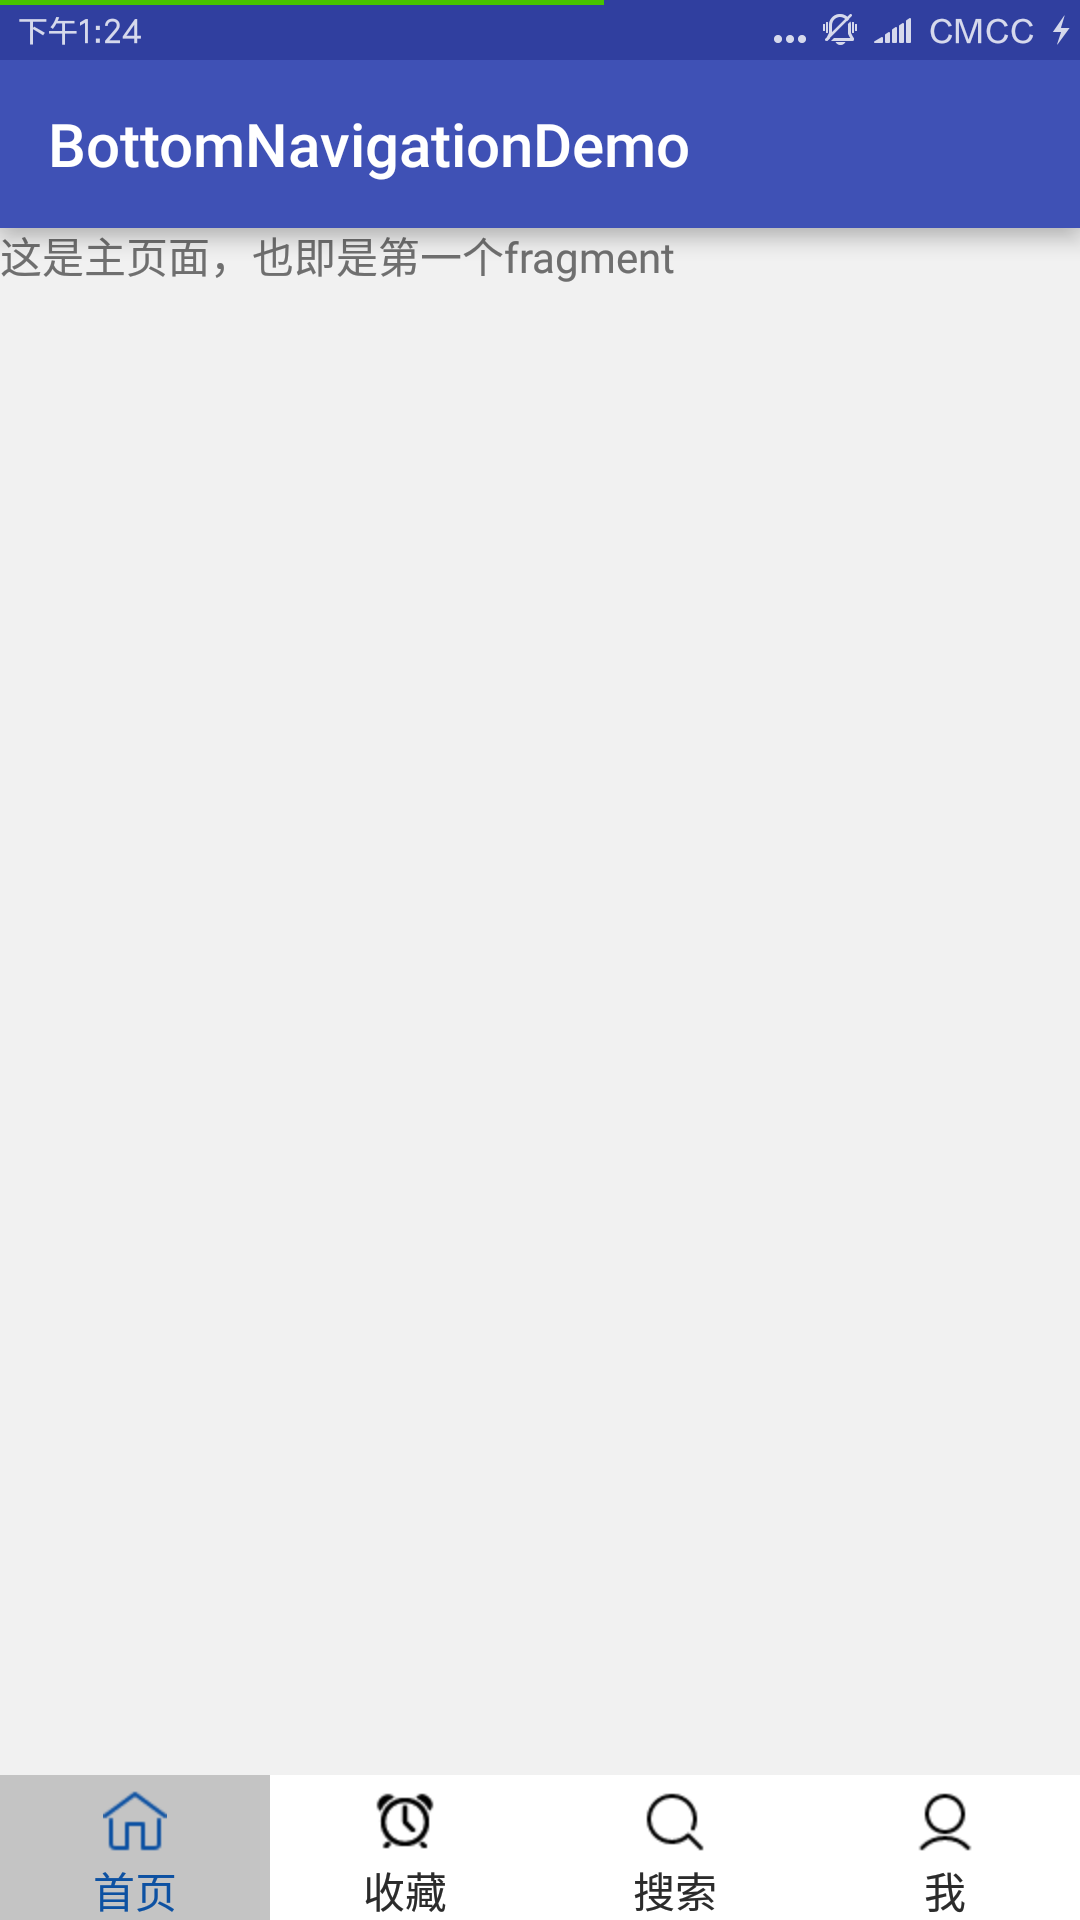
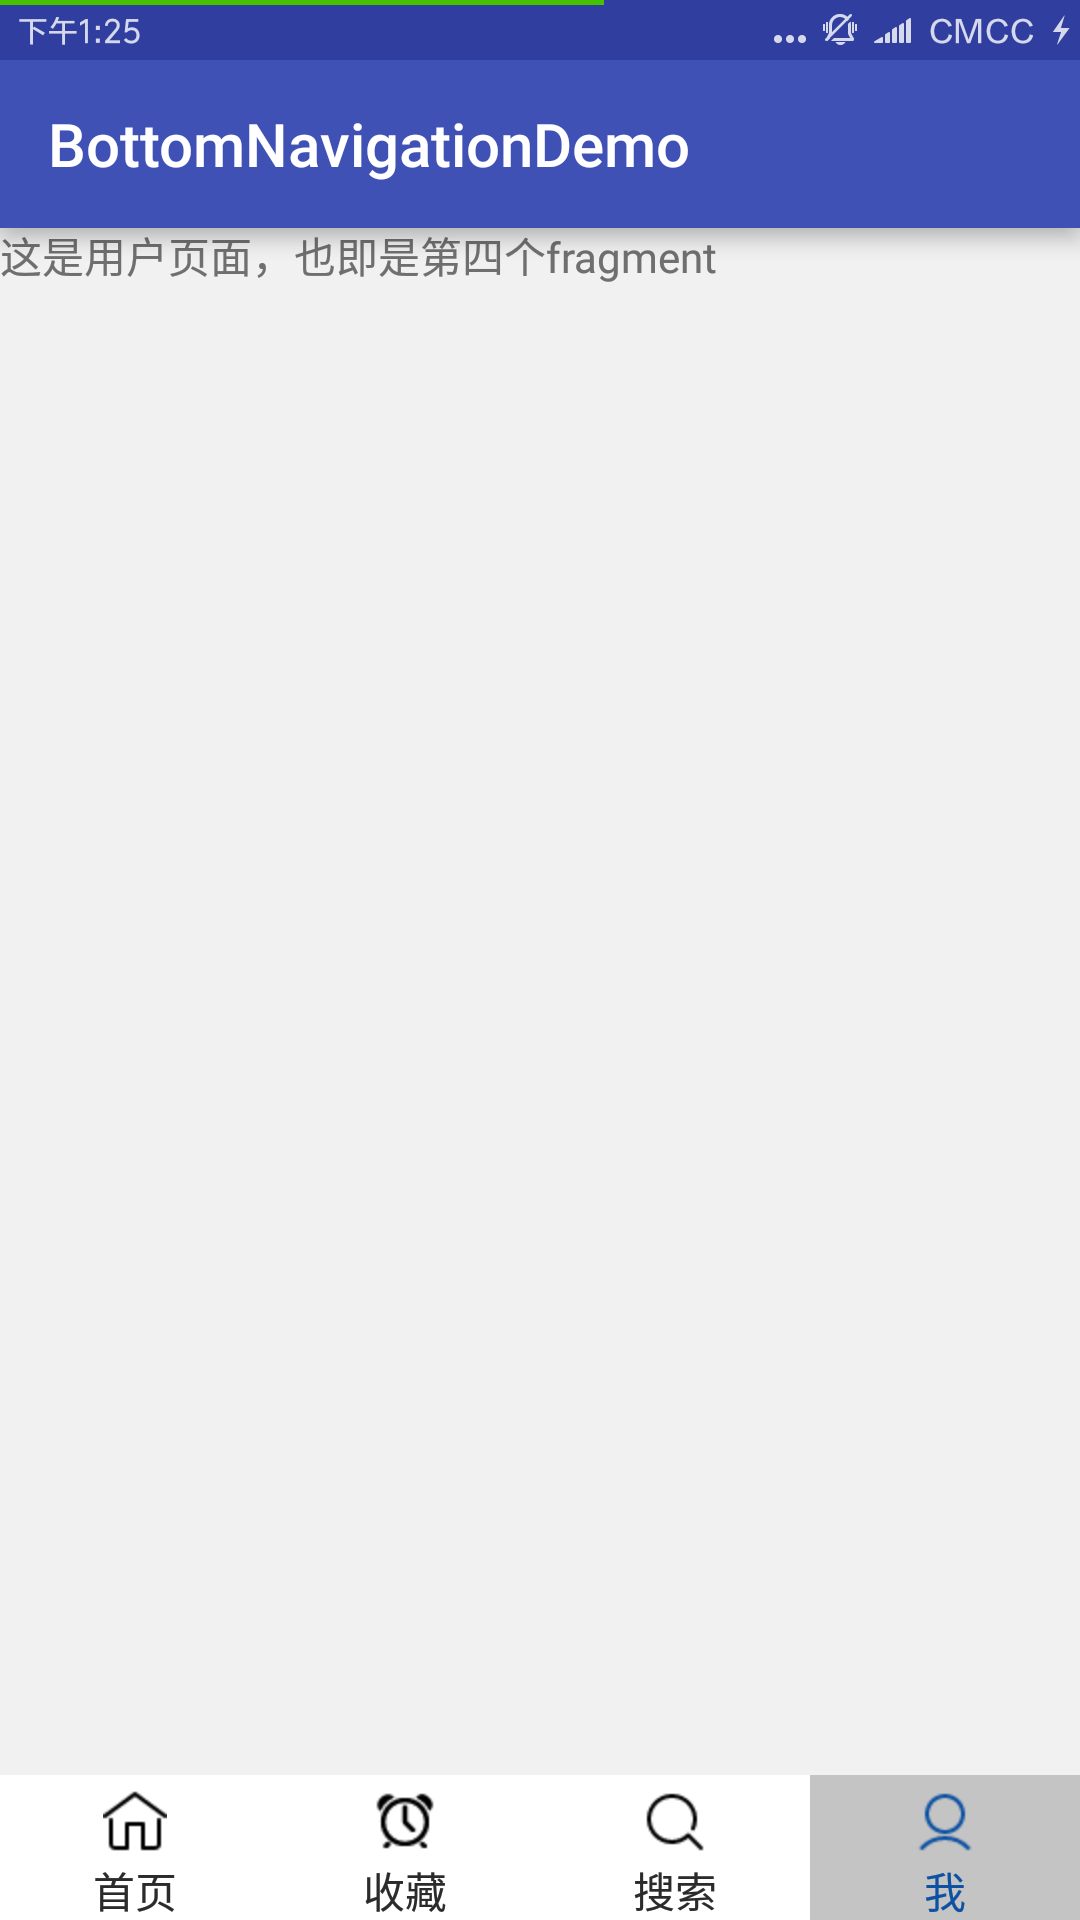
首先先看一下效果圖,再來看具體的程式碼:
圖中底部有四個TextView,設定點選監聽事件,點選後切換顯示內容
首先我們來看佈局檔案:
主佈局檔案activity_main.xml:
<?xml version="1.0" encoding="utf-8"?>
<RelativeLayout xmlns:android="http://schemas.android.com/apk/res/android"
xmlns:tools="http://schemas.android.com/tools"
android:id="@+id/activity_main" 該檔案已經經過了刪減,如截圖有一些不同,通過佈局可以看出主佈局主要包含四個textView和一個FrameLayout(用來包含Fragment)
Fragment佈局檔案fragment_main_xml:
<?xml version="1.0" encoding="utf-8"?>
<RelativeLayout xmlns:android="http://schemas.android.com/apk/res/android"
        android:layout_width="match_parent"
        android:layout_height="match_parent"
        >
        <LinearLayout
            android:layout_width="fill_parent"
            android:layout_height="wrap_content"
            android:background="#BED4F1"
            android:orientation="horizontal"
            android:id="@+id/line"
            >
        </LinearLayout>
        <LinearLayout
            android:layout_width="fill_parent"
            android:layout_height="wrap_content"
            android:layout_below="@id/line"
            android:id="@+id/line2"
            >
            <!-- 新增一個ListView控制元件 -->
            <ListView
                android:id="@+id/main_listview"
                android:layout_width="wrap_content"
                android:layout_height="wrap_content"
                />
        </LinearLayout>
    </RelativeLayout>
其實該部分的程式碼沒有太多的意義,針對你的不同需求,可以將該部分改成你需要的頁面佈局,其餘的四個佈局也就不一一貼出了。
MainActivity.java
public class MainActivity extends AppCompatActivity implements View.OnClickListener {

    //底部四個點選TextView
    private TextView txt_main;
    private TextView txt_clock;
    private TextView txt_search;
    private TextView txt_user;
    //fragmet嵌入在這裡
    private FrameLayout main_frameLayout;
    //Fragment管理
    private FragmentManager fragmentManager;
    //Fragment類
    private MainFragment mainFragment;
    private ClockFragment clockFragment;
    private SearchFragment searchFragment;
    private UserFragment userFragment;

    @Override
    protected void onCreate(Bundle savedInstanceState) {
        super.onCreate(savedInstanceState);
        setContentView(R.layout.activity_main);
        initUI();
    }


    private void initUI(){
        txt_main = (TextView)findViewById(R.id.txt_main);
        txt_clock = (TextView)findViewById(R.id.txt_clock);
        txt_search = (TextView)findViewById(R.id.txt_search);
        txt_user = (TextView)findViewById(R.id.txt_user);
       //framlayout獲取
        main_frameLayout = (FrameLayout)findViewById(R.id.main_fragment_container);
        //設定監聽器
        txt_main.setOnClickListener(this);
        txt_user.setOnClickListener(this);
        txt_search.setOnClickListener(this);
        txt_clock.setOnClickListener(this);

        fragmentManager = getSupportFragmentManager();
        FragmentTransaction transaction = fragmentManager.beginTransaction();
        mainFragment = new MainFragment();
        transaction.add(R.id.main_fragment_container,mainFragment);
        transaction.commit();

        txt_main.setSelected(true);
    }

    @Override
    public void onClick(View view) {
        //v4包匯入getSupportFragmentManager,app包使用getFragmentManager,app包3.0後才使用
        fragmentManager = getSupportFragmentManager();
        FragmentTransaction transaction = fragmentManager.beginTransaction();
        hideAllFragment(transaction);
        switch (view.getId()){

            case R.id.txt_main:
                reTxtSelect();
                txt_main.setSelected(true);
                if(mainFragment==null){
                    mainFragment = new MainFragment();
                    transaction.add(R.id.main_fragment_container,mainFragment);
                }else{
                    transaction.show(mainFragment);
                }
                break;
            case R.id.txt_clock:
                reTxtSelect();
                txt_clock.setSelected(true);
                if(clockFragment==null){
                    clockFragment = new ClockFragment();
                    transaction.add(R.id.main_fragment_container,clockFragment);
                }else{
                    transaction.show(clockFragment);
                }
                break;
            case R.id.txt_search:
                reTxtSelect();
                txt_search.setSelected(true);
                if(searchFragment==null){
                    searchFragment = new SearchFragment();
                    transaction.add(R.id.main_fragment_container,searchFragment);
                }else{
                    transaction.show(searchFragment);
                }
                break;
            case R.id.txt_user:
                reTxtSelect();
                txt_user.setSelected(true);
                if(userFragment==null){
                    userFragment = new UserFragment();
                    transaction.add(R.id.main_fragment_container,userFragment);
                }else{
                    transaction.show(userFragment);
                }
                break;

        }

            transaction.commit();

    }

    //初始化底部選單選擇狀態
    private void reTxtSelect(){
        txt_main.setSelected(false);
        txt_clock.setSelected(false);
        txt_search.setSelected(false);
        txt_user.setSelected(false);
    }

    //隱藏所有Fragment
    public void hideAllFragment(FragmentTransaction transaction){
        if(mainFragment!=null){
            transaction.hide(mainFragment);
        }
        if(clockFragment!=null){
            transaction.hide(clockFragment);
        }
        if(searchFragment!=null){
            transaction.hide(searchFragment);
        }
        if(userFragment!=null){
            transaction.hide(userFragment);
        }
    }
}
主類的主要步驟就是獲得佈局中的四個TextView,然後根據監聽點選事件動態切換不同的Fragment。
Fragment類主要程式碼如下,因為具體的實現需要你自己去新增,該部分只需要一個思路即可:
@Override
public View onCreateView(LayoutInflater inflater, ViewGroup container,Bundle savedInstanceState) {
                                                                  View view = inflater.inflate(R.layout.fragment_main,container,false);
        return view;
    }
4.一些注意事項
前面主要從思路程式碼進行了具體的分析,經過簡單的修正,我還是自己動手寫了一個demo出來,供初學者使用,專案基本包含,一個MainActivity,一個主佈局activity_main.xml和四個fragment佈局,專案地址在文末給出,實現的具體效果如下:
除此之外分享幾個專案編寫過程中的注意事項,首先給大家一個下載app圖示地址(點選就可以跳轉),我們可以在該網站找到自己需要的圖示,還支援自定義編輯,簡直是程式設計師的福音。
專案中底部圖示使用TextView中的drawableTop屬性新增圖片,圖片採用xml的形式,也即是有點選選中效果,drawablePadding屬性主要是設定圖片與文字的距離,建議高寬選擇wrap_content,因為當你選擇match_parent時,無論怎麼調整距離都會使得圖片跟文字拉的很遠,這也是實際開發中遇到的,如果要想使得空白距變大,那再新增一個線性佈局吧,可能有更好的方法歡迎大家指教,下面是圖片的xml檔案,該檔案作為底部導航點選文字的drawableTop檔案,其中專案中還涉及到了背景的選中變色和字型的選中變色,大體的思路一樣:
<?xml version="1.0" encoding="utf-8"?>
<selector xmlns:android="http://schemas.android.com/apk/res/android">
    <item android:drawable="@mipmap/home_"
        android:state_selected="true"
        />
    <!--未點選時背景圖片沒有變化-->
    <item android:drawable="@mipmap/home"/>
</selector>
具體可以參照專案中的實現
5.專案檔案
Android studio2.2開發工具
百度雲
CSDN