
matlab calibration toolbox -- matlab標定工具的使用方法--去畸變和雙目校正
一、 對於單目標定。
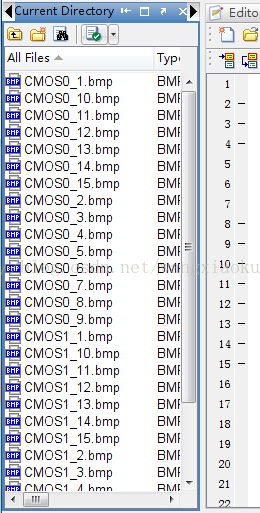
1、 也就是單個相機的標定,首先是用一個相機拍攝標定板獲得一定數量的標定板照片。或者下載的一定數量的照片。如下:

上圖CMOS0是相機1拍攝的圖片序列,CMOS1是相機2拍攝的圖片序列。
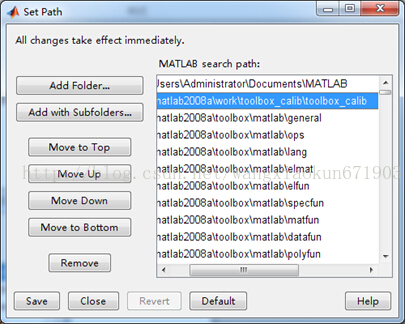
2、將下載的toolbox檔案解壓到一個目錄下,支援5.x--8.x版本的matlab。然後開啟matlab軟體:file—>SetPath出現如下介面。Add Folder新增toolbox所在的路徑。
3、新增好後,就可以在MATLAB的命令欄中輸入calib_gui 或者calib,回車
回車後出現如下介面:
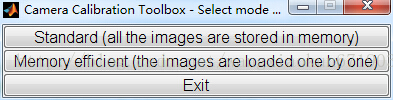
4、選擇圖片進行角點檢測。選擇第一項“Standard(all the images are stored in memory)”,出現如下介面:

此時要保證“Current Directory”為圖片所在的目錄:
點選“Image Names”按鈕。Command行裡就會將此目錄下所有的照片名字讀出來,如下:

“Basename camera calibration images (without number nor suffix):”後面輸入:CMOS0_。
出現如下提示:

“Image format: ([]='r'='ras', 'b'='bmp', 't'='tif', 'p'='pgm','j'='jpg', 'm'='ppm')”後面輸入:b。
matlab就將載入所有符合條件的圖片。


之後就是檢測角點,點選第三項:“Extract grid corners ”:

回車,選擇所有照片。

兩次回車,選擇預設視窗大小。

再回車,命令列出現如下:

同時,出現圖片:

此時需要在圖片上選擇四個拐點,選擇的方法是滑鼠單擊拐角位置。按照左上—右上—右下—左下的順時針順序圍一個框:

回車,檢測到角點如下圖:

再回車,自動出現下一張圖片,直到所有圖片均被檢測完畢。

此時出現這個檔案:

5、標定並檢視標定結果。點選“Calibration”,命令列裡面就會顯示標定結果包括內參和畸變係數:
Calibration parameters afterinitialization:
Focal Length: fc = [ 1086.72277 1086.72277 ]
Principal point: cc = [ 319.50000 239.50000 ]
Skew: alpha_c = [ 0.00000 ] => angle of pixel = 90.00000 degrees
Distortion: kc = [ 0.00000 0.00000 0.00000 0.00000 0.00000 ]
Main calibration optimization procedure -Number of images: 15
Gradient descent iterations:1...2...3...4...5...6...7...8...9...10...11...12...13...14...15...16...17...18...19...20...21...22...done
Estimation of uncertainties...done
Calibration results after optimization(with uncertainties):
Focal Length: fc = [ 1146.29229 1147.83468 ] ?[ 11.51067 11.19871 ]
Principal point: cc= [ 304.04991 233.16189 ] ?[8.23084 6.14044 ]
Skew: alpha_c = [ 0.00000 ] ?[0.00000 ] => angle of pixel axes = 90.00000?0.00000 degrees
Distortion: kc = [ -0.36478 1.07508 -0.00016 -0.00147 0.00000 ] ?[ 0.04196 0.67100 0.00120 0.00095 0.00000 ]
Pixel error: err = [ 0.54502 0.23183 ]
Note: The numerical errors areapproximately three times the standard deviations (for reference).
標定結果分為優化前和優化後的兩個結果。
點選

點選“Save”按鈕,在目錄中儲存標定的結果,出現如下檔案:

注:Result的mat檔案在雙目標定中能夠用到。將"Calib_Results.mat"改成"Calib_Results_left.mat "。
點選
6、去畸變。點選

CMOS0_1.bmp--原圖

CMOS0__rect1.bmp去畸變後圖
二、雙目校正。
1、用同樣的方法,對右相機拍攝的影象進行同樣的標定。
標定結果:
Aspect ratio optimized (est_aspect_ratio =1) -> both components of fc are estimated (DEFAULT).
Principal point optimized (center_optim=1)- (DEFAULT). To reject principal point, set center_optim=0
Skew not optimized (est_alpha=0) -(DEFAULT)
Distortion not fully estimated (defined bythe variable est_dist):
Sixth order distortion not estimated (est_dist(5)=0) - (DEFAULT) .
Initialization of the principal point atthe center of the image.
Initialization of the intrinsic parametersusing the vanishing points of planar patterns.
Initialization of the intrinsic parameters- Number of images: 15
Calibration parameters afterinitialization:
Focal Length: fc = [ 1094.51360 1094.51360 ]
Principal point: cc = [ 319.50000 239.50000 ]
Skew: alpha_c = [ 0.00000 ] => angle of pixel = 90.00000 degrees
Distortion: kc = [ 0.00000 0.00000 0.00000 0.00000 0.00000 ]
Main calibration optimization procedure -Number of images: 15
Gradient descent iterations:1...2...3...4...5...6...7...8...9...10...11...12...13...14...15...16...17...18...19...20...21...22...done
Estimation of uncertainties...done
Calibration results after optimization(with uncertainties):
Focal Length: fc = [ 1153.56062 1153.70663 ] ?[ 5.52064 5.37363 ]
Principal point: cc = [ 307.59643 201.79164 ] ?[ 4.00096 2.92143 ]
Skew: alpha_c = [ 0.00000 ] ?[0.00000 ] => angle of pixel axes = 90.00000?0.00000 degrees
Distortion: kc = [ -0.41467 0.77106 -0.00200 -0.00188 0.00000 ] ?[ 0.02287 0.37580 0.00051 0.00051 0.00000 ]
Pixel error: err = [ 0.21001 0.18752 ]
Note: The numerical errors areapproximately three times the standard deviations (for reference).
並將標定的結果儲存為Calib_Results_right.mat
則由左右相機標定的結果為“Calib_Results_left.mat”和“Calib_Results_right.mat”。
2、計算雙目校正的引數。在command的命令欄裡,輸入“stereo_gui.m”出現如下介面:

將”Current Directory“設定為圖片所在的目錄,點選:“Load left and right calibration files”按鈕,命令欄會提示,先輸入Calib_Results_left.mat,回車,再輸入Calib_Results_right.mat,回車。如下:
Calib_Results_left.mat calib_data_left.mat
Calib_Results_right.mat calib_data_right.mat
Loading of the individual left and rightcamera calibration files
Name of the left camera calibration file([]=Calib_Results_left.mat): Calib_Results_left.mat
Name of the right camera calibration file([]=Calib_Results_right.mat): Calib_Results_right.mat
回車,出現如下結果:
Intrinsic parameters of left camera:
Focal Length: fc_left = [ 1146.29229 1147.83468 ] ?[ 11.51067 11.19871 ]
Principal point: cc_left = [ 304.04991 233.16189 ] ?[ 8.23084 6.14044 ]
Skew: alpha_c_left = [ 0.00000 ] ?[0.00000 ] => angle of pixel axes = 90.00000?0.00000 degrees
Distortion: kc_left = [ -0.36478 1.07508 -0.00016 -0.00147 0.00000 ] ?[ 0.04196 0.67100 0.00120 0.00095 0.00000 ]
Intrinsic parameters of right camera:
Focal Length: fc_right = [ 1153.56062 1153.70663 ] ?[ 5.52064 5.37363 ]
Principal point: cc_right = [ 307.59643 201.79164 ] ?[ 4.00096 2.92143 ]
Skew: alpha_c_right = [ 0.00000 ] ?[0.00000 ] => angle of pixel axes = 90.00000?0.00000 degrees
Distortion: kc_right = [ -0.41467 0.77106 -0.00200 -0.00188 0.00000 ] ?[ 0.02287 0.37580 0.00051 0.00051 0.00000 ]
Extrinsic parameters (position of rightcamera wrt left camera):
Rotation vector: om = [ 0.02179 -0.01185 0.01145 ]
Translation vector: T = [ 288.71955 -4.79691 8.65882 ]
點選
Recomputation of the intrinsic parametersof the left camera (recompute_intrinsic_left = 1)
Recomputation of the intrinsic parametersof the right camera (recompute_intrinsic_right = 1)
Main stereo calibration optimizationprocedure - Number of pairs of images: 15
Gradient descent iterations: 1...done
Estimation of uncertainties...done
Stereo calibration parameters afteroptimization:
Intrinsic parameters of left camera:
Focal Length: fc_left = [ 1148.55963 1149.64262 ] ?[ 7.45634 7.30037 ]
Principal point: cc_left = [ 310.26705 238.04925 ] ?[ 7.04971 5.09296 ]
Skew: alpha_c_left = [ 0.00000 ] ?[0.00000 ] => angle of pixel axes = 90.00000?0.00000 degrees
Distortion: kc_left = [ -0.34370 0.76402 -0.00169 -0.00056 0.00000 ] ?[ 0.03451 0.53433 0.00090 0.00077 0.00000 ]
Intrinsic parameters of right camera:
Focal Length: fc_right = [ 1150.39567 1150.10073 ] ?[ 7.17569 6.99235 ]
Principal point: cc_right = [ 302.34812 193.42732 ] ?[ 7.17158 4.95445 ]
Skew: alpha_c_right = [ 0.00000 ] ?[0.00000 ] => angle of pixel axes = 90.00000?0.00000 degrees
Distortion: kc_right = [ -0.41255 0.86324 -0.00104 -0.00290 0.00000 ] ?[ 0.03845 0.60909 0.00084 0.00082 0.00000 ]
Extrinsic parameters (position of rightcamera wrt left camera):
Rotation vector: om = [ 0.01223 0.00022 0.01149 ] ?[ 0.00584 0.00846 0.00023 ]
Translation vector: T = [ 278.99648 3.79371 -16.83653 ] ?[ 2.50669 2.11662 17.55917 ]
Note: The numerical errors areapproximately three times the standard deviations (for reference).
3、進行雙目校正即平行校正。點選
校正的圖片就在圖片所在的目錄下如下:
以“CMOS0__rectified1.bmp”和“CMOS1__rectified1.bmp”為命名成對出現的。如:

CMOS0__rectified2.bmp左圖校正後

CMOS1__rectified2右圖校正後
這樣就進行完立體校正了。這兩幅影象就是平行的了。
Matlab將上述左右兩幅影象放在一起對比平行如下圖:

這兩幅圖片對應的原始影象如下:

CMOS0_2.bmp左原圖

CMOS1_2.bmp右原圖
當然還有很多其他按鈕以及對應的功能,大家都可以親自試一試。