
IDEA用maven建立springMVC專案和配置(XML配置和Java配置)(修正版)
這段時間在學習javaweb的一些知識,然後接觸到了springmvc框架。框架的建立和配置一直是新手入門的一個難題,所以我就寫一下我的配置過程,以供參考,另外因為spring4的新特性可以用java來配置,網上相關資料較少,所以我參考了很多博文後,把xml和java兩種配置方式都試了一下。
工具準備:IDEA2016.3 Java jdk 1.8
1、DEA建立專案
新建一個maven project,並且選擇webapp原型。
然後點選next
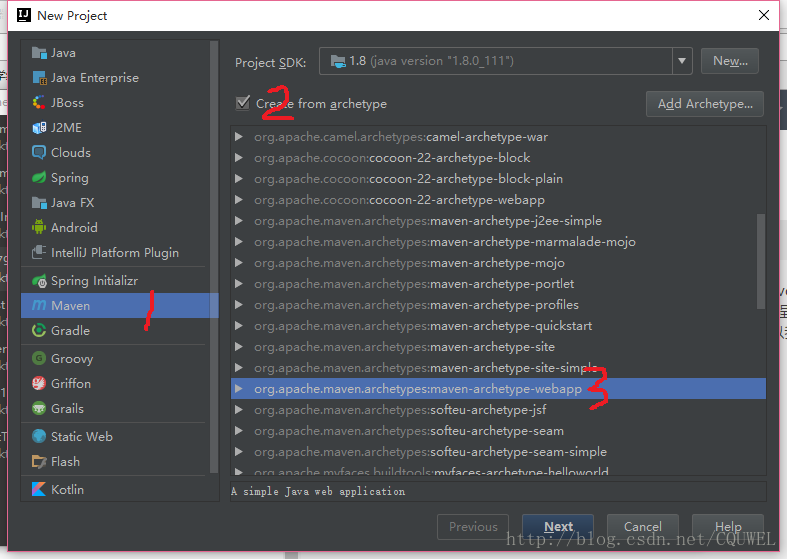
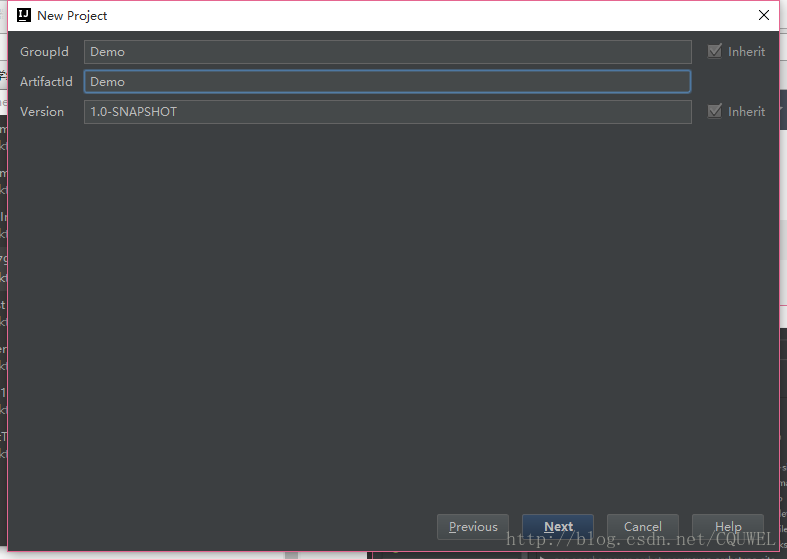
這裡的GroupId和ArtifactID隨意填寫,但是ArtifactID最好和你的專案一名一樣然後next
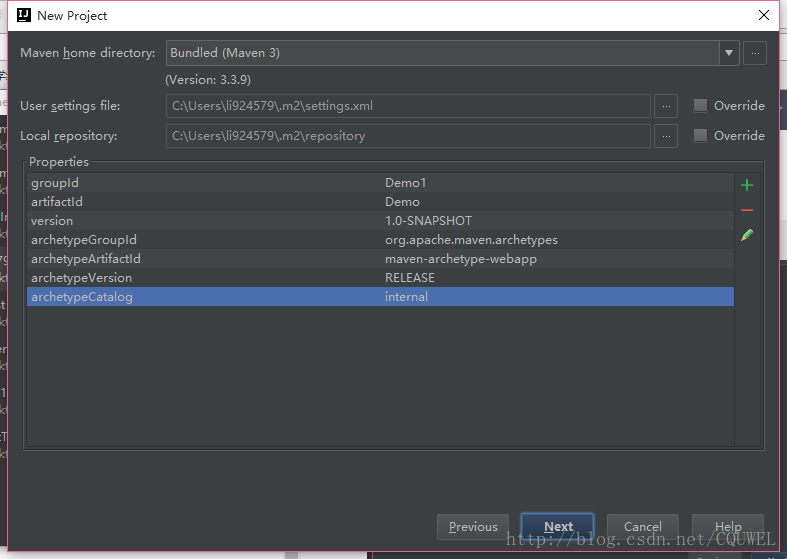
為了快一點建立,我們新增一個屬性值,如圖中亮的所示,點右邊的加號,name=archetypeCatalog value=internal。
這裡我們選擇使用IDEA自帶的maven,下面的兩個分別是你的maven配置檔案和你的倉庫地址,我記得idea的maven一開始是沒有setting.xml的,所以你要去maven的目錄裡面拷一份setting.xml到你的倉庫中。idea的maven在安裝路徑的plugins資料夾下,即X:\xxx\JetBrains\IntelliJ IDEA 2016.3.2\plugins\plugins\maven\lib\maven3\conf\setting.xml拷貝到你的使用者資料夾下的.m2資料夾下,為了之後能夠快速的下載依賴包,我們要加一個官方庫的映象,因為maven的官方倉庫在國外,太慢了。
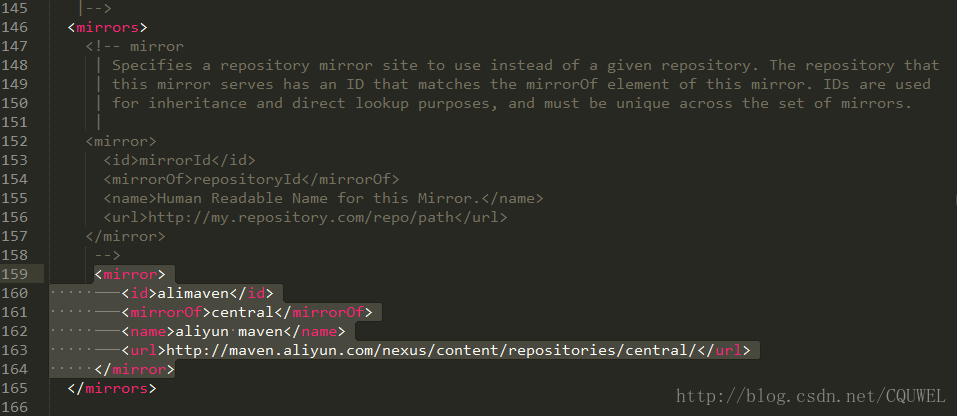
我們在你的.m2資料夾下的setting.xml中新增如下程式碼:
<mirror>
        <id>alimaven</id>
        <mirrorOf>central</mirrorOf>
        <name>aliyun maven</name>
      <url>http://maven.aliyun.com/nexus/content/repositories/central/</url>
</mirror>- 1
- 2
- 3
- 4
- 5
- 6
具體位置如下圖所示
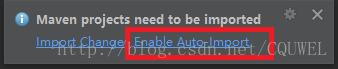
這個是阿里的庫,所以很快。做完之後我們回到idea,點選next,然後填寫專案名,然後finish。
接下來idea開始建立專案,這裡你要把maven自動匯入開啟。
然後等待maven建立專案成功
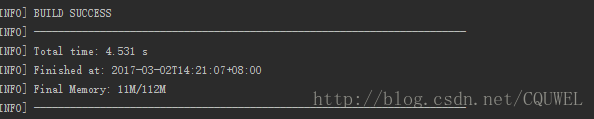
這樣我們的專案初始的框架就弄好了。
2、新增pom依賴
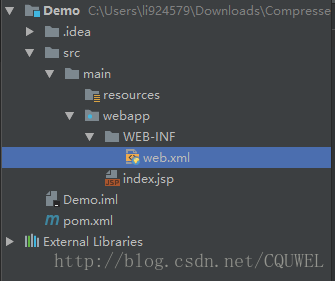
建立好之後的專案目錄如圖所示
我們開啟其中的pom.xml,新增我們的依賴。這裡我把我的依賴全部放出來,複製到你的pom.xml的dependencies標籤之間就可以了,pom檔案中也會給你一個示例。
我的依賴如下
<!--測試-->
<dependency>
<groupId>junit</groupId>
<artifactId>junit</artifactId>
<version - 1
- 2
- 3
- 4
- 5
- 6
- 7
- 8
- 9
- 10
- 11
- 12
- 13
- 14
- 15
- 16
- 17
- 18
- 19
- 20
- 21
- 22
- 23
- 24
- 25
- 26
- 27
- 28
- 29
- 30
- 31
- 32
- 33
- 34
- 35
- 36
- 37
- 38
- 39
- 40
- 41
- 42
- 43
- 44
- 45
- 46
- 47
- 48
- 49
- 50
- 51
- 52
- 53
- 54
- 55
- 56
- 57
- 58
- 59
- 60
- 61
- 62
- 63
- 64
- 65
- 66
- 67
- 68
- 69
- 70
- 71
- 72
- 73
- 74
- 75
- 76
- 77
- 78
- 79
- 80
- 81
- 82
- 83
一旦你複製過去之後,maven就會開始下載相應的jar檔案,等待下載完成即可。可能包有點多,不過用了阿里的映象之後還是挺快的。
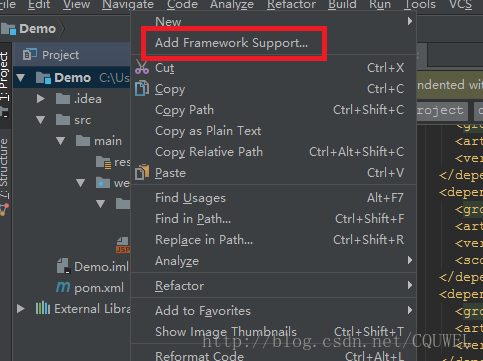
3、新增框架支援
配置完pom.xml之後,我們在idea中要新增一下框架的支援。
右擊我們的專案資料夾,選擇add framework support
然後在視窗中分別選中spring和springmvc,並且選擇spring是,記得勾選springconfig.xml
如果沒有看見spring相關選項,說明系統已經預設,可以到Project StruStructure---Mudules--刪掉Spring項...然後回頭再來選一次即可看見
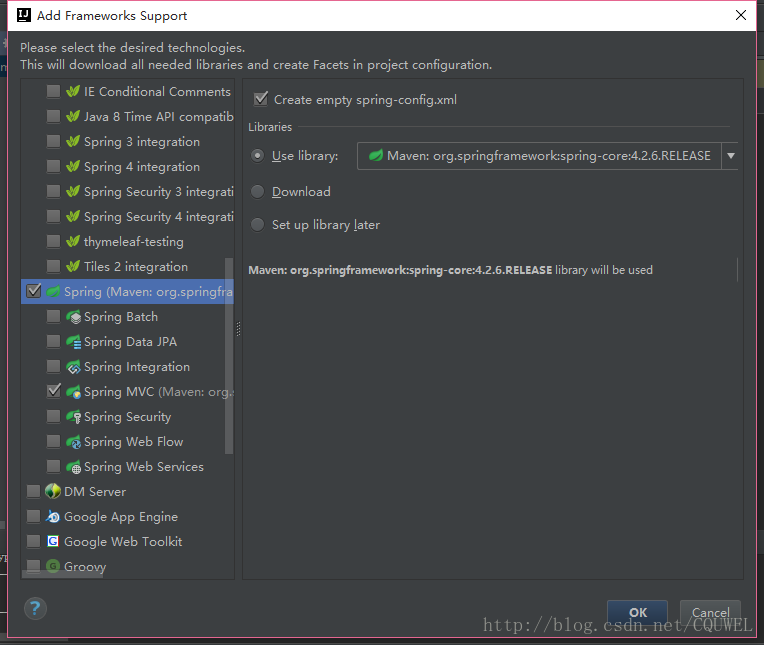
因為我們之前下載過相應的檔案,所以這裡直接用我們下載好的spring檔案。
點選ok之後,我們會發現WEB-INF資料夾下多出了兩個檔案
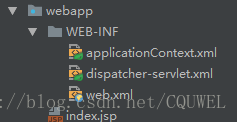
這個就是我們之後要配置的檔案,先不用管。
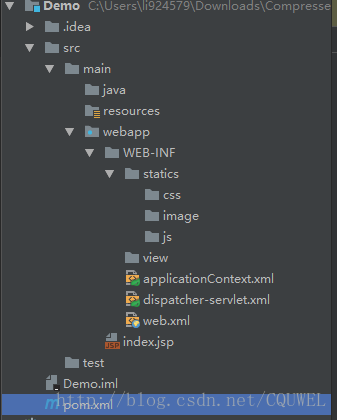
4、完善目錄結構
首先我們在src/main資料夾下建立java資料夾,你會發現這個資料夾不能建立java的類檔案和package,別急,先把必須的資料夾全部建立好。請按照下圖建立資料夾
然後我們進入project structure選擇資料夾的作用,在介面的右上角進入project structure
然後在module中選擇設定各個模組,其中java資料夾是 sources,test是Test,改完之後,點ok,資料夾會變色,那就成功了。 
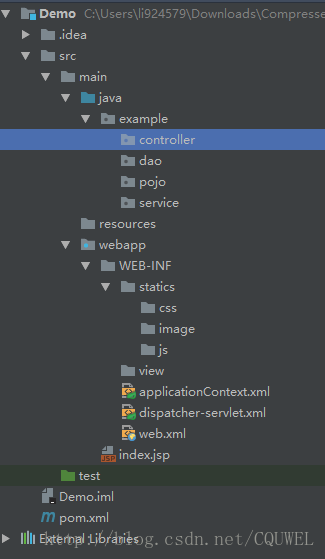
然後仔仔java資料夾中新增需要的包。最後的完整目錄如下
這樣我們配置前的工作就完成了,接下來就是對springmvc進行配置。我把兩種配置的方法分成兩部分,以供參考。
5、基於XML 的配置
5.1、配置web.xml
idea建立的web.xml這個檔案版本比較低,所以我們要找一個新的。把我的檔案直接全部覆蓋複製進去就可以了。
<?xml version="1.0" encoding="UTF-8"?>
<web-app xmlns="http://xmlns.jcp.org/xml/ns/javaee"
         xmlns:xsi="http://www.w3.org/2001/XMLSchema-instance"
         xsi:schemaLocation="http://xmlns.jcp.org/xml/ns/javaee http://xmlns.jcp.org/xml/ns/javaee/web-app_3_1.xsd"
         version="3.1">

    <display-name>Archetype Created Web Application</display-name>

    <!--welcome pages-->
    <welcome-file-list>
        <welcome-file>index.jsp</welcome-file>
    </welcome-file-list>

    <!--配置springmvc DispatcherServlet-->
    <servlet>
        <servlet-name>springMVC</servlet-name>
        <servlet-class>org.springframework.web.servlet.DispatcherServlet</servlet-class>
        <init-param>
            <!--配置dispatcher.xml作為mvc的配置檔案-->
            <param-name>contextConfigLocation</param-name>
            <param-value>/WEB-INF/dispatcher-servlet.xml</param-value>
        </init-param>
        <load-on-startup>1</load-on-startup>
        <async-supported>true</async-supported>
    </servlet>
    <servlet-mapping>
        <servlet-name>springMVC</servlet-name>
        <url-pattern>/</url-pattern>
    </servlet-mapping>
    <!--把applicationContext.xml加入到配置檔案中-->
    <context-param>
        <param-name>contextConfigLocation</param-name>
        <param-value>/WEB-INF/applicationContext.xml</param-value>
    </context-param>
    <listener>
        <listener-class>org.springframework.web.context.ContextLoaderListener</listener-class>
    </listener>
</web-app>- 1
- 2
- 3
- 4
- 5
- 6
- 7
- 8
- 9
- 10
- 11
- 12
- 13
- 14
- 15
- 16
- 17
- 18
- 19
- 20
- 21
- 22
- 23
- 24
- 25
- 26
- 27
- 28
- 29
- 30
- 31
- 32
- 33
- 34
- 35
- 36
- 37
- 38
上面程式碼的意思主要就是建立一箇中央的控制器,都有簡單的註釋,如果有需要,請自行百度。
5.2 配置dispatcher-servlet.xml
這個檔案負責mvc的配置。
<?xml version="1.0" encoding="UTF-8"?>
<beans xmlns="http://www.springframework.org/schema/beans"
       xmlns:xsi="http://www.w3.org/2001/XMLSchema-instance"
       xmlns:context="http://www.springframework.org/schema/context"
       xmlns:mvc="http://www.springframework.org/schema/mvc"
       xsi:schemaLocation="http://www.springframework.org/schema/beans http://www.springframework.org/schema/beans/spring-beans.xsd http://www.springframework.org/schema/context http://www.springframework.org/schema/context/spring-context.xsd http://www.springframework.org/schema/mvc http://www.springframework.org/schema/mvc/spring-mvc.xsd">
    <!--此檔案負責整個mvc中的配置-->

    <!--啟用spring的一些annotation -->
    <context:annotation-config/>

    <!-- 配置註解驅動 可以將request引數與繫結到controller引數上 -->
    <mvc:annotation-driven/>

    <!--靜態資源對映-->
    <!--本專案把靜態資源放在了webapp的statics目錄下,資源對映如下-->
    <mvc:resources mapping="/css/**" location="/WEB-INF/statics/css/"/>
    <mvc:resources mapping="/js/**" location="/WEB-INF/statics/js/"/>
    <mvc:resources mapping="/image/**" location="/WEB-INF/statics/image/"/>

    <!-- 對模型檢視名稱的解析,即在模型檢視名稱新增前後綴(如果最後一個還是表示資料夾,則最後的斜槓不要漏了) 使用JSP-->
    <!-- 預設的檢視解析器 在上邊的解析錯誤時使用 (預設使用html)- -->
    <bean id="defaultViewResolver" class="org.springframework.web.servlet.view.InternalResourceViewResolver">
        <property name="viewClass" value="org.springframework.web.servlet.view.JstlView"/>
<property name="prefix" value="/"/><!--設定JSP檔案的目錄位置-->
<property name="suffix" value=".jsp"/><property name="exposeContextBeansAsAttributes" value="true"/></bean><!-- 自動掃描裝配 --><context:component-scan base-package="example.controller"/></beans>- 1
- 2
- 3
- 4
- 5
- 6
- 7
- 8
- 9
- 10
- 11
- 12
- 13
- 14
- 15
- 16
- 17
- 18
- 19
- 20
- 21
- 22
- 23
- 24
- 25
- 26
- 27
- 28
- 29
- 30
- 31
- 32
直接複製即可,都有註釋,如果有需要,請自行百度。
5.3、 配置applicationContext.xml
其實這個檔案沒什麼好配置的,這個檔案主要負責一些非mvc元件(或者其他元件)的配置,暫時沒有,所以是空的,但你也可以掃描一下。
<?xml version="1.0" encoding="UTF-8"?>
<beans xmlns="http://www.springframework.org/schema/beans"
       xmlns:xsi="http://www.w3.org/2001/XMLSchema-instance"
       xmlns:context="http://www.springframework.org/schema/context"
       xsi:schemaLocation="http://www.springframework.org/schema/beans http://www.springframework.org/schema/beans/spring-beans.xsd http://www.springframework.org/schema/context http://www.springframework.org/schema/context/spring-context.xsd">
    <context:component-scan base-package="example"/>
</beans>- 1
- 2
- 3
- 4
- 5
- 6
- 7
5.4、 測試
三個配置檔案配置好之後,就可以測試了。首先在controller資料夾下建立一個IndexController,程式碼如下:
@Controller
@RequestMapping("/home")
public class IndexController {

    @RequestMapping("/index")
    public String index() {
        return "index";
    }
}- 1
- 2
- 3
- 4
- 5
- 6
- 7
- 8
- 9
- 10
views資料夾下建立index.jsp,statics/css/下建立test.css
<%@ taglib prefix="c" uri="http://java.sun.com/jsp/jstl/core" %>
<%@ page contentType="text/html;charset=UTF-8" language="java" %>
<html>
<head>
    <title>Index</title>
    <link rel="stylesheet" type="text/css" href="<c:url value="/css/test.css"/> "/>
</head>
<body>
<p>Spring MVC based on XML config success!</p>
</body>
</html>
- 1
- 2
- 3
- 4
- 5
- 6
- 7
- 8
- 9
- 10
- 11
- 12
p
{
background-color:
相關推薦
JAVA實用操作(一)IDEA用maven建立springMVC專案和配置
最近做使用者畫像需要使用API的方式訪問hbase表,這裡構建使用java web專案使用java語言進行API開發,這裡簡單回顧下java web的構建方式。
一.回顧建立SpringMVC
Spring MVC 框架在 Java 的 Web 專案中應該是無人
IDEA用maven建立springMVC專案和配置(XML配置和Java配置)
這段時間在學習javaweb的一些知識,然後接觸到了springmvc框架。框架的建立和配置一直是新手入門的一個難題,所以我就寫一下我的配置過程,以供參考,另外因為spring4的新特性可以用java來配置,網上相關資料較少,所以我參考了很多博文後,把xml和j
IDEA用maven建立springMVC專案和配置(XML配置和Java配置)(修正版)
這段時間在學習javaweb的一些知識,然後接觸到了springmvc框架。框架的建立和配置一直是新手入門的一個難題,所以我就寫一下我的配置過程,以供參考,另外因為spring4的新特性可以用java來配置,網上相關資料較少,所以我參考了很多博文後,把xml和java兩種配置方式都試了一下。
工具準備:
Idea用Maven建立SpringMVC框架專案及配置
1.IDEA新建一個maven project,選擇webapp原型,具體建立方法,參考之前的案例:
https://blog.csdn.net/gaofengyan/article/details/82995003 此處不再贅述。
2.新增pom.xml依賴(
用maven建立web專案
工具選擇的是Eclipse:
在File —— new —— maven project,如圖,勾選上
下一步,group id 輸入maven專案在倉庫中的位置, ArtifactId則是專案的名字,Packaging選擇war包代表w
idea使用maven建立web專案偶遇神坑
錯誤資訊上圖:
然後各種嘗試,各種配置,以為maven的配置引入了不同的setting.xml檔案,然後各種不起作用
.......................................................
最終準備準備解除安裝idea(因為
IntelliJ IDEA下 Maven 建立 Scala 專案,執行hello world
建立Maven Scala專案 https://blog.csdn.net/qq_1290259791/article/details/79052584
IntelliJ IDEA 中 右鍵新建(new)時,選項沒有scala(java) class的解決方法和具體解釋 https://
使用IDEA中Maven建立JavaWeb專案
1. 新建web專案
1.1 選擇maven的webapp模板建立web工程
1.2 填寫內容
1.3 此步驟可以解決idea新建maven專案載入緩慢問題處理
1.4 在pom.xml中新增javaweb所需要的依賴
(junit(已存在)、servlet
IDEA 通過maven建立struts2專案
前提:電腦上安裝了jdk、maven。
第一步file->new->project
依照下圖步驟走
next之後填寫groupid和artifactid,groupid隨意先寫一個,artifactid寫自己的專案名,如下圖
繼續next->
maven的安裝使用以及IDEA使用maven建立ssm專案
maven的簡單介紹
Maven是Apache開源組織提供的一個基於POM(Project Object Model)的專案構建(Build)工具,所謂的構建指的是程式碼清除(clean)、編譯(compile)、測試(test)、打包(package)、部署(deploy)等一系列流程
eclipse下用maven建立多專案工程記錄
1.版本:eclipse是4.7.0,maven是3.5.2(沒有配置環境變數。。。懶得配)
2.目標:採用springBoot的具有多個子專案的工程
步驟:maven建立父專案:
在父專案中建立maven module:
依次建立需要的子專案比如:web,common
26 idea使用maven建立web專案
建立web專案
2.建立java目錄
3.建立resources目錄
&
用maven 建立ssm專案 ----學習筆記
轉載 https://www.cnblogs.com/youzhibing/p/5004619.html
maven搭建
安裝過程挺簡單的,去apache下載apache-maven的zip包,解壓到一個目錄下,如下圖
接下來配置windows環境,右擊我的電腦-
IDEA解決Maven建立新專案不載入jar包問題
一、安裝IDEA 引用別人安裝心得 安裝二、新建maven專案 1、建立maven project 選擇quickstart型別,點選Next 2、輸入groupId和ArtifactId 點選Next 3、選擇ma
maven 建立springmvc專案
1、新建Maven專案,選擇webapp,如下圖,點選next,輸入GroupId和ArtifactId(即專案名稱)後點擊Finish。
2.
此時專案會報錯,如下:
右擊
【SpringMVC學習筆記】03 使用maven建立springMVC專案
6.建立controller@ControllerpublicclassIndexController {/** * 主頁設定 "/"的話預設情況下就訪問 * @return */@RequestMapping("/")public String home() {return"home";
IDEA用Maven外掛生成Mybatis的mapper,xml,bean
一、專案下建好資料夾
二、generatorConfig.xml檔案
<?xml version="1.0" encoding="UTF-8"?>
<!DOCTYPE ge
IDEA用maven創建springMVC項目和配置
beans connector 點擊 lease odi tar 記得 相關信息 iyu 原文地址:http://blog.csdn.net/cquwel
這段時間在學習javaweb的一些知識,然後接觸到了springmvc框架。框架的創建和配置一直是新手入門的一個難題,
idea建立springMVC專案(maven)
1、本文只講解怎麼用intellij IDEA進行建立spring MVC專案,並不會講解具體的spring MVC框架基礎,如需瞭解框架原理,請移步其他教程。
2、本文是我在剛學習Spring MVC框架中,看了很多的教程,經過了前前後後很多的坑點進行編寫,不足之處,多多
整理不易,且整且珍惜 2.開發環境的搭建 3.Eclipse的相關配置 4.使用maven建立web專案 5.Spring+Mybatis+SpringMVC整合 6.mybatis自動生成程式碼 7.spring與mybatis整合中Junit的測試 8.maven專案的啟動 9.Restful
整理不易,且整且珍惜
2.開發環境的搭建
3.Eclipse的相關配置
4.使用maven建立web專案
5.Spring+Mybatis+SpringMVC整合
6.mybatis自動生成程式碼