1. 程式人生 > >影象語義分割程式碼實現(1)

影象語義分割程式碼實現(1)

針對《影象語義分割(1)- FCN》介紹的FCN演算法,以官方的程式碼為基礎,在 SIFT-Flow 資料集上做訓練和測試。

介紹瞭如何製作自己的訓練資料

資料準備

1) 首先 clone 官方工程

git clone https://github.com/shelhamer/fcn.berkeleyvision.org.git

工程是基於 CAFFE 的,所以也需要提前安裝好

2)下載資料集及模型
- 到這裡下載 SIFT-Flow 資料集,解壓縮到 fcn/data/sift-flow/ 下
- 到這裡下載 VGG-16 預訓練模型,移動到 fcn/ilsvrc-nets/ 下
- 參考文章

《 FCN模型訓練中遇到的困難》,到這裡下載 VGG_ILSVRC_16_layers_deploy.prototxt
 或者直接 copy 以下內容:

name: "VGG_ILSVRC_16_layers"
input: "data"
input_dim: 10
input_dim: 3
input_dim: 224
input_dim: 224
layers {
  bottom: "data"
  top: "conv1_1"
  name: "conv1_1"
  type: CONVOLUTION
  convolution_param {
    num_output: 64
pad: 1 kernel_size: 3
} } layers { bottom: "conv1_1" top: "conv1_1" name: "relu1_1" type: RELU } layers { bottom: "conv1_1" top: "conv1_2" name: "conv1_2" type: CONVOLUTION convolution_param { num_output: 64 pad: 1 kernel_size: 3 } } layers { bottom: "conv1_2"
top: "conv1_2" name: "relu1_2" type: RELU
} layers { bottom: "conv1_2" top: "pool1" name: "pool1" type: POOLING pooling_param { pool: MAX kernel_size: 2 stride: 2 } } layers { bottom: "pool1" top: "conv2_1" name: "conv2_1" type: CONVOLUTION convolution_param { num_output: 128 pad: 1 kernel_size: 3 } } layers { bottom: "conv2_1" top: "conv2_1" name: "relu2_1" type: RELU } layers { bottom: "conv2_1" top: "conv2_2" name: "conv2_2" type: CONVOLUTION convolution_param { num_output: 128 pad: 1 kernel_size: 3 } } layers { bottom: "conv2_2" top: "conv2_2" name: "relu2_2" type: RELU } layers { bottom: "conv2_2" top: "pool2" name: "pool2" type: POOLING pooling_param { pool: MAX kernel_size: 2 stride: 2 } } layers { bottom: "pool2" top: "conv3_1" name: "conv3_1" type: CONVOLUTION convolution_param { num_output: 256 pad: 1 kernel_size: 3 } } layers { bottom: "conv3_1" top: "conv3_1" name: "relu3_1" type: RELU } layers { bottom: "conv3_1" top: "conv3_2" name: "conv3_2" type: CONVOLUTION convolution_param { num_output: 256 pad: 1 kernel_size: 3 } } layers { bottom: "conv3_2" top: "conv3_2" name: "relu3_2" type: RELU } layers { bottom: "conv3_2" top: "conv3_3" name: "conv3_3" type: CONVOLUTION convolution_param { num_output: 256 pad: 1 kernel_size: 3 } } layers { bottom: "conv3_3" top: "conv3_3" name: "relu3_3" type: RELU } layers { bottom: "conv3_3" top: "pool3" name: "pool3" type: POOLING pooling_param { pool: MAX kernel_size: 2 stride: 2 } } layers { bottom: "pool3" top: "conv4_1" name: "conv4_1" type: CONVOLUTION convolution_param { num_output: 512 pad: 1 kernel_size: 3 } } layers { bottom: "conv4_1" top: "conv4_1" name: "relu4_1" type: RELU } layers { bottom: "conv4_1" top: "conv4_2" name: "conv4_2" type: CONVOLUTION convolution_param { num_output: 512 pad: 1 kernel_size: 3 } } layers { bottom: "conv4_2" top: "conv4_2" name: "relu4_2" type: RELU } layers { bottom: "conv4_2" top: "conv4_3" name: "conv4_3" type: CONVOLUTION convolution_param { num_output: 512 pad: 1 kernel_size: 3 } } layers { bottom: "conv4_3" top: "conv4_3" name: "relu4_3" type: RELU } layers { bottom: "conv4_3" top: "pool4" name: "pool4" type: POOLING pooling_param { pool: MAX kernel_size: 2 stride: 2 } } layers { bottom: "pool4" top: "conv5_1" name: "conv5_1" type: CONVOLUTION convolution_param { num_output: 512 pad: 1 kernel_size: 3 } } layers { bottom: "conv5_1" top: "conv5_1" name: "relu5_1" type: RELU } layers { bottom: "conv5_1" top: "conv5_2" name: "conv5_2" type: CONVOLUTION convolution_param { num_output: 512 pad: 1 kernel_size: 3 } } layers { bottom: "conv5_2" top: "conv5_2" name: "relu5_2" type: RELU } layers { bottom: "conv5_2" top: "conv5_3" name: "conv5_3" type: CONVOLUTION convolution_param { num_output: 512 pad: 1 kernel_size: 3 } } layers { bottom: "conv5_3" top: "conv5_3" name: "relu5_3" type: RELU } layers { bottom: "conv5_3" top: "pool5" name: "pool5" type: POOLING pooling_param { pool: MAX kernel_size: 2 stride: 2 } } layers { bottom: "pool5" top: "fc6" name: "fc6" type: INNER_PRODUCT inner_product_param { num_output: 4096 } } layers { bottom: "fc6" top: "fc6" name: "relu6" type: RELU } layers { bottom: "fc6" top: "fc6" name: "drop6" type: DROPOUT dropout_param { dropout_ratio: 0.5 } } layers { bottom: "fc6" top: "fc7" name: "fc7" type: INNER_PRODUCT inner_product_param { num_output: 4096 } } layers { bottom: "fc7" top: "fc7" name: "relu7" type: RELU } layers { bottom: "fc7" top: "fc7" name: "drop7" type: DROPOUT dropout_param { dropout_ratio: 0.5 } } layers { bottom: "fc7" top: "fc8" name: "fc8" type: INNER_PRODUCT inner_product_param { num_output: 1000 } } layers { bottom: "fc8" top: "prob" name: "prob" type: SOFTMAX }

訓練指令碼修改

1)生成 test、trainval、deploy

a. 執行 fcn/siftflow-fcn32s/net.py 生成 test.prototxt 和 trainval.prototxt
b. cp test.prototxt 為 deploy.protxt

將第一個 data 層換成

layer {
  name: "input"
  type: "Input"
  top: "data"
  input_param {
    # These dimensions are purely for sake of example;
    # see infer.py for how to reshape the net to the given input size.
    shape { dim: 1 dim: 3 dim: 256 dim: 256 }
  }
}

刪除網路後面包含 loss 的層(一共2個)

2)修改 fcn/siftflow-fcn32s/solve.py

import caffe
import surgery, score

import numpy as np
import os
import sys

try:
    import setproctitle
    setproctitle.setproctitle(os.path.basename(os.getcwd()))
except:
    pass

vgg_weights = '../ilsvrc-nets/vgg16-fcn.caffemodel'
vgg_proto = '../ilsvrc-nets/VGG_ILSVRC_16_layers_deploy.prototxt'

# init
caffe.set_device(0)
caffe.set_mode_gpu()

solver = caffe.SGDSolver('solver.prototxt')
#solver.net.copy_from(weights)
vgg_net = caffe.Net(vgg_proto, vgg_weights, caffe.TRAIN)
surgery.transplant(solver.net, vgg_net)
del vgg_net

# surgeries
interp_layers = [k for k in solver.net.params.keys() if 'up' in k]
surgery.interp(solver.net, interp_layers)

# scoring
test = np.loadtxt('../data/sift-flow/test.txt', dtype=str)

for _ in range(50):
    solver.step(2000)
    # N.B. metrics on the semantic labels are off b.c. of missing classes;
    # score manually from the histogram instead for proper evaluation
    score.seg_tests(solver, False, test, layer='score_sem', gt='sem')
    score.seg_tests(solver, False, test, layer='score_geo', gt='geo')

3)修改 fcn/siftflow-fcn32s/solve.prototxt
新增快照設定:

snapshot:4000
snapshot_prefix:"snapshot/train"

訓練及測試

1) 複製 fcn/ 下的 infer.py、score.py、siftflow_layers.py、surgery.py 到 fcn/siftflow-fcn32s 下

2)python train.py 開始訓練

3)修改 infer.py 的模型路徑及測試圖片路徑
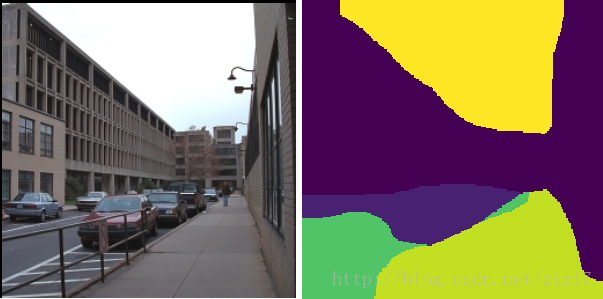
          這裡寫圖片描述
                       圖1. 迭代72000次的分割結果

4)之後可以以 fcn32s 的訓練結果為基礎,訓練 fcn16s 和 fcn8s
 需要注意的是,對於 fcn16s 和 fcn8s,由於不需要重新構造網路層,因此 solve.py 不需要改

import caffe
import surgery, score

import numpy as np
import os
import sys

try:
    import setproctitle
    setproctitle.setproctitle(os.path.basename(os.getcwd()))
except:
    pass

weights = '../siftflow-fcn32s/snapshot/train_iter_100000.caffemodel'

# init
caffe.set_device(0)
caffe.set_mode_gpu()

solver = caffe.SGDSolver('solver.prototxt')
solver.net.copy_from(weights)

# surgeries
interp_layers = [k for k in solver.net.params.keys() if 'up' in k]
surgery.interp(solver.net, interp_layers)

# scoring
test = np.loadtxt('../data/sift-flow/test.txt', dtype=str)

for _ in range(50):
    solver.step(2000)
    # N.B. metrics on the semantic labels are off b.c. of missing classes;
    # score manually from the histogram instead for proper evaluation
    score.seg_tests(solver, False, test, layer='score_sem', gt='sem')
    score.seg_tests(solver, False, test, layer='score_geo', gt='geo')

如何製作自己的訓練資料

相比 detect(使用LabelImg框選目標),segment的資料需要耗費很大精力去準備

參考這篇帖子,MIT提供了一個線上標註多邊形的工具LabelMe,但一般在工程上,為了儘量精確,更多還是使用 photoshop 的“快速選擇”工具

1)首先用 ps 開啟待標記影象,“影象->模式->灰度”,將影象轉為灰度圖
2)使用“快速選擇”工具,選出目標區域,“右鍵->填充->顏色”,假設該區域的 label 為 9 ,那麼設定 RGB 為 (9,9,9)
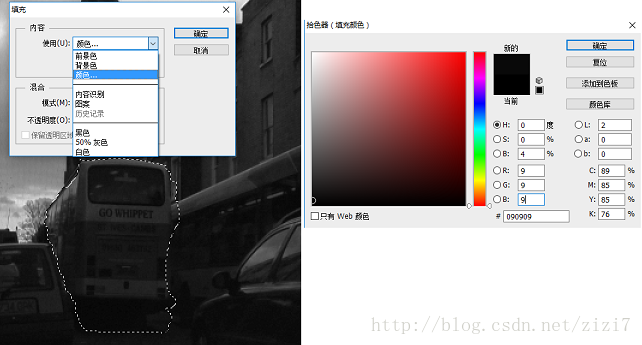
           這裡寫圖片描述
                           圖2. 選擇區域並填充

3)所有類別填充完成後,“檔案->儲存為”label 影象

注意:以上方法針對 SegNet 裡的 CamVid 資料格式(圖3)

                       這裡寫圖片描述
                         圖3. CamVid 資料格式

如圖3所示,train和test裡為RGB影象,trainannot和testannot裡為標記過的label影象(灰度)
      一組訓練(圖3右)資料包含兩張影象