二、通過純程式碼建立的UICollectionView的簡單使用
阿新 • • 發佈:2019-01-31
之前寫了一個Xib建立UiCollectionView的簡單使用的demo,現在寫個用純程式碼寫的,原理其實差不多,只是那個Cell之前是用XIb現在用一個繼承UiColelctionViewCell的類代替,如下所示:
1.首先建立一個CollectionCell的類繼承UIColelctionViewCell
@interface CollectionCell : UICollectionViewCell

@property (nonatomic, strong) UIImageView *imageView;

@property (nonatomic, strong) UILabel *label;

@end
裡面的UIImageView和UILabel控制元件是我定義的加在cell上面的控制元件;
2.在OneViewController的.h檔案中實現三個協議:如下所示,並宣告UICollectionView控制元件
<span style="font-size:14px;">@interface OneViewController : UIViewController<UICollectionViewDataSource,UICollectionViewDelegate,UICollectionViewDelegateFlowLayout>


@property (nonatomic, strong)UICollectionView *collectionView;

@property (nonatomic, strong)NSMutableArray *dataArray;

@end</span>
3.在OneViewController的.m檔案中初始化UICollectionView控制元件
<span style="font-size:14px;">    UICollectionViewFlowLayout *flowLayout = [UICollectionViewFlowLayout new];
    flowLayout.scrollDirection = UICollectionViewScrollDirectionHorizontal; //水平滾動

    self.collectionView = [[UICollectionView alloc] initWithFrame:CGRectMake(0, 20, self.view.frame.size.width, 100) collectionViewLayout:flowLayout];
    self.collectionView.delegate = self;        //實現代理
    self.collectionView.dataSource = self;      //實現資料來源方法
    self.collectionView.showsHorizontalScrollIndicator = NO;
    [self.view addSubview:self.collectionView];
    //註冊cell,通過建立的CollectionCell
    [self.collectionView registerClass:[CollectionCell class] forCellWithReuseIdentifier:@"CELL"];</span>
4.實現其相關的代理方法
<span style="font-size:14px;">#pragma mark UICollectionViewDelegateFlowLayout的代理方法
-(CGSize)collectionView:(UICollectionView *)collectionView layout:(UICollectionViewLayout *)collectionViewLayout sizeForItemAtIndexPath:(NSIndexPath *)indexPath{

    return CGSizeMake(100, 100);
}

#pragma mark UICollectionViewDataSource的代理方法
-(NSInteger)collectionView:(UICollectionView *)collectionView numberOfItemsInSection:(NSInteger)section{

    return self.dataArray.count;
}

-(UICollectionViewCell *)collectionView:(UICollectionView *)collectionView cellForItemAtIndexPath:(NSIndexPath *)indexPath{

    CollectionCell *cell = (CollectionCell *)[collectionView dequeueReusableCellWithReuseIdentifier:@"CELL" forIndexPath:indexPath];

    [cell.imageView setImage:[UIImage imageNamed:[self.dataArray objectAtIndex:indexPath.row]]];
    [cell.label setText:[self.dataArray objectAtIndex:indexPath.row]];
    cell.backgroundColor = [UIColor redColor];
    return cell;

}

#pragma mark UICollectionViewDelegate的代理方法
-(void)collectionView:(UICollectionView *)collectionView didSelectItemAtIndexPath:(NSIndexPath *)indexPath{

    CollectionCell *cell = (CollectionCell *)[collectionView cellForItemAtIndexPath:indexPath];
    cell.backgroundColor = [UIColor greenColor];
}

-(void)collectionView:(UICollectionView *)collectionView didDeselectItemAtIndexPath:(NSIndexPath *)indexPath{
    CollectionCell *cell = (CollectionCell *)[collectionView cellForItemAtIndexPath:indexPath];
    cell.backgroundColor = [UIColor redColor];
}</span>
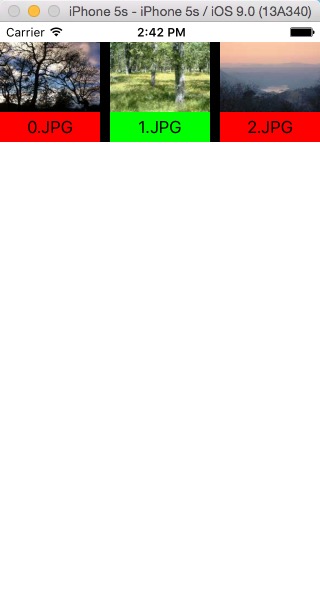
5.ok了執行完效果圖如下: