
關閉CentOS7的firewalld並啟用iptables操作
CentOS7釋出也挺長時間了,但是因為與舊版本差異過大,一直使用 的CentOS6,為了安全性以及技術的更新,總是要換成CentOS7的
在CentOS7中,防火牆iptables被firewalld取代。但為了使用習慣,還是喜歡把防火牆改回iptables。
[[email protected] ~]# systemctl stop firewalld ##停止防火牆 firewalld
[[email protected] ~]# systemctl disable firewalld ##禁用防火牆 firewalld
Removed symlink /etc/systemd/system/dbus-org.fedoraproject.FirewallD1.service.
Removed symlink /etc/systemd/system/basic.target.wants/firewalld.service.
[

防火牆 firewalld 關閉成功
接下來就是啟用iptables了,安裝iptables相關元件
[[email protected] ~]# yum install -y iptables-services iptables-devel.x86_64 iptables.x86_64
[[email protected] ~]# systemctl enable iptables ##啟用iptables

[[email protected] ~]# systemctl status iptables ##檢視iptables狀態
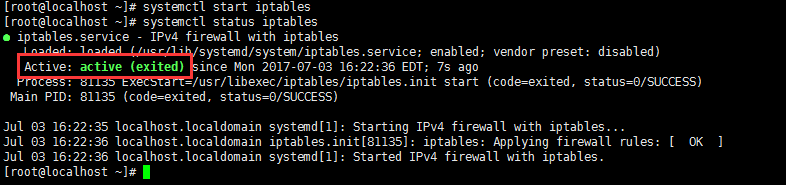
測試:
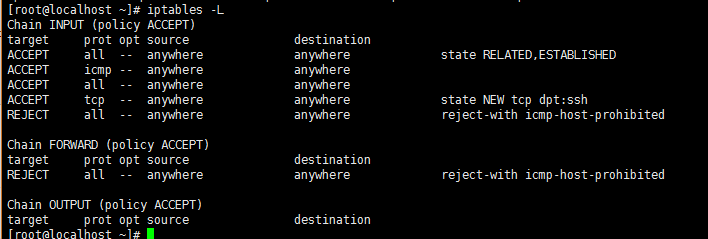
iptables啟用成功。
相關推薦
關閉CentOS7的firewalld並啟用iptables操作
CentOS7釋出也挺長時間了,但是因為與舊版本差異過大,一直使用 的CentOS6,為了安全性以及技術的更新,總是要換成CentOS7的 在CentOS7中,防火牆iptables被firewalld取代。但為了使用習慣,還是喜歡把防火牆改回iptables。 [[
Centos7防火牆關閉和啟用iptables操作
https://yq.aliyun.com/ziliao/33590 前序 還是docker惹得最近做的系統都是上的centos7的系統帶來的一系列的新環境的適應 補記下:在使用oracle vmbox虛擬centos7的時候 選用橋接網路的時候一定要記得插網線,無線不
CentOS 7.0關閉默認防火墻啟用iptables防火墻
you -i system 顯示 entos star for con restart 操作系統環境:CentOS Linux release 7.0.1406(Core) 64位CentOS 7.0默認使用的是firewall作為防火墻,這裏改為iptables防火墻步
CentOS關閉防火牆啟用iptables、開放埠號
CentOS:關閉防火牆,啟用iptables 參考文件: https://blog.csdn.net/bitterliquor/article/details/70256141 a、關閉firewall: //停止firewall systemctl stop firewalld.se
CentOS7系統中關閉firewall,並使用iptables管理防火牆
在我們日常伺服器管理中,經常會統一防火牆的管理形式,我們常用的是關閉iptables(centos6.X),使用指令碼來管理防火牆。如果有的系統是centos7的話,就要同時關閉firewall防火牆了。 1.關閉系統預設的firewall防火牆 sys
mysql創建新用戶並授權訪問操作該數據庫
mysql1.mysql -uroot -p2.輸入密碼:3.update mysql.user set authentication_string=password(‘123456‘) where user=‘oneuser‘ and Host = ‘%‘;4.grant all privileges on
CentOS7 禁用firewall防火墻 啟用iptables 步驟
ase htm put -m for localhost ask jpg state 一、題目:CentOS7 禁用firewall防火墻 啟用iptables 步驟 二、要求:CentOS7 的防火墻默認是firewall 防火墻,現在需要啟用iptables防火墻並完成
centos6 防火墻iptables操作整理
out port dash 端口號 his 設置 rip written 詳細說明 使用語句 前言: iptables的啟動文件位置再: /etc/init.d/iptables , srevice iptables調用的就是這裏的執行文件 查看防火墻狀態
1.創建虛擬機並安裝Centos操作系統
校園網 編輯器 簡體 編輯 分享圖片 安裝 aid ios 加載 一、安裝創建虛擬機 1、下載VMware虛擬機軟件,雙機下一步進行安裝VMvare軟件;2、在安裝好的虛擬化軟件VMware裏創建虛擬機:新建虛擬機(可以先不選擇安裝操作系統ios鏡像文件)虛擬機參數需註意:
VMware搭建內網並通過iptables實現端口轉發實現聯網
配置 enca conf data 一個 info 靜態ip fast accep 整體流程圖 配置Server1 新建兩塊網卡 一塊網卡設置為橋接模式,另外一塊設置為僅主機模式 查看兩塊網卡配置 root@ubuntu:~# ifconfig ens33
Linux服務器配置Redis並啟用PHP支持
daemon bin brush div test serve 自啟 apach 方式 ####安裝redis-2.8.3.tar.gz cd /usr/local/src/ tar -zxvf redis-2.8.3.tar.gz cd redis-2.8.3 ma
LIUNX關閉防火墻等常用操作
防火墻設置 禁止端口 1).重啟後永久生效: 開啟:chkconfig iptables on 關閉: chkconfig iptables off 2).即時生效,重啟後失效: 開啟:service iptables start 關閉:service ip
iptables 操作
dpt NPU all tab chain tput HA line 查看 iptables --list 查看列表 iptables刪除規則 iptables -nL --line-number Chain INPUT (policy ACCEPT)num
輪詢檢測Apache狀態並啟用釘釘報警
F5 head seq spa true 服務 api then ans #!/bin/bash shell_user="root" shell_domain="apache" shell_list="/root/ip_list" shell_row=`
windows環境下安裝部署並啟用zkui的web圖形界面
manager 安裝 CI jar文件 根目錄 https 文件中 項目文件 .cn 在此之前的工作:不是本機部署的三個服務器最為偽集群的zookeeper環境,並將三個為服務啟動起來。 然後才有了下面的工作。 1. 首先,zkui項目地址:https://github.c
kubeadm安裝kubernetes v1.11.3 HA多主高可用並啟用ipvs
har 3.1 oba smt lec template prior yaml 應用 環境介紹: 系統版本:CentOS 7.5 內核:4.18.7-1.el7.elrepo.x86_64 Kubernetes: v1.11.3 Docker-ce: 18.06 Kee
windows server 2003搭建CA服務器並啟用https(SSL)
如何 caf 想要 ca證書 數據 什麽 控制面板 cert 圖片 本文簡單講解在Windows server 2003上如何搭建CA服務,並啟用SSL。廢話不多說,直接開始搭建環境。想要知道證書服務器CA是怎麽一回事,或想要知道SSL原理的朋友,請自行百度,說的非常清楚一
Docker中安裝rabbitmq並啟用插件
sea tex The daemon gen ef7 onf info shard 1.獲取rabbitmq鏡像,註意獲取鏡像的時候要獲取management,不要獲取last版本,management版本才是帶有管理界面的,結果如下 root@newings:/usr/
點選彈窗提示,3秒後關閉視窗並跳轉新的頁面
<!DOCTYPE html PUBLIC "-//W3C//DTD XHTML 1.0 Transitional//EN" "http://www.w3.org/TR/xhtml1/DTD/xhtml1-transitional.dtd"> <html xmlns="
dom4j解析xml 檔案 並對其操作
程式碼例項 package cn.test.dom4jtest; import java.io.FileOutputStream; import java.util.List; import org.dom4j.Document; import org.dom4j.DocumentHel