
從ViewRootImpl類分析View繪製的流程
我們知道Activity中的PhoneWindow物件幫我們建立了一個PhoneWindow內部類DecorView(父類為FrameLayout)視窗頂層檢視,
然後通過LayoutInflater將xml內容佈局解析成View樹形結構新增到DecorView頂層檢視中id為content的FrameLayout父容器上面。到此,我們已經知道Activity的content內容佈局最終
會新增到DecorView視窗頂層檢視上面,相信很多人也會有這樣的疑惑:視窗頂層檢視DecorView是怎麼繪製到我們的手機螢幕上的呢?
這篇部落格來嘗試著分析DecorView的繪製流程。
頂層檢視DecorView新增到視窗的過程
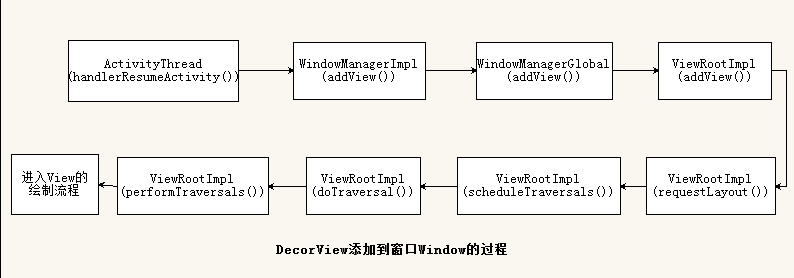
DecorView是怎麼新增到視窗的呢?這時候我們不得不從Activity是怎麼啟動的說起,當Activity初始化 Window和將佈局新增到
PhoneWindow的內部類DecorView類之後,ActivityThread類會呼叫handleResumeActivity方法將頂層檢視DecorView新增到PhoneWindow視窗,來看看handlerResumeActivity方法的實現:
0-1
Step1
final void handleResumeActivity(IBinder token,
boolean clearHide, boolean isForward, boolean reallyResume) {
... 分析:詳細步驟以上程式碼都有詳細註釋,這裡就不一一解釋。handlerResumeActivity()方法主要就是通過第 23 行程式碼將
Activity的頂層檢視DecorView新增到視窗檢視上。我們來看看WindowManagerImpl類的addView()方法。
@Override
    public void addView(View view, ViewGroup.LayoutParams params) {
        mGlobal.addView(view, params, mDisplay, mParentWindow);
    }
原始碼很簡單,直接呼叫了 mGlobal物件的addView()方法。繼續跟蹤,mGlobal物件是WindowManagerGlobal類。進入WindowManagerGlobal類看addView()方法。
0-2
Step2
 public void addView(View view, ViewGroup.LayoutParams params,
            Display display, Window parentWindow) {

        ............

        ViewRootImpl root;
        View panelParentView = null;

        ............

        //獲得ViewRootImpl物件root
         root = new ViewRootImpl(view.getContext(), display);

        ...........

        // do this last because it fires off messages to start doing things
        try {
            //將傳進來的引數DecorView設定到root中
            root.setView(view, wparams, panelParentView);
        } catch (RuntimeException e) {
          ...........
        }
    }
該方法中建立了一個ViewRootImpl物件root,然後呼叫ViewRootImpl類中的setView成員方法()。繼續跟蹤程式碼進入ViewRootImpl類分析:
0-3
Step3
 public void setView(View view, WindowManager.LayoutParams attrs, View panelParentView) {
        synchronized (this) {
            if (mView == null) {
            //將頂層檢視DecorView賦值給全域性的mView
                mView = view;
            .............
            //標記已新增DecorView
             mAdded = true;
            .............
            //請求佈局
            requestLayout();

            .............
        }
 }
該方法實現有點長,我省略了其他程式碼,直接看以上幾行程式碼:
- 將外部引數DecorView賦值給mView成員變數
- 標記DecorView已新增到ViewRootImpl
- 呼叫requestLayout方法請求佈局
0-4
跟蹤程式碼進入到 requestLayout()方法:
Step4
@Override
    public void requestLayout() {
        if (!mHandlingLayoutInLayoutRequest) {
            checkThread();
            mLayoutRequested = true;
            scheduleTraversals();
        }
    }
    ................

void scheduleTraversals() {
        if (!mTraversalScheduled) {
            mTraversalScheduled = true;
            mTraversalBarrier = mHandler.getLooper().postSyncBarrier();
            mChoreographer.postCallback(
                    Choreographer.CALLBACK_TRAVERSAL, mTraversalRunnable, null);
            if (!mUnbufferedInputDispatch) {
                scheduleConsumeBatchedInput();
            }
            notifyRendererOfFramePending();
        }
    }

..............

final class TraversalRunnable implements Runnable {
        @Override
        public void run() {
            doTraversal();
        }
    }
final TraversalRunnable mTraversalRunnable = new TraversalRunnable();

...............

 void doTraversal() {
        if (mTraversalScheduled) {
            mTraversalScheduled = false;
            mHandler.getLooper().removeSyncBarrier(mTraversalBarrier);

            try {
                performTraversals();
            } finally {
                Trace.traceEnd(Trace.TRACE_TAG_VIEW);
            }
        }
    }

............
跟蹤程式碼,最後DecorView的繪製會進入到ViewRootImpl類中的performTraversals()成員方法,這個過程可以參考上面的程式碼流程圖。現在我們主要來分析下 ViewRootImpl類中的performTraversals()方法。
0-5
Step5
private void performTraversals() {
        // cache mView since it is used so much below...
        //我們在Step3知道,mView就是DecorView根佈局
        final View host = mView;
        //在Step3 成員變數mAdded賦值為true,因此條件不成立
        if (host == null || !mAdded)
            return;
        //是否正在遍歷
        mIsInTraversal = true;
        //是否馬上繪製View
        mWillDrawSoon = true;

        .............
        //頂層檢視DecorView所需要視窗的寬度和高度
        int desiredWindowWidth;
        int desiredWindowHeight;

        .....................
        //在構造方法中mFirst已經設定為true,表示是否是第一次繪製DecorView
        if (mFirst) {
            mFullRedrawNeeded = true;
            mLayoutRequested = true;
            //如果視窗的型別是有狀態列的,那麼頂層檢視DecorView所需要視窗的寬度和高度就是除了狀態列
            if (lp.type == WindowManager.LayoutParams.TYPE_STATUS_BAR_PANEL
                    || lp.type == WindowManager.LayoutParams.TYPE_INPUT_METHOD) {
                // NOTE -- system code, won't try to do compat mode.
                Point size = new Point();
                mDisplay.getRealSize(size);
                desiredWindowWidth = size.x;
                desiredWindowHeight = size.y;
            } else {//否則頂層檢視DecorView所需要視窗的寬度和高度就是整個螢幕的寬高
                DisplayMetrics packageMetrics =
                    mView.getContext().getResources().getDisplayMetrics();
                desiredWindowWidth = packageMetrics.widthPixels;
                desiredWindowHeight = packageMetrics.heightPixels;
            }
    }
............
//獲得view寬高的測量規格,mWidth和mHeight表示視窗的寬高,lp.widthhe和lp.height表示DecorView根佈局寬和高
 int childWidthMeasureSpec = getRootMeasureSpec(mWidth, lp.width);
 int childHeightMeasureSpec = getRootMeasureSpec(mHeight, lp.height);

  // Ask host how big it wants to be
  //執行測量操作
  performMeasure(childWidthMeasureSpec, childHeightMeasureSpec);

........................
//執行佈局操作
 performLayout(lp, desiredWindowWidth, desiredWindowHeight);

.......................
//執行繪製操作
performDraw();

}
該方法主要流程就體現了View繪製渲染的三個主要步驟,分別是測量,佈局,繪製三個階段。
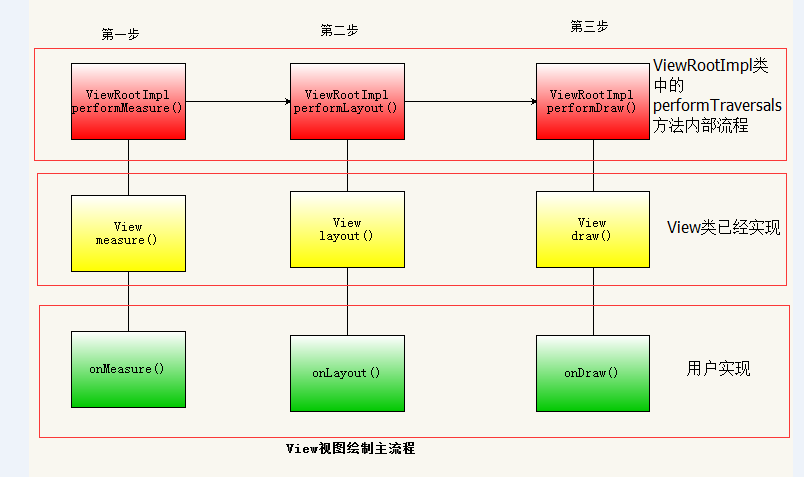
這裡先給出Android系統View的繪製流程:依次執行View類裡面的如下三個方法:
- measure(int ,int) :測量View的大小
- layout(int ,int ,int ,int) :設定子View的位置
- draw(Canvas) :繪製View內容到Canvas畫布上
測量measure
1-1
從performTraversals方法我們可以看到,在執行performMeasure測量之前要通過getRootMeasureSpec方法獲得頂層檢視DecorView的測量規格,跟蹤程式碼進入getRootMeasureSpec()方法:
  /**
     * Figures out the measure spec for the root view in a window based on it's
     * layout params.
     *
     * @param windowSize
     *            The available width or height of the window
     *
     * @param rootDimension
     *            The layout params for one dimension (width or height) of the
     *            window.
     *
     * @return The measure spec to use to measure the root view.
     */
    private static int getRootMeasureSpec(int windowSize, int rootDimension) {
        int measureSpec;
        switch (rootDimension) {
        //匹配父容器時,測量模式為MeasureSpec.EXACTLY,測量大小直接為螢幕的大小,也就是充滿真個螢幕
        case ViewGroup.LayoutParams.MATCH_PARENT:
            // Window can't resize. Force root view to be windowSize.
            measureSpec = MeasureSpec.makeMeasureSpec(windowSize, MeasureSpec.EXACTLY);
            break;
        //包裹內容時,測量模式為MeasureSpec.AT_MOST,測量大小直接為螢幕大小,也就是充滿真個螢幕
        case ViewGroup.LayoutParams.WRAP_CONTENT:
            // Window can resize. Set max size for root view.
            measureSpec = MeasureSpec.makeMeasureSpec(windowSize, MeasureSpec.AT_MOST);
            break;
        //其他情況時,測量模式為MeasureSpec.EXACTLY,測量大小為DecorView頂層檢視佈局設定的大小。
        default:
            // Window wants to be an exact size. Force root view to be that size.
            measureSpec = MeasureSpec.makeMeasureSpec(rootDimension, MeasureSpec.EXACTLY);
            break;
        }
        return measureSpec;
    }
分析:該方法主要作用是在整個視窗的基礎上計算出root view(頂層檢視DecorView)的測量規格,該方法的兩個引數分別表示:
- windowSize:當前手機視窗的有效寬和高,一般都是除了通知欄的螢幕寬和高
- rootDimension 根佈局DecorView請求的寬和高,由前面的部落格我們知道是MATCH_PARENT
因此DecorView根佈局的測量模式就是MeasureSpec.EXACTLY,測量大小一般都是整個螢幕大小,所以一般我們的Activity
視窗都是全屏的。因此上面程式碼走第一個分支,通過呼叫MeasureSpec.makeMeasureSpec方法將
DecorView的測量模式和測量大小封裝成DecorView的測量規格。
1-2
由於performMeasure()方法呼叫了 View中measure()方法倆進行測量,並且DecorView(繼承自FrameLayout)的父類是
ViewGroup,祖父類是View。因此我們從View的成員函式measure開始分析整個測量過程。
這個過程分為 3 步,我們來一一分析。
Step1
    int mOldWidthMeasureSpec = Integer.MIN_VALUE;

    int mOldHeightMeasureSpec = Integer.MIN_VALUE;

 public final void measure(int widthMeasureSpec, int heightMeasureSpec) {

        ..................
        //如果上一次的測量規格和這次不一樣,則條件滿足,重新測量檢視View的大小
        if ((mPrivateFlags & PFLAG_FORCE_LAYOUT) == PFLAG_FORCE_LAYOUT ||
                widthMeasureSpec != mOldWidthMeasureSpec ||
                heightMeasureSpec != mOldHeightMeasureSpec) {

            // first clears the measured dimension flag
            mPrivateFlags &= ~PFLAG_MEASURED_DIMENSION_SET;

            resolveRtlPropertiesIfNeeded();

            int cacheIndex = (mPrivateFlags & PFLAG_FORCE_LAYOUT) == PFLAG_FORCE_LAYOUT ? -1 :
                    mMeasureCache.indexOfKey(key);
            if (cacheIndex < 0 || sIgnoreMeasureCache) {
                // measure ourselves, this should set the measured dimension flag back
                onMeasure(widthMeasureSpec, heightMeasureSpec);
                mPrivateFlags3 &= ~PFLAG3_MEASURE_NEEDED_BEFORE_LAYOUT;
            } else {
                long value = mMeasureCache.valueAt(cacheIndex);
                // Casting a long to int drops the high 32 bits, no mask needed
                setMeasuredDimensionRaw((int) (value >> 32), (int) value);
                mPrivateFlags3 |= PFLAG3_MEASURE_NEEDED_BEFORE_LAYOUT;
            }

            mPrivateFlags |= PFLAG_LAYOUT_REQUIRED;
        }

        mOldWidthMeasureSpec = widthMeasureSpec;
        mOldHeightMeasureSpec = heightMeasureSpec;

    }
分析:
1.程式碼第10行:判斷當前檢視View是否需要重新測量,當上一次檢視View測量的規格和本次檢視View測量規格不一樣時,就說明檢視View的大小有改變,因此需要重新測量。
2.程式碼第23行:呼叫了onMeasure方法進行測量,說明View主要的測量邏輯是在該方法中實現。
3.程式碼第35-36行:儲存本次檢視View的測量規格到mOldWidthMeasureSpec和mOldHeightMeasureSpec以便下次測量條件的判斷是否需要重新測量。
1-3
跟蹤程式碼,進入View類的 onMeasure方法
 /**
     * <p>
     * Measure the view and its content to determine the measured width and the
     * measured height. This method is invoked by {@link #measure(int, int)} and
     * should be overriden by subclasses to provide accurate and efficient
     * measurement of their contents.
     * </p>
     *
     * <p>
     * <strong>CONTRACT:</strong> When overriding this method, you
     * <em>must</em> call {@link #setMeasuredDimension(int, int)} to store the
     * measured width and height of this view. Failure to do so will trigger an
     * <code>IllegalStateException</code>, thrown by
     * {@link #measure(int, int)}. Calling the superclass'
     * {@link #onMeasure(int, int)} is a valid use.
     * </p>
     *
     * <p>
     * The base class implementation of measure defaults to the background size,
     * unless a larger size is allowed by the MeasureSpec. Subclasses should
     * override {@link #onMeasure(int, int)} to provide better measurements of
     * their content.
     * </p>
     *
     * <p>
     * If this method is overridden, it is the subclass's responsibility to make
     * sure the measured height and width are at least the view's minimum height
     * and width ({@link #getSuggestedMinimumHeight()} and
     * {@link #getSuggestedMinimumWidth()}).
     * </p>
     *
     * @param widthMeasureSpec horizontal space requirements as imposed by the parent.
     *                         The requirements are encoded with
     *                         {@link android.view.View.MeasureSpec}.
     * @param heightMeasureSpec vertical space requirements as imposed by the parent.
     *                         The requirements are encoded with
     *                         {@link android.view.View.MeasureSpec}.
     *
     * @see #getMeasuredWidth()
     * @see #getMeasuredHeight()
     * @see #setMeasuredDimension(int, int)
     * @see #getSuggestedMinimumHeight()
     * @see #getSuggestedMinimumWidth()
     * @see android.view.View.MeasureSpec#getMode(int)
     * @see android.view.View.MeasureSpec#getSize(int)
     */
    protected void onMeasure(int widthMeasureSpec, int heightMeasureSpec) {
        setMeasuredDimension(getDefaultSize(getSuggestedMinimumWidth(), widthMeasureSpec),
                getDefaultSize(getSuggestedMinimumHeight(), heightMeasureSpec));
    }
分析:
該方法的實現也很簡單,直接呼叫setMeasuredDimension方法完成檢視View的測量。我們知道,Android中所有的檢視元件都是繼承自View實現的。因此該方法提供了一個預設測量檢視View大小的實現。
1-4
言外之意,如果你不想你自己的View使用預設實現來測量View的寬高的話,你可以在子類中重寫onMeasure方法來自定義測量方法。我們先來看看預設測量寬高的實現。跟蹤程式碼進入getDefaultSize方法:
 /**
     * Utility to return a default size. Uses the supplied size if the
     * MeasureSpec imposed no constraints. Will get larger if allowed
     * by the MeasureSpec.
     *
     * @param size Default size for this view
     * @param measureSpec Constraints imposed by the parent
     * @return The size this view should be.
     */
    public static int getDefaultSize(int size, int measureSpec) {
        int result = size;
        //獲得測量模式
        int specMode = MeasureSpec.getMode(measureSpec);
        //獲得父親容器留給子檢視View的大小
        int specSize = MeasureSpec.getSize(measureSpec);

        switch (specMode) {
        case MeasureSpec.UNSPECIFIED:
            result = size;
            break;
        case MeasureSpec.AT_MOST:
        case MeasureSpec.EXACTLY:
            result = specSize;
            break;
        }
        return result;
    }
分析:該方法的作用是根據View佈局設定的寬高和父View傳遞的測量規格重新計算View的測量寬高。由此可以知道,我們佈局的
子View最終的大小是由佈局大小和父容器的測量規格共同決定的。如果自定義View你沒有重寫onMeasure使用系統預設方法的
話,測量模式MeasureSpec.AT_MOST和MeasureSpec.EXACTLY下的測量大小是一樣的。我們來總結一下測量模式的種類:
- MeasureSpec.EXACTLY:確定模式,父容器希望子檢視View的大小是固定,也就是specSize大小。
- MeasureSpec.AT_MOST:最大模式,父容器希望子檢視View的大小不超過父容器希望的大小,也就是不超過specSize大小。
- MeasureSpec.UNSPECIFIED: 不確定模式,子檢視View請求多大就是多大,父容器不限制其大小範圍,也就是size大小。
從上面程式碼可以看出,當測量模式是MeasureSpec.UNSPECIFIED時,View的測量值為size,當測量模式為
MeasureSpec.AT_MOST或者case MeasureSpec.EXACTLY時,View的測量值為specSize。我們知道,specSize是由父容器決
定,那麼size是怎麼計算出來的呢?getDefaultSize方法的第一個引數是呼叫getSuggestedMinimumWidth方法獲得。進入getSuggestedMinimumWidth方法看看實現:
/**
     * Returns the suggested minimum width that the view should use. This
     * returns the maximum of the view's minimum width)
     * and the background's minimum width
     *  ({@link android.graphics.drawable.Drawable#getMinimumWidth()}).
     * <p>
     * When being used in {@link #onMeasure(int, int)}, the caller should still
     * ensure the returned width is within the requirements of the parent.
     *
     * @return The suggested minimum width of the view.
     */
    protected int getSuggestedMinimumWidth() {
        return (mBackground == null) ? mMinWidth : max(mMinWidth, mBackground.getMinimumWidth());
    }
原來size大小是獲取View屬性當中的最小值,也就是 android:minWidth和 android:minHeight的值,前提是View沒有設定背景屬性。否則就在最小值和背景的最小值中間取最大值。
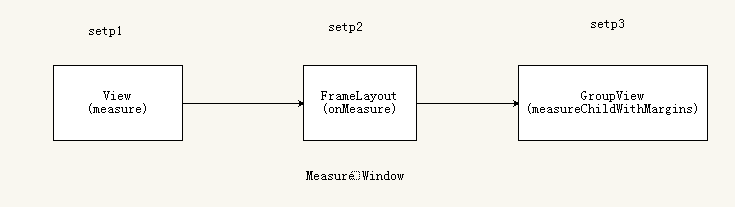
sizeSpec大小是有父容器決定的,我們由 1-1節知道父容器DecorView的測量模式是MeasureSpec.EXACTLY,測量大小sizeSpec是整個螢幕的大小。
setp2
而DecorView是繼承自FrameLayout的,那麼我們來看看FrameLayout類中的onMeasure方法的實現
 @Override
    protected void onMeasure(int widthMeasureSpec, int heightMeasureSpec) {
        int count = getChildCount();
        ..............
        int maxHeight = 0;
        int maxWidth = 0;
        int childState = 0;

        for (int i = 0; i < count; i++) {
            final View child = getChildAt(i);
            if (mMeasureAllChildren || child.getVisibility() != GONE) {
                //測量FrameLayout下每個子檢視View的寬和高
                measureChildWithMargins(child, widthMeasureSpec, 0, heightMeasureSpec, 0);
                final LayoutParams lp = (LayoutParams) child.getLayoutParams();
                maxWidth = Math.max(maxWidth,
                        child.getMeasuredWidth() + lp.leftMargin + lp.rightMargin);
                maxHeight = Math.max(maxHeight,
                        child.getMeasuredHeight() + lp.topMargin + lp.bottomMargin);
                childState = combineMeasuredStates(childState, child.getMeasuredState());
                if (measureMatchParentChildren) {
                    if (lp.width == LayoutParams.MATCH_PARENT ||
                            lp.height == LayoutParams.MATCH_PARENT) {
                        mMatchParentChildren.add(child);
                    }
                }
            }
        }

        // Account for padding too
        maxWidth += getPaddingLeftWithForeground() + getPaddingRightWithForeground();
        maxHeight += getPaddingTopWithForeground() + getPaddingBottomWithForeground();

        // Check against our minimum height and width
        maxHeight = Math.max(maxHeight, getSuggestedMinimumHeight());
        maxWidth = Math.max(maxWidth, getSuggestedMinimumWidth());

        // Check against our foreground's minimum height and width
        final Drawable drawable = getForeground();
        if (drawable != null) {
            maxHeight = Math.max(maxHeight, drawable.getMinimumHeight());
            maxWidth = Math.max(maxWidth, drawable.getMinimumWidth());
        }
        //設定當前FrameLayout測量結果,此方法的呼叫表示當前View測量的結束。
        setMeasuredDimension(resolveSizeAndState(maxWidth, widthMeasureSpec, childState),
                resolveSizeAndState(maxHeight, heightMeasureSpec,
                        childState << MEASURED_HEIGHT_STATE_SHIFT));
}
分析:由以上程式碼發現,ViewGroup測量結果都是帶邊距的,程式碼第9-27行就是遍歷測量FrameLayout下子檢視View的大小了。
程式碼第44行,最後呼叫setMeasuredDimension方法設定當前View的測量結果,此方法的呼叫表示當前View測量結束。
那麼我們來分析下程式碼第12行measureChildWithMargins方法測量FrameLayout下的子檢視View的大小,跟蹤原始碼:
Step3:
由於FrameLayout父類是ViewGroup,measureChildWithMargins方法在ViewGroup下
/**
     * Ask one of the children of this view to measure itself, taking into
     * account both the MeasureSpec requirements for this view and its padding
     * and margins. The child must have MarginLayoutParams The heavy lifting is
     * done in getChildMeasureSpec.
     *
     * @param child The child to measure
     * @param parentWidthMeasureSpec The width requirements for this view
     * @param widthUsed Extra space that has been used up by the parent
     *        horizontally (possibly by other children of the parent)
     * @param parentHeightMeasureSpec The height requirements for this view
     * @param heightUsed Extra space that has been used up by the parent
     *        vertically (possibly by other children of the parent)
     */
    protected void measureChildWithMargins(View child,
            int parentWidthMeasureSpec, int widthUsed,
            int parentHeightMeasureSpec, int heightUsed) {
        final MarginLayoutParams lp = (MarginLayoutParams) child.getLayoutParams();

        final int childWidthMeasureSpec = getChildMeasureSpec(parentWidthMeasureSpec,
                mPaddingLeft + mPaddingRight + lp.leftMargin + lp.rightMargin
                        + widthUsed, lp.width);
        final int childHeightMeasureSpec = getChildMeasureSpec(parentHeightMeasureSpec,
                mPaddingTop + mPaddingBottom + lp.topMargin + lp.bottomMargin
                        + heightUsed, lp.height);

        child.measure(childWidthMeasureSpec, childHeightMeasureSpec);
    }
分析:該方法中呼叫getChildMeasureSpec方法來獲得ViewGroup下的子檢視View的測量規格。然後將測量規格最為引數傳遞給
View的measure方法,最終完成所有子檢視View的測量。來看看這裡是怎麼獲得子檢視View的測量規格的,進入getChildMeasureSpec方法:
public static int getChildMeasureSpec(int spec, int padding, int childDimension) {
        int specMode = MeasureSpec.getMode(spec);
        int specSize = MeasureSpec.getSize(spec);

        int size = Math.max(0, specSize - padding);

        int resultSize = 0;
        int resultMode = 0;

        switch (specMode) {
        // Parent has imposed an exact size on us
        case MeasureSpec.EXACTLY:
            if (childDimension >= 0) {
                resultSize = childDimension;
                resultMode = MeasureSpec.EXACTLY;
            } else if (childDimension == LayoutParams.MATCH_PARENT) {
                // Child wants to be our size. So be it.
                resultSize = size;
                resultMode = MeasureSpec.EXACTLY;
            } else if (childDimension == LayoutParams.WRAP_CONTENT) {
                // Child wants to determine its own size. It can't be
                // bigger than us.
                resultSize = size;
                resultMode = MeasureSpec.AT_MOST;
            }
            break;

       ...........

        }
        return MeasureSpec.makeMeasureSpec(resultSize, resultMode);
}分析:由1-1節我們知道根佈局DecorView的測量規格中的測量模式是MeasureSpec.EXACTLY,測量大小是整個視窗大小。因此上面程式碼分支走MeasureSpec.EXACTLY。子檢視View的測量規格由其寬和高參數決定。
- 當DecorView根佈局的子檢視View寬高為一個確定值childDimension時,該View的測量模式為MeasureSpec.EXACTLY,測量大小就是childDimension。
- 當子檢視View寬高為MATCH_PARENT時,該View的測量模式為MeasureSpec.EXACTLY,測量大小是父容器DecorView規定的大小,為整個螢幕大小MATCH_PARENT。
- 當子檢視View寬高為WRAP_CONTENT時,該View的測量模式為MeasureSpec.AT_MOST,測量大小是父容器DecorView規定的大小,為整個螢幕大小MATCH_PARENT。
這裡我們來驗證一下以上的結論,目的是進一步理解 View的幾種測量模式和View的測量規格。
1.定義一個佈局activity_main.xml如下:
<com.xjp.layoutdemo.MyView
    xmlns:android="http://schemas.android.com/apk/res/android"
    android:layout_width="wrap_content"
    android:layout_height="wrap_content"
    android:text="Button"
    android:gravity="start"/>
這個佈局很簡單,直接將自定義的MyView作為Activity的內容佈局。
2.自定義MyView程式碼如下:
public class MyView extends View {

    private static final String TAG = "MyCustomView";
    private String titleText = "Hello world";

    private int titleColor = Color.BLACK;
    private int titleBackgroundColor = Color.RED;
    private int titleSize = 16;

    private Paint mPaint;
    private Rect mBound;

    public MyView(Context context) {
        this(context, null);
    }

    public MyView(Context context, AttributeSet attrs) {
        this(context, attrs, 0);
    }

    public MyView(Context context, AttributeSet attrs, int defStyleAttr) {
        super(context, attrs, defStyleAttr);
        init();
    }

    @Override
    protected void onMeasure(int widthMeasureSpec, int heightMeasureSpec) {
        int specMode = MeasureSpec.getMode(widthMeasureSpec);
        int specSize = MeasureSpec.getSize(widthMeasureSpec);

        switch (specMode) {
            case MeasureSpec.UNSPECIFIED:
                Log.e(TAG, "UNSPECIFIED.....");
                break;
            case MeasureSpec.AT_MOST:
                Log.e(TAG, "AT_MOST.....");
                break;
            case MeasureSpec.EXACTLY:
                Log.e(TAG, "EXACTLY.....");
                break;
        }

        super.onMeasure(widthMeasureSpec, heightMeasureSpec);
    }

    /**
     * 初始化
     */
    private void init() {
        mPaint = new Paint(Paint.ANTI_ALIAS_FLAG);
        mPaint.setTextSize(titleSize);
        /**
         * 得到自定義View的titleText內容的寬和高
         */
        mBound = new Rect();
        mPaint.getTextBounds(titleText, 0, titleText.length(), mBound);
    }

    @Override
    protected void onDraw(Canvas canvas) {
        mPaint.setColor(titleBackgroundColor);
        canvas.drawCircle(getWidth() / 2f, getWidth() / 2f, getWidth() / 2f, mPaint);
        mPaint.setColor(titleColor);
        canvas.drawText(titleText, getWidth() / 2 - mBound.width() / 2, getHeight() / 2 + mBound.height() / 2, mPaint);
    }
}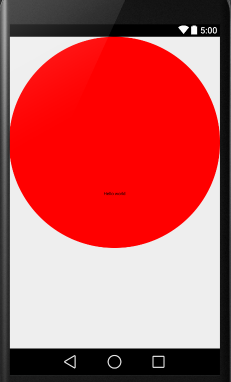
自定義的MyView也很簡單,僅僅重寫了onDraw方法,onMeasure方法呼叫父類方法。程式碼執行之後你會發現,
1.佈局中設定的MyView大小是wrap_content包裹內容的,但是View檢視卻充滿整個螢幕。看打印發現當前的測量模式是MeasureSpec.AT_MOST。
2.當MyView大小是match_parent填滿父容器時,View檢視也是充滿整個螢幕,看打印發現測量模式是MeasureSpec.EXACTLY。
3.當MyView大小是固定值,比如是1200dp和1200dp時,View檢視是超出整個螢幕的。
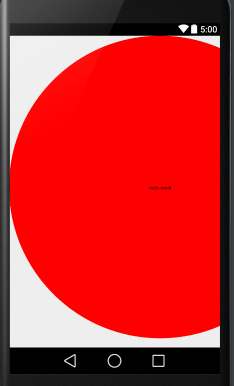
原因是此處的Activity內容佈局的父容器也是一個id為content的FrameLayout佈局。這裡就不解釋以上三種情況的原因了,參考Stpe3解釋的很詳細了。
至此,整個View樹型結構的佈局測量流程可以歸納如下:
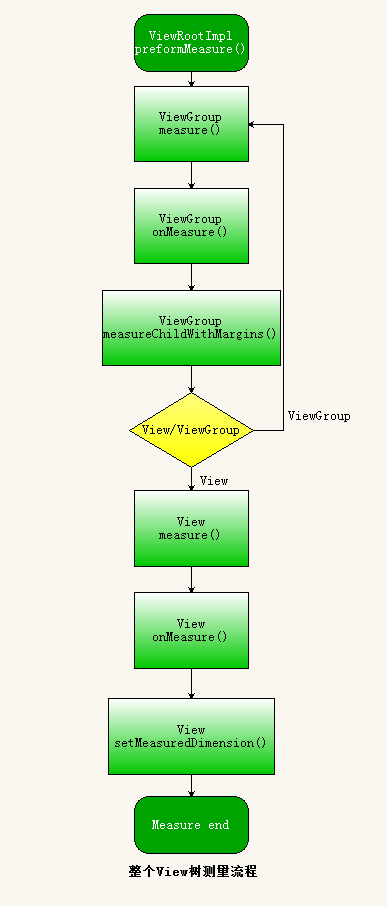
measure總結
- View的measure方法是final型別的,子類不可以重寫,子類可以通過重寫onMeasure方法來測量自己的大小,當然也可以不重寫onMeasure方法使用系統預設測量大小。
- View測量結束的標誌是呼叫了View類中的setMeasuredDimension成員方法,言外之意是,如果你需要在自定義的View中重寫onMeasure方法,在你測量結束之前你必須呼叫setMeasuredDimension方法測量才有效。
- 在Activity生命週期onCreate和onResume方法中呼叫View.getWidth()和View.getMeasuredHeight()返回值為0的,是因為當前View的測量還沒有開始,這裡關係到Activity啟動過程,文章開頭說了當ActivityThread類中的performResumeActivity方法執行之後才將DecorView新增到PhoneWindow視窗上,開始測量。在Activity生命週期onCreate在中performResumeActivity還為執行,因此呼叫View.getMeasuredHeight()返回值為0。
- 子檢視View的大小是由父容器View和子檢視View佈局共同決定的。
佈局Layout
由 0-5節可知,View檢視繪製流程中的佈局layout是由ViewRootImpl中的performLayout成員方法開始的,看原始碼:
2-1
 private void performLayout(WindowManager.LayoutParams lp, int desiredWindowWidth,
            int desiredWindowHeight) {
        ..................
        //標記當前開始佈局
        mInLayout = true;
        //mView就是DecorView
        final View host = mView;
        ..................
        //DecorView請求佈局
        host.layout(0, 0, host.getMeasuredWidth(), host.getMeasuredHeight());
        //標記佈局結束
        mInLayout = false;
        ..................
}
分析:
程式碼第10行發現,DecorView的四個位置左=0,頂=0,右=螢幕寬,底=螢幕寬,說明DecorView佈局的位置是從螢幕最左最頂端開始佈局,到螢幕最低最右結束。因此DecorView根佈局是充滿整個螢幕的。
該方法主要呼叫了View類的layout方法,跟蹤程式碼進入View類的layout方法瞧瞧吧
2-2
/**
     * Assign a size and position to a view and all of its
     * descendants
     *
     * <p>This is the second phase of the layout mechanism.
     * (The first is measuring). In this phase, each parent calls
     * layout on all of its children to position them.
     * This is typically done using the child measurements
     * that were stored in the measure pass().</p>
     *
     * <p>Derived classes should not override this method.
     * Derived classes with children should override
     * onLayout. In that method, they should
     * call layout on each of their children.</p>
     *
     * @param l Left position, relative to parent
     * @param t Top position, relative to parent
     * @param r Right position, relative to parent
     * @param b Bottom position, relative to parent
     */
    @SuppressWarnings({"unchecked"})
    public void layout(int l, int t, int r, int b) {
        //判斷是否需要重新測量
        if ((mPrivateFlags3 & PFLAG3_MEASURE_NEEDED_BEFORE_LAYOUT) != 0) {
            onMeasure(mOldWidthMeasureSpec, mOldHeightMeasureSpec);
            mPrivateFlags3 &= ~PFLAG3_MEASURE_NEEDED_BEFORE_LAYOUT;
        }
        //儲存上一次View的四個位置
        int oldL = mLeft;
        int oldT = mTop;
        int oldB = mBottom;
        int oldR = mRight;
        //設定當前檢視View的左,頂,右,底的位置,並且判斷佈局是否有改變
        boolean changed = isLayoutModeOptical(mParent) ?
                setOpticalFrame(l, t, r, b) : setFrame(l, t, r, b);
        //如果佈局有改變,條件成立,則檢視View重新佈局
            if (changed || (mPrivateFlags & PFLAG_LAYOUT_REQUIRED) == PFLAG_LAYOUT_REQUIRED) {
            //呼叫onLayout,將具體佈局邏輯留給子類實現
            onLayout(changed, l, t, r, b);
            mPrivateFlags &= ~PFLAG_LAYOUT_REQUIRED;

            ListenerInfo li = mListenerInfo;
            if (li != null && li.mOnLayoutChangeListeners != null) {
                ArrayList<OnLayoutChangeListener> listenersCopy =
                        (ArrayList<OnLayoutChangeListener>)li.mOnLayoutChangeListeners.clone();
                int numListeners = listenersCopy.size();
                for (int i = 0; i < numListeners; ++i) {
                    listenersCopy.get(i).onLayoutChange(this, l, t, r, b, oldL, oldT, oldR, oldB);
                }
            }
        }

        mPrivateFlags &= ~PFLAG_FORCE_LAYOUT;
        mPrivateFlags3 |= PFLAG3_IS_LAID_OUT;
    }
分析:
1.程式碼第23-32行儲存本次佈局的四個位置,用於佈局變化的監聽事件,如果使用者設定了佈局變化的監聽事件,則程式碼第43-50就會執行設定監聽事件。
2.程式碼第34-35行設定當前View的佈局位置,也就是當呼叫了setFrame(l, t, r, b)方法之後,當前View佈局基本完成,既然這樣為什麼還要第39行 onLayout方法呢?稍後解答,這裡來分析一下setFrame是怎麼設定當前View的佈局位置的。
進入setFrame方法
2-3
/**
     * Assign a size and position to this view.
     *
     * This is called from layout.
     *
     * @param left Left position, relative to parent
     * @param top Top position, relative to parent
     * @param right Right position, relative to parent
     * @param bottom Bottom position, relative to parent
     * @return true if the new size and position are different than the
     *         previous ones
     * {@hide}
     */
    protected boolean setFrame(int left, int top, int right, int bottom) {
        boolean changed = false;
        //當上,下,左,右四個位置有一個和上次的值不一樣都會重新佈局
        if (mLeft != left || mRight != right || mTop != top || mBottom != bottom) {
            changed = true;

            // Remember our drawn bit
            int drawn = mPrivateFlags & PFLAG_DRAWN;
            //得到本次和上次的寬和高
            int oldWidth = mRight - mLeft;
            int oldHeight = mBottom - mTop;
            int newWidth = right - left;
            int newHeight = bottom - top;
            //判斷本次View的寬高和上次View的寬高是否相等
            boolean sizeChanged = (newWidth != oldWidth) || (newHeight != oldHeight);

            // Invalidate our old position
            //清楚上次佈局的位置
            invalidate(sizeChanged);
            //儲存當前View的最新位置
            mLeft = left;
            mTop = top;
            mRight = right;
            mBottom = bottom;
            mRenderNode.setLeftTopRightBottom(mLeft, mTop, mRight, mBottom);

            mPrivateFlags |= PFLAG_HAS_BOUNDS;

            //如果當前View的尺寸有所變化
            if (sizeChanged) {
                sizeChange(newWidth, newHeight, oldWidth, oldHeight);
            }

            ...............
        return changed;
    }
分析:
1.程式碼第17行,如果當前View檢視的最新位置和上一次不一樣時,則View會重新佈局。
2.程式碼第32-38行,儲存當前View的最新位置,到此當前View的佈局基本結束。從這裡我們可以看到,四個全域性變數 mLeft,mTop,mRight,mBottom在此刻賦值,聯想我們平時使用的View.getWidth()方法獲得View的寬高,你可以發現,其實View.getWidth()方法的實現如下:
public final int getWidth() {
        return mRight - mLeft;
    }
 public final int getHeight() {
        return mBot