作業系統實驗一之載入程式
一, 實驗內容
改寫bootsect.s和setup.s, 完成如下主要功能:

1, bootsect.s能夠在螢幕上列印一段提示資訊"XXX is booting...", 其中XXX是你給自己的作業系統起的名字,例如LZJos、Sunix等.

2, bootsect.s能夠完成setup.s的載入, 並跳轉到setup.s開始地址執行.

3, setup.s能夠像螢幕輸出一行資訊 "Now we are in SETUP"

4, setup.s能獲取至少一個基本的硬體引數(如記憶體引數、顯示卡引數、硬碟引數等),將其存放在記憶體的特定地址,並輸出到螢幕上。

5,setup.s不再載入linux核心, 保持上述資訊顯示到螢幕上即可
二, 實驗基礎知識
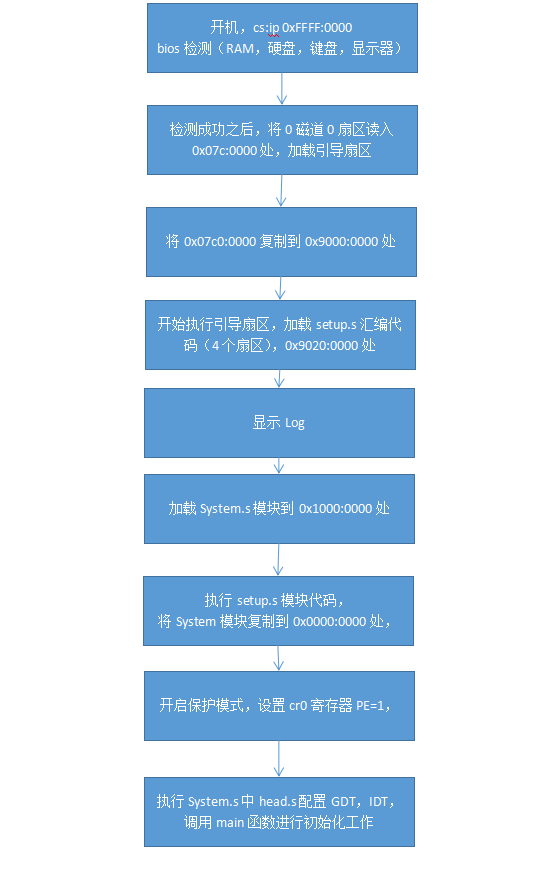
1。啟動流程
三, 實驗步驟
1, 完成bootsect的螢幕輸出功能
由於不需要載入linux核心,所以就不需要原始的linux程式碼那麼複雜,比如: 將bootsect自身移動到0x90000處等操作,可以忽略的。
要顯示字串,那麼字串顯示到螢幕的哪裡呢?當然是當前游標的位置了!所以第一步就要先讀取游標的位置,這可以利用10號中斷的3號子程式來完成。要顯示字串,可以利用10號功能的13號子程式來完成,需要注意的是一定要邊顯示字元邊移動游標,最終的游標要移動到字串的末尾處。最後要注意用0xAA55來標記引導扇區。程式碼如下:
entry _start
_start: 編譯和執行: 進入~/oslab/linux-0.11/boot/目錄,編譯並連線:
as86 -0 -a -o bootsect.o bootsect.s
ld86 -0 -s -o bootsect bootsect.o
引數說明:-0(注意:這是數字0,不是字母O)表示生成8086的16位目標程式,-a表示生成與GNU as和ld部分相容的程式碼,-s告訴連結器ld86去除最後生成的可執行檔案中的符號資訊。
如果這兩個命令沒有任何輸出,說明編譯與連結都通過了。需要留意的生成的bootsect的大小是544位元組,而載入程式必須要正好佔用一個磁碟扇區,即512個位元組。造成多了32個位元組的原因是ld86產生的是Minix可執行檔案格式,這樣的可執行檔案處理文字段、資料段等部分以外,還包括一個Minix可執行檔案頭部。所以最後必須要把這多餘的32個位元組刪掉,可以用linux自帶的工具dd來完成:
dd bs=1 if=bootsect of=Image skip=32去掉這32個位元組後,將生成的檔案拷貝到linux-0.11目錄下,並一定要命名為“Image”(注意大小寫)。然後就可以run了
2, setup的載入
首先要確定setup是在磁碟的0磁軌2扇區,linux 0.11中的setup佔了4個扇區,而我們最後要寫的setup顯然沒有那麼複雜,所以可以只用1個扇區就可以了。另外,由於bootsect位於0x7c00處,佔用512個位元組,所以可以將setup載入到0x7e00處。要想從磁碟中載入資料到記憶體,可以利用BIOS提供的13號中斷輕鬆完成。最後就直接用jumi指令跳轉到0x7e00處即可。對前面的bootsect.s擴充套件之後的完整程式碼如下:
SETUPLEN = 1
SETUPSEG = 0x07e0

entry _start
_start:
! 首先利用10號中斷的3號功能來讀取游標位置
    mov    ah,#0x03
    xor    bh,bh
    int    0x10

! 再利用10號中斷的13號功能顯示字串
    mov    cx,#50            ! 加上回車和換行,字串一共包含50個字元,所以設定cx為50
    mov    bx,#0x0007
    mov    bp,#msg1
    mov     ax,#0x07c0
    mov     es,ax            ! es:bp=顯示字串的地址
    mov    ax,#0x1301
    int    0x10

load_setup:
    mov    dx,#0x0000        ! 設定驅動器和磁頭(drive 0, head 0): 軟盤0磁頭
    mov    cx,#0x0002        ! 設定扇區號和磁軌(sector 2, track 0):0磁頭、0磁軌、2扇區
    mov    bx,#0x0200        ! 設定讀入的記憶體地址:BOOTSEG+address = 512,偏移512位元組
    mov    ax,#0x0200+SETUPLEN    ! 設定讀入的扇區個數(service 2, nr of sectors),
                    ! SETUPLEN是讀入的扇區個數,Linux 0.11設定的是4,
                    ! 我們不需要那麼多,我們設定為1
    int    0x13            ! 應用0x13號BIOS中斷讀入1個setup.s扇區
    jnc    ok_load_setup        ! 讀入成功,跳轉到ok_load_setup: ok - continue
    mov    dx,#0x0000        ! 軟碟機、軟盤有問題才會執行到這裡
    mov    ax,#0x0000        ! 否則復位軟碟機
    int    0x13
    j    load_setup        ! 重新迴圈,再次嘗試讀取

ok_load_setup:
    jmpi    0,SETUPSEG

! msg1處放置要顯示的字串
msg1:
    .byte 13,10            ! 換行+回車
    .ascii "AXF OS is booting, my name is Aixiangfei ..."
    .byte 13,10,13,10        ! 兩對換行+回車

! 下面是啟動盤具有有效引導扇區的標誌. 僅供BIOS中的程式載入扇區時識別使用。
! 它必須位於引導扇區的最後兩個位元組中.
.org 510
boot_flag:
    .word 0xAA55    ! 引導扇區的標記就是0XAA55
3, 完成setup的螢幕輸出功能
這個很簡單,跟bootsect是一樣的。程式碼如下:
entry _start
_start:
! 首先利用10號中斷的3號功能來讀取游標位置
    mov    ah,#0x03
    xor    bh,bh
    int    0x10

! 再利用10號中斷的13號功能顯示字串
    mov    cx,#26
    mov    bx,#0x0007
    mov    bp,#msg
    mov ax,cs
    mov    es,ax
    mov    ax,#0x1301
    int    0x10

Inf_loop:
    jmp Inf_loop            ! 無限迴圈

msg:
    .byte 13,10
    .ascii "Now we are in SETUP."
    .byte 13,10,13,10


.org 510
boot_flag:
    .word 0xAA55
編譯和與執行:現在有兩個檔案都要編譯、連結。一個個手工編譯,效率低下,所以藉助Makefile是最佳方式。linux 0.11中Makefile檔案已經幫我們把這件事做好了。進入liux-0.11目錄後,使用命令:
$ make BootImage
但是我們發現竟然出現了錯誤:
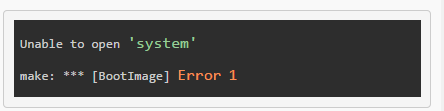
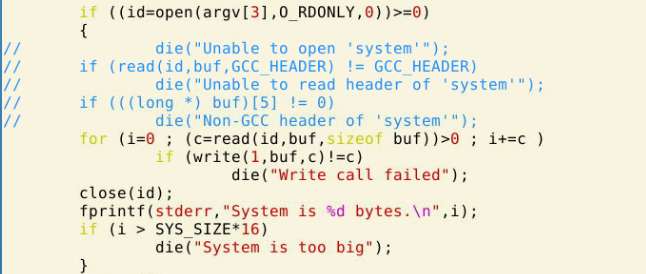
原因:這是因為make根據Makefile的指引執行了tools/build.c,它是為生成整個核心的映象檔案而設計的,沒考慮我們只需要bootsect.s和setup.s的情況。build.c從命令列引數得到bootsect、setup和system核心的檔名,將三者做簡單的整理後一起寫入Image。其中system是第三個引數(argv[3])。當“make all”或者“makeall”的時候,這個引數傳過來的是正確的檔名,build.c會開啟它,將內容寫入Image。而“make BootImage”時,傳過來的是字串”none”。所以,修改build.c的思路就是當argv[3]是”none”的時候,只寫bootsect和setup,忽略所有與system有關的工作,或者在該寫system的位置都寫上“0”。
修改build.c檔案很簡單,只需要把第178到183這幾行程式碼刪除即可!
4, 讀取硬體引數
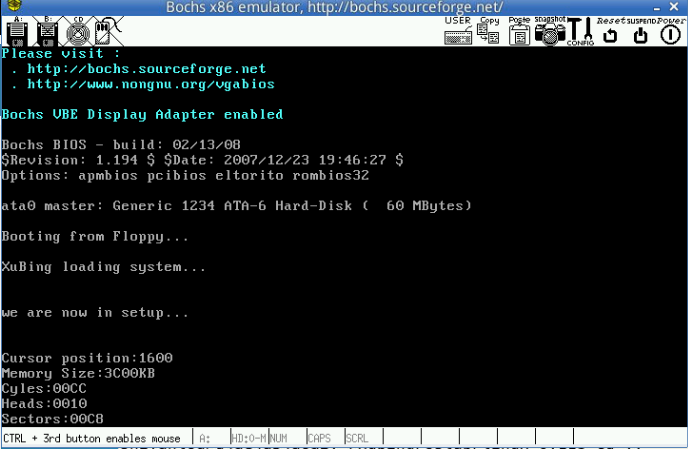
這個部分是最複雜的了。需要列印的硬體資訊有:游標位置,記憶體大小,磁碟的柱面數,磁頭數,每磁軌的扇區數。在這個實驗中,這些引數的資訊可以儲存在記憶體中的任意位置,在linux 0.11中,這些引數資訊是被儲存到了0x90000處,所以不妨跟linux 0.11一樣。
(1)獲取硬體引數
獲得游標位置資訊,這個很簡單,只需要呼叫13號中斷的3號子程式就可以得到,前面已經用過了的。
獲得記憶體大小,可以呼叫用15號中斷的88號子程式得到,也很簡單。
與磁碟相關的資訊稍微複雜一點,這些資訊被儲存在0x0000:0x0104地址處的16個位元組的中,這16個位元組的資訊叫做“磁碟引數表”。所以獲得磁碟資訊的方法就是複製資料。
(2)數字轉字元
現在已經將這些硬體引數取出來放在了0x90000處,接下來的工作是將這些引數顯示在螢幕上。這些引數都是一些無符號整數,所以需要做的主要工作是用匯程式設計序在螢幕上將這些整數用16進位制的形式顯示出來。
因為十六進位制與二進位制有很好的對應關係(每4位二進位制數和1位十六進位制數存在一一對應關係),顯示時只需將原二進位制數每4位劃成一組,按組求對應的ASCII碼送顯示器即可。ASCII碼與十六進位制數字的對應關係為:0x30~0x39對應數字0~9,0x41~0x46對應數字a~f。從數字9到a,其ASCII碼間隔了7h,這一點在轉換時要特別注意。為使一個十六進位制數能按高位到低位依次顯示,實際程式設計中,需對bx中的數每次迴圈左移一組(4位二進位制),然後遮蔽掉當前高12位,對當前餘下的4位(即1位十六進位制數)求其ASCII碼,要判斷它是0~9還是a~f,是前者則加0x30得對應的ASCII碼,後者則要加0x37才行,最後送顯示器輸出。以上步驟重複4次,就可以完成bx中數以4位十六進位制的形式顯示出來。
因為在輸出的時候需要呼叫多次,所以最好把這個功能寫成一個函式print_bx,方便使用。既然要用到函式,故一定要先設定好棧。為了方便,還可以寫一個函式print_nl實現換行的功能。
最終setup.s程式碼如下:
INITSEG  = 0x9000   ! we move boot here - out of the way
SYSSEG   = 0x1000   ! system loaded at 0x10000 (65536).
SETUPSEG = 0x9020   ! this is the current segment
.globl begtext, begdata, begbss, endtext, enddata, endbss
.text
begtext:
.data
begdata:
.bss
begbss:
.text

entry start
start:

    mov ax,#SETUPSEG
    mov es,ax
! init ss:sp
        mov ax,#INITSEG
    mov ss,ax
    mov sp,#0xFF00
! *************print we are in step**************

        mov ah,#0x03        ! read cursor pos
    xor bh,bh
    int 0x10

    mov cx,#28
    mov bx,#0x0007      ! page 0, attribute 7 (normal)
    mov bp,#msg_log
    mov ax,#0x1301      ! write string, move cursor
    int 0x10

!*******************************hard parm******************************
    mov ax,#INITSEG ! this is done in bootsect already, but...
    mov ds,ax
    mov ah,#0x03    ! read cursor pos
    xor bh,bh
    int 0x10        ! save it in known place, con_init fetches
    mov [0],dx      ! it from 0x90000.
! Get memory size (extended mem, kB)
    mov ah,#0x88
    int 0x15
    mov [2],ax

! Get hd0 data

    mov ax,#0x0000
    mov ds,ax
    lds si,[4*0x41]
    mov ax,#INITSEG
    mov es,ax
    mov di,#0x0004
    mov cx,#0x10
    rep
    movsb

! *************************show msg

    mov ax,#SETUPSEG
    mov es,ax
    mov ax,#INITSEG ! this is done in bootsect already, but...
    mov ds,ax


! **************print cursor position***********
        mov ah,#0x03        ! read cursor pos
    xor bh,bh
    int 0x10

    mov cx,#18
    mov bx,#0x0007      ! page 0, attribute 7 (normal)
    mov bp,#msg_cursor
    mov ax,#0x1301      ! write string, move cursor
    int 0x10
! *****************cursor position**************
        mov ax,#INITSEG ! this is done in bootsect already, but...
    mov ds,ax
    mov dx,[0]
    call    print_hex
! *******************print memory size****************
        mov ah,#0x03        ! read cursor pos
    xor bh,bh
    int 0x10

    mov cx,#14
    mov bx,#0x0007      ! page 0, attribute 7 (normal)
    mov bp,#msg_memory
    mov ax,#0x1301      ! write string, move cursor
    int 0x10
! *****************memory size**************
        mov ax,#INITSEG ! this is done in bootsect already, but...
    mov ds,ax
    mov dx,[2]
    call    print_hex
! *****************print KB************
    mov ah,#0x03        ! read cursor pos
    xor bh,bh
    int 0x10

    mov cx,#2
    mov bx,#0x0007      ! page 0, attribute 7 (normal)
    mov bp,#msg7
    mov ax,#0x1301      ! write string, move cursor
    int 0x10
! ****************print Cyles****************
    mov ah,#0x03        ! read cursor pos
    xor bh,bh
    int 0x10

    mov cx,#8
    mov bx,#0x0007      ! page 0, attribute 7 (normal)
    mov bp,#msg_cyles
    mov ax,#0x1301      ! write string, move cursor
    int 0x10
! ********************Cyles size************************
        mov ax,#INITSEG ! this is done in bootsect already, but...
    mov ds,ax
    mov dx,[4]
    call    print_hex
! ****************print Heads****************
    mov ah,#0x03        ! read cursor pos
    xor bh,bh
    int 0x10

    mov cx,#8
    mov bx,#0x0007      ! page 0, attribute 7 (normal)
    mov bp,#msg_heads
    mov ax,#0x1301      ! write string, move cursor
    int 0x10
! ********************Heads size************************
        mov ax,#INITSEG ! this is done in bootsect already, but...
    mov ds,ax
    mov dx,[6]
    call    print_hex
! ****************print msg_sectors****************
    mov ah,#0x03        ! read cursor pos
    xor bh,bh
    int 0x10

    mov cx,#10
    mov bx,#0x0007      ! page 0, attribute 7 (normal)
    mov bp,#msg_sectors
    mov ax,#0x1301      ! write string, move cursor
    int 0x10
! ********************msg_sectors size************************
        mov ax,#INITSEG ! this is done in bootsect already, but...
    mov ds,ax
    mov dx,[12]
    call    print_hex

L6:
        jmp L6

print_hex:
    mov    cx,#4        ! 4???????
print_digit:
    rol    dx,#4        ! ?????4???? !! ?dx??4?????4????
    mov    ax,#0xe0f    ! ah = ???????al = ???(4???)???
    and    al,dl        ! ?dl??4????
    add    al,#0x30     ! ?al????????0x30
    cmp    al,#0x3a
    jl     outp     !??????????
    add    al,#0x07     !?a?f????7
outp:
    int    0x10
    loop   print_digit
    ret
print_nl:
    mov    ax,#0xe0d     ! CR
    int    0x10
    mov    al,#0xa     ! LF
    int    0x10
    ret

! ??wo are new in setup.s  ==28
msg_log:
    .byte 13,10
    .ascii "we are now in setup..."
    .byte 13,10,13,10
msg_cursor:
        .byte 13,10
    .ascii "Cursor position:"
msg_memory:
        .byte 13,10
    .ascii "Memory Size:"
msg_cyles:
        .byte 13,10
    .ascii "Cyles:"

msg_heads:
        .byte 13,10
    .ascii "Heads:"
msg_sectors:
        .byte 13,10
    .ascii "Sectors:"
msg7:
        .ascii "KB"

.text
endtext:
.data
enddata:
.bss
endbss:
實驗結果如下: