
Android 兩種製作圓形/圓角圖片的方法
前言:
目前網上有很多圓角圖片的例項,Github上也有一些成熟的專案。之前做專案,為了穩定高效都是選用Github上的專案直接用。但這種結束也是Android開發必備技能 ,所以今天就來簡單研究一下該技術,分享給大家。
預備知識:
Xfermode介紹:
下面是Android ApiDemo裡的“Xfermodes”例項,效果圖。
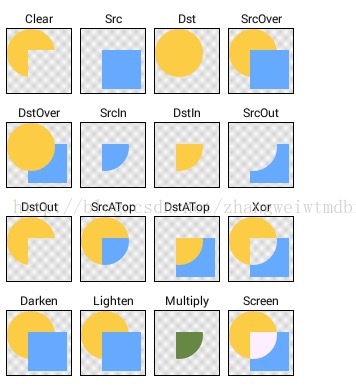
Xfermode有三個子類,結構如下:
public class
Xfermode
extends Object
java.lang.Object
   ↳	android.graphics.Xfermode
Known Direct Subclasses
AvoidXfermode, PixelXorXfermode, PorterDuffXfermode
AvoidXfermode 指定了一個顏色和容差,強制Paint避免在它上面繪圖(或者只在它上面繪圖)。
PixelXorXfermode 當覆蓋已有的顏色時,應用一個簡單的畫素異或操作。
PorterDuffXfermode 這是一個非常強大的轉換模式,使用它,可以使用影象合成的16條Porter-Duff規則的任意一條來控制Paint如何與已有的Canvas影象進行互動。
上面圖片種顯示的16種模式介紹如下:
1.PorterDuff.Mode.CLEAR
所繪製不會提交到畫布上。
2.PorterDuff.Mode.SRC
顯示上層繪製圖片
3.PorterDuff.Mode.DST
顯示下層繪製圖片
4.PorterDuff.Mode.SRC_OVER
正常繪製顯示,上下層繪製疊蓋。
5.PorterDuff.Mode.DST_OVER
上下層都顯示。下層居上顯示。
6.PorterDuff.Mode.SRC_IN
取兩層繪製交集。顯示上層。
7.PorterDuff.Mode.DST_IN
取兩層繪製交集。顯示下層。
8.PorterDuff.Mode.SRC_OUT
取上層繪製非交集部分。
9.PorterDuff.Mode.DST_OUT
取下層繪製非交集部分。
10.PorterDuff.Mode.SRC_ATOP
取下層非交集部分與上層交集部分
11.PorterDuff.Mode.DST_ATOP
取上層非交集部分與下層交集部分
12.PorterDuff.Mode.XOR
異或:去除兩圖層交集部分
13.PorterDuff.Mode.DARKEN
取兩圖層全部區域,交集部分顏色加深
14.PorterDuff.Mode.LIGHTEN
取兩圖層全部,點亮交集部分顏色
15.PorterDuff.Mode.MULTIPLY
取兩圖層交集部分疊加後顏色
16.PorterDuff.Mode.SCREEN
取兩圖層全部區域,交集部分變為透明色
瞭解了上面的知識點後,我們根據上面的知識點先來實現第一種圓角圖片製作方式:
原圖:

先看這一段程式碼
private ImageView mImg;
@Override
protected void onCreate(Bundle savedInstanceState) {
super.onCreate(savedInstanceState);
setContentView(R.layout.activity_main);
mImg = (ImageView) findViewById(R.id.img);
//獲得imageview中設定的圖片
BitmapDrawable drawable = (BitmapDrawable) mImg.getDrawable();
Bitmap bmp = drawable.getBitmap();
//獲得圖片的寬,並建立結果bitmap
int width = bmp.getWidth();
Bitmap resultBmp = Bitmap.createBitmap(width, width,
Bitmap.Config.ARGB_8888);
Paint paint = new Paint();
Canvas canvas = new Canvas(resultBmp);
//畫圓
canvas.drawCircle(width / 2, width / 2, width / 2, paint);
paint.setXfermode(new PorterDuffXfermode(PorterDuff.Mode.SRC_IN));// 選擇交集去上層圖片
canvas.drawBitmap(bmp, 0, 0, paint);
mImg.setImageBitmap(resultBmp);
bmp.recycle();
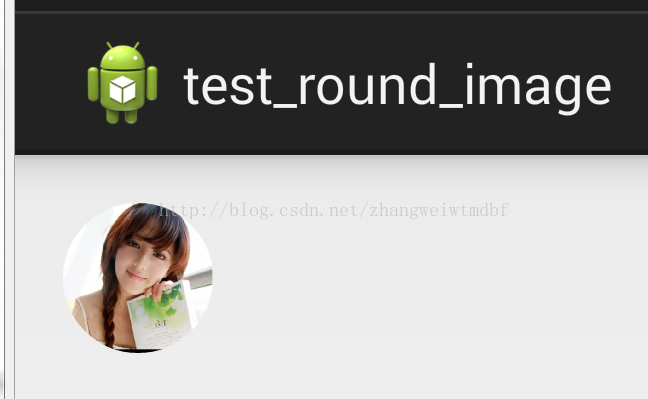
}通過執行上面的程式碼,我們得出的結果如下:

大家看到這是我們需要的結果。可是這樣做可能導致OutOfMomery異常。假如圖片很大或者你可能並非通過ImageView的getDrawable獲得影象,而是直接Decode一張很大的圖片載入到記憶體,你會發現可能會出現異常。我們做一下改變。
private static final String TAG = "RoundImage";
	private ImageView mImg;

	@Override
	protected void onCreate(Bundle savedInstanceState) {
		super.onCreate(savedInstanceState);
		setContentView(R.layout.activity_main);
		mImg = (ImageView) findViewById(R.id.img);
		// 裁剪圖片
		BitmapFactory.Options options = new BitmapFactory.Options();
		options.inJustDecodeBounds = true;
		BitmapFactory
				.decodeResource(getResources(), R.drawable.avatar, options);
		Log.d(TAG, "original outwidth: " + options.outWidth);
		// 此寬度是目標ImageView希望的大小,你可以自定義ImageView,然後獲得ImageView的寬度。
		int dstWidth = 150;
		// 我們需要載入的圖片可能很大,我們先對原有的圖片進行裁剪
		int sampleSize = calculateInSampleSize(options, dstWidth, dstWidth);
		options.inSampleSize = sampleSize;
		options.inJustDecodeBounds = false;
		Log.d(TAG, "sample size: " + sampleSize);
		Bitmap bmp = BitmapFactory.decodeResource(getResources(),
				R.drawable.avatar, options);

		// 繪製圖片
		Bitmap resultBmp = Bitmap.createBitmap(dstWidth, dstWidth,
				Bitmap.Config.ARGB_8888);
		Paint paint = new Paint();
		paint.setAntiAlias(true);
		Canvas canvas = new Canvas(resultBmp);
		// 畫圓
		canvas.drawCircle(dstWidth / 2, dstWidth / 2, dstWidth / 2, paint);
		// 選擇交集去上層圖片
		paint.setXfermode(new PorterDuffXfermode(PorterDuff.Mode.SRC_IN));
		canvas.drawBitmap(bmp, new Rect(0, 0, bmp.getWidth(), bmp.getWidth()),
				new Rect(0, 0, dstWidth, dstWidth), paint);
		mImg.setImageBitmap(resultBmp);
		bmp.recycle();
	}

	private int calculateInSampleSize(BitmapFactory.Options options,
			int reqWidth, int reqHeight) {
		// Raw height and width of image
		final int height = options.outHeight;
		final int width = options.outWidth;
		int inSampleSize = 1;

		if (height > reqHeight || width > reqWidth) {

			final int halfHeight = height / 2;
			final int halfWidth = width / 2;

			// Calculate the largest inSampleSize value that is a power of 2 and
			// keeps both
			// height and width larger than the requested height and width.
			while ((halfHeight / inSampleSize) > reqHeight
					&& (halfWidth / inSampleSize) > reqWidth) {
				inSampleSize *= 2;
			}
		}
		return inSampleSize;
	}
再來看一下效果:
首先我們需要了解一個類BitmapShader
引用的介紹如下:
呼叫這個方法來產生一個畫有一個位圖的渲染器(Shader)。
bitmap 在渲染器內使用的點陣圖
tileX The tiling mode for x to draw the bitmap in. 在點陣圖上X方向花磚模式
tileY The tiling mode for y to draw the bitmap in. 在點陣圖上Y方向花磚模式
TileMode:(一共有三種)
CLAMP :如果渲染器超出原始邊界範圍,會複製範圍內邊緣染色。
REPEAT :橫向和縱向的重複渲染器圖片,平鋪。
MIRROR :橫向和縱向的重複渲染器圖片,這個和REPEAT 重複方式不一樣,他是以映象方式平鋪。
知道這個原理後,我們貼出對應的程式碼:public class CircleImageView extends ImageView {
private static final String TAG = CircleImageView.class.getSimpleName();
private Paint mBitmapPaint = new Paint();
private int mRadius;
public CircleImageView(Context context, AttributeSet attrs, int defStyleAttr) {
super(context, attrs, defStyleAttr);
init();
}
public CircleImageView(Context context, AttributeSet attrs) {
super(context, attrs);
init();
}
public CircleImageView(Context context) {
super(context);
init();
}
private void init() {
BitmapDrawable drawable = (BitmapDrawable) getDrawable();
if (drawable == null) {
Log.i(TAG, "drawable: null");
return;
}
Bitmap bmp = drawable.getBitmap();
BitmapShader shader = new BitmapShader(bmp, TileMode.CLAMP,
TileMode.CLAMP);
mBitmapPaint.setShader(shader);
mBitmapPaint.setAntiAlias(true);
invalidate();
}
@Override
protected void onDraw(Canvas canvas) {
if (getDrawable() == null) {
return;
}
mRadius = Math.min(getWidth()/2, getHeight()/2);
canvas.drawCircle(getWidth() / 2, getHeight() / 2, mRadius,
mBitmapPaint);
}
}是不是挺簡單的
結果我就不顯示了,跟上面的一樣。上面也是最原始的程式碼,文章的結尾貼出一份完整優化過的程式碼共大家參考如下:
public class CircleImageView extends ImageView {

    private static final ScaleType SCALE_TYPE = ScaleType.CENTER_CROP;

    private static final Bitmap.Config BITMAP_CONFIG = Bitmap.Config.ARGB_8888;
    private static final int COLORDRAWABLE_DIMENSION = 1;

    private static final int DEFAULT_BORDER_WIDTH = 0;
    private static final int DEFAULT_BORDER_COLOR = Color.BLACK;

    private final RectF mDrawableRect = new RectF();
    private final RectF mBorderRect = new RectF();

    private final Matrix mShaderMatrix = new Matrix();
    private final Paint mBitmapPaint = new Paint();
    private final Paint mBorderPaint = new Paint();

    private int mBorderColor = DEFAULT_BORDER_COLOR;
    private int mBorderWidth = DEFAULT_BORDER_WIDTH;

    private Bitmap mBitmap;
    private BitmapShader mBitmapShader;
    private int mBitmapWidth;
    private int mBitmapHeight;

    private float mDrawableRadius;
    private float mBorderRadius;

    private boolean mReady;
    private boolean mSetupPending;

    public CircleImageView(Context context) {
        super(context);

        init();
    }

    public CircleImageView(Context context, AttributeSet attrs) {
        this(context, attrs, 0);
    }

    public CircleImageView(Context context, AttributeSet attrs, int defStyle) {
        super(context, attrs, defStyle);

        TypedArray a = context.obtainStyledAttributes(attrs, R.styleable.CircleImageView, defStyle, 0);

        mBorderWidth = a.getDimensionPixelSize(R.styleable.CircleImageView_border_width, DEFAULT_BORDER_WIDTH);
        mBorderColor = a.getColor(R.styleable.CircleImageView_border_color, DEFAULT_BORDER_COLOR);

        a.recycle();

        init();
    }

    private void init() {
        super.setScaleType(SCALE_TYPE);
        mReady = true;

        if (mSetupPending) {
            setup();
            mSetupPending = false;
        }
    }

    @Override
    public ScaleType getScaleType() {
        return SCALE_TYPE;
    }

    @Override
    public void setScaleType(ScaleType scaleType) {
        if (scaleType != SCALE_TYPE) {
            throw new IllegalArgumentException(String.format("ScaleType %s not supported.", scaleType));
        }
    }

    @Override
    protected void onDraw(Canvas canvas) {
        if (getDrawable() == null) {
            return;
        }

        canvas.drawCircle(getWidth() / 2, getHeight() / 2, mDrawableRadius, mBitmapPaint);
        if (mBorderWidth != 0) {
            canvas.drawCircle(getWidth() / 2, getHeight() / 2, mBorderRadius, mBorderPaint);
        }
    }

    @Override
    protected void onSizeChanged(int w, int h, int oldw, int oldh) {
        super.onSizeChanged(w, h, oldw, oldh);
        setup();
    }

    public int getBorderColor() {
        return mBorderColor;
    }

    public void setBorderColor(int borderColor) {
        if (borderColor == mBorderColor) {
            return;
        }

        mBorderColor = borderColor;
        mBorderPaint.setColor(mBorderColor);
        invalidate();
    }

    public int getBorderWidth() {
        return mBorderWidth;
    }

    public void setBorderWidth(int borderWidth) {
        if (borderWidth == mBorderWidth) {
            return;
        }

        mBorderWidth = borderWidth;
        setup();
    }

    @Override
    public void setImageBitmap(Bitmap bm) {
        super.setImageBitmap(bm);
        mBitmap = bm;
        setup();
    }

    @Override
    public void setImageDrawable(Drawable drawable) {
        super.setImageDrawable(drawable);
        mBitmap = getBitmapFromDrawable(drawable);
        setup();
    }

    @Override
    public void setImageResource(int resId) {
        super.setImageResource(resId);
        mBitmap = getBitmapFromDrawable(getDrawable());
        setup();
    }

    @Override
    public void setImageURI(Uri uri) {
        super.setImageURI(uri);
        mBitmap = getBitmapFromDrawable(getDrawable());
        setup();
    }

    private Bitmap getBitmapFromDrawable(Drawable drawable) {
        if (drawable == null) {
            return null;
        }

        if (drawable instanceof BitmapDrawable) {
            return ((BitmapDrawable) drawable).getBitmap();
        }

        try {
            Bitmap bitmap;

            if (drawable instanceof ColorDrawable) {
                bitmap = Bitmap.createBitmap(COLORDRAWABLE_DIMENSION, COLORDRAWABLE_DIMENSION, BITMAP_CONFIG);
            } else {
                bitmap = Bitmap.createBitmap(drawable.getIntrinsicWidth(), drawable.getIntrinsicHeight(), BITMAP_CONFIG);
            }

            Canvas canvas = new Canvas(bitmap);
            drawable.setBounds(0, 0, canvas.getWidth(), canvas.getHeight());
            drawable.draw(canvas);
            return bitmap;
        } catch (OutOfMemoryError e) {
            return null;
        }
    }

    private void setup() {
        if (!mReady) {
            mSetupPending = true;
            return;
        }

        if (mBitmap == null) {
            return;
        }

        mBitmapShader = new BitmapShader(mBitmap, Shader.TileMode.CLAMP, Shader.TileMode.CLAMP);

        mBitmapPaint.setAntiAlias(true);
        mBitmapPaint.setShader(mBitmapShader);

        mBorderPaint.setStyle(Paint.Style.STROKE);
        mBorderPaint.setAntiAlias(true);
        mBorderPaint.setColor(mBorderColor);
        mBorderPaint.setStrokeWidth(mBorderWidth);

        mBitmapHeight = mBitmap.getHeight();
        mBitmapWidth = mBitmap.getWidth();

        mBorderRect.set(0, 0, getWidth(), getHeight());
        mBorderRadius = Math.min((mBorderRect.height() - mBorderWidth) / 2, (mBorderRect.width() - mBorderWidth) / 2);

        mDrawableRect.set(mBorderWidth, mBorderWidth, mBorderRect.width() - mBorderWidth, mBorderRect.height() - mBorderWidth);
        mDrawableRadius = Math.min(mDrawableRect.height() / 2, mDrawableRect.width() / 2);

        updateShaderMatrix();
        invalidate();
    }

    private void updateShaderMatrix() {
        float scale;
        float dx = 0;
        float dy = 0;

        mShaderMatrix.set(null);

        if (mBitmapWidth * mDrawableRect.height() > mDrawableRect.width() * mBitmapHeight) {
            scale = mDrawableRect.height() / (float) mBitmapHeight;
            dx = (mDrawableRect.width() - mBitmapWidth * scale) * 0.5f;
        } else {
            scale = mDrawableRect.width() / (float) mBitmapWidth;
            dy = (mDrawableRect.height() - mBitmapHeight * scale) * 0.5f;
        }

        mShaderMatrix.setScale(scale, scale);
        mShaderMatrix.postTranslate((int) (dx + 0.5f) + mBorderWidth, (int) (dy + 0.5f) + mBorderWidth);

        mBitmapShader.setLocalMatrix(mShaderMatrix);
    }

}
補充一點上面的都是圓形圖片,圓角的如何製作呢?這個問題留給你思考吧。
全文完