Android上傳檔案到Web伺服器,PHP接收檔案(一)
阿新 • • 發佈:2019-02-02
Android上傳檔案到伺服器,通常採用構造http協議的方法,模擬網頁POST方法傳輸檔案,伺服器端可以採用JavaServlet或者PHP來接收要傳輸的檔案。使用JavaServlet來接收檔案的方法比較常見,在這裡給大家介紹一個簡單的伺服器端使用PHP語言來接收檔案的例子。
伺服器端程式碼比較簡單,接收傳輸過來的檔案:
<?php
$target_path  = "./upload/";//接收檔案目錄
$target_path = $target_path . basename( $_FILES['uploadedfile']['name']);
if(move_uploaded_file($_FILES['uploadedfile']['tmp_name'], $target_path)) {
   echo "The file ".  basename( $_FILES['uploadedfile']['name']). " has been uploaded";
}  else{
   echo "There was an error uploading the file, please try again!" . $_FILES['uploadedfile']['error'];
}
?>
手機客戶端程式碼:
package com.figo.uploadfile;

import java.io.BufferedReader;
import java.io.DataOutputStream;
import java.io.FileInputStream;
import java.io.InputStream;
import java.io.InputStreamReader;
import java.net.HttpURLConnection;
import java.net.URL;
import android.app.Activity;
import android.os.Bundle;
import android.view.View;
import android.widget.Button;
import android.widget.TextView;
import android.widget.Toast;

public class UploadfileActivity extends Activity
{
  // 要上傳的檔案路徑,理論上可以傳輸任何檔案,實際使用時根據需要處理
  private String uploadFile = "/sdcard/testimg.jpg";
  private String srcPath = "/sdcard/testimg.jpg";
  // 伺服器上接收檔案的處理頁面,這裡根據需要換成自己的
  private String actionUrl = "http://10.100.1.208/receive_file.php";
  private TextView mText1;
  private TextView mText2;
  private Button mButton;

  @Override
  public void onCreate(Bundle savedInstanceState)
  {
    super.onCreate(savedInstanceState);
    setContentView(R.layout.main);

    mText1 = (TextView) findViewById(R.id.myText2);
    mText1.setText("檔案路徑:\n" + uploadFile);
    mText2 = (TextView) findViewById(R.id.myText3);
    mText2.setText("上傳網址:\n" + actionUrl);
    /* 設定mButton的onClick事件處理 */
    mButton = (Button) findViewById(R.id.myButton);
    mButton.setOnClickListener(new View.OnClickListener()
    {
      @Override
      public void onClick(View v)
      {
        uploadFile(actionUrl);
      }
    });
  }

  /* 上傳檔案至Server,uploadUrl:接收檔案的處理頁面 */
  private void uploadFile(String uploadUrl)
  {
    String end = "\r\n";
    String twoHyphens = "--";
    String boundary = "******";
    try
    {
      URL url = new URL(uploadUrl);
      HttpURLConnection httpURLConnection = (HttpURLConnection) url
          .openConnection();
      // 設定每次傳輸的流大小,可以有效防止手機因為記憶體不足崩潰
      // 此方法用於在預先不知道內容長度時啟用沒有進行內部緩衝的 HTTP 請求正文的流。
      httpURLConnection.setChunkedStreamingMode(128 * 1024);// 128K
      // 允許輸入輸出流
      httpURLConnection.setDoInput(true);
      httpURLConnection.setDoOutput(true);
      httpURLConnection.setUseCaches(false);
      // 使用POST方法
      httpURLConnection.setRequestMethod("POST");
      httpURLConnection.setRequestProperty("Connection", "Keep-Alive");
      httpURLConnection.setRequestProperty("Charset", "UTF-8");
      httpURLConnection.setRequestProperty("Content-Type",
          "multipart/form-data;boundary=" + boundary);

      DataOutputStream dos = new DataOutputStream(
          httpURLConnection.getOutputStream());
      dos.writeBytes(twoHyphens + boundary + end);
      dos.writeBytes("Content-Disposition: form-data; name=\"uploadedfile\"; filename=\""
          + srcPath.substring(srcPath.lastIndexOf("/") + 1)
          + "\""
          + end);
      dos.writeBytes(end);

      FileInputStream fis = new FileInputStream(srcPath);
      byte[] buffer = new byte[8192]; // 8k
      int count = 0;
      // 讀取檔案
      while ((count = fis.read(buffer)) != -1)
      {
        dos.write(buffer, 0, count);
      }
      fis.close();

      dos.writeBytes(end);
      dos.writeBytes(twoHyphens + boundary + twoHyphens + end);
      dos.flush();

      InputStream is = httpURLConnection.getInputStream();
      InputStreamReader isr = new InputStreamReader(is, "utf-8");
      BufferedReader br = new BufferedReader(isr);
      String result = br.readLine();

      Toast.makeText(this, result, Toast.LENGTH_LONG).show();
      dos.close();
      is.close();

    } catch (Exception e)
    {
      e.printStackTrace();
      setTitle(e.getMessage());
    }
  }
}
在AndroidManifest.xml檔案裡新增網路訪問許可權:
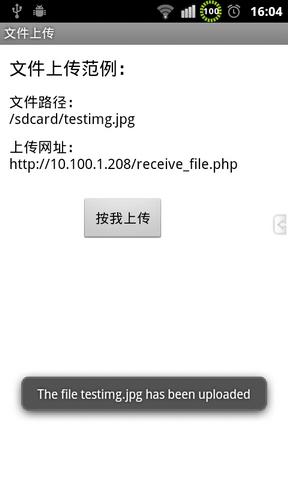
<uses-permission android:name="android.permission.INTERNET" />執行結果:

