
使用Python openpyxl模組讀寫Excel
前面介紹了利用Python中xlrd與xlwt讀寫Excel的基本操作( 《使用Python xlrd與xlwt模組讀寫Excel》),這兩個模組可以很方便地對Excel進行處理,非常實用。但由於xlwt只支援Excel2007之前的版本,所以無法生成.xlsx字尾的檔案,而且其單個sheet支援的最大行數為65535,資料量一旦超過限制行數,會遇到如下錯誤
ValueError: row index was 65536, not allowed by .xls format
這是xlwt很大的短板,遇到這種情況只能用其他包代替,openpyxl 是一個不錯的選擇,它可用於讀寫Excel2010 xlsx/xlsm/xltx/xltm 檔案,同時支援 Pandas 和 NumPy 等包,能夠繪製圖表,並且同樣支援格式控制等,詳細文件可以參考:
下面開始介紹它的一些基本操作:
首先通過pip安裝
pip install openpyxl
###Excel的讀取
#匯入openpyxl package
import openpyxl

#開啟一個已有工作簿
f = openpyxl.load_workbook('test.xlsx')
sheet相關操作
#獲取sheet名稱列表
name_list = f.sheetnames
name_list = f.get_sheet_names()
#通過名稱呼叫sheet
table = 單元格相關操作
#讀取單元格或範圍切片
c = table['A1'] #獲取'A1',返回class
c = table.cell(row = 1,column = 1) #按行列數獲讀取
row5 = 需要注意的是openpyxl中按行列數檢索時引數名‘row =’及‘column =’ 不能省略,而且均從1開始計數,這與xlrd有所不同。
####一個例子
利用openpyxl讀出圖1所示表中的一些資訊,程式碼及結果如下:
import openpyxl				#匯入openpyxl

f = openpyxl.load_workbook('demo.xlsx')			#開啟工作簿
print(f.sheetnames)			#列印sheet名稱列表
table = f['成績單']		  #呼叫成績單sheet
print(table.max_column)		#列印最大列數
print(table.cell(row = 3,column = 3).value)		#列印C3的值
for i in table['A']:		#依次列印A列的值
	print(i.value)
執行結果如下:
[‘名單’, ‘成績單’]
6
80
姓名
None
小明
小紅
李華
openpyxl在讀取合併格時也將其值當做左上角單元格的值,剩餘單元格則返回None,而在xlrd中其他單元格則為empty: ‘’,有所區別。
###Excel的建立及更改
#匯入openpyxl package
import openpyxl

#建立一個工作簿
f = openpyxl.Workbook()
每次新建一個工作簿會預設生成一個名稱為“Sheet1”的工作表,可以先將其利用起來,操作與前面相同,比如
table = f.active
#or
table = f['Sheet1']
當需要更多的工作表時,可以建立新的sheet
#建立sheet
table = f.create_sheet('AD')    	#建立並插入末尾
table = f.create_sheet('AD',0)      #建立並插入首位

#可以通過RGB色值設定sheet標籤顏色
table.sheet_properties.tabColor = 'RRGGBB'

#複製一個工作表
target = f.copy_worksheet(table)
寫入資料
table['A2'] = 4    			 #單元格寫入
table['A1'] = '=SUM(1,1)'    #按公式寫入

#按行列數寫入
table.cell(row = 3,column = 1,value = 10)
table.cell(row = 3,column = 1).value = 10

#單元格合併與分解
table.merge_cells('A1:B1')	  #按位置
table.unmerge_cells('A1:B1')

table.merge_cells(star_row = 2,star_column = 1,end_row = 2,end_column = 4)	#按行列號
table.unmerge_cells(start_row = 2,star_column = 1,end_row = 2,end_column = 4)

#插入圖片
img = openpyxl.drawing.image.Image('demo.png')
table.add_image(img,'A1')

#儲存檔案
f.template = True    #存為模板
f.save('demo.xlsx', as_template = False)
openpyxl的寫入語法與xlwt差別不大,主要區別在於它對單元格的定位主要根據座標進行,如 ‘A5’,‘C3’,而xlrd則完全依靠單元格的行列位置,如cell(0,4),cell(2,2)。除了常規的讀寫操作,openpyxl也提供了完善的格式控制的方法,下面進行簡單介紹。
###單元格的格式控制
openpyxl中提供的Style方法用於調整表格的外觀,如字型格式、邊框、對齊方式、單元格背景、保護等。
字型格式:
# 匯入相關模組
from openpyxl.styles import PatternFill, Border, Side, Alignment, Protection, Font

#字型格式
font0 = Font(name='Calibri',
            size=11,
            bold=False,
            italic=False,
            vertAlign=None,    #Maybe:'baseline', 'superscript', 'subscript'
            underline='none',  #Maybe:'single','double','singleAccounting','doubleAccounting'
            strike=False,
            color='FF00FF00')

#單元格填充
fill0 = PatternFill(fill_type=None,
#Maybe:'lightUp', 'darkVertical', 'darkGrid', 'solid', 'darkHorizontal', 'darkUp', 'lightVertical', 'lightGray', 'darkTrellis', 'lightDown', 'gray125', 'gray0625', 'mediumGray', 'lightTrellis', 'darkGray', 'darkDown', 'lightHorizontal', 'lightGrid'
            start_color='FFFFFFFF',
            end_color='FF000000')

#邊框
border0 = Border(left=Side(border_style=None,color='FF000000'),
#style Maybe:'mediumDashDotDot', 'dotted', 'thick', 'medium', 'dashDotDot', 'double', 'dashed', 'mediumDashed', 'dashDot', 'mediumDashDot', 'hair', 'slantDashDot', 'thin'
				right=Side(border_style=None,color='FF000000'),
				top=Side(border_style=None,color='FF000000'),
				bottom=Side(border_style=None,color='FF000000'),
				diagonal=Side(border_style=None,color='FF000000'),
				diagonal_direction=0,
				outline=Side(border_style=None,color='FF000000'),
				vertical=Side(border_style=None,color='FF000000'),
				horizontal=Side(border_style=None,color='FF000000')
				)

#對齊方式
alignment0 = Alignment(horizontal='general',	#Maybe:'centerContinuous', 'fill', 'right', 'distributed', 'justify', 'general', 'center', 'left'
                	vertical='bottom',
                    text_rotation=0,
                    wrap_text=False,
                    shrink_to_fit=False,
                    indent=0)

#表格保護
protection0 = Protection(locked=True,
                         hidden=False)
格式應用:
# 匯入相關模組
from openpyxl.styles import NamedStyle

# 建立格式
style0 = NamedStyle(name = 'style_example')

#格式賦值
style0.font = font0
style0.alignment = alignment0
style0.border = border0
style0.fill = fill0
style0.Protection = protection0

#格式呼叫
#單屬性呼叫
table['A1'].font = font0
table['A1'].alignment = alignment0
table.cell(row = 1,column = 1).border = border0

#按名稱呼叫
table['A1'].style = style0
table['A1'].style = 'style_example'
table.cell(row = 1,column = 1).style = style0
由上可知,openpyxl提供的格式控制方法可以實現對單元格屬性所有基本操作。下面還是以實現圖 1 所示表格為例進行演示。
####第二個例子
import openpyxl
from openpyxl.styles import NamedStyle, Border, Side, Alignment

# 生成工作簿及sheet
f = openpyxl.Workbook()
table = f.active
table.title = '成績單'

# 資訊列表
subject_list = ['語文','思想品德','數學','科學']
info_list = [
['小明',22,80,85,90,77],
['小紅',23,91,88,95,90],
['李華',24,75,70,98,100]
]

# 建立表頭
table.merge_cells('A1:A2')
table.cell(row = 1,column = 1,value = '姓名')
table.merge_cells('B1:B2')
table.cell(row = 1,column = 2,value = '學號')
table.merge_cells('C1:D1')
table.cell(row = 1,column = 3,value = '文科')
table.merge_cells('E1:F1')
table.cell(row = 1,column = 5,value = '理科')

for i in range(4):
	table.cell(row = 2,column = i+3,value = subject_list[i])

# 寫入資訊
for obs in range(3):
	for info in range(6):
		table.cell(row = obs+3,column = info+1,value = info_list[obs][info])

# 設定單元格格式,其中字型及背景為預設
style0 = NamedStyle('style0')
style0.border = Border(left=Side(border_style='thin'),
                right=Side(border_style='thin'),
                top=Side(border_style='thin'),
                bottom=Side(border_style='thin'))
style0.alignment = Alignment(horizontal='center',vertical='center',)

# 格式應用
for row in table.rows:
	for cell in row:
		cell.style = style0

# 儲存檔案
f.save("score.xlsx")
生成結果如下:
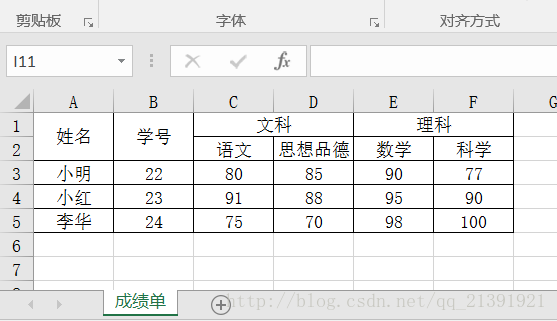 圖2.使用openpyxl生成的成績單對比後發現,使用openpyxl做出表格的效果與office介面製作的完全相同。當然,若只是製作類似簡單的表格,寫程式碼的效率顯然不如office介面操作高,程式設計處理表格的優勢在於處理人工難以完成的工作,下期將分享兩個用Python處理Excel的例項。