Hadoop 傳遞引數的四種方式
摘要: 在學習使用Hadoop的時候肯定會遇到以下問題,想當然的定義一些靜態全域性變數,好讓mapper和reducer能夠訪問到這些變數裡邊的內容,然後興高采烈的去寫程式碼,最後得到空指標異常,很懊惱,怎麼就不行呢,打破了傳統對java的理解。
其實對java的理解沒有錯,只是對Hadoop架構的理解錯了,為什麼全域性靜態變數訪問不到,是因為啟動job的程式和執行job的程式不在同一個jvm中,你想用jvmb去訪問jvma裡的資料是不行的,最起碼用你常用的方式--全域性變數是不行的。
那麼,難道就沒有辦法了嗎,當然不是,辦法自然有,那就是configuration物件。
為什麼會想到這個,先簡單分析一下,我們會使用configuration物件去配置job的引數,這些引數在map task和reduce task都要使用到的,所以可以貫穿始終。但是在mapper和reducer裡沒有發現這個物件啊,發現貫穿mapper和reducer的物件是一個context物件,可喜的是這個context物件包含了configuration物件,根據見名知意的原則,上下文物件報錯有貫穿始終的配置資訊是非常合理的一種猜測與理解。
先不過多說原理,先看例子然後在慢慢猜測理解其原理。
方式一:Configuration傳遞引數
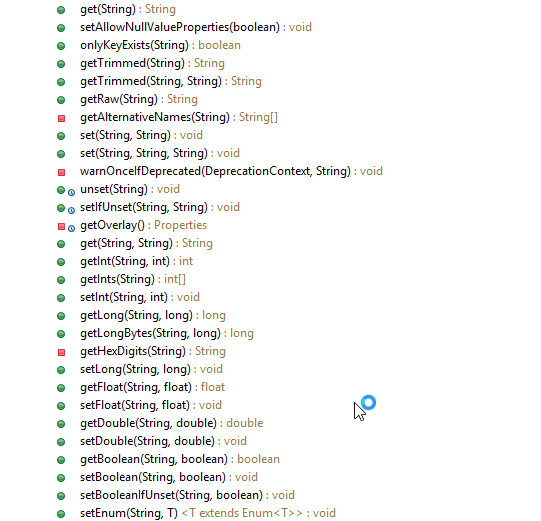
configuration類中提供了大量的set和get方法,可以簡單的存放於獲取基本資料型別和String型別。
那我們就來看一個例子,如何實現:
        Configuration conf = new Configuration();
        // 傳遞引數方式一 :簡單字串
        conf.set("key1", "value1");
在入口程式中通過conf物件設定一個String型別的值,然後在Mapper和Reducer中分別取獲取這個值:
執行程式後,得到如下結果:// 獲取引數方式一:獲取簡單字串 Configuration conf = context.getConfiguration(); String value1 = conf.get("key1"); LOG.info("第一個引數: " + value1);
第一個引數: value1這個是mappe task 和reduce task log打印出來的資訊,說明引數傳遞成功
至於其他的基本型別的設定方式與String型別類似,並且其實還是轉化為String型別進行存取,例如int型:
  /**
   * Set the value of the <code>name</code> property to an <code>int</code>.
   *
   * @param name property name.
   * @param value <code>int</code> value of the property.
   */
  public void setInt(String name, int value) {
    set(name, Integer.toString(value));
  }
第一種方式就不過多介紹,因為很簡單,使用起來也很方便,但是有人就有問題了,這個只能傳遞String型別和基本型別,那麼物件怎麼傳遞呢?這個是個好問題,hadoop的工程師不可能想不到,下面就來介紹一個傳遞物件的方式。
方式二:DefaultStringifier傳遞引數
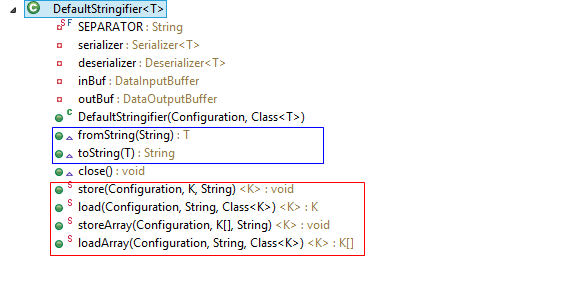
繼續先檢視一下這個類的API,看看有什麼介面提供用於傳參。
介面也很明顯,支援傳遞物件和物件陣列,但是這次先不能著急試,先簡單看一下API,比如看一下store:
  /**
   * Stores the item in the configuration with the given keyName.
   *
   * @param <K>  the class of the item
   * @param conf the configuration to store
   * @param item the object to be stored
   * @param keyName the name of the key to use
   * @throws IOException : forwards Exceptions from the underlying
   * {@link Serialization} classes.
   */
  public static <K> void store(Configuration conf, K item, String keyName)
  throws IOException {

    DefaultStringifier<K> stringifier = new DefaultStringifier<K>(conf,
        GenericsUtil.getClass(item));
    conf.set(keyName, stringifier.toString(item));
    stringifier.close();
  }
這裡用了toString方法,並且看到了屬性的conf.set()方法,這說明什麼,他把物件轉換成了字串,然後使用configuration物件的set方法進行存放,和我們將的第一種方式是一樣的。
再來看一下toString方法:
  public String toString(T obj) throws IOException {
    outBuf.reset();
    serializer.serialize(obj);
    byte[] buf = new byte[outBuf.getLength()];
    System.arraycopy(outBuf.getData(), 0, buf, 0, buf.length);
    return new String(Base64.encodeBase64(buf));
  }
這裡又發現一個現象,它把物件序列化了,其實也不難想象,如果要把物件轉換為字串,序列化是不是一種途徑,很正常。可是又有問題了,我們定義一個普通的物件用於傳參行嗎?答案肯定是不行的,至少要實現Serializable介面吧。不錯,思路很對,但是hadoop畢竟是個框架,它本身提供了一種序列化方案,並不是實現Serializable介面,而是Writable介面,所以,在嘗試前,定義的用於傳遞物件的類要實現Writable介面。
我來定義一個簡單的類:
package com.darren.hadoop.transfer;

import java.io.DataInput;
import java.io.DataOutput;
import java.io.IOException;

import org.apache.hadoop.io.Writable;

public class SimpleParameter implements Writable {


    private String name;
    private String value;

    @Override
    public void write(DataOutput out) throws IOException {
        out.writeUTF(this.name);
        out.writeUTF(this.value);
    }

    @Override
    public void readFields(DataInput in) throws IOException {
        this.name = in.readUTF();
        this.value = in.readUTF();
    }

    public String getName() {
        return name;
    }

    public void setName(String name) {
        this.name = name;
    }

    public String getValue() {
        return value;
    }

    public void setValue(String value) {
        this.value = value;
    }

    @Override
    public String toString() {
        return "Parameter [name=" + name + ", value=" + value + "]";
    }
}
這裡要實現以下Writable的方法,用於序列化。
然後我們使用一下:
        // 傳遞引數方式二 :簡單物件
        SimpleParameter param = new SimpleParameter();
        param.setName("name");
        param.setValue("Darren");
        DefaultStringifier.store(conf, param, "key2");

        // 傳遞引數方式三 : 物件陣列
        SimpleParameter param1 = new SimpleParameter();
        param1.setName("name1");
        param1.setValue("Darren1");
        List<SimpleParameter> list = new ArrayList<>();
        list.add(param);
        list.add(param1);

        DefaultStringifier.storeArray(conf, list.toArray(), "key3");
Mapper中:
        // 獲取引數方式二: 獲取簡單物件
        SimpleParameter param = DefaultStringifier.load(conf, "key2", SimpleParameter.class);
        LOG.info("第二個引數: " + param);

        // 獲取引數方式三:獲取物件陣列
        SimpleParameter[] params = DefaultStringifier.loadArray(conf, "key3", SimpleParameter.class);
        for (SimpleParameter parameter : params) {
            LOG.info("第三個引數: " + parameter);
        }
執行結果:
第二個引數: Parameter [name=name, value=Darren]
第三個引數: Parameter [name=name, value=Darren]
第三個引數: Parameter [name=name1, value=Darren1]
結果也很正確。
剛才看了store和toString方法,猜測一下load和fromString幹了什麼事,load肯定是從conf物件中獲取傳遞的字串,fromString把字串反序列化成物件,接下來驗證一下對不對:
  /**
   * Restores the object from the configuration.
   *
   * @param <K> the class of the item
   * @param conf the configuration to use
   * @param keyName the name of the key to use
   * @param itemClass the class of the item
   * @return restored object
   * @throws IOException : forwards Exceptions from the underlying
   * {@link Serialization} classes.
   */
  public static <K> K load(Configuration conf, String keyName,
      Class<K> itemClass) throws IOException {
    DefaultStringifier<K> stringifier = new DefaultStringifier<K>(conf,
        itemClass);
    try {
      String itemStr = conf.get(keyName);
      return stringifier.fromString(itemStr);
    } finally {
      stringifier.close();
    }
  }
public T fromString(String str) throws IOException {
try {
byte[] bytes = Base64.decodeBase64(str.getBytes("UTF-8"));
inBuf.reset(bytes, bytes.length);
T restored = deserializer.deserialize(null);
return restored;
} catch (UnsupportedCharsetException ex) {
throw new IOException(ex.toString());
}
}沒問題吧,這個用起來是不是也還算方便。
那麼問題又來了,如果我想傳遞一個map怎麼辦,因為我們常用的是不是都應map這個結果儲存啊。
其實,hadoop也提供瞭解決方案,它提供了MapWritable類,我們直接來看例子吧:
        // 傳遞引數方式四 : 複雜Map
        MapWritable map = new MapWritable();
        map.put(new Text("param"), param);
        map.put(new Text("param1"), param1);
        DefaultStringifier.store(conf, map, "key4");
// 獲取引數方式四:獲取複雜Map
MapWritable map = DefaultStringifier.load(conf, "key4", MapWritable.class);
Set<Entry<Writable, Writable>> entrySet = map.entrySet();
for (Entry<Writable, Writable> entry : entrySet) {
LOG.info("第四個引數: " + entry.getKey().toString() + ": " + entry.getValue().toString());
}執行結果:
第四個引數: param: Parameter [name=name, value=Darren]
第四個引數: param1: Parameter [name=name1, value=Darren1]
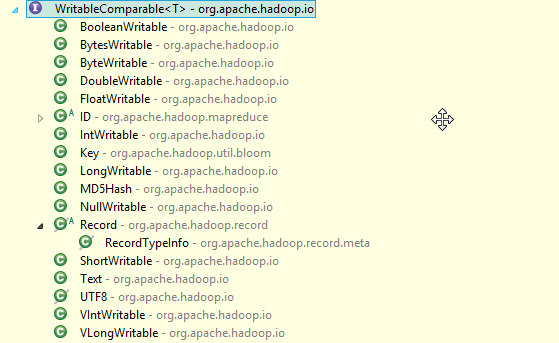
由於map的key和value都要求是Writable型別的,所以你只要實現Writable介面就可以了吧,當然,如果是key的話再重寫一下equals和hashcode方法就行了,不過hadoop也提供了依稀作為key的常用型別,String型別的話你可以用Text類,總之各種常用型別都要,請看下圖:
value的話,我是用的是自定義的物件,這樣不就可以實現一個複雜Map的傳遞了嗎。
如果是複雜的物件呢,比如:
package com.darren.hadoop.transfer;

import java.io.Serializable;
import java.util.ArrayList;
import java.util.HashMap;
import java.util.List;
import java.util.Map;

public class ComplexParameter implements Serializable  {
    /**
     *
     */
    private static final long serialVersionUID = 3689550651827430036L;
    private String name;
    private SimpleParameter silpleParameter;
    private Map<String, String> simpleMap = new HashMap<>();
    private Map<String, SimpleParameter> complexMap = new HashMap<>();
    private List<SimpleParameter> complexList = new ArrayList<>();

    public String getName() {
        return name;
    }

    public void setName(String name) {
        this.name = name;
    }

    public SimpleParameter getSilpleParameter() {
        return silpleParameter;
    }

    public void setSilpleParameter(SimpleParameter silpleParameter) {
        this.silpleParameter = silpleParameter;
    }

    public Map<String, String> getSimpleMap() {
        return simpleMap;
    }

    public void setSimpleMap(Map<String, String> simpleMap) {
        this.simpleMap = simpleMap;
    }

    public Map<String, SimpleParameter> getComplexMap() {
        return complexMap;
    }

    public void setComplexMap(Map<String, SimpleParameter> complexMap) {
        this.complexMap = complexMap;
    }

    public List<SimpleParameter> getComplexList() {
        return complexList;
    }

    public void setComplexList(List<SimpleParameter> complexList) {
        this.complexList = complexList;
    }

    @Override
    public String toString() {
        return "ComplexParameter [name=" + name + ", silpleParameter=" + silpleParameter + ", simpleMap=" + simpleMap
                + ", complexMap=" + complexMap + ", complexList=" + complexList + "]";
    }

}
這個物件很複雜,實現Writable介面似乎也不便於序列化,那怎麼辦呢?
方式三:實現Serializable介面,自己序列化
這個方案就是自己序列化的一種,轉換為JSON字串是不是也可以啊,我們在這裡就採用java序列化的方式:
這個時候SimpleParameter也要實現Serializable介面:
package com.darren.hadoop.transfer;

import java.io.DataInput;
import java.io.DataOutput;
import java.io.IOException;
import java.io.Serializable;

import org.apache.hadoop.io.Writable;

public class SimpleParameter implements Writable, Serializable {

    /**
     *
     */
    private static final long serialVersionUID = 898737795340677656L;
    private String name;
    private String value;

    @Override
    public void write(DataOutput out) throws IOException {
        out.writeUTF(this.name);
        out.writeUTF(this.value);
    }

    @Override
    public void readFields(DataInput in) throws IOException {
        this.name = in.readUTF();
        this.value = in.readUTF();
    }

    public String getName() {
        return name;
    }

    public void setName(String name) {
        this.name = name;
    }

    public String getValue() {
        return value;
    }

    public void setValue(String value) {
        this.value = value;
    }

    @Override
    public String toString() {
        return "Parameter [name=" + name + ", value=" + value + "]";
    }
}
        // 傳遞引數方式五 : 複雜物件, 複雜物件需要手動序列化
        ComplexParameter complexParameter = new ComplexParameter();
        complexParameter.setName("Darren");
        complexParameter.setComplexList(list);
        complexParameter.setSilpleParameter(param);
        Map<String, SimpleParameter> complexMap = new HashMap<>();
        complexMap.put("test", param);
        complexParameter.setComplexMap(complexMap);
        Map<String, String> simpleMap = new HashMap<>();
        simpleMap.put("name", "Darren");
        complexParameter.setSimpleMap(simpleMap);
        ByteArrayOutputStream out = new ByteArrayOutputStream();
        ObjectOutputStream objOut = new ObjectOutputStream(out);
        objOut.writeObject(complexParameter);
        objOut.flush();
        objOut.close();
        String complexString = out.toString("ISO-8859-1");
        conf.set("key5", URLEncoder.encode(complexString, "UTF-8"));
// 獲取引數方式五: 獲取複雜物件
String value5 = conf.get("key5");
LOG.info("第五個引數: " + value5);
ObjectInputStream objIn = new ObjectInputStream(new ByteArrayInputStream(URLDecoder.decode(value5, "UTF-8").getBytes("ISO-8859-1")));
ComplexParameter complexParameter = null;
try {
complexParameter = (ComplexParameter) objIn.readObject();
} catch (ClassNotFoundException e) {
e.printStackTrace();
}
LOG.info("第五個引數: " + complexParameter);執行結果:
第五個引數: %C2%AC%C3%AD%00%05sr%00%2Bcom.darren.hadoop.transfer.ComplexParameter33%C3%AA%C3%85%0E%C3%BC%22%C2%94%02%00%05L%00%0BcomplexListt%00%10Ljava%2Futil%2FList%3BL%00%0AcomplexMapt%00%0FLjava%2Futil%2FMap%3BL%00%04namet%00%12Ljava%2Flang%2FString%3BL%00%0FsilpleParametert%00%2CLcom%2Fdarren%2Fhadoop%2Ftransfer%2FSimpleParameter%3BL%00%09simpleMapq%00%7E%00%02xpsr%00%13java.util.ArrayListx%C2%81%C3%92%1D%C2%99%C3%87a%C2%9D%03%00%01I%00%04sizexp%00%00%00%02w%04%00%00%00%02sr%00*com.darren.hadoop.transfer.SimpleParameter%0Cx%C3%B5C%5D%7F%C2%B2%18%02%00%02L%00%04nameq%00%7E%00%03L%00%05valueq%00%7E%00%03xpt%00%04namet%00%06Darrensq%00%7E%00%08t%00%05name1t%00%07Darren1xsr%00%11java.util.HashMap%05%07%C3%9A%C3%81%C3%83%16%60%C3%91%03%00%02F%00%0AloadFactorI%00%09thresholdxp%3F%40%00%00%00%00%00%0Cw%08%00%00%00%10%00%00%00%01t%00%04testq%00%7E%00%09xq%00%7E%00%0Bq%00%7E%00%09sq%00%7E%00%0F%3F%40%00%00%00%00%00%0Cw%08%00%00%00%10%00%00%00%01q%00%7E%00%0Aq%00%7E%00%0Bx
第五個引數: ComplexParameter [name=Darren, silpleParameter=Parameter [name=name, value=Darren], simpleMap={name=Darren}, complexMap={test=Parameter [name=name, value=Darren]}, complexList=[Parameter [name=name, value=Darren], Parameter [name=name1, value=Darren1]]]
這種方式主要解決更加複雜物件的傳遞,使用hadoop自帶的序列化方式不便於解決的,可以採用這種方式,當然,轉化為JSON一樣可以達到目的。
總結以上方式:都是採用configuration物件來達到目的的,為什麼這種方式可以跨越不同的JVM呢,我們來簡單分析一下原來,當然在分析之前,再看一個例子:
        Job job = new Job(conf);
        conf.set("key7", "test7");
我在new Job之後又設定了一個引數
然後在Mapper接收:
LOG.info("第七個引數: " + conf.get("key7"));結果:
第七個引數: null獲取不到了,這是為什麼呢?
現在來揭曉答案,configuration物件傳遞引數的原理是因為自己被序列化到HDFS上,然後再被不同的JVM反序列化為物件使用的,所以可以傳遞引數,可以檢視Configuration的原始碼:
public class Configuration implements Iterable<Map.Entry<String,String>>,
                                      Writable {
也實現了Writable介面。
但是為什麼new Job之後就不能傳遞了呢?是因為初始化Job之後會把configuration物件序列化,並且是隻讀的,不可再更改。所以初始化Job之後不能再有傳遞引數的作用。
方式四:DistributedCache
通過上述三種方式,我們發現基本能滿足使用需要,但是如果想傳遞個檔案怎麼辦呢?就使用第四種方式,當然這個類不僅是為了傳遞檔案而寫的,它甚至可以直接把jar檔案放到相應的classpath下去使用,當然今天在這裡只介紹一下如何傳遞檔案。
先來簡單瞭解一下這個類可以做什麼事情,以及在什麼需求下使用這個類。
DistributedCache是hadoop框架提供的一種機制,可以將job指定的檔案,在job執行前,先行分發到task執行的機器上,並有相關機制對cache檔案進行管理.
常見的應用場景有:
- 分發第三方庫(jar,so等);
- 分發演算法需要的詞典檔案;
- 分發程式執行需要的配置;
- 分發多表資料join時小表資料簡便處理等
主要的注意事項有:
- DistributedCache只能應用於分散式的情況,包括偽分散式,完全分散式.有些api在這2種情況下有移植性問題.
- 需要分發的檔案,必須提前放到hdfs上.預設的路徑字首是hdfs://的,不是file://
- 需要分發的檔案,最好在執行期間是隻讀的.
- 不建議分發較大的檔案,比如壓縮檔案,可能會影響task的啟動速度.
來看例子:
        // 傳遞引數方式六 : 傳遞檔案
        DistributedCache.addCacheFile(new Path(args[0]).toUri(), conf);
// 獲取引數方式六: 獲取檔案
Path[] paths = DistributedCache.getLocalCacheFiles(conf);
LOG.info("第六個引數: " + paths[0]);
LOG.info("path=================本地檔案系統 ");
for (Path path : paths) {
BufferedReader reader = new BufferedReader(new FileReader(path.toString()));
String line = null;
while((line = reader.readLine()) != null){
LOG.info("第六個引數: " + line);
}
reader.close();
}
URI[] urls = DistributedCache.getCacheFiles(conf);
LOG.info("第六個引數: " + urls[0]);
LOG.info("uri=================HDFS檔案系統 ");
//fileSystem = FileSystem.get(conf);
fileSystem = FileSystem.newInstance(conf);
for (URI uri : urls) {
BufferedReader reader = new BufferedReader(new InputStreamReader(fileSystem.open(new Path(uri.toString()))));
String line = null;
while((line = reader.readLine()) != null){
LOG.info("第六個引數: " + line);
}
reader.close();
}執行結果:
第六個引數: /mnt/dsk/8/yarn/nm/usercache/darren/appcache/application_1489987036629_958673/container_1489987036629_958673_01_000002/wordCount.txt
path=================本地檔案系統
第六個引數: I am Darren
第六個引數: /user/darren/darren-hadoop/data/test/darren/wordCount.txt
uri=================HDFS檔案系統
第六個引數: I am Darren
我的檔案內容就是:
I am Darren所以得到的結果也是正確的。
這裡發現,我用兩種方式去獲取檔案路徑,一種獲取的是本地檔案系統的路徑,一種是HDFS檔案系統的路徑,這個相信大家從方法名上可以看出來。可是我就有一個疑問,返回HDFS檔案系統路徑的時候是URI,二本地檔案系統的是Path,感覺剛好使用反了,不知道工程師是怎麼想的。
傳遞引數就先到這裡,以後發現新的東西再補充
程式碼:
參考:


