在Asp.Net中操作PDF – iTextSharp
轉自:http://www.cnblogs.com/CareySon/archive/2011/11/04/2236239.html
使用者和PDF文件的互動可以通過錨(連結)和書籤進行,接著我前面iTextSharp的系列文章,本篇文章主要講通過iTextSharp建立的PDF中連結和書籤的基礎知識
連結
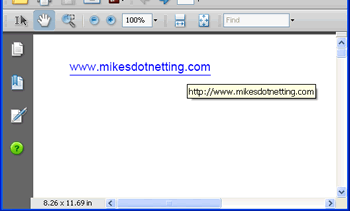
iTextSharp的Anchor物件和HTML中的錨非常相似,它們都允許建立連結到外部文件或是內部文件的連結。但和HTML中的連結不同的是,iTextSharp的連結預設沒有任何樣式,有鑑於此,我建議對於連結來說,都應該加下劃線並且使用藍色字型來告訴使用者這段文字有著連結的功能:
string path = Server.MapPath("PDFs");

Document doc = new Document();
try

{

    PdfWriter.GetInstance(doc, new FileStream(path + "/Anchors.pdf", FileMode.Create));

    doc.Open();

    Font link = FontFactory.GetFont("Arial", 12, Font.UNDERLINE, new Color(0, 0, 255));

    Anchor anchor = new Anchor("www.mikesdotnetting.com", link);

    anchor.Reference = "http://www.mikesdotnetting.com";

    doc.Add(anchor);

}

catch (DocumentException dex)

{

    Response.Write(dex.Message);

}

catch (IOException ioex)

{

    Response.Write(ioex.Message);

}

finally

{

    doc.Close();

}
上面程式碼建立了一個外部連結,當點選連結後會開啟瀏覽器並導向指定連結.
內部連結在HTML中是通過為<a>標籤新增NAME屬性來實現的,iTextSharp也是用的這種方法:
Anchor click = new Anchor("Click to go to Target");

click.Reference = "#target";

Paragraph p1 = new Paragraph();

p1.Add(click);

doc.Add(p1);


Paragraph p2 = new Paragraph();

p2.Add(new Chunk("\n\n\n\n\n\n\n\n"));

doc.Add(p2);


Anchor target = new Anchor("This is the Target");

target.Name = "target";

Paragraph p3 = new Paragraph();

p3.Add(target);

doc.Add(p3);
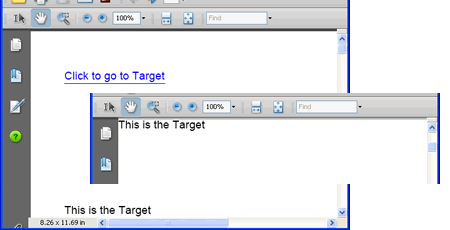
第一個段落包含一個就像HTML中<a>一樣的指向”#target”的錨記,第二個段落包含了多個換行符,第三個段落包含了一個錨記,並設定成和第一個段落引用名一樣的Name.結果是當你點選”Click to go to target”時,PDF現在無論讀到哪了,都會導向這個錨記,現在”This is target”會出現在PDF頂端.
錨記的一個代替方案是使用Chunk類的SetLocalGoto()和 SetLocalDestination()方法:
Paragraph p4 = new Paragraph();

p4.Add(new Chunk("Click "));

p4.Add(new Chunk("here", link).SetLocalGoto("GOTO"));

p4.Add(new Chunk(" to find local goto"));

p4.Add(new Chunk("\n\n\n\n\n\n\n\n\n"));


Paragraph p5 = new Paragraph();

p5.Add(new Chunk("Local Goto Destination").SetLocalDestination("GOTO"));


doc.Add(p4);

doc.Add(p5);
第一個段落使用的字型傳達的意思告訴使用者這個是一個超連結,Chunk.SetLocalGoto()接受一個String型別的引數,這個String是錨記的名稱。接下來又加入了幾個換行符。接下來使用了SetLocalDestination()方法設定當前位置的名稱,他和之前定義的SetLocalGoto()方法中的指定的位置名稱相對應。當生成PDF時,”Here”有下劃線並且是藍色的,點選後會將PDF導向到”Local Goto Destination”處於最頂端。
書籤
很多時候你開啟一個PDF時,你的PDF瀏覽程式都會顯示一個數狀的文件結構,每一個樹枝或者葉節點都會連結到一章或者一節,iTextSharp通過Chapter和Section物件提供了生成樹狀導航的功能.
書籤最大的物件是Chapter,每一個Chapter物件都會另起一頁,而Section物件必須加在Chapter物件或其他Section物件之中:
Chapter chapter1 = new Chapter(new Paragraph("This is Chapter 1"),1);

Section section1 = chapter1.AddSection(20f, "Section 1.1", 2);

Section section2 = chapter1.AddSection(20f, "Section 1.2", 2);

Section subsection1 = section2.AddSection(20f, "Subsection 1.2.1", 3);

Section subsection2 = section2.AddSection(20f, "Subsection 1.2.2", 3);

Section subsubsection = subsection2.AddSection(20f, "Sub Subsection 1.2.2.1", 4);

Chapter chapter2 = new Chapter(new Paragraph("This is Chapter 2"), 1);

Section section3 = chapter2.AddSection("Section 2.1", 2);

Section subsection3 = section3.AddSection("Subsection 2.1.1", 3);

Section section4 = chapter2.AddSection("Section 2.2", 2);

chapter1.BookmarkTitle = "Changed Title";

chapter1.BookmarkOpen = true;

chapter2.BookmarkOpen = false;

doc.Add(chapter1);

doc.Add(chapter2);
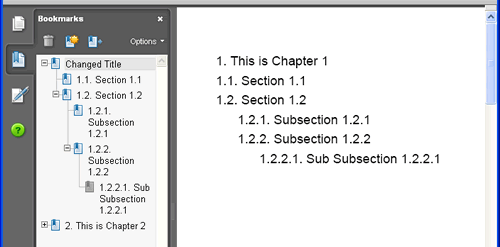
上面的圖片清楚解釋了之前的程式碼。程式碼開始,建立了一個Chapter物件並傳入了一個Paragraph物件作為引數,第二個引數表示當前章是第幾章。這裡設定為1,然後把一個Section物件加入到當前章,為Section的建構函式傳入的三個引數分別為,Float型別的引數代表左邊的縮排,第二個String引數代表在書籤和頁面上顯示的節點名稱,最後一個引數是當前節點的縮排層次.這個例子中,Section 1.1是樹的第二層,SubSection1被加入了Section1.1所以SubSection1是樹的第三層。弄懂了上面的解釋後,剩下的程式碼看起來就直接多了。
最後的程式碼(chapter1.BookmarkTitle = "Changed Title";)可以通過設定BookmarkTitle屬性將樹狀導航的名字改了,上面程式碼將Chapter1的BookmarkOpen設定為True將Chapter2的BookmarkOpen設定為False.最後將所有Chapter加入到Document中.
Chapter和Section對記憶體的消耗是驚人的,所以對於它們的使用也要十分謹慎,如果你需要建立手冊一類的PDF文件時,最好將其安排在你的Web伺服器空閒時做。


