
SpringBoot—訪問關係型資料庫—SpringData JPA
一、SpringData JPA是什麼
上一節學習瞭如何入門SpringBoot,本篇章介紹springboot對資料庫是如何進行訪問的。在介紹之前,有必要了解一下SpringDataJPA,這是SpringCore中的一個專案,致力於簡化對資料庫的訪問,增強了ORM的操作。對於JPA(Java persisten API),全稱為Java持久化API,是JAVAEE中的一套規範API。它推出的目的是對ORM框架進行大統一,它提供一套介面,讓廠商們(如hibernate)對JPA提供實現。JPA與hibernate的關係就像JDBC與Mysql驅動、Oracle驅動一樣的關係,只是它更加高度抽象,可以稱之為ORM框架的介面,它的層遞關係是這樣的: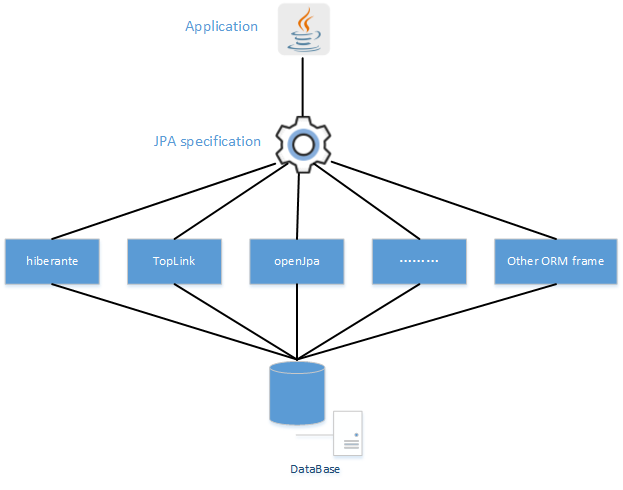
而SpringDataJPA是什麼樣子的呢?相信學過hibernate的同學一定也學過hibernate template,甚至自己實現過hibernate template。沒錯,SpringData JPA就很像這樣一款template,把該有的東西都給你封裝好,當然,其強大不止這一點點。相信學過mybatis的同學也知道,我們只需要一個mapper介面與一些mapper.xml,就可以讓其代理實現的持久層。SpringDataJPA在使用的時候,也只需要宣告一個介面,讓其Spring以代理的形式生成Dao。對於SpringDataJPA與hibernate等ORM框架、JPA的關係是這樣子的:

SpringDataJPA對類似hibernate這樣的框架又做了一層封裝,以便於我們程式設計的時候使用更方便。好了,說了那麼多理論,下面就開始實踐吧。
二、開始實踐
1.建立maven web專案,名稱為springboot-jpa,在pom.xml中匯入以下依賴:
	<parent>
		<groupId>org.springframework.boot</groupId>
		<artifactId>spring-boot-starter-parent</artifactId>
		<version>1.4.1.RELEASE</version>
	</parent>

	<properties>
		<project.build.sourceEncoding>UTF-8</project.build.sourceEncoding>
		<java.version>1.8</java.version>
		<springBoot.groupId>org.springframework.boot</springBoot.groupId>
	</properties>

	<dependencies>
		<!-- SpringBoot Start -->
		<dependency>
			<groupId>${springBoot.groupId}</groupId>
			<artifactId>spring-boot-starter-web</artifactId>
		</dependency>
		<!-- jpa -->
		<dependency>
			<groupId>${springBoot.groupId}</groupId>
			<artifactId>spring-boot-starter-data-jpa</artifactId>
		</dependency>
		<dependency>
			<groupId>${springBoot.groupId}</groupId>
			<artifactId>spring-boot-starter-test</artifactId>
		</dependency>
		<!-- mysql -->
		<dependency>
			<groupId>mysql</groupId>
			<artifactId>mysql-connector-java</artifactId>
		</dependency>
		<dependency>
			<groupId>junit</groupId>
			<artifactId>junit</artifactId>
			<version>4.12</version>
		</dependency>
	</dependencies>
其中SpringDataJPA核心支援依賴是spring-boot-starter-data-jpa。
2.編輯配置
待maven構建導包完成後,請在mysql中建立好資料庫springboot_test,在src/main/resources中新增application.yml配置,程式碼如下所示:server:
port: 8080
tomcat:
uri-encoding: UTF-8
spring:
datasource:
url: jdbc:mysql://127.0.0.1:3306/springboot_test?characterEncoding=utf8
username: root
password: root
jpa:
database: MYSQL
show-sql: true
#hibernate ddl auto(validate,create,update,create-drop)
hibernate:
ddl-auto: update
naming:
strategy: org.hibernate.cfg.ImprovedNamingStrategy
properties:
hibernate:
dialect: org.hibernate.dialect.MySQL5Dialect
在src/main/java中新建org.fage包,在其中建立一個Jpa的Java配置類:
package org.fage;

import org.springframework.boot.autoconfigure.domain.EntityScan;
import org.springframework.context.annotation.Bean;
import org.springframework.context.annotation.Configuration;
import org.springframework.core.Ordered;
import org.springframework.core.annotation.Order;
import org.springframework.dao.annotation.PersistenceExceptionTranslationPostProcessor;
import org.springframework.data.jpa.repository.config.EnableJpaRepositories;
import org.springframework.transaction.annotation.EnableTransactionManagement;

/**
 *
 * @author Caizhfy
 * @email [email protected]
 * @createTime 2017年10月30日
 * @description JPA基礎配置類
 *
 */
@Order(Ordered.HIGHEST_PRECEDENCE)
@Configuration
@EnableTransactionManagement(proxyTargetClass=true)
@EnableJpaRepositories(basePackages={"org.fage.**.repository"})
@EntityScan(basePackages={"org.fage.**.domain"})
public class JpaConfiguration {
	@Bean
	PersistenceExceptionTranslationPostProcessor persistenceExceptionTranslationPostProcessor(){
		return new  PersistenceExceptionTranslationPostProcessor();
	}
}在根包中建立入口類App.java:
package org.fage;

import org.springframework.boot.SpringApplication;
import org.springframework.boot.autoconfigure.ImportAutoConfiguration;
import org.springframework.boot.autoconfigure.SpringBootApplication;
/**
 *
 * @author Caizhfy
 * @email [email protected]
 * @createTime 2017年10月30日
 * @description Springboot-jpa學習建立步驟:
 * 						1.建立專案
 *						2.新增依賴,填寫配置類
 *						3.配置application.yml
 *						4.配置實體jpa關係
 *						5.繼承jpaRepository
 *						6.編寫測試用例
 */

@SpringBootApplication
@ImportAutoConfiguration(value=JpaConfiguration.class)
public class App {
	public static void main(String[] args) {
		SpringApplication.run(App.class, args);
	}
}
3.建立實體建模:
建模關係是有部門、使用者、角色三個實體;部門與使用者是一對多的關係,使用者與角色是多對多的關係,在org.fage.domain包中建立三個實體,建模程式碼如下 部門實體:@Entity
@Table(name = "department")
public class Department implements Serializable {
private static final long serialVersionUID = 159714803901985366L;
@Id
@GeneratedValue(strategy=GenerationType.IDENTITY)
private Long id;
private String name;
@OneToMany(mappedBy="department",fetch=FetchType.LAZY)
private List<User> users;
//getter and setter
...
}
@Entity
@Table(name = "user")
public class User implements Serializable{

	@Id
	@GeneratedValue(strategy = GenerationType.IDENTITY)
	private Long id;
	private String username;
	@Column(name = "create_date")
	@DateTimeFormat(pattern = "yyyy-MM-dd HH:mm:ss")
	@Temporal(TemporalType.TIMESTAMP)
	private Date createDate;
	//一對多對映
	@ManyToOne
	@JoinColumn(name = "department_id")
	@JsonBackReference // 防止物件的遞迴訪問
	private Department department;
	//多對多對映
	@ManyToMany(fetch=FetchType.EAGER)
	@JoinTable(name = "user_role",
			joinColumns = {@JoinColumn(name="user_id")},
			inverseJoinColumns = {@JoinColumn(name = "role_id")}
			)

//getter and setter
}
@Entity
@Table(name="role")
public class Role implements Serializable{

	@Id
	@GeneratedValue(strategy=GenerationType.IDENTITY)
	private Long id;
	private String name;


//getter and setter

}
實體對映關係建立完成,解釋一下其中的註解,這些註解其實大多數都是在學JPA與hibernate的時候學會的:@Entity宣告這是一個實體類;@Table宣告該實體在表中對應的表名是什麼;@Id宣告該屬性為實體對應表的主鍵;@GeneratedValue聲明瞭主鍵策略是什麼,這裡使用的是自動增長主鍵策略;@ManyToOne與@OneToMany聲明瞭該實體與對應屬性的實體是多對一或者一對多的關係,其中如果設立雙向關係記得設定mappedBy,fetch的值聲明瞭載入方式是懶載入還是立即載入;@ManyToMany是實體間多對多的關係,@JoinTable設定了兩個多對多的實體的中間表外來鍵。
4.建立持久層Dao
在SpringDataJPA中,我們不在稱其為mapper或者dao,而是稱為repository,我們來為三個實體分別建立自己的repository。在org.fage.repository中建立如下三個介面,繼承自JpaRepository,泛型左邊為實體型別,右邊為該實體的主鍵型別: 部門repository:package org.fage.repository;
import org.fage.domain.Department;
import org.springframework.data.jpa.repository.JpaRepository;
import org.springframework.stereotype.Repository;
@Repository
public interface DepartmentRepository extends JpaRepository<Department, Long>{}
@Repository
public interface UserRepository extends JpaRepository<User, Long>{
	//And用法
	User findById(long id);

	User findByIdAndUsername(long id, String username);

	//Or用法
	User findByIdOrUsername(long id, String name);

	//Between用法
	User findByCreateDateBetween(Date start, Date end);

	//LessThan用法
	List<User> findByCreateDateLessThan(Date start);

	//GreaterThan用法
	List<User> findByCreateDateGreaterThan(Date start);

	//IsNull/IsNutNull用法
	List<User> findByUsernameIsNull();

	//Like/NotLike用法
	List<User> findByUsernameLike(String username);

	//OrderBy用法
	List<User> findByUsernameOrderByIdAsc(String username);

	//Not用法
	List<User> findByUsernameNot(String username);

	//In/NotIn用法
	List<User> findByUsernameIn(Collection<String> nameList);


}
角色repository:
@Repository
public interface RoleRepository extends JpaRepository<Role, Long>{}
至此,我們可以建立Junit程式,測試使用這三個持久層介面了,在src/test/java中可以建立測試程式進行測試了,hibernate實現會自動幫我們生成表,SpringDataJPA提供了常用的CRUD操作:
@RunWith(SpringRunner.class)
@SpringBootTest
public class RepositoryTest {
	private final Logger log = LoggerFactory.getLogger(RepositoryTest.class);


	@Autowired
	UserRepository userRepository;
	@Autowired
	RoleRepository roleRepository;
	@Autowired
	DepartmentRepository departmentRepository;

	@Before
	public void initData() {
		departmentRepository.deleteAll();
		roleRepository.deleteAll();
		userRepository.deleteAll();

		Department d = new Department();
		d.setName("開發部");
		departmentRepository.save(d);
		Assert.assertNotNull(d.getId());

		Role r = new Role();
		r.setName("部門經理");
		roleRepository.save(r);
		Assert.assertNotNull(r.getId());
		List<Role> roles = new ArrayList<Role>();
		roles.add(r);

		User u = new User();
		u.setUsername("蔡智法");
		u.setCreateDate(new Date());
		u.setDepartment(d);
		u.setRoles(roles);
		userRepository.save(u);
		Assert.assertNotNull(u.getId());
	}

	@Test
	public void testGeneralMethod(){
		System.out.println(userRepository.findByUsernameLike("蔡智法"));
	}


	@Test
	public void testFindPage() {
		//hibernate一對多分頁原理:先分頁,然後在將id作為引子查詢(效率低)
		Pageable pageable = new PageRequest(0, 5, new Sort(Sort.Direction.ASC, "id"));
		Page<Department> page = departmentRepository.findAll(pageable);
		System.out.println(page.getNumberOfElements());
	}

}
沒搞錯吧?這些介面甚至一行業務程式碼都不用寫(UserRepository中的程式碼待會兒解釋),就能實現增刪改查、分頁操作??沒錯,確實就是這麼簡單。不難發現,我們獲得支援的最重要一點是繼承了JpaRepository(該介面提供了上層介面更多的查詢操作)介面,跟蹤原始碼發現JpaRepository介面繼承了上層的PageAndSortingRepository(該介面提供了分頁以及排序的支援),PageAndSortingRepository繼承自CrudRepository(該介面提供基礎的增刪改查操作),而CrudRepository又繼承自Repository。我們知道,他們都是介面,本身沒有實現方法,但是SpringDataJPA幫我們提供了一套實現,在執行的時候會以代理的形式給我們生成實現類,只要你繼承了Spring給你的這些Repository介面,那麼你就能獲得這些方法支援。
問題又來了,UserRepository介面中自定義宣告的方法我們也沒有實現,為什麼也能正常使用呢? 那是因為在SpringDataJPA中,自定義的方法一般有兩種,第一種就是這種“約定命名”法,這種方法一定要查詢命名規範,比如findByXXX,SpringData會根據字首、中間連線詞(Or、And、Like、NotNull等等類似Sql中的關鍵詞),詳情使用請看下錶,內部會自己轉換成JPQL使用:


內部幫我們拼接sql代理生成方法的實現,不得不感嘆,真的太方便了。 第二種方法就是使用@Query註解使用JPQL(類似SQL與EL的組合)語句查詢,這種查詢一般不使用代理,是直接內部轉化成SQL進行執行,這種方法比前一種靈活一些,後面章節會提到(還有一種方法,就是自定義增強Repository實現),使用原生SQL查詢,這樣方便優化SQL。自定義增強Repository與框架原理解析,在後續文章中會陸續更新。
以上原始碼在https://github.com/Phapha1996/springboot-jpa能檢出。 在本文中,最重要的詞就是代理了,如果不瞭解代理模式的同學,希望能惡補一波代理,這是一組非常值得學習而有用的模式。
相關推薦
SpringBoot—訪問關係型資料庫—SpringData JPA
一、SpringData JPA是什麼 上一節學習瞭如何入門SpringBoot,本篇章介紹springboot對資料庫是如何進行訪問的。在介紹之前,有必要了解一下SpringDataJPA,這是Sp
SpringBoot:SpringData JPA:訪問關係型資料庫
一、SpringData JPA是什麼 上一節學習瞭如何入門SpringBoot,本篇章介紹springboot對資料庫是如何進行訪問的。在介紹之前,有必要了解一下SpringDataJPA,這是SpringCore中的一個專案,致力於簡化對資料庫的訪問,增強了ORM的操作。對於JPA(Java
SpringBoot-訪問MySQL資料庫
1.開發工具:Intellij Idea, 通過JPA(Java Persistence API,Java 資料持久化介面)來操作資料庫 2.開始 2.1新建Spring Initializr 專案,勾選web,mysql,jpa依賴 專案結構如下:
十五、SpringBoot之資料訪問整合SpringData JPA
1.SpringData簡介 2.整合SpringData JPA JPA:ORM(Object Relational Mapping 物件關係對映); 1.編寫一個實體類(bean)和資料表
SpringBoot之使用Spring-data-jpa更加簡單優雅的訪問資料庫
@RunWith(SpringJUnit4ClassRunner.class) @SpringApplicationConfiguration(Application.class) public class ApplicationTests {@Autowiredprivate UserRepository
搭建 SpringBoot 2.0 專案 (三) 使用 JPA 訪問MySQL資料庫
SpringBoot 入門系列: 本博文主要講述使用 JPA 訪問 MySQL 資料庫,參考了官網的入門指南,連結如下: 執行環境: MySQL 5.6或更高版本。 Maven STS 1、首先登入Mysq
SpringBoot集成Spring-data-jpa訪問數據庫(四)
data inter 自動 繼承 users boot mea cte emp 相比使用JdbcTemplate,Spring-data-jpa使用起來更方便 1.首先UserService 繼承JpaRepository public interface UserSer
Springboot+SpringData+jpa+redis+postgresql後臺專案
https://github.com/MAXIAODONGS/Configure 主要做的是基於Springboot+SpringData+jpa+redis+postgresql後臺檔案管理服務、包括支援遠端連線伺服器讀寫伺服器檔案 程式碼下載後需要配置application.yml中的p
springboot(二) 和資料庫(jdbcTemplete,jpa,mybatis)連線 單元測試
建立資料庫 springboot-database 建立user表 CREATE TABLE `user` ( `id` int(11) DEFAULT NULL, `name` varchar(255) DEFAULT NULL, `pass
11-SpringBoot之資料庫(二)——JPA
SpringBoot之資料庫(二)——JPA 1. 新增pom依賴 2. JPA配置 3. 例項開發 3.1 建立實體類 3.2 DAO 3.3 Service 3.4 Controller 3.5 測試
SpringBoot(六) SpirngBoot與Mysql關係型資料庫
pom.xml檔案的配置 <dependency> <groupId>org.springframework.boot</groupId> <artifactId>spring-boot-starter-jdbc</artifa
SpringBoot:SpringData JPA:進階查詢—JPQL/原生SQL查詢、分頁處理、部分欄位對映查詢
上一篇介紹了入門基礎篇SpringDataJPA訪問資料庫。本篇介紹SpringDataJPA進一步的定製化查詢,使用JPQL或者SQL進行查詢、部分欄位對映、分頁等。本文儘量以簡單的建模與程式碼進行展示操作,文章比較長,包含查詢的方方面面。如果能耐心看完這篇文章,你應該能使用SpringDataJ
SpringBoot整合SpringData-JPA
1、依賴新增 // 新增spring data jpa依賴 compile('org.springframework.boot:spring-boot-starter-data-jpa') //
Springboot集成SpringData JPA
-- div urn ner direction req builder findall pos 序 StringData JPA 是微服務框架下一款ORM框架,在微服務體系架構下,數據持久化框架,主要為SpringData JPA及Mybatis兩種,這兩者的具體比較,本
SpringBoot對非關係型資料庫NoSql的支援
NoSql是對於所有不使用關係作為資料管理的資料庫系統的總稱,NoSql的特點主要是不使用sql作為查詢語言。資料儲存也不是固定的表和欄位 NoSql資料庫主要有文件儲存型(MongoDB),圖形關係儲存型(Neo4j),鍵值對儲存型(Redis) Sp
SpringBoot-SpringData-JPA整合
資料庫訪問這一層 常用的方式有:JdbcTemplate ,SpringData-JPA, MyBatis 今天我們說一下SpringData-JPA, 使用上一篇SpringBoot-JUnit作為基礎程式碼 注:本文使用的例子來自DD程式設計師,旨在學習
29-SpringBoot——核心-非關係型資料庫NoSQL
SpringBoot核心-非關係型資料庫NoSQL MongoDB MongoDB 是一個基於文件( Document )的儲存型的資料瘁,使用面向物件的思想,每一條資料記錄都是文件的物件。Spring 對MongoDB
用IDEA搭建第一個SpringBoot+SpringData Jpa框架
本文純屬自己的一些摸索和實踐,如有寫的不好的地方歡迎大家一起討論。 首先我們來建立一個maven專案。 建立java目錄並將其變為Sources Root資料夾。 3.接下來配置pom.xml檔案裡的一些依賴 <
帶你搭一個SpringBoot+SpringData JPA的環境
開發十年,就只剩下這套架構體系了! >>>
【極簡版】SpringBoot+SpringData JPA 管理系統
開發十年,就只剩下這套架構體系了! >>>