
IOS 本地通知和遠端通知
- 本地通知
- 遠端通知
本文參考:
本地通知
本地通知,local notification,用於基於時間行為的通知,比如有關日曆或者todo列表的小應用。另外,應用如果在後臺執行,iOS允許它在受限的時間內執行,它也會發現本地通知有用。比如,一個應用,在後臺執行,嚮應用的伺服器端獲取訊息,當訊息到達時,比如下載更新版本的提示訊息,通過本地通知機制通知使用者。
本地通知是UILocalNotification的例項,主要有三類屬性:
- scheduled time,時間週期,用來指定iOS系統傳送通知的日期和時間;
- notification type,通知型別,包括警告資訊、動作按鈕的標題、應用圖示上的badge(數字標記)和播放的聲音;
- 自定義資料,本地通知可以包含一個dictionary型別的本地資料。
對本地通知的數量限制,iOS最多允許最近本地通知數量是64個,超過限制的本地通知將被iOS忽略。
如果就寫個簡單的定時提醒,是很簡單的,比如這樣:

示例寫的很簡單,啟動應用後,就發出一個定時通知,10秒後啟動。這時按Home鍵退出,一會兒就會提示上圖的提示資訊。如果應用不退出則無效。
程式碼如下:
UILocalNotification *notification=[[UILocalNotification alloc] init];
if (notification!=nil) {
NSLog(@">> support local notification");
NSDate *now=[NSDate new];
notification.fireDate=[now addTimeInterval:10];
notification.timeZone=[NSTimeZone defaultTimeZone];
[email protected]"該去吃晚飯了!";
[[UIApplication sharedApplication] scheduleLocalNotification:notification];
設定更多本地通知的資訊:
- 設定icon上數字。
- (BOOL)application:(UIApplication *)application didFinishLaunchingWithOptions:(NSDictionary *)launchOptions {
// Override point for customization after application launch.
/////////////
application.applicationIconBadgeNumber = 0;// Add the view controller’s view to the window and display.
[self.window addSubview:viewController.view];
[self.window makeKeyAndVisible];return YES;
}
- 新增通知時間,通知型別,取消通知
#pragma mark –
#pragma mark onChageValue
-(IBAction)onChangeValue:(id)sender
{
UISwitch *switch1=(UISwitch *)sender;
if (switch1.on) {
UILocalNotification *notification=[[UILocalNotification alloc] init];
NSDate *now1=[NSDate date];
notification.timeZone=[NSTimeZone defaultTimeZone];
notification.repeatInterval=NSDayCalendarUnit;
notification.applicationIconBadgeNumber = 1;
notification.alertAction = NSLocalizedString(@"顯示", nil);
switch (switch1.tag) {
case 0:
{
notification.fireDate=[now1 dateByAddingTimeInterval:10];
notification.alertBody=self.myLable1.text;
}
break;
case 1:
{
notification.fireDate=[now1 dateByAddingTimeInterval:20];
notification.alertBody=self.myLable2.text;
}
break;
case 2:
{
notification.fireDate=[now1 dateByAddingTimeInterval:30];
notification.alertBody=self.myLable3.text;
}
break;
default:
break;
}
[notification setSoundName:UILocalNotificationDefaultSoundName];
NSDictionary *dict = [NSDictionary dictionaryWithObjectsAndKeys:
[NSString stringWithFormat:@"%d",switch1.tag], @"key1", nil];
[notification setUserInfo:dict];
[[UIApplication sharedApplication] scheduleLocalNotification:notification];
}else {
NSArray *myArray=[[UIApplication sharedApplication] scheduledLocalNotifications];
for (int i=0; i<[myArray count]; i++) {
UILocalNotification *myUILocalNotification=[myArray objectAtIndex:i];
if ([[[myUILocalNotification userInfo] objectForKey:@"key1"] intValue]==switch1.tag) {
[[UIApplication sharedApplication] cancelLocalNotification:myUILocalNotification];
}
}
}
}
遠端通知
- 裝置的準備
首先要知道,push notification只能在真機上執行的,無法在模擬器上使用,如果在模擬器上執行,在註冊裝置的時候會有類似如下報錯:
Error in registration. Error: Error Domain=NSCocoaErrorDomain Code=3010 "remote notifications are not supported in the simulator" UserInfo=0x5d249d0 {NSLocalizedDescription=remote notifications are not supported in the simulator}
真機也要注意,如果沒有越獄,沒有問題。越獄的話,比如通過blacksnOw,因為沒有經過iTunes,無法生成有效的裝置證書(device certificate),因此註冊的時候不會成功。
檢查越獄版本是否可用,可以ssh到裝置上,執行命令:
ls /var/mobile/Library/Preferences/com.apple.apsd.plist -l
-rw——- 1 mobile mobile 119 Aug 24 19:21 /var/mobile/Library/Preferences/com.apple.apsd.plist
返回的檔案大小是119,就沒有問題。
2.獲取device token的原理
在說操作步驟之前,先說一下獲取device token的一些原理方面的事情。
device token,即裝置令牌,不是系統唯一標識(見獲取iOS裝置的基本資訊),需要在應用啟動時發起到apple伺服器請求,註冊自己的裝置和應用,並獲得這個device token。
device token有什麼用?如果應用需要push notification給手機,那麼它要有個伺服器端(provider),但是它發出的資訊不是直接給手機的,而是必須統一交給apple的伺服器,這個伺服器就是apple push notification server(apns)。apple伺服器通過這個token,知道應用要發的訊息是給哪個手機裝置的,並轉發該訊息給手機,手機再通知應用程式。
3.獲取device token的操作步驟
該文件很詳細,照做就應該沒有問題。
需要注意的是identifier一定要和provision portal profile中的app id一致,即:

要和:

一致。
另外,要確保裝置繫結的是唯一的profile:

編寫程式碼,是在AppDelegate中增加兩個方法:
- didRegisterForRemoteNotificationsWithDeviceToken:當應用第一次執行的時候,ios獲取到device token後呼叫,用於註冊裝置到apns上之後的操作(比如將device token通知應用的伺服器端provider)
- didFailToRegisterForRemoteNotificationsWithError:如果註冊的時候失敗,ios會呼叫這個方法,可以列印一些報錯日誌或者提醒使用者通知不可用
另外,有一個方法需要增加內容,主要是列印日誌,說明是否已經註冊:
- (void)applicationDidFinishLaunching:(UIApplication *)application {
[[UIApplication sharedApplication] setApplicationIconBadgeNumber:0];
NSLog(@"Initiating remoteNoticationssAreActive");
if(!application.enabledRemoteNotificationTypes){
NSLog(@"Initiating remoteNoticationssAreActive1");
[[UIApplication sharedApplication] registerForRemoteNotificationTypes:(UIRemoteNotificationTypeAlert | UIRemoteNotificationTypeSound | UIRemoteNotificationTypeBadge)];
}
UIApplication* myapp = [UIApplication sharedApplication];
myapp.idleTimerDisabled = YES;
[window addSubview:viewController.view];
[window makeKeyAndVisible];
}
第一次執行帶註冊方法的應用,會看到類似這樣的提示視窗:
`A%S_MRQRS6I92")
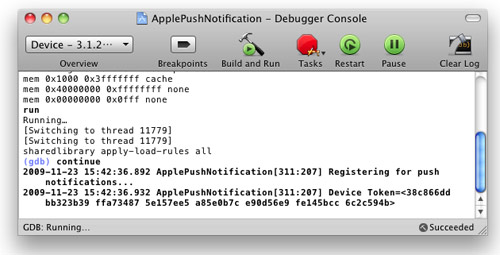
然後,在日誌中看到類似下面的日誌,主要是看到打印出device token的64位字串,就說明成功了。
5.獲得證書
蘋果提供兩種接入方式的證書:
- developer,用於測試
- production,用於產品
如果是內部測試,使用developer方式即可。
下載證書,通過ios provisioning portal:
![]()
這要求:
- 登入的apple developer program帳號必須是級別最高的agent(這是針對企業帳號來說的,如果是個人帳號就無所謂了),agent帳號即創始帳號,否則看不到configure連結;
- 必須經過configure操作,已經enable了developer和product。
然後進入configure連結,點選download按鈕即可:

6.處理證書
如果是編寫在mac下跑的objc程式,無需對證書做處理,可跳過這一步。
如果是在java下使用,需要把打證書用的私有專用金鑰和上述的支援通知的證書(注意,不是iphone developer證書)合併匯出。

生成證書:

點選儲存的時候,會提示生成一個檔案密碼:

當然可以密碼為空。
之後會提示:

這裡需要輸入mac登入使用者的密碼。
檔案生成。
7.編寫傳送通知的例項
匯入到xcode中,只需將:

deviceToken填寫成裝置的token字串,另外,pathForResource改為上面圖中的:
aps_developer_identity
另外,要把剛才獲得證書步驟中下載的證書複製到xcode專案Resources目錄下:

可以看到檔名和上面的pathForResource的引數一致。
之後執行程式就可以在裝置上收到推送通知。
如果是用java編寫,可以用第三方庫,見:
編寫簡單的傳送通知程式碼:
import org.json.JSONException;
import javapns.back.PushNotificationManager;
import javapns.back.SSLConnectionHelper;
import javapns.data.Device;
import javapns.data.PayLoad;public class Main {
/**
* @param args
* @throws Exception
*/
public static void main(String[] args) throws Exception {
PayLoad simplePayLoad = new PayLoad();
// Get PushNotification Instance
PushNotificationManager pushManager = PushNotificationManager.getInstance();
// Link iPhone’s UDID (64-char device token) to a stringName
pushManager.addDevice("iPhone", "00000000 00000000 00000000 00000000 00000000 00000000 00000000 00000000 ");
simplePayLoad.addAlert("My alert message測試");
simplePayLoad.addBadge(1);
simplePayLoad.addSound("default");
Device client = PushNotificationManager.getInstance().getDevice("iPhone");
PushNotificationManager.getInstance().initializeConnection("gateway.sandbox.push.apple.com", 2195, "/home/ubuntu/mypush.p12", "password", SSLConnectionHelper.KEYSTORE_TYPE_PKCS12);
PushNotificationManager.getInstance().sendNotification(client, simplePayLoad);
測試中文沒有亂碼問題。
編寫比較複雜的使用示例(可以控制通知是否有提示視窗、是否有提醒聲音):
- aPayload.addBadge( 2),顯示在手機應用圖示上的數字
- aPayload.addAlert("軟體版本有更新"),顯示提示視窗文字
- aPayload.addSound("default.wav"),指定提示聲音
另外,也可以使用php的第三方實現,比如:
基本原理是啟動一個php服務,監控memcacheq佇列,如果有訊息就傳送給蘋果伺服器。
Programming Apple Push Notification Services
 POSTED BY WEIMENGLEE 2 YEARS 9 WEEKS AGO
One of the key limitations of the iPhone is its constraint on running applications in the background. Because of this, applications cannot keep running in the background when the user switches to another application. So, applications that require a constant state of connectivity (such as social networking applications) will not be able to receive timely updates.
To remedy this limitation, Apple released the Apple Push Notification Service (APNs). The APNs is a service that allows your device to be constantly connected to Apple's push notification server. When you want to send a push notification to an application installed on the users' devices, you (the provider) can contact the APNs so that it can deliver a push message to the particular application installed on the intended device.
In this article, you will learn how to perform the various steps needed to create an iPhone application that uses the APNs.
Generating a Certificate Request
The first step to using the APNs is to generate a certificate request file so that you can use it to request for a development SSL certificate later on.
1. Launch the Keychain Access application in your Mac OS X.
2. Select Keychain Access'Certificate Assistant'Request a Certificate From a Certificate Authority (see Figure 1):
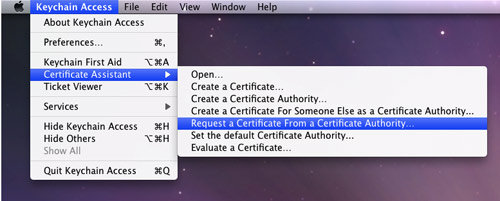
Figure 1. Generating a certificate request
3. Enter the information required and check the Saved to disk option. Click Continue (see Figure 2).
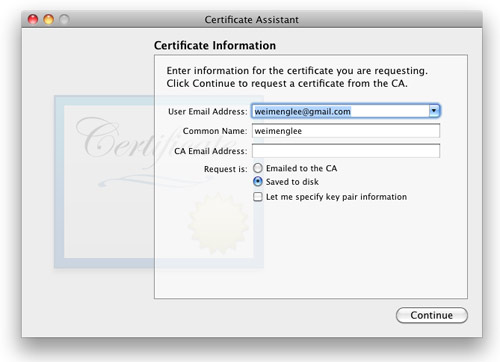
Figure 2. Saving the certificate request to disk
4. Save the certificate request using the suggested name and click Save (see Figure 3): Click Done in the next screen.
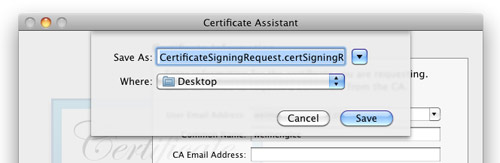
Figure 3. Naming the certificate request
Creating an App ID
Each iPhone applications that uses the APNs must have a unique application ID that uniquely identifies itself. In this step, you will learn how to create an App ID for push notification.
1. Sign in to the iPhone Developer Program at: http://developer.apple.com/iphone/. Click on the iPhone Developer Program Portal on the right of the page (see Figure 4).
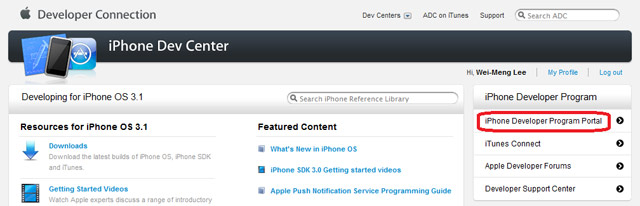
Figure 4. Launching the iPhone Developer Program Portal
2. You should see the welcome page (see Figure 5).

Figure 5. The welcome screen of the iPhone Developer Program Portal
3. Click on the App IDs tab on the left and then click on the New App ID button (see Figure 6).
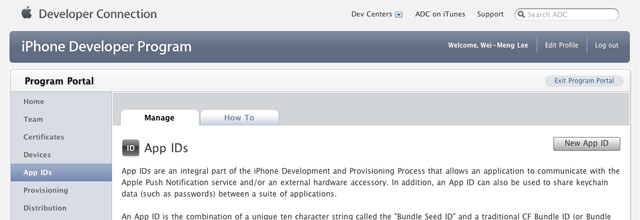
Figure 6. Clicking on the App ID tab
4. Enter "PushAppID" for the Description and select Generate New for the Bundle Seed ID. For the Bundle Identifier, enter net.learn2develop.MyPushApp.
Click Submit (see Figure 7).
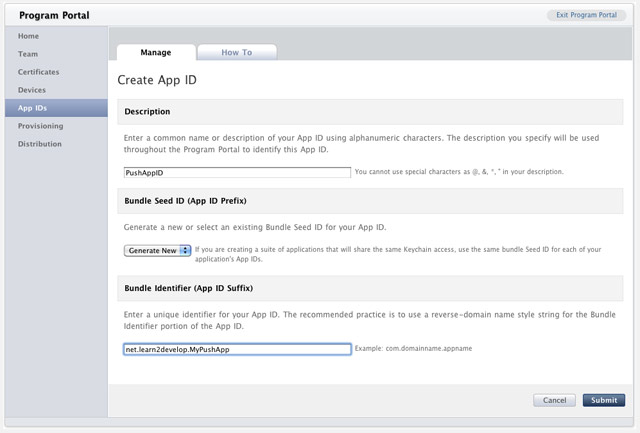
Figure 7. Creating a new App ID
5. You should now see the App ID that you have created (together with those you have previously created) (see Figure 8).

Figure 8. Viewing the newly created App ID
Configuring an App ID for Push Notifications
Once an App ID is created, you need to configure it for push notifications.
1. To configure an App ID for push notification, you need to click the Configure link displayed to the right of the App ID. You will now see the option (see Figure 9).
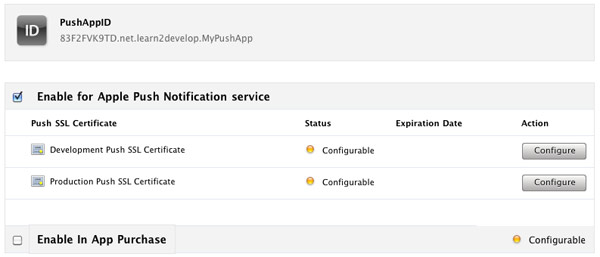
Figure 9. Configuring an App ID for push notification service
Check the Enable for Apple Push Notification service option and click the Configure button displayed to the right of the Development Push SSL Certificate.
2. You will now see the Apple Push Notification service SSL Certificate Assistant screen. Click Continue (see Figure 10).
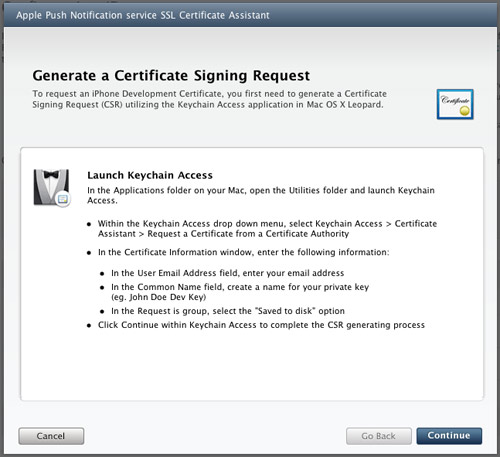
Figure 10. The Apple Push Notification service SSL Certificate Assistant screen
3. Click the Choose File button to locate the Certificate Request file that you have saved earlier. Click Generate (see Figure 11).

Figure 11. Generating the SSL certificate
4. Your SSL Certificate will now be generated. Click Continue (see Figure 12).
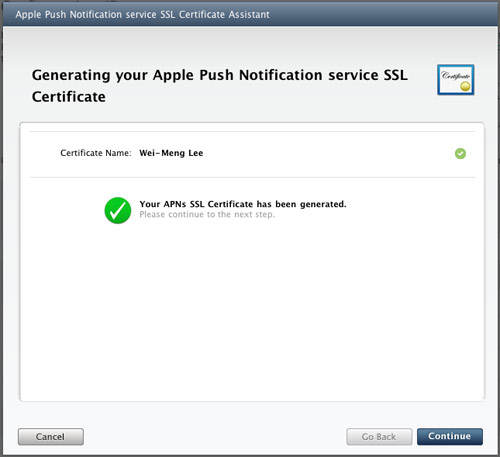
Figure 12. The APNs SSL certificate that is generated
5. Click the Download Now button to download the SSL Certificate. Click Done (see Figure 13).
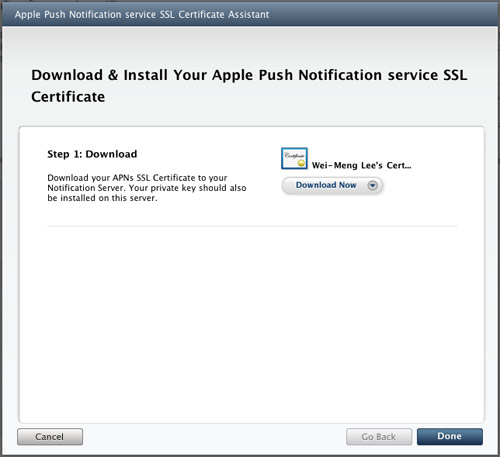
Figure 13. Downloading the certificate generated
6. The SSL Certificate that you download is named aps.developer.identity.cer.
Double-click on it to install it in the Keychain Access application (see Figure 14). The SSL certificate will be used by your provider application so that it can contact the APNs to send push notifications to your applications.
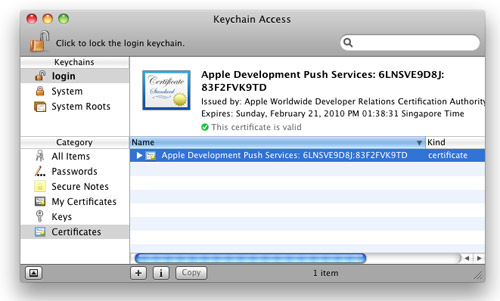
Figure 14. Installing the generated certificate into the Keychain Access application
Creating a Provisioning Profile
The next step is to create a provisioning profile so that your application can be installed onto a real device.
1. Back in the iPhone Development Program Portal, click on the Provisioning tab and click on the New Profile button (see Figure 15).
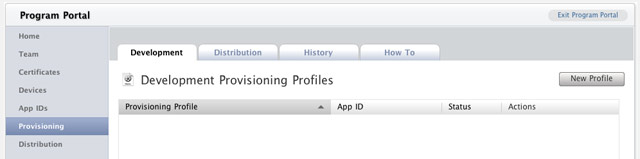
Figure 15. Selecting the Provisioning tab
2. Type in MyDevicesProfile as
the profile name. Select PushAppID as the App ID. Finally, check all the devices that you want to provision (you can register these devices with the iPhone Developer Program Portal through the Devices tab). Click Submit (see Figure 16).
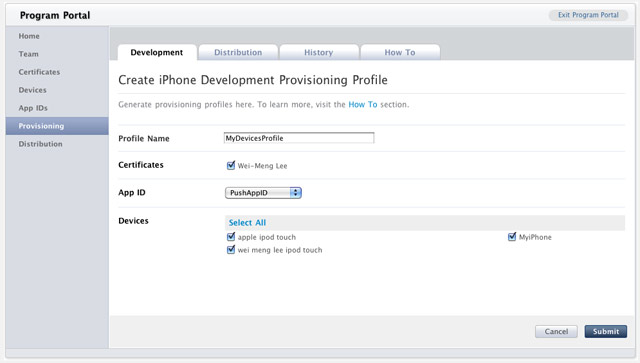
Figure 16. Creating a new provisioning profile
3. The provisioning profile will now be pending approval. After a while, you will see it appear. Click on the Download button to download the provisioning profile (see Figure 17).
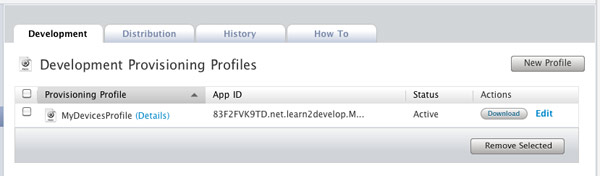
Figure 17. Pending the approval of the provisioning profile
4. The downloaded provisioning profile is named MyDevicesProfile.mobileprovision.
Provisioning a Device
With the provision profile created, you will now install it onto a real device.
1. Connect your iPhone or iPod Touch to your Mac.
2. Drag and drop the downloaded MyDevicesProfile.mobileprovision file
onto the Xcode icon on the Dock.
3. Launch the Organizer application from within Xcode and select the device currently connected to your Mac. You should see the MyDevicesProfile installed
on the device (see Figure 18).
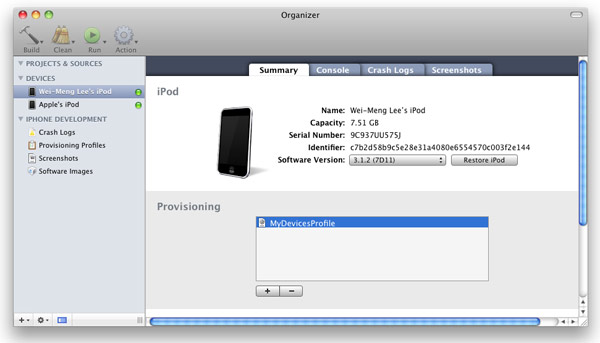
Figure 18. Viewing the installed provisioning profile
Creating the iPhone Application
1. In Xcode, create a new View-Based Application project and name it as ApplePushNotification.
2. Drag and drop a WAV file (shown as beep.wav in
this example) onto the Resources folder in Xcode (see Figure 19).
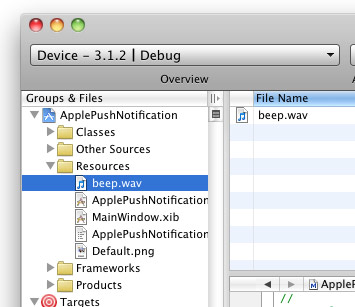
Figure 19. Adding a WAV file to the project
3. Expand on the Targets item in Xcode and select the ApplePushNotification item. Press Command-I. In the Info window, click the Properties tab (see Figure 20).
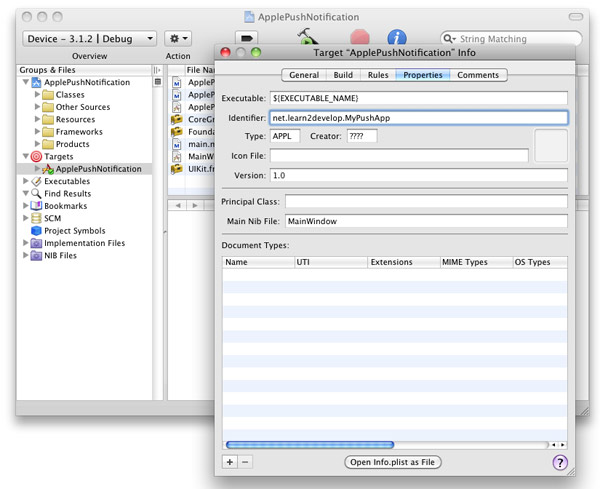
Figure 20. Entering the App ID for the application
In the Identifier textbox, type <net.learn2develop.MyPushApp.
4. Click on the Build tab and type "Code Signing" in the search box. In the Any iPhone OS Device item, select the profile as shown in Figure 21:
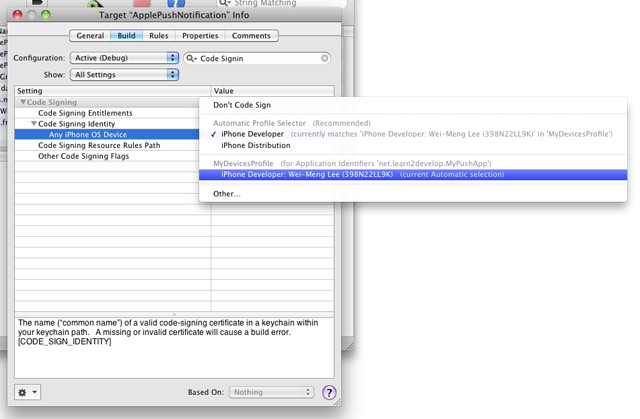
Figure 21. Selecting the profile for code signing
5. In the ApplePushNotificationAppDelegate.m file,
type the following code in bold:
#import "ApplePushNotificationAppDelegate.h"
#import "ApplePushNotificationViewController.h"

@implementation ApplePushNotificationAppDelegate

@synthesize window;
@synthesize viewController;

- (void)applicationDidFinishLaunching:(UIApplication *)application {
    [window addSubview:viewController.view];
    [window makeKeyAndVisible];

    NSLog(@"Registering for push notifications...");
    [[UIApplication sharedApplication]
        registerForRemoteNotificationTypes:
        (UIRemoteNotificationTypeAlert |
         UIRemoteNotificationTypeBadge |
         UIRemoteNotificationTypeSound)];

}

- (void)application:(UIApplication *)app didRegisterForRemoteNotificationsWithDeviceToken:(NSData *)deviceToken {

    NSString *str = [NSString
        stringWithFormat:@"Device Token=%@",deviceToken];
    NSLog(str);

}

- (void)application:(UIApplication *)app didFailToRegisterForRemoteNotificationsWithError:(NSError *)err {

    NSString *str = [NSString stringWithFormat: @"Error: %@", err];
    NSLog(str);

}

- (void)application:(UIApplication *)application didReceiveRemoteNotification:(NSDictionary *)userInfo {

    for (id key in userInfo) {
        NSLog(@"key: %@, value: %@", key, [user