
ubuntu恢復被rm誤刪的資料及原理
昨天一不小心,執行了rm xx -rf,把一個專案刪除了。然後就是各種悔恨,各種自責,這個專案可是一週的工作量啊。最後肯定得解決,於是google搜尋發現了恢復神器extundelete,最後順利恢復了所有被我無意中的刪除的檔案。感謝上天,感謝extundelete。下面將個人的經歷總結下。
如何使用extundelete
1) 下載工具extundelete
Ubuntu下下載這個工具太簡單了
- sudo apt-get install extundelete
2) 使用
使用這個也很簡單。使用extundelete–help命令,可以告訴我們很多。
- [email protected]Itleaks::~$ extundelete --help
- Usage: extundelete [options] [--] device-file
- Options:
- ……………….
- --after dtime Only process entries deleted on or after 'dtime'.
- --before dtime Only process entries deleted before 'dtime'.
- Actions:
- …………
- --restore-file 'path' Will restore file 'path'. 'path'is relative to root
- of the partition and does not start with a '/' (it
- must be one of the paths returned by --dump-names).
- The restored file is created in the current
- directory as 'RECOVERED_FILES/path'.
- --restore-files 'path' Will restore files which are listed in the file 'path'.
- Each filename should be in the same format as an option
- to --restore-file, and there should be one per line.
- --output-dir 'path' Restore files in the output dir 'path'.
- By default the restored files are created under current directory 'RECOVERED_FILES'.
- --restore-all Attempts to restore everything.
- ………..
我們知道當我們不小心刪除了有用的檔案,我們一般是比較容易知道刪除的時間的,因此,使用時間這個option可以很快並且精確的恢復出我們想要的檔案。那這個dtime怎麼生成。請參考如下命令:
- [email protected] Itleaks:~$ date -d "2014-06-01 23:02:00" +%s
- 1401634920
%s的意思是seconds since 1970-01-01 00:00:00 UTC,就是輸入時間與1970-01-0100:00:00的時間差
然後就可以使用這個來恢復了
- sudo extundelete /dev/sda8 --after 1401634920--restore-all
現在我們來做個試驗:具體操作如下
- [email protected] Itleaks:/tmp$ echo "recovery test"> itleaks.test
- [email protected] Itleaks:/tmp$ rm itleaks.test
- [email protected] Itleaks:/tmp$ date -d "2014-06-01 22:28:00" +%s
- 1401632880
- [email protected] Itleaks:/tmp$ sudo extundelete /dev/sda8 --after 1401632880 --restore-all
- Only show and process deleted entries if they are deleted on or after 1401632880and before 9223372036854775807.
- WARNING: Extended attributes are not restored.
- WARNING: EXT3_FEATURE_INCOMPAT_RECOVER is set.
- The partition should be unmounted to undelete any files without further data loss.
- If the partition isnot currently mounted, this message indicates
- it was improperly unmounted, and you should run fsck before continuing.
- If you decide to continue, extundelete may overwrite some of the deleted
- files and make recovering those files impossible. You should unmount the
- file system and check it with fsck before using extundelete.
- Would you like to continue? (y/n)
- y
- Loading filesystem metadata ... 378 groups loaded.
- Loading journal descriptors ...
- 27106 descriptors loaded.
- Searching for recoverable inodes in directory / ...
- 85 recoverable inodes found.
- Looking through the directory structure for deleted files ...
- ………………..
- Unable to restore inode 2360218 (etc/brltty/brl-fs-bumpers.kti): No undeleted copies found in the journal.
- Unable to restore inode 2359564 (etc/mtab~): No undeleted copies found in the journal.
- Restored inode 2883641 to file RECOVERED_FILES/tmp/itleaks.test
- [email protected] Itleaks:/tmp$ tree RECOVERED_FILES/
- RECOVERED_FILES/
- └── tmp
- └── itleaks.test
- 1 directory, 1 file
extundelete原理
這個是由於linuxext3檔案系統的組織結構決定的,如下圖:
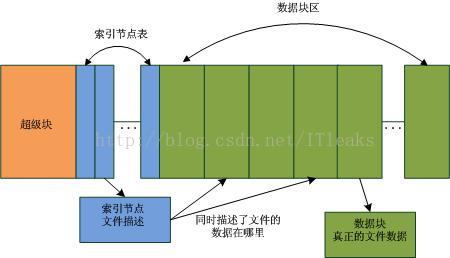
在Linux系統中,超級塊描述了分割槽的資訊,一個分割槽被分為兩個部分,索引節點表和資料塊區,這個在格式化的時候就定下來了。檔案(目錄也是檔案的一種,只不過它的內容是描述目錄下的檔案的)由索引節點描述,索引節點描述了檔案的修改時間,檔案的名稱,檔案的資料塊地址等等。並且,linux對於檔案刪除操作是個懶動作,刪除檔案時系統只是將檔案對應的索引節點及其擁有的資料塊置為free(將nlink=0),而並沒有做其他清空的,只有當這個索引節點或者資料塊被真正用到的時候才會修改裡面的資料。這就為我們檔案修復提供了可趁之機。由於系統中的索引節點是固定大小的,因此可以很輕鬆的遍歷掃描系統中所有的索引節點,找出free的索引節點並檢查其資料塊是否已經被用,如果沒有則可修復並修復。同時,由於索引節點裡的時間等資訊也是保留的,因此就可以根據時間來恢復特定的被刪除的檔案。
檔案誤刪除後的注意事項
從上面的分析可知,誤刪檔案後,儘量不要做大的資料操作,以避免被刪除的檔案的資料塊被重新使用,導致資料完全丟失。
/********************************
* 本文來自部落格 “愛踢門”
******************************************/
相關推薦
ubuntu恢復被rm誤刪的資料及原理
昨天一不小心,執行了rm xx -rf,把一個專案刪除了。然後就是各種悔恨,各種自責,這個專案可是一週的工作量啊。最後肯定得解決,於是google搜尋發現了恢復神器extundelete,最後順利恢復了所有被我無意中的刪除的檔案。感謝上天,感謝extundelete。下面將
如何恢復被電腦誤刪的文件
恢復 電腦 誤刪 文件 我們每天用電腦處理文件的時間越來越多,如何更好地管理電腦中的文件,避免出現數據丟失也越來越成為人們關註的話題。電腦上刪除的一些文件該怎麽被恢復回來呢。有些人玩電腦不小心刪除了文件不在回收站又該如何才能恢復呢? 想要恢復誤刪的文件,我們可以選擇使用迅龍數據恢復軟件進行恢復
ORA-27041: unable to open file--恢復被rm意外刪除資料檔案
當資料庫中的某個資料檔案被誤刪除之後,DBA可以選擇使用已有的備份進行還原與恢復,下文為DBA提供了另一種選擇,已經通過測試環境進行了相關測試,該方法是個不錯的選擇。轉自http://www.xifenfei.com/2289.html一.模擬資料檔案刪除[[email&#
CentOS 恢復 rm -rf * 誤刪資料--extundelete
一、 將磁碟分割槽掛載為只讀 這一步很重要,並且在誤刪除檔案後應儘快將磁碟掛載為只讀。越早進行,恢復的成功機率就越大。 1. 檢視被刪除檔案位於哪個分割槽 [root@localhost ~]# mount/dev/mapper/VolGroup-lv_roo
CentOS 恢復 rm -rf * 誤刪資料
一、 將磁碟分割槽掛載為只讀 這一步很重要,並且在誤刪除檔案後應儘快將磁碟掛載為只讀。越早進行,恢復的成功機率就越大。 1. 檢視被刪除檔案位於哪個分割槽 [root@localhost ~]# mount/dev/mapper/VolGroup-lv_root on / type ext
ext2檔案系統下rm-rf * 誤刪資料恢復
如果你不小心執行了rm -rf * 或者 rm -rf XXX,在ext2系統並不是不可以恢復的。 一. 首先需要明確幾個基本概念:磁碟裝置檔案(簡稱硬碟)、分割槽、檔案系統、目錄&am
短信被誤刪除的話該怎麽恢復 短信誤刪恢復
日常生活中我們的一些資料填充或者註冊某個軟件又或者在銀行的時候都會用到短信驗證碼,如果驗證碼被刪除的話該怎麽找回數據呢? 在這裏我推薦大家使用強力手機數據恢復軟件這款專業的數據恢復軟件,我們只需要利用這款軟件,那麽我們就可以最大程度的將我們誤刪的手機短信恢復了,這款軟件操作非
利用plsql工具恢復誤刪表和恢復誤刪資料
一、恢復誤刪表 1.執行以下sql語句,找到被自己誤刪的資料表對應的object_name; select * from user_recyclebin t;--檢視被刪掉
SqlServer無備份下誤刪資料恢復
系統已上線,給客戶修改bug的時候,使用delete語句刪表資料,沒想到庫沒切換成測試庫。誤刪了正式庫的資料,而且一次備份都沒有做過,玩大了 不扯了,進入主題 網上很多方法,都是針對至少有一次備份的情況下進行資料恢復的,沒有備份就基本上只能找資料恢復公司了。本章將通過日誌來恢復誤刪的資料,若是日誌檔案都沒
Oracle資料庫中對誤刪資料的恢復
如果一不小心對Oracle資料庫中的資料進行了誤刪除操作,那麼如何進行資料恢復呢(不考慮全庫備份和利用歸檔日誌)?如果使用的是9i以及之後的版本,那麼我們可以採用閃回技術對誤刪除的資料進行恢復。方式有兩種。 原理: 利用oracle提供的閃回方法,如果在刪除資料後還沒做大量的操作(只
linux誤刪資料檔案後恢復
--------------建立測試表 [[email protected] ~]$ sqlplus / as sysdba SQL>create user test identified by test default tablespace users;
oracle delete from table 誤刪資料的恢復:
oracle delete from table 誤刪資料的恢復: select log_mode,open_mode,flashback_on from v$database; --檢視閃回功能是否開啟(NO 表示未開啟;Y
SQL Server 2008無備份誤刪資料的恢復
系統已上線,給客戶修改bug的時候,使用delete語句刪表資料,沒想到庫沒切換成測試庫。誤刪了SQL Server正式庫的資料,而且一次備份都沒有做過,玩大了。 不扯了,進入主題 網上很多方法,都是針對至少有一次備份的情況下進行資料恢復的,沒有備份就基本上只能找資料恢復公司了。本章將通過日誌來恢復誤刪的
oracle表資料誤刪恢復,表誤刪恢復
一 表資料誤刪恢復: 1.ALTER TABLE CCUSAGENTRELA ENABLE row movement ; 2.flashback table CCUSAGENTRELA to timestamp to_timestamp(‘2018-11-01 10:34:00’,‘yyyy
mysql使用binlog恢復使用delete誤刪的資料
在我們平時使用MySQL資料庫的時候,可能會出現delete from table_name 忘記寫條件語句而導致刪除了整個表的資料。 這個時候就很棘手了。如果公司的資料庫都有開啟資料備份那自然是沒有問題。source 一下備份下來的sql檔案就好。 但是如果沒有備份
恢復誤刪資料
問題點: 比如,不小心使用 diskpark clean 刪除了整個硬碟。 1.下載DiskGenius破解版。 DiskGenius4.9.6專業版註冊版 https://download.csdn.net/download/qq_27278957/1069767
mysql 恢復誤刪資料
mysql通過bin_log恢復資料 轉載 2016年09月26日 15:55:39 2897 一、開啟binlog日誌: 編輯開啟mysql
恢復oracle 中誤刪的表 或delete 刪掉的資料恢復
查看回收站中表 drop表之後的恢復 select object_name,original_name,partition_name,type,ts_name,createtime,droptime from recyclebin; SQL>flashback
linux系統rm誤刪檔案恢復 ext4
[[email protected] extundelete-0.2.4]# extundelete --inode 2 /dev/mapper/VolGroup-lv_home <div class="crayon-pre" style="box-sizing: border-bo
SQLSERVER2012誤刪資料恢復過程
由於長時間從事企業應用系統開發,前往使用者現場升級、除錯系統是比較常做的事情,但是就在週一,由於同事的失誤在毫無知覺的情況下誤刪了生產資料庫幾乎所有的資料。當我發現的那一刻,感覺頭髮都立起來了,心想這他孃的是要領盒飯了。 為了迅速恢復系統的使用,在當時的情況下立即關閉