Activity中佈局資源layoutResId在setContentView載入過程分析
前言
記得剛開始學習安卓那會,感覺安卓真的很簡單,用xml寫一個佈局,然後再寫一個activity,接著呼叫一下在onCreate中呼叫下setContentView(resId)一個頁面就可以看到了,現在回想也才知道Android的牛逼,它降低了開發者的門檻 ,但是一旦你跨過門檻,越往裡走就發現越神奇,下面就分析下setContentView(resId)中到底做了什麼,也是為了後面分析view的Measure過程做一個鋪墊。
分析
1、尋找setContentView真正實現的地方
一般我們在新建的activity中傳入佈局的id就可以載入這個頁面了,當然setContentView有幾個過載的方法,就不細說了。
protected void onCreate(Bundle savedInstanceState) {
        super.onCreate(savedInstanceState);
        setContentView(R.layout.activity_main);
    }
上面講到了activity的onCreate方法,很明顯onCreate方法中我們常用的就是呼叫setContentView來給activity給定一個顯示的佈局id,就是我們常繼承的Activity中的setContentView(resId)的原始碼
/**
* Set the activity content from a layout resource. The resource will be
* inflated, adding all top-level views to the activity.
*
* @param 2、mWindow例項化
getWindow返回的是mWindow,mWindow是視窗抽象類Window的一個例項,而setContentView(resId)是window中一個抽象方法,所以我們需要找到mWindow例項化的地方,然後看mWindow實現類的setContentView方法做了一些什麼工作。
final void attach(Context context, ActivityThread aThread,
            Instrumentation instr, IBinder token, int ident,
            Application application, Intent intent, ActivityInfo info,
            CharSequence title, Activity parent, String id,
            NonConfigurationInstances lastNonConfigurationInstances,
            Configuration config) {
        attachBaseContext(context);
    ...
         mWindow = PolicyManager.makeNewWindow(this);
    ...
最後在activity的attach方法中找到了mWindow例項化的地方,接著需要找PolicyManager.makeNewWindow返回的物件,也就是Window實現子類,PolicyManager的程式碼不多,所以這裡就直接貼出來了看看。
/**
 * 隱藏的api,難怪sdk中找不到。T—T
 * {@hide}
 */
public final class PolicyManager {
    private static final String POLICY_IMPL_CLASS_NAME =
        "com.android.internal.policy.impl.Policy";
    private static final IPolicy sPolicy;
    static {
        // Pull in the actual implementation of the policy at run-time
        try {
            Class policyClass = Class.forName(POLICY_IMPL_CLASS_NAME);
            sPolicy = (IPolicy)policyClass.newInstance();
        } catch (ClassNotFoundException ex) {
            throw new RuntimeException(
                    POLICY_IMPL_CLASS_NAME + " could not be loaded", ex);
        } catch (InstantiationException ex) {
            throw new RuntimeException(
                    POLICY_IMPL_CLASS_NAME + " could not be instantiated", ex);
        } catch (IllegalAccessException ex) {
            throw new RuntimeException(
                    POLICY_IMPL_CLASS_NAME + " could not be instantiated", ex);
        }
    }
    // Cannot instantiate this class
    private PolicyManager() {}

    //mWindow其實也是在這裡例項化的
    public static Window makeNewWindow(Context context) {
        return sPolicy.makeNewWindow(context);
    }
    public static LayoutInflater makeNewLayoutInflater(Context context) {
        return sPolicy.makeNewLayoutInflater(context);
    }
    public static WindowManagerPolicy makeNewWindowManager() {
        return sPolicy.makeNewWindowManager();
    }
    public static FallbackEventHandler makeNewFallbackEventHandler(Context context) {
        return sPolicy.makeNewFallbackEventHandler(context);
    }
}
PolicyManager的makeNewWindow找到了,可惜這裡還不是真正例項化mWindow的地方,從上面的程式碼可以看出,通過反射例項化com.android.internal.policy.impl.Policy這個類,IPolicy 目測應該是一個介面,這個sPolicy例項化是通過反射構造方法來建立的,而且在static程式碼塊中,可見這個類是在被虛擬機器載入的時候就例項化了sPolicy。所以我們需要繼續尋找。最後功夫不負有心人,總算是找到了Policy 這個類,這個類的實現了IPolicy 介面,程式碼也不算多,那麼就直接貼出來吧。
public class Policy implements IPolicy {
    private static final String TAG = "PhonePolicy";

    private static final String[] preload_classes = {
        "com.android.internal.policy.impl.PhoneLayoutInflater",
        "com.android.internal.policy.impl.PhoneWindow",
        "com.android.internal.policy.impl.PhoneWindow$1",
        "com.android.internal.policy.impl.PhoneWindow$ContextMenuCallback",
        "com.android.internal.policy.impl.PhoneWindow$DecorView",
        "com.android.internal.policy.impl.PhoneWindow$PanelFeatureState",
        "com.android.internal.policy.impl.PhoneWindow$PanelFeatureState$SavedState",
    };

    static {
        // For performance reasons, preload some policy specific classes when
        // the policy gets loaded.
        for (String s : preload_classes) {
            try {
                Class.forName(s);
            } catch (ClassNotFoundException ex) {
                Log.e(TAG, "Could not preload class for phone policy: " + s);
            }
        }
    }
    //終於算是找到你了Activity中的mWindow也就是在這裡被例項化的
    public PhoneWindow makeNewWindow(Context context) {
        return new PhoneWindow(context);
    }

    public PhoneLayoutInflater makeNewLayoutInflater(Context context) {
        return new PhoneLayoutInflater(context);
    }

    public PhoneWindowManager makeNewWindowManager() {
        return new PhoneWindowManager();
    }
}
從上面的makeNewWindow方法中可以很清楚的看到,我們activity的mWindow也就是PhoneWindow的例項,所以我們也就回到了我們最初目的,開啟PhoneWindow看看它的setContentView(resId)方法都做了些什麼。
3、分析setContentView的實現
同樣PhoneWindow的原始碼在sdk中沒有找到,這裡就不貼了,為啥不貼,因為原始碼太多了。我在網上找了一個原始碼的連結地址,如果需要翻牆推薦一個nydus的翻牆工具,實惠好用
下面就將PhoneWindow的setContentView的程式碼貼出來
    @Override
    public void setContentView(int layoutResID) {
        if (mContentParent == null) {
        //如果mContentParent 為null就呼叫installDecor初始化
            installDecor();
        } else {
        //否則就情況所有的子View
            mContentParent.removeAllViews();
        }
        //然後將layoutResID載入到mContentParent中
        mLayoutInflater.inflate(layoutResID, mContentParent);
        //如果PhoneWindow沒有被銷燬,且回撥cb不為null,那麼就呼叫cb.onContentChanged()
        final Callback cb = getCallback();
        if (cb != null && !isDestroyed()) {
            cb.onContentChanged();
        }
    }
setContentView中呼叫的相關方法
   /**
     * 將layoutResId資源載入到View樹中
     *
     * @param 需要載入的layoutResId (e.g.,
     *        <code>R.layout.main_page</code>)
     * @param 需要載入佈局的父佈局
     * @return 返回根View,如果引數root不為空,那麼root就是根View,否則匯入的resource
     * 解析的View就是根View
     */
    public View inflate(int resource, ViewGroup root) {
        return inflate(resource, root, root != null);
    }
這裡需要重點分析一下installDecor方法
private void installDecor() {
        //mDecor是Window中的根View
        if (mDecor == null) {
           //mDecor是DecorView的例項,而DecorView是PhoneWindow中的一個內部類,
           //private final class DecorView extends **FrameLayout** implements
           //RootViewSurfaceTaker {...},這裡很明顯DecorView是FrameLayout的子類
           //generateDecor方法很直接new DecorView(getContext(), -1),即構建一個DecorView
            mDecor = generateDecor();
            mDecor.setDescendantFocusability(ViewGroup.FOCUS_AFTER_DESCENDANTS);
            mDecor.setIsRootNamespace(true);
        }
        if (mContentParent == null) {

            mContentParent = generateLayout(mDecor);

            //這裡特意留下了這句程式碼,就是要講下這個findViewById()方法,這個方法是Window中
            //繼承過來的,它的實現是getDecorView().findViewById(id);也就是說通過
            //mDecor來獲取相關的子控制元件
            mTitleView = (TextView)findViewById(com.android.internal.R.id.title);
           ...
           }
    }
看到這裡上面也就剩下 mContentParent = generateLayout(mDecor);需要深入瞭解了,所以這裡就深入瞭解下generateLayout方法。一般我們新建一個activity預設
protected ViewGroup generateLayout(DecorView decor) {
        // 根據主題和相關的設定配置layoutResource,有興趣的同學自己可以閱讀PhoneWindow在此省略
        ...
        mDecor.startChanging();
        View in = mLayoutInflater.inflate(layoutResource, null);
        decor.addView(in, new ViewGroup.LayoutParams(MATCH_PARENT, MATCH_PARENT));
        // window中的常量ID_ANDROID_CONTENT = com.android.internal.R.id.content;
        ViewGroup contentParent = (ViewGroup)findViewById(ID_ANDROID_CONTENT);
        if (contentParent == null) {
            throw new RuntimeException("Window couldn't find content container view");
        }
        ...
        mDecor.finishChanging();
        return contentParent;
    }
為了更進一步理解,使用了新建activity自動生成的一種佈局screen_title.xml,開始是在sdk下面找到然後解壓出來的,後面發現找不到編碼格式,只能google了一把,找到了相關資源。
<LinearLayout xmlns:android="http://schemas.android.com/apk/res/android"
    android:orientation="vertical"
    android:fitsSystemWindows="true">
    <!-- Popout bar for action modes -->
    <ViewStub android:id="@+id/action_mode_bar_stub"
              android:inflatedId="@+id/action_mode_bar"
              android:layout="@layout/action_mode_bar"
              android:layout_width="match_parent"
              android:layout_height="wrap_content" />
     <FrameLayout
        android:layout_width="match_parent"
        android:layout_height="?android:attr/windowTitleSize"
        style="?android:attr/windowTitleBackgroundStyle">
        <!--這裡也就是mTitleView-->
        <TextView android:id="@android:id/title"
            style="?android:attr/windowTitleStyle"
            android:background="@null"
            android:fadingEdge="horizontal"
            android:gravity="center_vertical"
            android:layout_width="match_parent"
            android:layout_height="match_parent" />
    </FrameLayout>
    <!--這裡也就是mContentParent-->
    <FrameLayout android:id="@android:id/content"
        android:layout_width="match_parent"
        android:layout_height="0dip"
        android:layout_weight="1"
        android:foregroundGravity="fill_horizontal|top"
        android:foreground="?android:attr/windowContentOverlay" />
</LinearLayout>
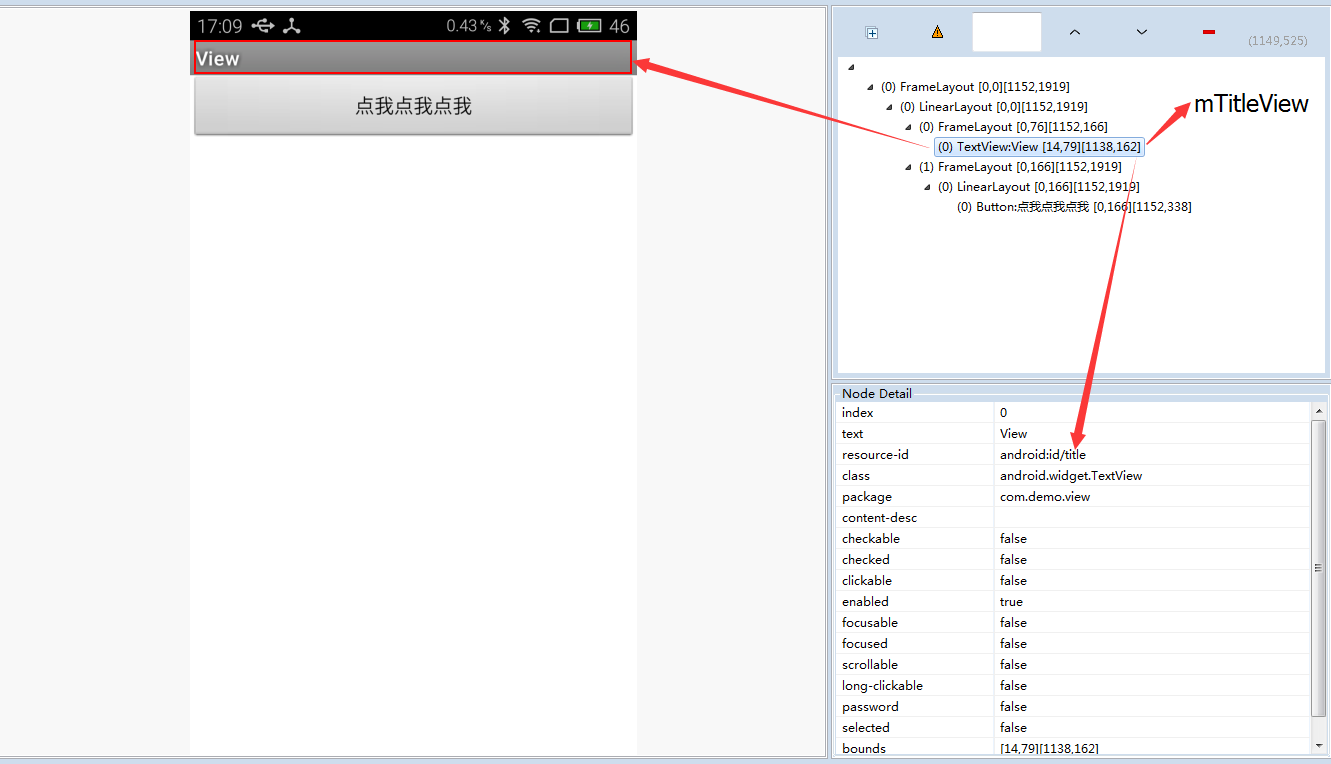
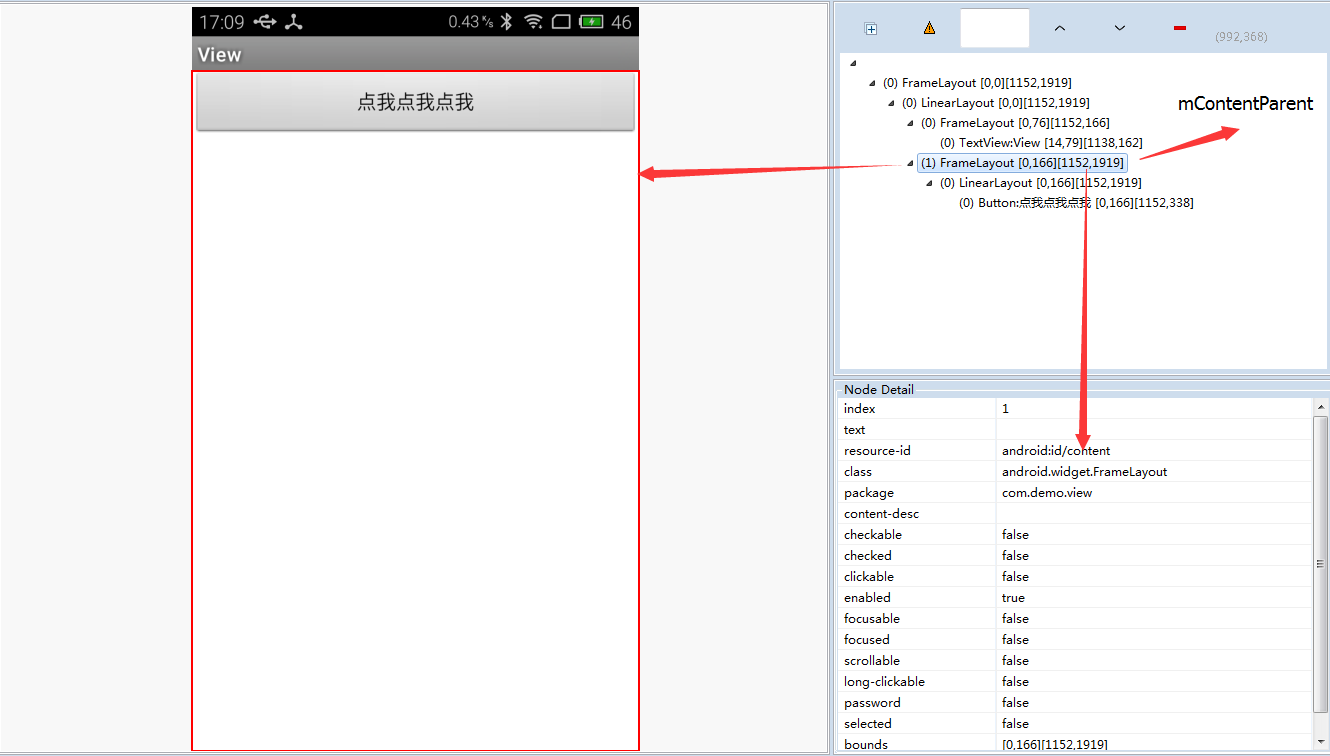
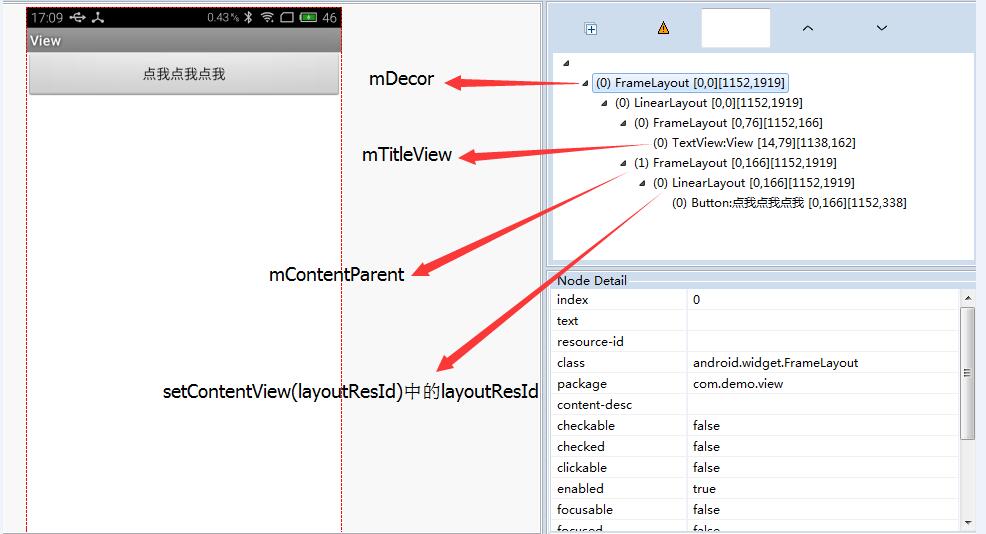
光看程式碼可能有點傷,所以我特意準備了3張圖
1.mTitleView
2.mContentParent
3.view樹
總結
最後來總結下這個過程
Activity層面:
MainActivity(setContentView(resId);)—>Activity(getWindow().setContentView(layoutResID);)
PhoneWindow中的setContentView方法首先判斷mContentParent是否為null,如果不為null則通過LayoutInflater來將resId解析後新增到mContentParent中,當然如果為null則通過installDecor方法初始化mContentParent,通過mDecor載入系統預定的主題佈局檔案,根據主題的不同,判斷是否需要標題欄,actionbar,載入的進度條等等,然後通過固定的id(@android:id/content)初始化mContentParent。


