
SpringBoot學習-(十三)SpringBoot中建立WebSocket連線(STOMP)
STOMP協議介紹
STOMP,Streaming Text Orientated Message Protocol,是流文字定向訊息協議,是一種為MOM(Message Oriented Middleware,面向訊息的中介軟體)設計的簡單文字協議。
它提供了一個可互操作的連線格式,允許STOMP客戶端與任意STOMP訊息代理(Broker)進行互動,類似於OpenWire(一種二進位制協議)。
由於其設計簡單,很容易開發客戶端,因此在多種語言和多種平臺上得到廣泛應用。其中最流行的STOMP訊息代理是Apache ActiveMQ。
STOMP協議工作於TCP協議之上,使用了下列命令:
- SEND 傳送
- SUBSCRIBE 訂閱
- UNSUBSCRIBE 退訂
- BEGIN 開始
- COMMIT 提交
- ABORT 取消
- ACK 確認
- DISCONNECT 斷開
傳送訊息:
SEND
destination:/app/sendTest
content-type:application/json
content-length:44

{"userId":"rwerfef45434refgrege"}
訂閱訊息:
SUBSCRIBE
id:sub-1
destination:/app/subscribeTest
伺服器進行廣播:
MESSAGE
message-id:nxahklf6-1 更多詳細的STOMP API,請點選這裡
springboot使用STOMP訊息步驟:
- 新增pom檔案依賴
- java方式配置websocket stomp
- 訊息實體類
- 書寫控制層
- 書寫客戶端
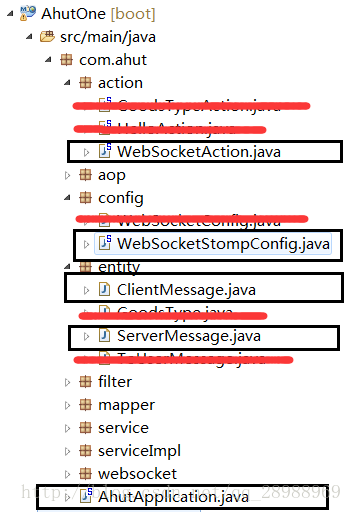
專案目錄結構:
1.新增pom檔案依賴
<!-- springboot websocket -->
<dependency>
<groupId>org.springframework.boot</groupId 2.java方式配置websocket stomp
package com.ahut.config;

import org.springframework.context.annotation.Configuration;
import org.springframework.messaging.simp.config.MessageBrokerRegistry;
import org.springframework.web.socket.config.annotation.AbstractWebSocketMessageBrokerConfigurer;
import org.springframework.web.socket.config.annotation.EnableWebSocketMessageBroker;
import org.springframework.web.socket.config.annotation.StompEndpointRegistry;

/**
 *
 * @ClassName: WebSocketStompConfig
 * @Description: springboot websocket stomp配置
 * @author cheng
 * @date 2017年9月27日 下午3:45:36
 */

@Configuration
@EnableWebSocketMessageBroker
public class WebSocketStompConfig extends AbstractWebSocketMessageBrokerConfigurer {

    /**
     * 註冊stomp的端點
     */
    @Override
    public void registerStompEndpoints(StompEndpointRegistry registry) {
        // 允許使用socketJs方式訪問,訪問點為webSocketServer,允許跨域
        // 在網頁上我們就可以通過這個連結
        // http://localhost:8080/webSocketServer
        // 來和伺服器的WebSocket連線
        registry.addEndpoint("/webSocketServer").setAllowedOrigins("*").withSockJS();
    }

    /**
     * 配置資訊代理
     */
    @Override
    public void configureMessageBroker(MessageBrokerRegistry registry) {
        // 訂閱Broker名稱
        registry.enableSimpleBroker("/queue", "/topic");
        // 全域性使用的訊息字首(客戶端訂閱路徑上會體現出來)
        registry.setApplicationDestinationPrefixes("/app");
        // 點對點使用的訂閱字首(客戶端訂閱路徑上會體現出來),不設定的話,預設也是/user/
        // registry.setUserDestinationPrefix("/user/");
    }

}
程式碼詳解:
registry.addEndpoint("/webSocketServer").setAllowedOrigins("*").withSockJS();registry.enableSimpleBroker("/queue", "/topic");使用者訂閱主題的字首
/topic 代表釋出廣播,即群發
/queue 代表點對點,即髮指定使用者
registry.setApplicationDestinationPrefixes("/app");設定客戶端請求字首
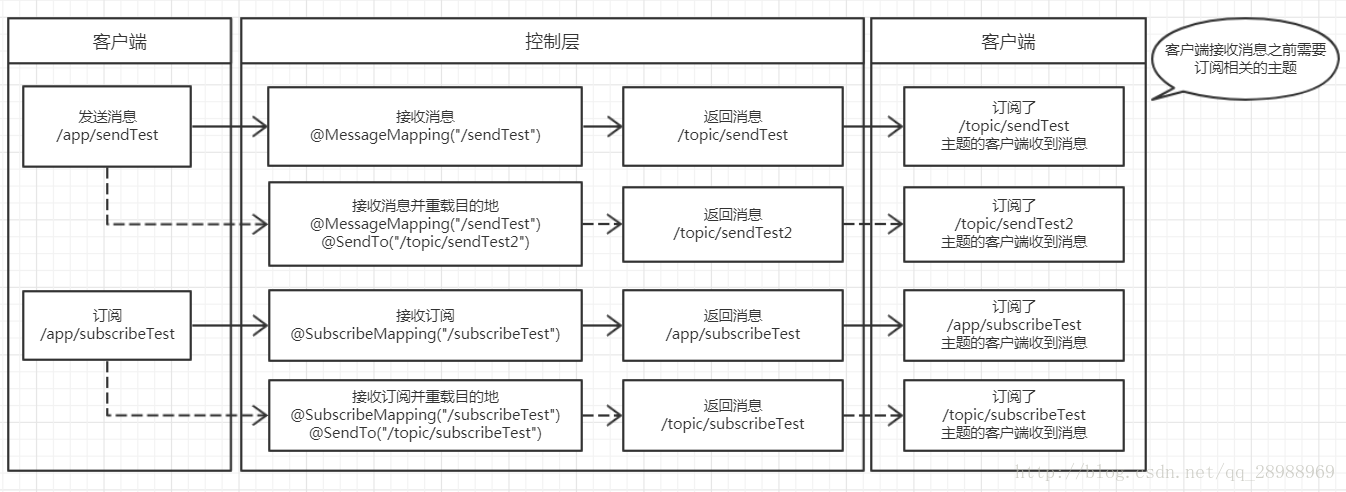
例如客戶端傳送訊息的目的地為/app/sendTest,則對應控制層@MessageMapping(“/sendTest”)
客戶端訂閱主題的目的地為/app/subscribeTest,則對應控制層@SubscribeMapping(“/subscribeTest”)
3.訊息實體類
客戶端發往伺服器端實體類(自定義)
package com.ahut.entity;

/**
 *
 * @ClassName: ClientMessage
 * @Description: 客戶端傳送訊息實體
 * @author cheng
 * @date 2017年9月27日 下午4:24:11
 */
public class ClientMessage {
    private String name;

    public String getName() {
        return name;
    }

    public void setName(String name) {
        this.name = name;
    }

}
伺服器端發往客戶端實體類(自定義)
package com.ahut.entity;

/**
 *
 * @ClassName: ServerMessage
 * @Description: 服務端傳送訊息實體
 * @author cheng
 * @date 2017年9月27日 下午4:25:26
 */
public class ServerMessage {
    private String responseMessage;

    public ServerMessage(String responseMessage) {
        this.responseMessage = responseMessage;
    }

    public String getResponseMessage() {
        return responseMessage;
    }

    public void setResponseMessage(String responseMessage) {
        this.responseMessage = responseMessage;
    }
}
4.書寫控制層
package com.ahut.action;

import org.slf4j.Logger;
import org.slf4j.LoggerFactory;
import org.springframework.messaging.handler.annotation.MessageMapping;
import org.springframework.messaging.handler.annotation.SendTo;
import org.springframework.messaging.simp.annotation.SubscribeMapping;
import org.springframework.stereotype.Controller;

import com.ahut.entity.ClientMessage;
import com.ahut.entity.ServerMessage;

/**
 *
 * @ClassName: WebSocketAction
 * @Description: websocket控制層
 * @author cheng
 * @date 2017年9月27日 下午4:20:58
 */
@Controller
public class WebSocketAction {

    private Logger logger = LoggerFactory.getLogger(this.getClass());

    @MessageMapping("/sendTest")
    @SendTo("/topic/subscribeTest")
    public ServerMessage sendDemo(ClientMessage message) {
        logger.info("接收到了資訊" + message.getName());
        return new ServerMessage("你傳送的訊息為:" + message.getName());
    }

    @SubscribeMapping("/subscribeTest")
    public ServerMessage sub() {
        logger.info("XXX使用者訂閱了我。。。");
        return new ServerMessage("感謝你訂閱了我。。。");
    }

}
程式碼詳解:
@MessageMapping(“/sendTest”)
接收客戶端傳送的訊息,當客戶端傳送訊息的目的地為/app/sendTest時,交給該註解所在的方法處理訊息,其中/app是在
registry.setApplicationDestinationPrefixes("/app");一步配置的客戶端請求字首
若沒有新增@SendTo註解且該方法有返回值,則返回的目的地地址為/topic/sendTest,經過訊息代理,客戶端需要訂閱了這個主題才能收到返回訊息
@SubscribeMapping(“/subscribeTest”)
接收客戶端傳送的訂閱,當客戶端訂閱的目的地為/app/subscribeTest時,交給該註解所在的方法處理訂閱,其中/app為客戶端請求字首
若沒有新增@SendTo註解且該方法有返回值,則返回的目的地地址為/app/sendTest,不經過訊息代理,客戶端需要訂閱了這個主題才能收到返回訊息
@SendTo(“/topic/subscribeTest”)
修改返回訊息的目的地地址為/topic/subscribeTest,經過訊息代理,客戶端需要訂閱了這個主題才能收到返回訊息
5.書寫客戶端
<!DOCTYPE html>
<html>

<head>
    <title>stomp</title>
</head>

<body>
    Welcome<br/><input id="text" type="text" />
    <button onclick="send()">傳送訊息</button>
    <button onclick="subscribe2()">訂閱訊息/topic/sendTest</button>
    <button onclick="subscribe1()">訂閱訊息/topic/subscribeTest</button>
    <hr/>
    <button onclick="closeWebSocket()">關閉WebSocket連線</button>
    <hr/>
    <div id="message"></div>
</body>

<script src="http://cdn.bootcss.com/stomp.js/2.3.3/stomp.min.js"></script>
<script src="https://cdn.bootcss.com/sockjs-client/1.1.4/sockjs.min.js"></script>
<script type="text/javascript">
    // 建立連線物件(還未發起連線)
    var socket = new SockJS("http://localhost:8080/webSocketServer");

    // 獲取 STOMP 子協議的客戶端物件
    var stompClient = Stomp.over(socket);

    // 向伺服器發起websocket連線併發送CONNECT幀
    stompClient.connect(
        {},
        function connectCallback(frame) {
            // 連線成功時(伺服器響應 CONNECTED 幀)的回撥方法
            setMessageInnerHTML("連線成功");
            stompClient.subscribe('/app/subscribeTest', function (response) {
                setMessageInnerHTML("已成功訂閱/app/subscribeTest");
                var returnData = JSON.parse(response.body);
                setMessageInnerHTML("/app/subscribeTest 你接收到的訊息為:" + returnData.responseMessage);
            });
        },
        function errorCallBack(error) {
            // 連線失敗時(伺服器響應 ERROR 幀)的回撥方法
            setMessageInnerHTML("連線失敗");
        }
    );

    //傳送訊息
    function send() {
        var message = document.getElementById('text').value;
        var messageJson = JSON.stringify({ "name": message });
        stompClient.send("/app/sendTest", {}, messageJson);
        setMessageInnerHTML("/app/sendTest 你傳送的訊息:" + message);
    }

    //訂閱訊息
    function subscribe1() {
        stompClient.subscribe('/topic/subscribeTest', function (response) {
            setMessageInnerHTML("已成功訂閱/topic/subscribeTest");
            var returnData = JSON.parse(response.body);
            setMessageInnerHTML("/topic/subscribeTest 你接收到的訊息為:" + returnData.responseMessage);
        });
    }

    //訂閱訊息
    function subscribe2() {
        stompClient.subscribe('/topic/sendTest', function (response) {
            setMessageInnerHTML("已成功訂閱/topic/sendTest");
            var returnData = JSON.parse(response.body);
            setMessageInnerHTML("/topic/sendTest 你接收到的訊息為:" + returnData.responseMessage);
        });
    }

    //將訊息顯示在網頁上
    function setMessageInnerHTML(innerHTML) {
        document.getElementById('message').innerHTML += innerHTML + '<br/>';
    }

</script>

</html>
注意:以下兩個js檔案一定要記得引入
<script src="http://cdn.bootcss.com/stomp.js/2.3.3/stomp.min.js"></script>
<script src="https://cdn.bootcss.com/sockjs-client/1.1.4/sockjs.min.js"></script>
客戶端傳送和接收訊息圖解
伺服器主動推資料
任意類中都可以
public class 任意類{
    @Autowired
    private SimpMessagingTemplate messagingTemplate;

    //客戶端只要訂閱了/topic/subscribeTest主題,呼叫這個方法即可
    public void templateTest() {
        messagingTemplate.convertAndSend("/topic/subscribeTest", new ServerMessage("伺服器主動推的資料"));
    }
}