
Struts2學習總結(3)--值棧,Ognl表示式,Struts標籤庫,國際化,資料校驗,攔截器
本文包括以下五個部分:
- 值棧。
- Ognl表示式。
- struts2標籤庫。
- 國際化。
- 表單資料校驗
- 攔截器。
- struts2的執行過程。
一、值棧
採用servlet和JSP開發時,servlet通過域物件儲存資料,在JSP頁面通過jstl標籤+el表示式獲取資料。
採用struts2和JSP框架進行開發時,Action通過值棧物件儲存資料,在JSP頁面通過struts標籤+ognl表示式獲取資料。
1.1 值棧(ValueStack)的概念
值棧就是存放action的堆疊,用來儲存請求響應資料,是Struts2存取資料的核心。值棧將資料統一管理起來,方便Action、Result、Interceptor的使用。值棧有一個標準介面ValueStack,而在實際的專案開發中,是通過一個實現類OgnlValueStack來儲存資料的。
1.2 值棧的結構
值棧分為值棧分為兩個邏輯結構(資料結構):
- Object Stack(物件棧):ArrayList (CompoundRoot),底層資料結構為ArrayList集合+棧的結構(先進後出)。
物件棧主要儲存Action物件和Provider代理物件。
- Context Map(對映棧): HashMap (OgnlContext),底層的資料結構為Map集合的結構。
a. 對映棧主要存放各個域存放的資料和使用者的引數資訊。
b. 物件棧主要有五個物件:
Key Value request RequestMap session SessionMap application ApplicationMap parameters ParaemterMap attr AttributeMap (封裝了三個Map(request,session,application))
1.3 操作值棧物件
1.3.1 操作Object Stack
                //得到ActionContext物件
		ActionContext ac = ActionContext.getContext();
		//得到值棧物件
		ValueStack vs = ac.getValueStack();
push(Object o):壓入棧頂
Object pop():推出棧頂元素
1.3.2 操作Context Map
Map<String,Object> getContext(): 得到Context Map物件
ActionContxt.get("request").put("name",Object): 操作Context Map中的reqest元素
ActionContxt.getSession().put("name",Object): 操作Context Map中的session元素
ActionContxt.getApplication().put("name",Object): 操作Context Map中的application元素
package edu.scut.d_valuestack;

import java.util.Date;
import java.util.Map;
import com.opensymphony.xwork2.ActionContext;
import com.opensymphony.xwork2.ActionSupport;
import com.opensymphony.xwork2.util.ValueStack;
//演示值棧
public class BookAction extends ActionSupport {
	public String list(){
		//值棧是由struts2框架在每次訪問Action的方法時建立的,然後將其存入ActionContext

		//1 得到ActionContext物件
		ActionContext ac = ActionContext.getContext();
		//2 得到值棧物件
		ValueStack vs = ac.getValueStack();
		System.out.println(vs);

		//3 操作值棧
		//Object Stack(物件棧)
		Book book = new Book();
		book.setName("java程式設計思想");
		book.setPrice(58);
		book.setPublishtime(new Date());

		//3.1 壓入元素(棧定)
		vs.push(book);
		System.out.println(vs);

		//3.2 推出元素
		vs.pop();
		System.out.println(vs);

		//4 對映棧(Context Map)
		//4.1 操作request屬性
		Map requestMap = (Map) ac.get("request");
		requestMap.put("r_book", book);

		//4.2 操作session屬性
		ac.getSession().put("s_book", book);

		//4.3 操作application屬性
		ac.getApplication().put("c_book", book);

		System.out.println(vs);
		return SUCCESS;
	}
}
二、Ognl表示式
2.1 Ognl表示式簡介
OGNL是Object GraphicNavigation Language(物件圖導航語言)的縮寫,它是一個開源專案。 Struts2框架使用OGNL作為預設的表示式語言。在struts2專案中匯入ognl.jar 包來實現支援ognl表示式。
2.2 Ognl表示式和EL表示式的比較
Ognl表示式 EL表示式 獲取域物件的資料。可以存放資料,可以呼叫方法。
獲取域物件的資料。不能存放資料,不能呼叫方法
2.3 Ognl表示式的優勢
- 支援物件方法呼叫,如xxx.doSomeSpecial();
支援類靜態的方法呼叫和值訪問,表示式的格式:
@[類全名(包括包路徑)]@[方法名 | 值名],例如:
@[email protected]('foo %s', 'bar')或者
@[email protected]_NAME。
支援賦值操作和表示式串聯,如(price=10,discount=0.6,calculatePrice()),這個表示式會返回6.0;
- 可以訪問OGNL上下文(OGNL context)和ActionContext;
- 可以操作集合物件。
2.4 Ognl表示式的核心物件(OgnlContext)
2.4.1 Ognl表示式的核心物件OgnlContext物件的使用
package edu.scut.a_ognl;

import ognl.Ognl;
import ognl.OgnlContext;
import ognl.OgnlException;
import org.junit.Test;

//演示Ognl
public class OgnlDemo {
	//1 學習瞭解Ognl表示式的核心物件OgnlContext物件的使用
	@Test
	public void test1(){
		User user = new User();
		user.setId(1);
		user.setUserName("喬峰");
		user.setUserPsw("666666");

		//1 建立一個OgnlContext物件
		OgnlContext context = new OgnlContext();

		//2 把user物件存入OgnlContext物件
		context.put("user", user);
		//3 從OgnlContext物件取出資料
		User user2 = (User) context.get("user");
		System.out.println(user2.getId()+"\t"+user2.getUserName()+"\t"+user2.getUserPsw());
	}
}
2.4.2 使用Ognl表示式取出OgnlContext的資料,根物件不需要有key,取值不需要#package edu.scut.a_ognl; import ognl.Ognl; import ognl.OgnlContext; import ognl.OgnlException; import org.junit.Test; //演示Ognl public class OgnlDemo { //2 使用Ognl表示式取出OgnlContext的資料,根物件不需要有key,取值不需要# @Test public void test2() throws Exception{ User user = new User(); user.setId(3); user.setUserName("段譽"); user.setUserPsw("88888888"); //1 建立一個OgnlContext物件 OgnlContext context = new OgnlContext(); //2 把user物件存入OgnlContext物件 //根物件要儲存資料需要key context.setRoot(user); //3 從OgnlContext物件取出資料,使用Ognl表示式取資料 Object ognlObj = Ognl.parseExpression("userName"); Object result = Ognl.getValue(ognlObj, context, context.getRoot()); System.out.println(result); } }
2.4.3 使用Ognl表示式取出OgnlContext的資料,非根物件需要有key,取值需要#
}package edu.scut.a_ognl; import ognl.Ognl; import ognl.OgnlContext; import ognl.OgnlException; import org.junit.Test; //演示Ognl public class OgnlDemo { <pre name="code" class="java"> //3 使用Ognl表示式取出OgnlContext的資料,非根物件需要有key,取值需要# @Test public void test3() throws Exception{ User user = new User(); user.setId(2); user.setUserName("虛竹"); user.setUserPsw("7777777"); //1 建立一個OgnlContext物件 OgnlContext context = new OgnlContext(); //2 把user物件存入OgnlContext物件 //非根物件要儲存資料需要key context.put("user", user); //3 從OgnlContext物件取出資料,使用Ognl表示式取資料 Object ognlObj = Ognl.parseExpression("#user.userName"); Object result = Ognl.getValue(ognlObj, context, context.getRoot()); System.out.println(result); }2.4.4 Ognl表示式呼叫靜態方法
package edu.scut.a_ognl;

import ognl.Ognl;
import ognl.OgnlContext;
import ognl.OgnlException;
import org.junit.Test;

//演示Ognl
public class OgnlDemo {

	//4 Ognl表示式呼叫靜態方法
	@Test
	public void test4() throws Exception{
		System.out.println(Math.round(12.55));
		//1 建立一個OgnlContext物件
		OgnlContext context = new OgnlContext();
		//使用Ognl表示式取資料
		Object ognlObject = Ognl.parseExpression("@[email protected](10.5)");
		Object result = Ognl.getValue(ognlObject, context, context.getRoot());
		System.out.println(result);
	}
}
結論:
a. 從OgnlContext物件的根物件取出資料,不需要#號。
b. 從OgnlContext物件的非根物件取出資料,需要#號。
2.5 值棧如何共享和獲取資料
2.5.1 值棧如何傳遞到jsp頁面
struts2框架在Action中最後把值棧物件傳遞到jsp頁面,是通過request域物件的struts.valueStack名稱的屬性傳遞到jsp頁面的。
 class Action{
		1.建立OgnlValueStack物件

	public String list(){
		2.得到OgnlValueStack物件,然後操作OgnlValueStack物件
	}

        3.把OgnlValueStack物件放入request域物件
                request.setAttribute("struts.valueStack",OgnlValueStack物件);
}
2.5.2 檢視值棧物件所有內容
<s:debug/>
2.5.3 獲取值棧資料2.5.3.1 獲取值棧資料的條件
a. 必須使用ognl表示式獲取,需要學習ognl表示式語法。
b. ognl表示式必須依賴struts2的標籤。
struts2獲取資料的標籤:
            <s:property value="ognl表示式"/>
2.5.3.1 獲取值棧資料的規則
a. 獲取Object Stack: 不帶#號直接獲取
(a) 獲取物件(物件棧): [下標] 下標從0開始 。
規則:從物件棧的指定下標的元素開始查詢,直到最後一個元素為止!
[0] 從第一個元素開始查詢
[1] 從第二個元素開始查詢<s:property value="[1]"/>(b) 獲取物件屬性: [下標].屬性 注意:下標可以不寫,預設從第一個元素開始查詢。
規則:從物件棧的指定下標的元素開始查詢指定的屬性,如果找到了就直接返回了,如果沒有繼續查詢,直到最後一個元素為止!<s:property value="[1].name"/>b. 獲取Context Map(對映棧):帶#號獲取
<s:property value="#name"/>
<s:property value="#request.r_book.price"/><br/>
<s:property value='#session.s_book.price'/>
<s:property value='#application.c_book.price'/>
<s:property value="#parameters.email"/>
<s:property value="#attr.request.r_book.price"/>
三、struts2標籤庫
3.1 邏輯類標籤: 類似於jstl裡面的的條件判斷,迴圈等,用於處理jsp頁面的邏輯
<s:set/> 儲存資料
<s:property/> 獲取資料
<s:if/>+<s:elseif/>+<s:else> 條件判斷
<s:iterator/> 迴圈
 <body>
   <%-- <s:set> 設定資料, <s:property> 獲取資料--%>
    <s:set var="message" value="'itcast'" scope="request"/>
    <s:set var="message" value="'itcast'" scope="session"/>
    <s:set var="message" value="'itcast'" scope="application"/>
    <s:property value="#request.message"/>
    <hr>

   <%--條件判斷 <s:if>  <s:elseif>  <s:else> --%>
   <%--預設登入資料放在ContextMapd的session中 --%>
   	<s:set var="loginInfo" value="'rose'" scope="session" ></s:set>
   	<s:if test="#session.loginInfo==null">
   		請先登入
   	</s:if>
   	<s:else>
              歡迎你,使用者名稱:<s:property value="#session.loginInfo"/>
   	</s:else>
   	<hr>

   <%--<S:iterator>迴圈迭代  --%>
   <s:iterator value="#request.books" status="vs" id="book">
   		序號:<s:property value="#vs.count"/>
   		書名:<s:property value="#book.name"/>
   		價格:<s:property value="#book.price"/><br>
   </s:iterator>
</body>
3.2 UI標籤:用於簡化html標籤(表單)使用
<s:form>
<s:textfield>
<s:password>
<s:submit>
<s:reset>
<s:checkbox>
*<s:checkboxlist>
*<s:radio>
*<s:select>
<body>
   	<s:form action="book_list" namespace="/ognl">
   	<%--Struts2的UI部分不是代表ognl表示式,如果要讓他們成為OGNL表示式,要加上%{}
   		%{ognl表示式}
   	 --%>
   		<s:textfield label="使用者名稱" name="curUser.userName" cssClass="style2"></s:textfield>
   		<s:password label="密碼" name="curUser.userPsw" ></s:password>
   		<s:textarea label="簡介" name="info"></s:textarea>
   		<s:submit value="註冊" align="left"></s:submit>
   		<s:checkbox name="hobby" label="籃球" value="打籃球"></s:checkbox>
   		<s:checkbox name="hobby" label="足球" value="足球"></s:checkbox>
   		<s:checkbox name="hobby" label="網球" value="網球"></s:checkbox>

   	<%-- 可以用ognllist進行資料的展示
   		ognl表示式建立List集合
   		ognl表示式建立Map集合
   	 --%>
   	<%--label和value一致的情況 --%>
   		<s:checkboxlist name="hobby" list="{'籃球','足球','網球'}"></s:checkboxlist>
   		<s:checkboxlist name="types" list="#request.types"></s:checkboxlist>

   	<%--lable和value不一致的情況 --%>
		<s:checkboxlist name="hobby" list="#{'eat':'吃','drink':'喝','play':'玩'}"></s:checkboxlist>

	<%--list:所以checkbox的值
	    value:預設選中的checkbox的值 --%>
   	<s:checkboxlist name="types" list="#request.typesMap" value="curTypes" ></s:checkboxlist>
   	<s:select name="types" list="#request.typesMap" value="curTypes"></s:select>
   	<s:radio list="#request.typesMap" value="%{curTypes}"></s:radio>
 	<s:reset value="重置" align="left" theme="simple"></s:reset>
   	</s:form>
</body>
四、國際化
國際化步驟:
1. 在src目錄下建立resource包,在resource包下建立國際化的properties檔案:
message_en_US.properties:
user=USERNAME
password=PASSWORD
login=LOGIN
message_zh_CN.properties:
user=\u7528\u6237\u540D
password=\u5BC6\u7801
login=\u767B\u5F55
2. 統一繫結資源包。
在struts.xml配置檔案中新增國際化的常量配置。
<!-- 修改國際化資源包的路徑 -->
<constant name="struts.custom.i18n.resources" value="resource.message"></constant>
3. 使用國際化
a. Action:注意action類要繼承ActionSupport類,用getText()方法獲取需要國際化的屬性。
b. JSP頁面:注意用key接收需要國際化的屬性。package edu.scut.a_ognl; import com.opensymphony.xwork2.ActionSupport; public class BookAction extends ActionSupport{ public String i18n(){ //獲取國際化內容 String user = getText("user"); String password = getText("password"); String login = getText("login"); System.out.println(user); System.out.println(password); System.out.println(login); return "i18n"; } }<body> <%--在標籤中使用國際化內容 --%> <s:form> <s:textfield key="user"/> <s:password key="password"/> <s:submit key="login"/> </s:form> </body>
五、表單資料校驗
採用javascript頁面前端進行驗證安全性不夠,容易被繞過去,為了提高安全性,一般要進行後臺驗證。
5.1 使用程式碼驗證
使用程式碼進行驗證的方式靈活太差,一般比較少用。
5.1.1 全域性驗證(所有的方法都驗證)
a. 編寫一個Action類,繼承ActionSupport(為了實現Valiateable介面)。b. 覆蓋validate()方法。
b. 覆蓋validate()方法。
下面的程式碼中對reg()和list()兩個方均進行了驗證。
}package edu.scut.b_validate; import org.hibernate.validator.constraints.Email; import com.opensymphony.xwork2.ActionSupport; import com.opensymphony.xwork2.ModelDriven; //採用方式進行驗證,必須繼承actionSupport public class UserAction extends ActionSupport implements ModelDriven<User> { //接受頁面資料 private User user = new User(); @Override public User getModel() { // TODO Auto-generated method stub return user; } /** * 1)使用者名稱不能為空,必須為數字或字母,長度4-16位 * 2)密碼不能為空,必須為數字,長度為6-16位 */ @Override public void validate() { System.out.println("執行資料校驗!"); System.out.println(user); if(user!=null){ //進行資料校驗 //使用者名稱 if(user.getName()==null || user.getName().equals("")){ //使用者名稱不能為空 //將錯誤資訊帶入註冊頁面 addFieldError("username", "使用者名稱不能為空!"); }else{ //必須是字母或者數字。並且長度為4-16位 if(!user.getName().matches("[0-9a-zA-Z]{4,16}")){ addFieldError("username", "使用者名稱格式錯誤!"); }; } //密碼 if(user.getPassword()==null || user.getPassword().equals("")){ //密碼不能為空 addFieldError("password", "密碼不能為空!"); }else{ //必須為數字,4-16位 if(!user.getPassword().matches("[0-9]{6,16}")){ addFieldError("password", "密碼格式有誤!"); } } } public String reg(){ System.out.println(user); return SUCCESS; } <span style="color:#FF0000;"><span style="color:#000000;"></span></span><pre name="code" class="java"> public String list(){ System.out.println(user); return "list"; }c.在struts.xml檔案中對應的action配置加上input檢視,然後struts2就會自動把錯誤資訊轉發到input檢視的頁面上去。
d.在input檢視頁面上,打印出錯誤資訊。<result name="input">/reg.jsp</result><s:fielderror></s:fielderror>5.1.2 區域性驗證(對一個方法驗證)
區域性校驗時,只需要把需要驗證的方法名改成固定格式(validate+需要驗證的方法名稱)即可。
例如,要對只對reg()方法驗證,而不對其他方法驗證,只需將reg()方法名稱改成validateReg()即可。
        //程式碼方式區域性驗證,編寫validate+需要驗證的方法名稱!!!
	public void validateReg(){
		//有錯誤資訊,struts2會自動跳轉到input頁面
		if(user!=null){
			//使用者名稱驗證
			if(user.getName()==null || user.getName().equals("")){
				addFieldError("name", "使用者名稱不能為空!");
			}else{
				if(!user.getName().matches("[0-9a-zA-Z]{4,16}")){
					addFieldError("name", "使用者名稱格式錯誤!");
				}
			}

		}
	}
5.2 使用配置檔案驗證
為了提高資料校驗的靈活性,可以使用配置檔案的方式完成校驗。
5.2.1 全域性驗證(所有的方法都驗證)
這種配置方式對action的所有方法都生效。a. 編寫一個xml檔案,名稱: Action檔名-validation.xml。
b. 該xml檔案必須放在Action檔案的同一目錄。
例如:UserAction-validation.xml
<?xml version="1.0" encoding="UTF-8"?>
<!DOCTYPE validators PUBLIC
        "-//Apache Struts//XWork Validator 1.0.2//EN"
        "http://struts.apache.org/dtds/xwork-validator-1.0.2.dtd">
<validators>
	<!-- 驗證一個屬性 name是屬性名 -->
	<field name="name">
		<!-- 屬性驗證器 -->
		<field-validator type="requiredstring">
			<!-- 錯誤資訊 -->
			<message key="name.requried"></message>
		</field-validator>
		<field-validator type="regex">
			<!-- 給驗證器注入一個引數 -->
			<param name="expression">[0-9a-zA-Z]{4,16}</param>
			<!-- 錯誤資訊 -->
			<message key="name.formaterror"></message>
		</field-validator>
	</field>

	<field name="email">
		<field-validator type="requiredstring">
			<message key="email.requried"></message>
		</field-validator>
		<field-validator type="email">
			<message key="email.formaterror"></message>
		</field-validator>
	</field>
</validators>
5.2.2 區域性驗證(對一個方法驗證)
這種配置方式對action的指定方法都生效。
a. 編寫一個xml檔案,名稱: Action檔名-訪問方法路徑-validation.xml。
b. 該xml檔案必須放在Action檔案的同一目錄。
例如:UserAction-user_reg-validation.xml
<?xml version="1.0" encoding="UTF-8"?>
<!DOCTYPE validators PUBLIC
        "-//Apache Struts//XWork Validator 1.0.2//EN"
        "http://struts.apache.org/dtds/xwork-validator-1.0.2.dtd">
<validators>
	<!-- 驗證一個屬性 name是屬性名 -->
	<field name="name">
		<!-- 屬性驗證器 -->
		<field-validator type="requiredstring">
			<!-- 錯誤資訊 -->
			<message key="name.requried"></message>
		</field-validator>
		<field-validator type="regex">
			<!-- 給驗證器注入一個引數 -->
			<param name="expression">[0-9a-zA-Z]{4,16}</param>
			<!-- 錯誤資訊 -->
			<message key="name.formaterror"></message>
		</field-validator>
	</field>

	<field name="email">
		<field-validator type="requiredstring">
			<message key="email.requried"></message>
		</field-validator>
		<field-validator type="email">
			<message key="email.formaterror"></message>
		</field-validator>
	</field>
</validators>
六、攔截器
6.1 攔截器簡介
攔截器的功能類似於過濾器,但是過濾器可以過濾專案的任何請求(servlet/jsp/html/img),攔截器只能攔截Action資源。攔截器是struts2框架的核心,因為struts2的核心功能都是通過攔截器來實現的。
例如:
引數的接收攔截器:com.opensymphony.xwork2.interceptor.ParametersInterceptor
檔案上傳攔截器:org.apache.struts2.interceptor.FileUploadInterceptor
國際化攔截器:com.opensymphony.xwork2.interceptor.I18nInterceptor
6.2 攔截器和過濾器的比較
| 攔截器 | 過濾器 |
| 可以攔截程式碼 | 可以攔截程式碼 |
| struts2的元件之一,主要是攔截的action(方法) | servlet的三大元件之一,主要是攔截請求(靜態內容和動態內容)和響應 |
6.3 自定義攔截器的開發步驟
struts2框架有很多攔截器,來支援其核心功能。但是,有時候不能滿足實際開發的需求,使用者需要自定義具有特殊功能的攔截器。struts2支援自定義攔截器。 自定義攔 截器的開發步驟如下:
Example
編寫兩個攔截器:
MyInterceptor1
package edu.scut.d_Interceptor;

import com.opensymphony.xwork2.ActionInvocation;
import com.opensymphony.xwork2.interceptor.Interceptor;

public class MyInterceptor1 implements Interceptor {

	@Override
	public void destroy() {
	}

	@Override
	public void init() {
	}

 	@Override
	public String intercept(ActionInvocation invocation) throws Exception {
 		System.out.println("1 執行interceptor1的action前面的程式碼!");
		String result = invocation.invoke();
 		System.out.println("5 執行interceptor1的action後面的程式碼!");
		return result;
 	}
}
MyInterceptor2
package edu.scut.d_Interceptor;

import com.opensymphony.xwork2.ActionInvocation;
import com.opensymphony.xwork2.interceptor.Interceptor;

public class MyInterceptor2 implements Interceptor {

	@Override
	public void destroy() {
	}

	@Override
	public void init() {
	}

	@Override
 	public String intercept(ActionInvocation invocation) throws Exception {
		System.out.println("2 執行interceptor2的action前面的程式碼!");
 		String result = invocation.invoke();
		System.out.println("4 執行interceptor2的action後面的程式碼!");
 		return result;
 	}
}
action類
package edu.scut.d_Interceptor;

import com.opensymphony.xwork2.ActionSupport;
//圖書操作類
public class BookAction extends ActionSupport {
	//接收頁面引數
	private String name;
	public void setName(String name) {
		this.name = name;
	}

	private String password;
	public void setPassword(String password) {
		this.password = password;
	}

       public String list(){
		System.out.println("3 執行了圖書的list方法!");
		System.out.println(name);
 		System.out.println(password);
		return SUCCESS;
 	}
}
b. 在struts.xml檔案中配置攔截器,並定義攔截器棧。。
注意:在配置action時,引用了自定義的攔截器棧後,預設的攔截器棧(defaultStack)也要引用,並且放在配置的第一位置。否則,struts2的很多核心功能將實效。例如不能接收頁面傳過來的引數。
<?xml version="1.0" encoding="UTF-8"?>
 <!DOCTYPE struts PUBLIC
	"-//Apache Software Foundation//DTD Struts Configuration 2.3//EN"
	"http://struts.apache.org/dtds/struts-2.3.dtd">
<struts>
	<package name="interceptor" extends="struts-default" namespace="/interceptor">
		<!-- 配置自定義攔截器 -->
		<interceptors>
			<!-- 定義攔截器 -->
			<interceptor name="interceptor1" class="edu.scut.d_Interceptor.MyInterceptor1"/>
			<interceptor name="interceptor2" class="edu.scut.d_Interceptor.MyInterceptor2"/>
			<!-- 定義攔截器棧 -->
			<interceptor-stack name="myStack">
				<!-- 一個攔截器棧包含多個攔截器 -->
				<!-- 注意:struts2的預設攔截器一定要配置在第一位!否則會被覆蓋! -->
				<interceptor-ref name="defaultStack"></interceptor-ref>
				<interceptor-ref name="interceptor1"></interceptor-ref>
				<interceptor-ref name="interceptor2"></interceptor-ref>
			</interceptor-stack>
		</interceptors>

		<action name="book_*" class="edu.scut.d_Interceptor.BookAction" method="{1}" >
			<!-- 引入攔截器 -->
			<interceptor-ref name="myStack"></interceptor-ref>
			<result >/succ.jsp</result>
		</action>
	</package>
</struts>
以上Example的執行結果:1 執行interceptor1的action前面的程式碼!2 執行interceptor2的action前面的程式碼!3 執行了圖書的list方法!4 執行interceptor2的action後面的程式碼!5 執行interceptor1的action後面的程式碼!可以看出,頁面傳送的請求,必須經過攔截器才能訪問action類,而且通過攔截器的順序是根據struts2裡面的配置順序進行的。執行了第一個攔截器的(String result = invocation.invoke();)才能放行,依次執行後面的攔截器或者方法。
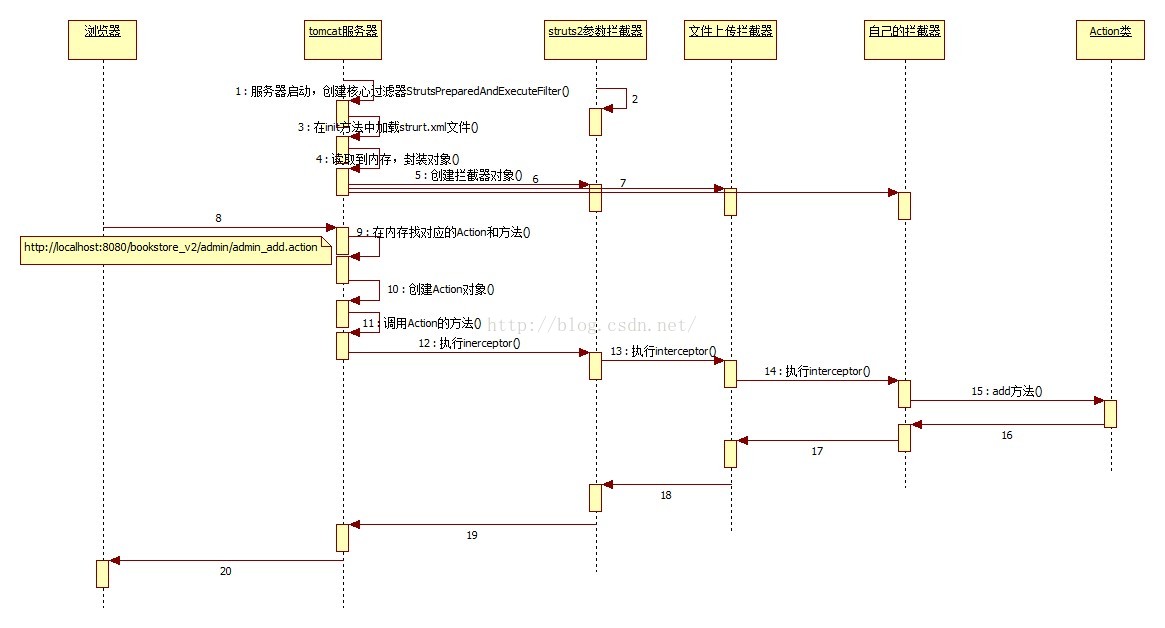
七、struts2的執行過程
下面這個圖不是我自己畫的,但是為了說明問題,我引用一下。跟著步驟仔細看一遍,會加深理解。
.