
小程式上傳圖片到阿里雲oss
阿新 • • 發佈:2019-02-06
首先到阿里雲下載文件示例
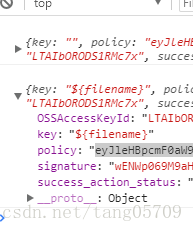
https://help.aliyun.com/document_detail/31925.html?spm=a2c4g.11186623.6.634.CwkAvp,解壓后里面有個upload.js檔案,編輯這個檔案,把accessid、accesskey、host換成自己的,由於小程式只接受https,所以host最好是繫結自己的域名,且實用了https,然後找到new_multipart_params,使用log打印出來,接下來執行一遍index.html,上傳圖片後會打印出我們需要的東西
接下來就小程式上傳了,使用
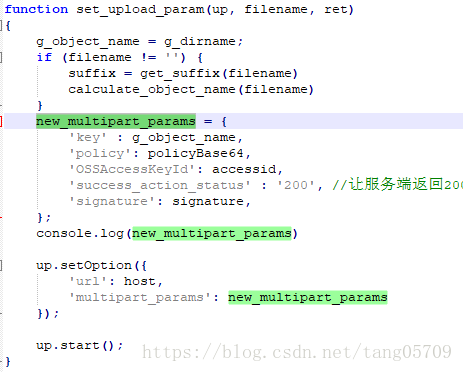
chooseImage和uploadFileuploadImage: function () { var that = this wx.chooseImage({ count: 3, // 預設9 sizeType: ['original'], // 可以指定是原圖還是壓縮圖,預設二者都有 sourceType: ['album', 'camera'], // 可以指定來源是相簿還是相機,預設二者都有 success: function (res) { // 返回選定照片的本地檔案路徑列表,tempFilePath可以作為img標籤的src屬性顯示圖片 var tempFilePaths = res.tempFilePaths var myDate = new Date() var ossPath = 'seekings/' + myDate.getFullYear() for (var i = 0; i < tempFilePaths.length; i++) { // 獲取檔案字尾 var pathArr = tempFilePaths[i].split('.') // 隨機生成檔名稱 var fileRandName = Date.now() + "" + parseInt(Math.random() * 1000) var fileName = fileRandName + '.' + pathArr[3] // 要提交的key var fileKey = ossPath + '/' + fileName wx.uploadFile({ url: 'https://xxx.xxx.com', filePath: tempFilePaths[i], name: 'file', formData: { name: tempFilePaths[i], key: fileKey, policy: 'xxxxxxxxxx', OSSAccessKeyId: 'xxxxxxx', signature: 'xxxxxx', success_action_status: "200" }, success: function (res) { var data = res.data console.log(res) } }) } that.setData({ upliadImages: res.tempFilePaths }) } }) },