
Android Matrix的使用與自定義動畫
變形矩陣的原理
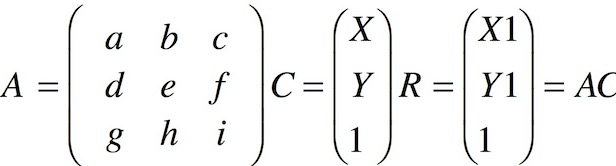
Android對圖形的處理通過矩陣,每個畫素點都有其X,Y座標資訊,圖形變換矩陣是一個3X3的矩陣,通過變換矩陣與位置矩陣相乘得到新的位置矩陣,從而可以通過不同的變換矩陣實現不同的變換效果。
圖形變換主要有以下四個基本的變換:
- Translate,平移
- Rotate,旋轉
- Scale,縮放
- Skew,錯切
可以知道基本的變換矩陣是對角a e i為1,其餘為0,這樣變換後不會改變座標,一般使g h為0, i為1,這樣座標矩陣的最後一個為1恆成立。
以平移為例,假設x方向平移dx,y方向平移dy,那麼應該是在基本矩陣的基礎上將c f分別改為dx dy,這樣的到的座標矩陣就是X+dx, Y+dy, 1。
下面以一個小例子說明
自定義一個類MyVIew繼承View
public class MyView extends View {
Context context;
private Matrix mMatrix;
private float[] m;
private int i = 1;
public MyView(Context context) {
super(context);
m = new float[]{1, 0, 0, 0, 1, 0, 0, 0, 1};
mMatrix = new 初始變換矩陣就是基礎矩陣,通過drawBitmap傳入矩陣畫出bitmap,定義一個方法傳入matrix傳入心得matrix,然後改變mMtrix繪圖。
佈局檔案
<?xml version="1.0" encoding="utf-8"?>
<LinearLayout xmlns:android="http://schemas.android.com/apk/res/android"
    xmlns:tools="http://schemas.android.com/tools"
    android:layout_width="match_parent"
    android:layout_height="match_parent"
    android:orientation="vertical">

    <com.example.wulinpeng.matrixtest.MyView
        android:id="@+id/iv_test"
        android:layout_width="match_parent"
        android:layout_height="300dp" />

    <RelativeLayout
        android:layout_width="match_parent"
        android:layout_height="0dp"
        android:layout_weight="1">

        <LinearLayout
            android:id="@+id/btns"
            android:layout_width="match_parent"
            android:layout_height="wrap_content"
            android:layout_alignParentBottom="true">

            <Button
                android:id="@+id/change"
                android:layout_weight="1"
                android:layout_width="0dp"
                android:layout_height="wrap_content"
                android:text="Change"/>

            <Button
                android:id="@+id/reset"
                android:layout_weight="1"
                android:layout_width="0dp"
                android:layout_height="wrap_content"
                android:text="Reset"/>

        </LinearLayout>

        <LinearLayout
            android:id="@+id/bottom"
            android:layout_above="@id/btns"
            android:layout_width="match_parent"
            android:layout_height="wrap_content">

            <EditText

                android:id="@+id/G"
                android:layout_width="0dp"
                android:layout_height="wrap_content"
                android:layout_weight="1"
                android:text="0"/>

            <EditText
                android:id="@+id/H"
                android:layout_width="0dp"
                android:layout_height="wrap_content"
                android:layout_weight="1"
                android:text="0"/>

            <EditText
                android:id="@+id/I"
                android:layout_width="0dp"
                android:layout_height="wrap_content"
                android:layout_weight="1"
                android:text="1"/>

        </LinearLayout>

        <LinearLayout
            android:id="@+id/center"
            android:layout_above="@id/bottom"
            android:layout_width="match_parent"
            android:layout_height="wrap_content">

            <EditText

                android:id="@+id/D"
                android:layout_width="0dp"
                android:layout_height="wrap_content"
                android:layout_weight="1"
                android:text="0"/>

            <EditText
                android:id="@+id/E"
                android:layout_width="0dp"
                android:layout_height="wrap_content"
                android:layout_weight="1"
                android:text="1"/>

            <EditText
                android:id="@+id/F"
                android:layout_width="0dp"
                android:layout_height="wrap_content"
                android:layout_weight="1"
                android:text="0"/>

        </LinearLayout>

        <LinearLayout
            android:layout_above="@id/center"
            android:layout_width="match_parent"
            android:layout_height="wrap_content">

            <EditText

                android:id="@+id/A"
                android:layout_width="0dp"
                android:layout_height="wrap_content"
                android:layout_weight="1"
                android:text="1"/>

            <EditText
                android:id="@+id/B"
                android:layout_width="0dp"
                android:layout_height="wrap_content"
                android:layout_weight="1"
                android:text="0"/>

            <EditText
                android:id="@+id/C"
                android:layout_width="0dp"
                android:layout_height="wrap_content"
                android:layout_weight="1"
                android:text="0"/>

        </LinearLayout>

    </RelativeLayout>
</LinearLayout>
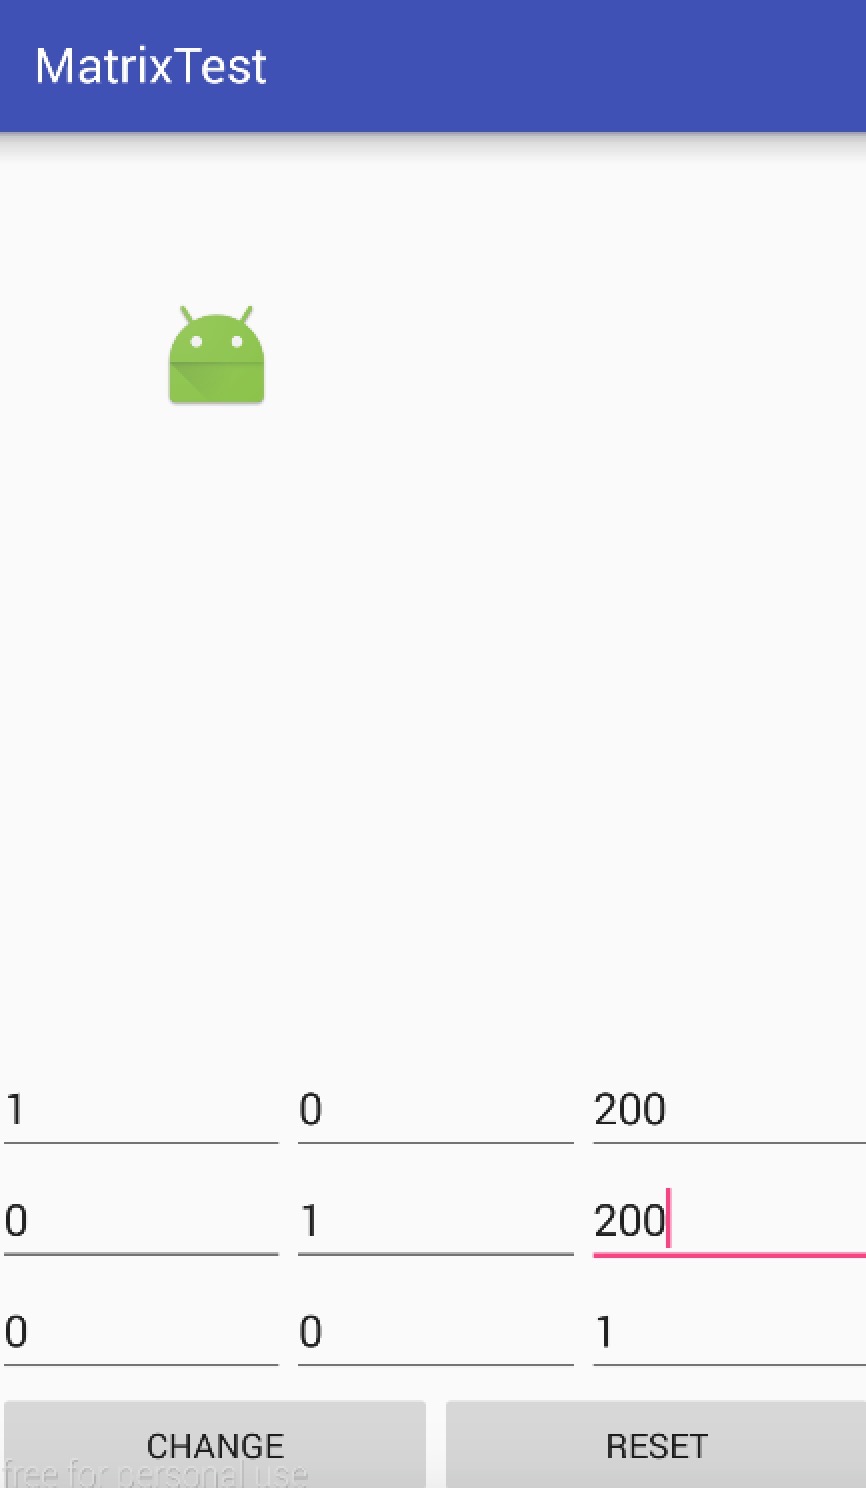
設定9個EditText設定Matrix,併為change按鈕設定監聽,呼叫change方法
                float[] m = new float[]{
                        Integer.parseInt(a.getText().toString()),
                        Integer.parseInt(b.getText().toString()),
                        Integer.parseInt(c.getText().toString()),
                        Integer.parseInt(d.getText().toString()),
                        Integer.parseInt(e.getText().toString()),
                        Integer.parseInt(f.getText().toString()),
                        Integer.parseInt(g.getText().toString()),
                        Integer.parseInt(h.getText().toString()),
                        Integer.parseInt(i.getText().toString())};

                Matrix matrix = new Matrix();
                matrix.setValues(m);

                myView.change(matrix);
效果如圖


Matrix封裝的方法
Matrix為開發者封裝了實現上述四種變換的方法,有三個系列set pre post。
三個系列的方法區別在與先後與是否重置矩陣,對於同一個Matrix物件來說可以看作有一個控制操作先後的隊伍,每次執行一次pre那麼該操作就會到第一位去,當然後面的pre會在前面的pre前面,post和pre相反,一次post就到最後,此時可以看作任何操作進來剛開始都在中間(然後pre和post會移動),而get操作就會清空前面的操作,也就是重置矩陣,說的很抽象,舉個例子,
        matrix.postScale(0f, 1f);
        matrix.postScale(1f, 0f);
        matrix.preTranslate(0, 500f);
        matrix.preTranslate(500f, 0);
按上述程式碼執行那麼實際執行順序就是
Translate(500f, 0)->Translate(0, 500f)->Scale(0f, 1f)->Scale(1f, 0f)
如果程式碼如下所示
        matrix.preTranslate(0, 500f);
        matrix.postScale(0f, 1f);
        matrix.setTranslate(300f, 500f);
        matrix.preTranslate(500f, 0);
        matrix.postScale(1f, 0f);
那麼順序就是
Translate(500f, 0f)->Translate(300f, 500f)->Scale(0f, 1f)->Scale(1f, 0f)
總之就是對於同一個Matrix如果呼叫set就會取消前面所有效果,從頭開始