springboot + swagger 註解
swagger用於定義API文件。
好處:
- 前後端分離開發
- API文件非常明確
- 測試的時候不需要再使用URL輸入瀏覽器的方式來訪問Controller
- 傳統的輸入URL的測試方式對於post請求的傳參比較麻煩(當然,可以使用postman這樣的瀏覽器外掛)
- spring-boot與swagger的整合簡單的一逼
1、專案結構
和上一節一樣,沒有改變。
2、pom.xml
引入了兩個jar。
<dependency>
           <groupId>io.springfox</groupId>
           <artifactId>springfox-swagger2</artifactId>
           <version>2.2.2</version>
        </dependency>
        <dependency>
           <groupId>io.springfox</groupId>
           <artifactId>springfox-swagger-ui</artifactId>
           <version>2.2.2</version>
        </dependency>
3、Application.java
package com.xxx.firstboot;
import org.springframework.boot.SpringApplication;
import org.springframework.boot.autoconfigure.SpringBootApplication;
import springfox.documentation.swagger2.annotations.EnableSwagger2;
@SpringBootApplication //same as @[email protected][email protected] 說明:
- 引入了一個註解@EnableSwagger2來啟動swagger註解。(啟動該註解使得用在controller中的swagger註解生效,覆蓋的範圍由@ComponentScan的配置來指定,這裡預設指定為根路徑"com.xxx.firstboot"下的所有controller)
4、UserController.java
package com.xxx.firstboot.web;

import org.springframework.beans.factory.annotation.Autowired;
import org.springframework.web.bind.annotation.RequestHeader;
import org.springframework.web.bind.annotation.RequestMapping;
import org.springframework.web.bind.annotation.RequestMethod;
import org.springframework.web.bind.annotation.RequestParam;
import org.springframework.web.bind.annotation.RestController;

import com.xxx.firstboot.domain.User;
import com.xxx.firstboot.service.UserService;

import io.swagger.annotations.Api;
import io.swagger.annotations.ApiImplicitParam;
import io.swagger.annotations.ApiImplicitParams;
import io.swagger.annotations.ApiOperation;
import io.swagger.annotations.ApiResponse;
import io.swagger.annotations.ApiResponses;

@RestController
@RequestMapping("/user")
@Api("userController相關api")
public class UserController {

    @Autowired
    private UserService userService;

//    @Autowired
//    private MyRedisTemplate myRedisTemplate;

    @ApiOperation("獲取使用者資訊")
    @ApiImplicitParams({
        @ApiImplicitParam(paramType="header",name="username",dataType="String",required=true,value="使用者的姓名",defaultValue="zhaojigang"),
        @ApiImplicitParam(paramType="query",name="password",dataType="String",required=true,value="使用者的密碼",defaultValue="wangna")
    })
    @ApiResponses({
        @ApiResponse(code=400,message="請求引數沒填好"),
        @ApiResponse(code=404,message="請求路徑沒有或頁面跳轉路徑不對")
    })
    @RequestMapping(value="/getUser",method=RequestMethod.GET)
    public User getUser(@RequestHeader("username") String username, @RequestParam("password") String password) {
        return userService.getUser(username,password);
    }
}
說明:
- @Api:用在類上,說明該類的作用
- @ApiOperation:用在方法上,說明方法的作用
- @ApiImplicitParams:用在方法上包含一組引數說明
- @ApiImplicitParam:用在@ApiImplicitParams註解中,指定一個請求引數的各個方面
- paramType:引數放在哪個地方
- header-->請求引數的獲取:@RequestHeader
- query-->請求引數的獲取:@RequestParam
- path(用於restful介面)-->請求引數的獲取:@PathVariable
- body(不常用)
- form(不常用)
- name:引數名
- dataType:引數型別
- required:引數是否必須傳
- value:引數的意思
- defaultValue:引數的預設值
- paramType:引數放在哪個地方
- @ApiResponses:用於表示一組響應
- @ApiResponse:用在@ApiResponses中,一般用於表達一個錯誤的響應資訊
- code:數字,例如400
- message:資訊,例如"請求引數沒填好"
- response:丟擲異常的類
- @ApiModel:描述一個Model的資訊(這種一般用在post建立的時候,使用@RequestBody這樣的場景,請求引數無法使用@ApiImplicitParam註解進行描述的時候)
- @ApiModelProperty:描述一個model的屬性
以上這些就是最常用的幾個註解了。
需要注意的是:
- ApiImplicitParam這個註解不只是註解,還會影響執行期的程式,例子如下:

如果ApiImplicitParam中的phone的paramType是query的話,是無法注入到rest路徑中的,而且如果是path的話,是不需要配置ApiImplicitParam的,即使配置了,其中的value="手機號"也不會在swagger-ui展示出來。
具體其他的註解,檢視:
測試:
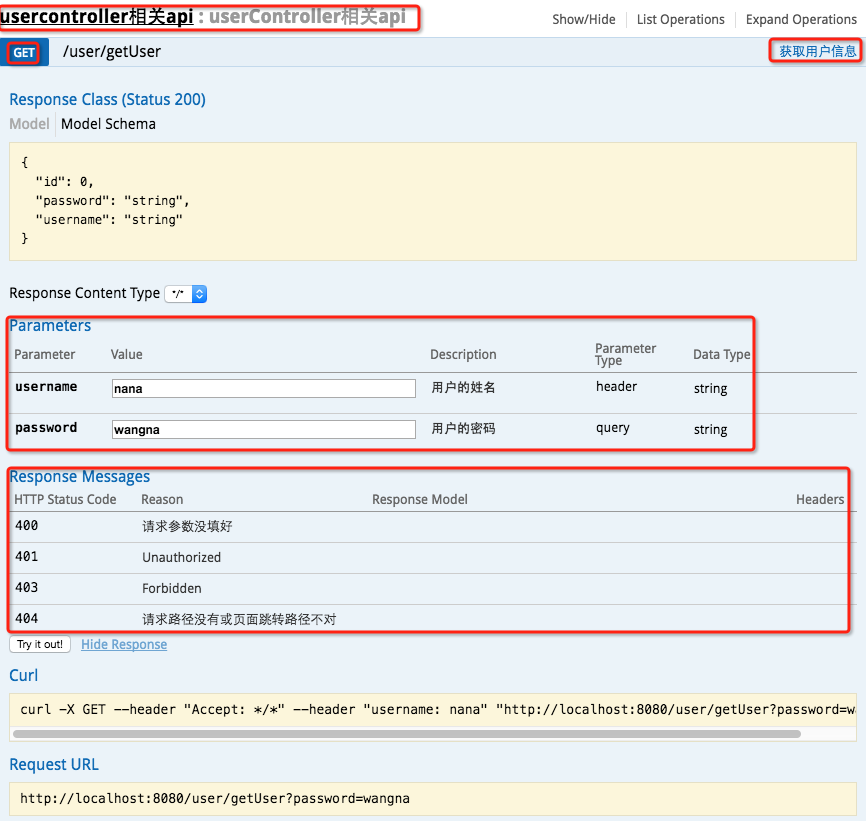
啟動服務,瀏覽器輸入"http://localhost:8080/swagger-ui.html"

最上邊一個紅框:@Api
GET紅框:method=RequestMethod.GET
右邊紅框:@ApiOperation
parameter紅框:@ApiImplicitParams系列註解
response messages紅框:@ApiResponses系列註解
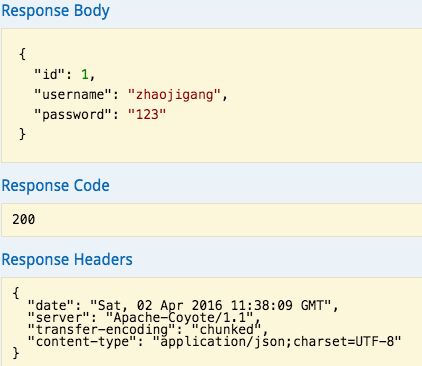
輸入引數後,點選"try it out!",檢視響應內容:

相關推薦
springboot + swagger 註解
swagger用於定義API文件。 好處: 前後端分離開發API文件非常明確測試的時候不需要再使用URL輸入瀏覽器的方式來訪問Controller傳統的輸入URL的測試方式對於post請求的傳參比較麻煩(當然,可以使用postman這樣的瀏覽器外掛)spring-boo
SpringBoot雞湯(註解集合二)
lis aps clas lap cti boot value 請求 app 1.@NotNull :屬性值不為空 2.@Profiles @Configuration @Profile("production") public class Production
springboot的註解詳解
ica prope pan span 配置 作用 cat fix 文件中 配置類相關: @PropertySource(value = "classpath:test.properties") //我們都把配置文件寫到application.yml中。有時我們不願意把
SpringBoot利用註解@Value獲取properties屬性為null
pro 解決 autowired dfs stat info 如何 一個 去掉 參考:https://www.cnblogs.com/zacky31/p/8609990.html 今天在項目中想使用@Value來獲取Springboot中properties中屬性值。
Springboot 常用註解
RF head rest服務 請求 false val bean api time @SpringBootApplication: 包含@Configuration、@EnableAutoConfiguration、@ComponentScan通常用在主類上。 很多Spri
springboot swagger api管理
.com cat 創建 暴露 mave cati boot 方法 img 一 引入maven包 二 創建SwaggerConfig類 三 暴露資源 四 攔截器過濾 五 ServiceApplication添加註解 六 類和方法註解 七 啟動項目訪問http:
SpringBoot —— AOP註解式攔截與方法規則攔截
運行 處理程序 return 編譯 clear 字節碼 動態獲取 nconf {} AspectJ是一個面向切面的框架,它擴展了Java語言。AspectJ定義了AOP語法,所以它有一個專門的編譯器用來生成遵守Java字節編碼規範的Class文件。 SpringBo
springboot+swagger
version spa ann require desc 其中 pid quest ignore 一、引入依賴 <dependency> <groupId>io.springfox</groupId>
springboot @vaule註解失效解決辦法
zed 便在 pub one div sync lose 方法 問題 在Controller類裏面通過@Value將參數註入進來,最後的確成功了。因此基於此經驗,我便在其他使用的類裏面也采用這樣的方式註入參數,但是發現去失效了,報錯為NULL,說明參數並沒有我們料想的被註入
SpringBoot | 問題 | 註解方式下無法發現Bean
ati art -- cat target blank boot tps 方式 在排除註解的問題後,考慮掃描類的位置, 【SpringBoot項目的Bean裝配默認規則是根據Application類所在的包位置從上往下掃描! “Application類”是指SpringBo
spring和springboot常用註解總結
普通 map 組件 構造 sca service 提交 依賴 demo1 @RequestMapping 這個註解可以用於類和方法上,用於類上,表示父路徑,如類上是demo,方法上是/demo1,那麽訪問路徑就是demo/demo1 該註解有六個屬性:params:指定re
springBoot @Enable*註解的工作原理
圖解 tor def sys autoconf 屬性註入 erb ota efi 使用註解實現異步 RunnableDemo類 package com.boot.enable.bootenable; import org.springframework.schedu
SpringBoot使用註解形式定時執行同步任務
1、SpringBoot定時執行同步任務可以使用org.springframework.scheduling包下的@EnableScheduling以及@Scheduled註解來實現,程式碼如下: @Configuration @EnableScheduling public class S
springboot swagger配置,Unable to infer base url,攔截器問題
swagger配置很簡單,但是,因為使用到了攔截器,所以,就不簡單了,剛開始怎麼也不能顯示介面列表,後來才發現是攔截器的問題,然後就各種方法的試試。剛開始是配置webmvc的靜態資源類來過濾,但是後來發現還是不行。 後來仔細想想,配置了靜態資源過濾,但是攔截器與這個什麼webmvcconfigu
SpringBoot 常用註解(持續更新)
SpringBoot 常用註解 @SpringBootApplication @Bean @ComponentScan @ControllerAdvice @ExceptionHandler @ResponseBody @Qualifier 注入(@Autowired和@R
Swagger 註解說明
1 @Api() 用於類;表示標識這個類是swagger的資源 2 tags–表示說明 3 value–也是說明,可以使用tags替代 4 5 @ApiOperation() 用於方法;表示一個http請求的操作 6 value用於方法描述 7 notes用於提示內容 8
springboot基本註解
宣告Bean的註解: @Component元件 @Service service層 @Respository dao層 @Controller 注入Bean的註解: @Autowired Spring提供的註解 @Inject JSR-330提供的註解 @Resource JSR-
基於springboot實現註解形式的mybatis
1.首先是用到的兩個工具類: package com.wangyu.utils; import java.sql.Connection; import java.sql.DriverManager; import java.sql.PreparedStatement; import java.
springboot+swagger+版本控制(文末附demo)
背景: Swagger不做過多介紹了,本篇為大家介紹下springboot+swagger下api介面的版本控制。(文末提供demo下載) 通常情況下服務上線後,會不停的迭代版本(BUG、新需求等),如果沒有控制好版本
SpringMVC整合Swagger外掛以及Swagger註解的簡單使用
一、簡介 Swagger 是一個規範和完整的框架,用於生成、描述、呼叫和視覺化 RESTful 風格的 Web 服務。總體目標是使客戶端和檔案系統作為伺服器以同樣的速度來更新 。介面的方法,引數和模型緊密整合到伺服器端的程式碼,允許API來始終保持同步。Swagger 讓部署管理和使用功能
