
AdapterView及子類的相關學習整理
一、瞭解 AdapterView 及其子類

(這個圖片是網上找的)主要是瞭解一下結構,其中AbsListView、AbsSpinner、AdapterViewAnimation依然是抽象類,實際使用時需要使用它們的子類。後面我會逐個練習這些子類,比較這些子類實現效果和使用的區別。
二、瞭解Adapter介面及實現類
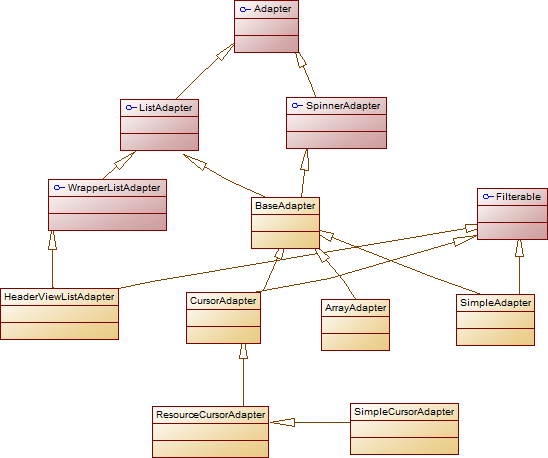
其中ListAdapter為AbsListView提供列表項,而SpinnerAdapter為AbsSpinner提供列表項。從圖中可以看出,幾乎所有Adapter都繼承了BaseAdapter,而BaseAdapter同時實現了AbsListView、SpinnerAdapter兩個介面。
(需要較靈活的自定義效果的時候BaseAdapter確實非常有用啊~~~)
Adapter常用的實現類如下:
1、ArrayAdapter:簡單易用,通常用於將陣列或List集合的多個值包裝成多個列表項,通俗點說,也就是直接將陣列或list集合中的內容直接包裝成ArrayAdapter.
例如:
這是arrayadapter構造方法中常用的一個。其中第一個引數是Context:代表訪問整個Android應用的介面;第二個引數是textViewResourceId:這個資源ID可以在xml檔案中自定義,表示列表項的外觀;第三個引數是陣列或List.String[] array=new String[]{ "周杰倫","方文山","青花瓷" }; ArrayAdapter<String> adapter1=new ArrayAdapter<String>(this,R.layout.xxx,array); listXXX.setAdapter(adapter1);
2.SimpleAdapter:可用於將List集合的多個物件包裝成多個列表項。最常見的形式就類似於QQ的聯絡人列表,由頭像,姓名,資訊組成了一個列表項。這就擴充套件了arrayadapter列表項只能為textview的形式,功能比較強大。
例如:
首先是設定兩個佈局檔案:(activity_listview.xml)
list_item_style.xml (用來設定列表項的風格)<?xml version="1.0" encoding="utf-8"?> <LinearLayout xmlns:android="http://schemas.android.com/apk/res/android" android:layout_width="match_parent" android:layout_height="match_parent" android:orientation="vertical" > <ListView android:id="@+id/list1" android:layout_width="fill_parent" android:layout_height="wrap_content" /> </LinearLayout>
<?xml version="1.0" encoding="utf-8"?>
<LinearLayout xmlns:android="http://schemas.android.com/apk/res/android"
    android:layout_width="match_parent"
    android:layout_height="match_parent"
    android:orientation="horizontal" >

    <ImageView
        android:id="@+id/header1"
        android:layout_width="wrap_content"
        android:layout_height="wrap_content"
        android:src="@drawable/ic_launcher" />
    <LinearLayout
        android:layout_width="match_parent"
        android:layout_height="match_parent"
        android:orientation="vertical" >
        <TextView
            android:id="@+id/name1"
            android:layout_width="wrap_content"
            android:layout_height="wrap_content"
            android:textSize="20dp"
            android:textColor="#f0f"
            android:paddingLeft="10dp"
            />
        <TextView
            android:id="@+id/desc1"
            android:layout_width="wrap_content"
            android:layout_height="wrap_content"
            android:textSize="14dp"
            android:paddingLeft="10dp"/>
        </LinearLayout>

</LinearLayout>
Java 檔案中主要是將需要顯示的資料封裝在Map物件,然後以list集合的形式放進介面卡:
public class Practise extends Activity {

	private String[] name = new String[] { "孫悟空", "唐僧", "豬八戒" };
	private String[] desc = new String[] { "一隻猴子", "一個和尚", "一隻豬" };
	private int[] headers = new int[] { R.drawable.x, R.drawable.y,
			R.drawable.z };

	public void onCreate(Bundle savedInstanceState) {
		super.onCreate(savedInstanceState);
		setContentView(R.layout.activity_listview);
		List<Map<String, Object>> listitems = new ArrayList<Map<String, Object>>();
		for (int i = 0; i < name.length; i++) {
			Map<String, Object> listitem = new HashMap<String, Object>();
			listitem.put("header", headers[i]);
			listitem.put("name", name[i]);
			listitem.put("desc", desc[i]);
			listitems.add(listitem);
		}
		SimpleAdapter sp = new SimpleAdapter(this, listitems,
				R.layout.list_item_style, new String[] { "name", "header",
						"desc" }, new int[] { R.id.name1, R.id.header1,
						R.id.desc1 });
		ListView ls=(ListView)findViewById(R.id.list1);
		ls.setAdapter(sp);
	}

}
從上面可以發現SimpleAdapter()有5個引數:第一個引數是context,第二個引數是list集合,第三個引數是指定介面佈局的ID,即我們定義的列表項風格的xml檔案的ID,第四個引數是決定Map<>物件中哪些key對應的value來生成列表項,第五個引數是決定填充哪些元件,也就是我們定義的xml檔案中相應的元件的id.
效果如下:

3.BaseAdapter:通常用於被擴充套件,可以對各列表項進行最大限度的定製。
重點是重寫如下4個方法:
getCount():該方法的返回值Adapter 將會包含多少個列表項;
getItem(int position):該方法的返回值決定第position處的列表項的內容;
getItemId(int position):決定第position 處的列表項的ID;
getView(int position,View convertView,ViewGroup parent):返回的View將作為列表框;(感覺這個方法最重要)
4.SimpleCursorAdapter:與SimpleAdapter基本相似,但是用於包裝Cursor 提供的資料。(這個我暫時還沒有用到過(⊙﹏⊙))
(以上是比較常用的4類adapter實現類)
除了使用xml檔案佈局外,還可以直接使用ListActivity等Activity的繼承類,省了佈局檔案,但是adapter實現類部分和使用普通activity是一樣的。注意在ListActivity中使用 setListAdapter(adapter);
三、測試使用主要的AdapterView 元件
1.ListView上面已經使用過了。
2.ExpandableListView(可展開的列表元件),ExpandableListView所顯示的列表項應該由ExpandableListAdapter提供,它的一個重要子類是BaseExpandableListAdapter,具體的使用方法可以去參考api,用法與普通ListView非常相似。
擴充套件BaseExpandableListAdapter時關鍵是要實現4個方法:
getGroupCount():返回包含的組列表項的數量;
getGroupView():返回View物件作為組列表項;(外觀設計)
getChildCount():返回特定組所包含的子列表項的數量;
getChildView();返回View物件作為特定組子列表項;(外觀設計)
在佈局檔案中<ExpandableListView.../>中比較常用的特性有:android:childIndicator/android:groupIndicator(顯示在子/組列表項旁邊的Drawable物件)雖然這樣設定很方便,但是我不知道怎麼才能控制影象的大小?
3.Spinner元件 其實就是一個簡單的列表選擇框,在使用這個元件的時候我們常常是已經確定了需要顯示的內容,所以在使用的時候不需要考慮到動態獲取,只需要直接為其指定 android:entries屬性即可實現Spinner.(在res/value目錄下已經定義了陣列資原始檔);或者在java程式碼中用陣列建立arrayadapter物件。
4.Gallery元件 (額。。。Android已經不再推薦使用這個元件了,建議使用HorizontalScrollView和ViewPager代替)
5.AdapterViewFipper和StackView 有動畫效果,繼承自AdapterViewAnimator,下一篇有練習的例子。