
【U3D】後期渲染效能優化之---減少Draw Calls的呼叫
本系列文章由CSDN
這是我在上看到的一篇文章,其中在講如何減少DrawCalls呼叫的的問題上有很多新奇的思路,特扒出來來供大家進行學習交流。內容如下:(渣翻見諒 (=ω=))
Reducing Draw Calls (also named SetPass calls) on Unity5.
So I have been working on the standard shader support for Unity 5 and doing some tests regarding how feasible is to reduce draw calls with the new standard shader and actually the results where pretty positive!.
我在著手研究Unity5中的Standard Shader(標準著色器),並且在如何減少Unity中Draw Calls呼叫的問題上作出了一些有趣的實驗,接下來分享給大家一些有用的方法:
Lets talk about the standard shader a little
bit. The standard shader is a physically based shader that is consistent across diverse lighting conditions, its multi-platform and texture slots enable different shader features.
首先我們來談談Standard Shader(標準著色器),Standard Shader是一種基於物理渲染的著色器,它可以支援各種光照條件下的渲染效果,並支援跨平臺呼叫,它的Texture slots(Shader裡的紋理槽點)可以呼叫各種不同的Shader特性。
This standard shader “mutates” and becomes more faster/slower depending
on the textures you are using on the texture slots. being said that these two shaders are different (even if they are using the standard shader):
Standard Shader(標準著色器)執行速度的快慢取決於在Shader的Texture slots(紋理槽)裡使用了的圖片。因此可以說下邊的這兩個Shaders是完全不同的,雖然它們使用了同樣的Standard Shader。
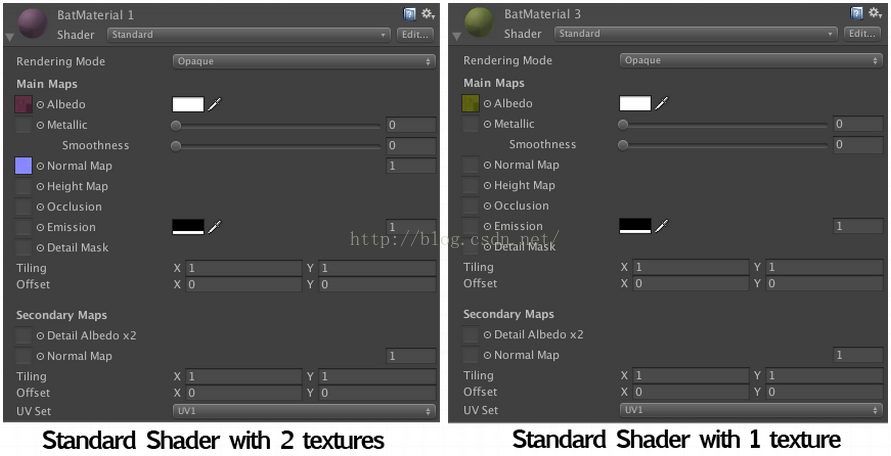
So these two shaders (even if they are “Standard”); they are totally different shaders when rendering a scene, hence they have to be handled totally different if we want to reduce some draw calls
那麼這兩個Shaders渲染場景的方式是完全不同的(雖然它們都是Standard
Shader(標準著色器)),所以為了能夠減少Draw Calls,我們需要想一些辦法來處理這兩個Shader。
Before Talking about how to reduce draw calls in Unity 5 I will talk about how draw calls are reduced regardless the shader is being used and then I will talk about how to reduce draw calls with the Standard shader
in Unity5.
我會先介紹減少Draw Calls通用的做法(不依賴於Shader),然後再討論Unity5中如何在減少Standard shader (標準著色器)上的Draw Calls。
Reducing Draw Calls in Unity The Manual Way.
So, if we want to reduce draw calls in Unity or in any other engine the way to do it is
using as less materials as possible.
Basically it all gets reduced to these single steps:
1、Sort all the materials and gather them by the type
of shader they are using.
2、With the materials that share the same shader gather their textures in a bigger texture (atlas texture).
3、Create one material that will contain the shader and the atlas texture(s) created on step 2.
4、Remap all the UVs of your meshes that use the shader to fit the coordinates of the atlas texture.
5、Assign to your remapped meshes the material we created on step 3.
首先講講手動減少Draw Calls的方式:
如果我們想要在Unity或者其它引擎上減少Draw Calls的呼叫,需要儘可能少的呼叫Materials(材質)。
需要如下幾個步驟:
1、整理所有使用的Materials,按照它們的Shader型別將所有Materials進行分類。
2、把所有使用同一個Shader的Material上的紋理放入atlas圖集中。(木有NGUI腫麼辦。。)
3、新建立一個Material,它包含著Shader以及步驟二中所建立的atlas圖集。
4、重新繪製網格上的UV紋理座標,讓它可以匹配到atlas圖集。
5、把步驟三中建立的Material放到重新繪製的網格上。
1. Sort all the materials and gather them by the type of shader.
I’m going to use for easiness of explanation purposes one simple scene that will have all the meshes use the same type of materials but different textures.
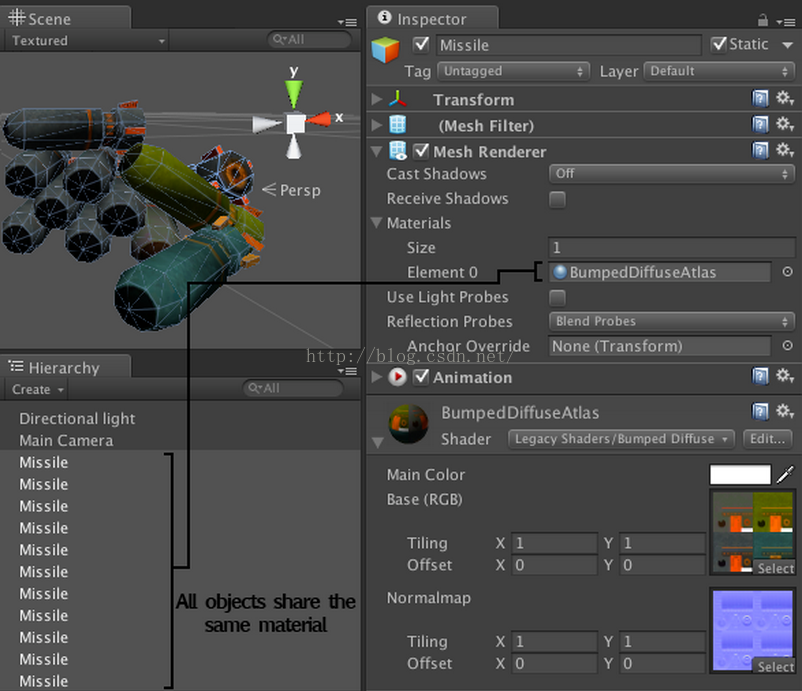
In our case we are going to use this scene (which contains 4 materials each of them with a Bumped Diffuse shader):
1、整理所有的Materials,按照它們的Shader型別將Materials進行分類。
我會用相對簡潔的方式來進行說明,這是一個很簡單的場景,裡邊的物體使用同一種類型的Materials(材質),但是貼圖不一樣。
在這個例子裡,一共有4種Materials,每個Material上邊都有一個Bumped Diffuse Shader(漫反射著色器)。
 Notice the SetPass calls: 4
So we have for this scene these materials to process:
注意圖中一共有個SetPass calls
之後我們要對場景裡的裡的Material做出如下處理:

2. With the materials that share the same shader gather their textures in a bigger texture
(Atlas texture).
In our case we have 2 textures per shader as the Bumped Diffuse shader uses a normal map and a base texture, so what we need to do is to have 2 textures like this:
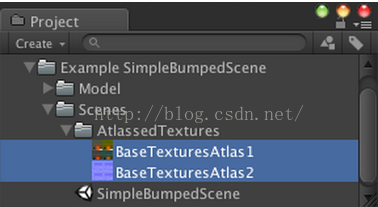
2、把所有使用同一個Shader的Material上的紋理放入atlas圖集中。
在這個例子中,一個Shader上有兩種紋理,一個Bumped Diffuse Shader(漫反射著色器)需要用到的法線紋理和一個基本紋理,所需的紋理如下所示:

Save these textures in the project view, we are going to need them later on:
可以把紋理放到Project面板下邊,方便今後的使用
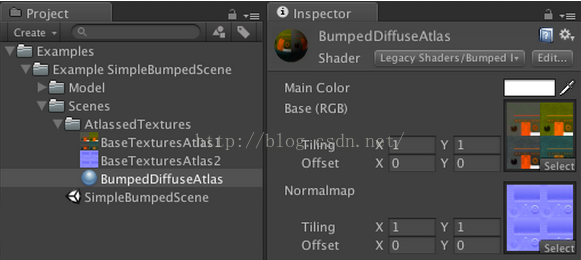
3. Create one material that will contain the shader and the atlas texture(s).
Create a material and assign (on this case) the two textures to the material with the shader used (in our case “Bumped Diffuse”):
3、新建立一個Material,它包含著Shader以及步驟二中所建立的atlas圖集。
新建立一個材質,材質上包含兩個紋理圖片,材質的Shader使用“Bumped Diffuse”
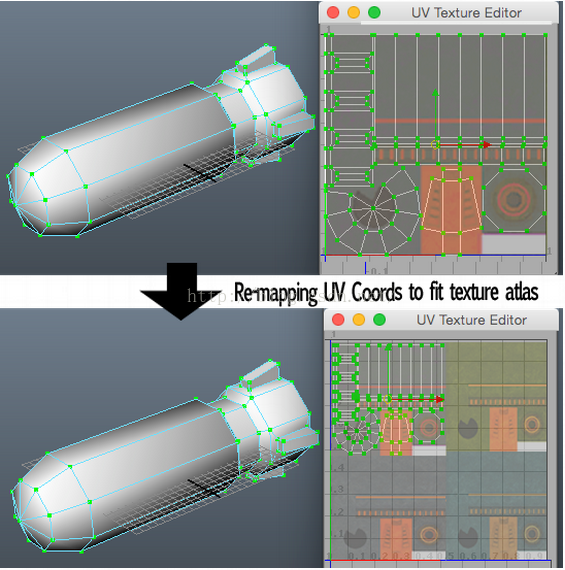
4. Remap all the UVs of your meshes that use the shader to fit the coordinates of
the atlas texture.
This modification can be done on any 3D editor (Maya/ 3D studio / Max / Blender / etc) of your choice.
This is the most boring/demanding step as it involves you modifying your UV coords of your meshes and make them match the texture’s atlas pixels (the texture we created on step 2).
So what we do is that to each of our UV coords located all around [0,0 – 1,1] we Re-position them on a smaller sub-set of [0,0-1,1] that matches the pixels on the atlas texture we created on step 2.
4、重新繪製網格上的UV紋理座標,讓它可以匹配到atlas圖集。
這一步操作可以在任意的3D編輯器中完成。(例如Maya/3D studio/Max/Blender等)。
這也是要求最嚴格的步驟,你需要仔細修改網格上的UV紋理座標,讓它們與第二步中建立的atlas圖集裡的紋理對其。
因此我們需要把每一個UV紋理座標設定在比[0,0,-1,1]更小的子集座標系內。
And...we do this for each of our meshes that share the same shader.
我們要對每一個含有“ Bumped Diffuse “Shader的網格都做這樣的操作,
5. Assign to the remapped meshes the material created on step 3.
We are almost there! still we have a couple of more steps to do:
1、Select all your UV-remapped-meshes and place them where the old meshes where located and deactivate
the old meshes.
2、Assign the created material on step 3 to all your UV-remapped-meshes.
5、把步驟三中建立的Material放到重新繪製的網格上。
我們終於快要搞定啦~~~\(≧▽≦)/~,接下來還有2個步驟:
1、選擇在步驟三中重新繪製的所有網格,替換掉之前的網格(就是重做時的網格),並且把舊的網格禁用掉~~~~
2、把重新繪製的網格拖到第三步建立的材質上邊。
And by here, we are finished!, now lets hit play:
到這裡就完成所有的工作啦~~~現在點選一下Play按鈕
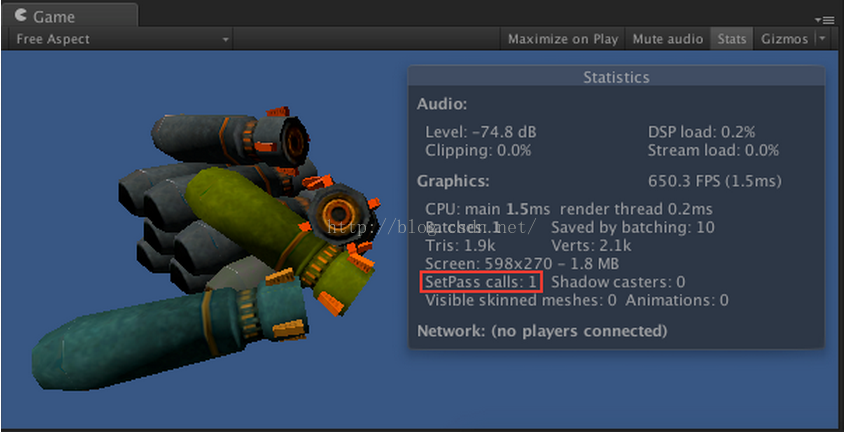
Before Optimizing if you go back to Step 1, we had 4 SetPass calls and after all the optimization has been done we end up with 1 SetPass calls!. which is amazing! its 75% draw call reduce on this case.
可以看到,在第一步我們優化之前時,SetPass calls數目為4,優化後數字變成了1,是不是很神奇呢~~~~在這個案例中我們把Draw calls減少了75%
Reducing Draw Calls in Unity 5 with the Standard shader.
By here you should know more or less how the optimization process is done with the standard shader. as I wrote on the beginning, the standard shader internally “mutates” and becomes more faster/slower depending on the textures you are using on the shader’s texture slots (and also renders differently depending on the textures that are used). being said that we have to gather our object’s materials if they are using the Standard shader by the textures used. i.e: Gather all the meshes that only have colors; Gather all the meshes that only have an Albedo texture.. and so on.Here’s a small scene I created for testing purposes:
在Unity5引擎中使用Standard shader(標準著色器)減少Draw Calls
到這裡,我們已經瞭解到了一些關於Standard shader的優化方法。就像我剛開始說的那樣,tandard Shader執行速度的快慢取決於在Shader的Texture slots(紋理槽)裡使用的圖片。如果材質都是用統一的Standard shader,我們可以將它們進行合併。比如可以合併所有隻有顏色的網格,合併所有含一個Albedo texture(Albedo紋理)的網格等等。
下邊是一個測試用的場景:

If you compare the original draw calls (91) and the optimized scene’s draw calls (22) you can see that there’s ~75% draw call decrease!. Which is amazing!
Also, if you can try to combine meshes as much as possible, this also helps a lot!.
可以觀察到,優化前場景中有91個Draw calls,優化後只有22個,Draw Calls減少了75%。
所以如果可以儘可能合併物體上的網格,在效能優化上會有很大的幫助。
Reducing Draw Calls on Unity Automatically
Knowing that this is a really cumbersome process I decided to create a tool that automatically gathers your objects and sort them by the type of shaders they use and automagically “Bakes” all your unoptimized scenes!, you can find the package here, and if your scene only uses Diffuse and Bumped Diffuse shaders please be my guest and use it for free!在Unity引擎中自主進行Draw Calls渲染優化
這是一個比較複雜的過程,我打算建立一個幫助工具,它可以自動收集場景中的Objects,並且按照身上的Shader型別進行自動分類,所有未優化的Scene會自動進行烘焙。你可以在這兒找到相關的外掛包,如果你的Scene上只是用了Diffuse和Bumped Diffuse Shaders,那麼歡迎您下載並且使用它~~~忘了說了,這是免費的
如果喜歡影象渲染優化方面的資料,歡迎訂閱我的部落格,我會經常釋出相關的國內外資料~~~>▽<