Android中使用SQlite進行資料操作
本文參考了這篇文章:http://www.ibm.com/developerworks/cn/opensource/os-cn-sqlite/
簡介: SQLite 是一款非常流行的嵌入式資料庫,它支援 SQL 查詢,並且只用很少的記憶體。Android在執行時集成了 SQLite,所以每個 Android 應用程式都可以使用 SQLite 資料庫。對數熟悉 SQL 的開發人員來時,使用 SQLite 相當簡單。可以,由於 JDBC 不適合手機這種記憶體受限裝置,所以 Android 開發人員需要學習新的 API 來使用 SQLite。本文主要講解 SQLite 在 Android 環境中的基本使用。
SQLite 一個非常流行的嵌入式資料庫,它支援 SQL 語言,並且只利用很少的記憶體就有很好的效能。此外它還是開源的,任何人都可以使用它。許多開源專案((Mozilla, PHP, Python)都使用了 SQLite。
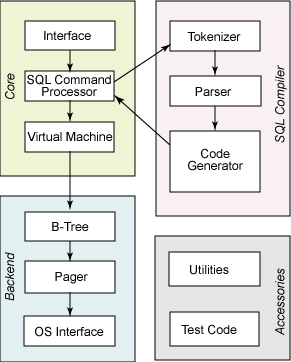
SQLite 由以下幾個元件組成:SQL 編譯器、核心、後端以及附件。SQLite 通過利用虛擬機器和虛擬資料庫引擎(VDBE),使除錯、修改和擴充套件 SQLite 的核心變得更加方便。

SQLite 基本上符合 SQL-92 標準,和其他的主要 SQL 資料庫沒什麼區別。它的優點就是高效,Android 執行時環境包含了完整的 SQLite。
SQLite 和其他資料庫最大的不同就是對資料型別的支援,建立一個表時,可以在 CREATE TABLE 語句中指定某列的資料型別,但是你可以把任何資料型別放入任何列中。當某個值插入資料庫時,SQLite 將檢查它的型別。如果該型別與關聯的列不匹配,則 SQLite 會嘗試將該值轉換成該列的型別。如果不能轉換,則該值將作為其本身具有的型別儲存。比如可以把一個字串(String)放入 INTEGER 列。SQLite稱這為“弱型別”(manifest typing.)。
此外,SQLite 不支援一些標準的 SQL 功能,特別是外來鍵約束(FOREIGN KEY constrains),巢狀 transcaction 和 RIGHT OUTER JOIN 和 FULL OUTER JOIN, 還有一些 ALTER TABLE 功能。
除了上述功能外,SQLite 是一個完整的 SQL 系統,擁有完整的觸發器,交易等等。
Android 集成了 SQLite 資料庫
Android 在執行時(run-time)集成了 SQLite,所以每個 Android 應用程式都可以使用 SQLite 資料庫。對於熟悉 SQL 的開發人員來時,在 Android 開發中使用 SQLite 相當簡單。但是,由於 JDBC 會消耗太多的系統資源,所以 JDBC 對於手機這種記憶體受限裝置來說並不合適。因此,Android 提供了一些新的 API 來使用 SQLite 資料庫,Android開發中,程式設計師需要學使用這些 API。
資料庫儲存在 data/< 專案資料夾 >/databases/ 下。
Android 開發中使用 SQLite 資料庫
Activites 可以通過 Content Provider 或者 Service 訪問一個數據庫。下面會詳細講解如果建立資料庫,新增資料和查詢資料庫。
Android 不自動提供資料庫。在 Android 應用程式中使用 SQLite,必須自己建立資料庫,然後建立表、索引,填充資料。Android 提供了 SQLiteOpenHelper 幫助你建立一個數據庫,你只要繼承 SQLiteOpenHelper 類,就可以輕鬆的建立資料庫。SQLiteOpenHelper類根據開發應用程式的需要,封裝了建立和更新資料庫使用的邏輯。SQLiteOpenHelper 的子類,至少需要實現三個方法:
1. 建構函式,呼叫父類 SQLiteOpenHelper 的建構函式。這個方法需要四個引數:上下文環境(例如,一個 Activity),資料庫名字,一個可選的遊標工廠(通常是 Null),一個代表你正在使用的資料庫模型版本的整數。
2. onCreate()方法,它需要一個 SQLiteDatabase 物件作為引數,根據需要對這個物件填充表和初始化資料。
3. onUpgrage()方法,它需要三個引數,一個SQLiteDatabase 物件,一箇舊的版本號和一個新的版本號,這樣你就可以清楚如何把一個數據庫從舊的模型轉變到新的模型。
下面示例程式碼展示瞭如何繼承 SQLiteOpenHelper 建立資料庫(AbstractDBOpenHelper繼承了SQLiteOpenHelper,在onCreate中建立了一張note表。):
/**
 * 摘要的DBOpenHelper
 * @author haozi
 *
 */
public class AbstractDBOpenHelper extends SQLiteOpenHelper {

	public AbstractDBOpenHelper(Context context, String name,
			CursorFactory factory, int version) {
		super(context, name, factory, version);
		// TODO Auto-generated constructor stub
	}

	@Override
	public void onCreate(SQLiteDatabase db) {

		// TODO 建立資料庫,對資料庫進行操作
                // 建立了一張note表
                String sql = "create table note( id integer primary key autoincrement, " +                                                 // 筆記的id
											"ntitle varchar(100), " +                          // 筆記的標題
											"ncontent varchar(600), " +                        // 筆記的內容
											"course_id integer, " +                            // 課程id
											"ndate date, " +                                   // 日期
											"ntime time, " +                                   // 時間
											"deletable integer default 0" +                    // 可否刪除(1表示可以,0表示不可以)
		// 執行建表語句									" );";
		db.execSQL(sql);
	}

	@Override
	public void onUpgrade(SQLiteDatabase db, int oldVersion, int newVersion) {
		// TODO 更改資料庫版本的操作

	}

	@Override
	public void onOpen(SQLiteDatabase db) {
		// TODO 每次成功開啟資料庫後首先被執行
		super.onOpen(db);
	}

}
接下來討論具體如何建立表、插入資料、刪除表等等。呼叫 getReadableDatabase() 或getWriteableDatabase() 方法,你可以得到 SQLiteDatabase 例項,具體呼叫那個方法,取決於你是否需要改變資料庫的內容:
// 得到可以修改資料表(增,刪,改)的sqliteDataBase例項
database = dbOpenHelper.getWritableDatabase();

// 得到只讀(查)的sqliteDataBase例項
database  = dbOpenHelper.getReadableDatabase();
上面的程式碼,已經建立了資料庫和表,現在需要給表新增資料。有兩種方法可以給表新增資料。
像上面建立表一樣,你可以使用 execSQL() 方法執行 INSERT, UPDATE, DELETE 等語句來更新表的資料。execSQL() 方法適用於所有不返回結果的 SQL 語句。例如:
	/**
	 * 儲存一條筆記
	 *
	 * @param note
	 *
	 * @project:note
	 *
	 * @author haozi on 2012-2-27
	 */
	public void save(Note note){

		String sql = "insert into note(ntitle, ncontent, course_id, ndate, ntime, deletable) values(?,?,?,date('now'),time('now'),0);";

		db = dbHelper.getWritableDatabase();
		// 開始事務
		db.beginTransaction();
		try{
			db.execSQL(sql, new Object[]{note.getTitle(), note.getContent(), note.getCourse_id()});
			db.setTransactionSuccessful();
		}catch(Exception e){
			System.out.println("插入筆記出現錯誤!");
		}
		// 結束事務
		db.endTransaction();
		db.close();
	}
另一種方法是使用 SQLiteDatabase 物件的 insert(), update(),delete() 方法。這些方法把 SQL 語句的一部分作為引數。示例如下:
	/**
	 * 更新筆記
	 *
	 * @param note
	 *
	 * @project:note
	 *
	 * @author haozi on 2012-2-27
	 */
	public void update(Note note){

		db = dbHelper.getWritableDatabase();
		// 開始事務處理
		db.beginTransaction();

		ContentValues cv = new ContentValues();
		cv.put("ntitle", note.getTitle());
		cv.put("ncontent", note.getContent());
		cv.put("course_id", note.getId());

		db.update("note", cv, "id=?", new String[]{""+note.getId()});
		db.setTransactionSuccessful();
		// 結束事務處理
		db.endTransaction();
		db.close();
}類似 INSERT, UPDATE, DELETE,有兩種方法使用 SELECT 從 SQLite 資料庫檢索資料。
1 .使用 rawQuery() 直接呼叫 SELECT 語句:
	/**
	 * 查詢全部的筆記記錄
	 *
	 * @return
	 *
	 * @project:note
	 *
	 * @author haozi on 2012-2-27
	 */
	public ArrayList<Note> findAll(){

		ArrayList<Note> notes = new ArrayList<Note>();

		db = dbHelper.getReadableDatabase();
		String sql = "select * from note;";

		Cursor cursor = db.rawQuery(sql, null);

		while(cursor.moveToNext()){
			Note note = new Note();
			note.setId(cursor.getInt(cursor.getColumnIndex("id")));
			note.setTitle(cursor.getString(cursor.getColumnIndex("ntitle")));
			note.setContent(cursor.getString(cursor.getColumnIndex("ncontent")));
			note.setCourse_id(cursor.getInt(cursor.getColumnIndex("course_id")));
			note.setDate(cursor.getString(cursor.getColumnIndex("ndate")));
			note.setTime(cursor.getString(cursor.getColumnIndex("ntime")));
			int deletable = cursor.getInt(cursor.getColumnIndex("deletable"));
			if(deletable == 1){
				note.setDeletable(true);
			}else{
				note.setDeletable(false);
			}
			notes.add(note);
		}

		db.close();
		cursor.close();

		return notes;
}不管你如何執行查詢,都會返回一個 Cursor,這是 Android 的SQLite 資料庫遊標,使用遊標,你可以:
通過使用 getCount() 方法得到結果集中有多少記錄;
通過 moveToFirst(), moveToNext(), 和isAfterLast() 方法遍歷所有記錄;
通過 getColumnNames() 得到欄位名;
通過 getColumnIndex() 轉換成欄位號;
通過 getString(),getInt() 等方法得到給定欄位當前記錄的值;
通過 requery() 方法重新執行查詢得到遊標;
通過 close() 方法釋放遊標資源;
例如,上面查詢表中所有筆記的方法還可以這樣寫:
    /**
     * 查詢全部的筆記記錄
     *
     * @return
     *
     * @project:note
     *
     * @author haozi on 2012-2-27
     */
    public ArrayList<Note> findAll(){

        ArrayList<Note> notes = new ArrayList<Note>();

        db = dbHelper.getReadableDatabase();
        String sql = "select * from note;";

        Cursor cursor = db.rawQuery(sql, null);

        cursor.moveToFirst();
        while(!cursor.isAfterLast()){
            Note note = new Note();
            note.setId(cursor.getInt(cursor.getColumnIndex("id")));
            note.setTitle(cursor.getString(cursor.getColumnIndex("ntitle")));
            note.setContent(cursor.getString(cursor.getColumnIndex("ncontent")));
            note.setCourse_id(cursor.getInt(cursor.getColumnIndex("course_id")));
            note.setDate(cursor.getString(cursor.getColumnIndex("ndate")));
            note.setTime(cursor.getString(cursor.getColumnIndex("ntime")));
            int deletable = cursor.getInt(cursor.getColumnIndex("deletable"));
            if(deletable == 1){
                note.setDeletable(true);
            }else{
                note.setDeletable(false);
            }
            notes.add(note);
            cursor.moveToNext();
        }

        db.close();
        cursor.close();

        return notes;
    }
2.使用dataBase.query(...),這很容易,在此就不說了。
