springboot專案搭建之基礎jar包的依賴和基礎配置
阿新 • • 發佈:2019-02-08

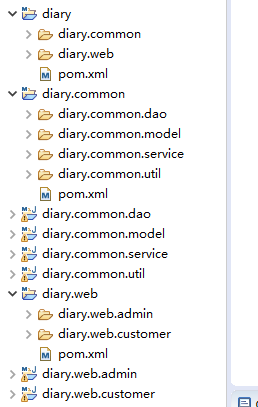
首先在diary工程的pom內引入spring-boot-starter-parent做為父工程用來管理工程內的jar包版本
匯入jar包後記得用maven重新整理diary工程
	<parent>
	      <groupId>org.springframework.boot</groupId>
	      <artifactId>spring-boot-starter-parent</artifactId>
	      <version>2.1.0.RELEASE</version>
	</parent>
然後引入spring-boot-starter-web模組
	<dependencies>

		<dependency>
		    <groupId>org.springframework.boot</groupId>
		    <artifactId>spring-boot-starter-web</artifactId>
		</dependency>

		<dependency>
		    <groupId>com.alibaba</groupId>
		    <artifactId>fastjson</artifactId>
		    <version>1.2.51</version>
		</dependency>

	</dependencies>
如果想要把專案打包成一個可執行的jar包,需要新增maven的一下元件並設定一下UTF-8編碼:
	<build>
		<plugins>
			<!-- 編譯外掛(設定原始碼的JDK版本,目的碼JDK版本,編譯字符集) -->
			<plugin>
				<groupId>org.apache.maven.plugins</groupId>
				<artifactId>maven-compiler-plugin</artifactId>
				<configuration>
					<source>1.8</source>
					<target>1.8</target>
					<encoding>UTF-8</encoding>
				</configuration>
			</plugin>
		</plugins>
	</build>
diary.web工程內加入,thymeleaf模板引擎這樣才可以訪問html檔案
<dependency>
            <groupId>org.springframework.boot</groupId>
            <artifactId>spring-boot-starter-thymeleaf</artifactId>
        </dependency>
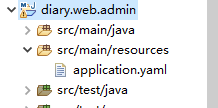
新建一個application.yaml檔案在diary.web.admin下的src/main/resources資料夾內
內容如下,值得注意的是yaml對縮排要求非常嚴格如果格式不正確的話節點將失效
# application.yaml
# Server settings (ServerProperties)
server:
  servlet:
    contextPath: /admin
  port: 8080
  address: 127.0.0.1
  sessionTimeout: 30


# Tomcat specifics
tomcat:
  accessLogEnabled: false
  protocolHeader: x-forwarded-proto
  remoteIpHeader: x-forwarded-for
  basedir:
  backgroundProcessorDelay: 30 # secs
spring:
  thymeleaf:
    cache: false
    prefix: /WEB-INF/views/
    suffix: .html
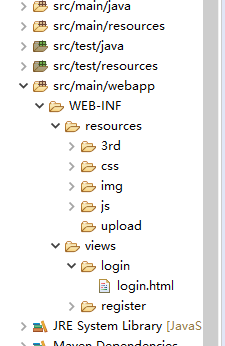
然後新建一個 型別名為src/main/webapp的資料夾用來存放html等檔案,結構如下
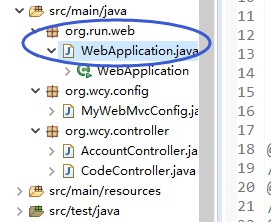
然後新建一個org.run.web包用來存放啟動器
package org.run.web;

import org.springframework.boot.SpringApplication;
import org.springframework.boot.autoconfigure.SpringBootApplication;
import org.springframework.context.annotation.ComponentScan;

/**
 * <p>Title : WebApplication</p>
 * <p>Description : 啟動類</p>
 * <p>DevelopTools : Eclipse_x64_v4.7.1</p>
 * <p>DevelopSystem : Windows 10</p>
 * <p>Company : org.wcy</p>
 * @author : WangChenYang
 * @date : 2018年11月14日 下午9:10:14
 * @version : 0.0.1
 */
@SpringBootApplication
//@ComponentScan用於配置掃描org.wcy.web之外的包下面的類
@ComponentScan(basePackages={"org.wcy"})
public class WebApplication {

	public static void main(String[] args) {
		SpringApplication sa=new SpringApplication(WebApplication.class);
		// 禁用devTools熱部署
		//System.setProperty("spring.devtools.restart.enabled", "false");
		// 禁用命令列更改application.properties屬性
		sa.setAddCommandLineProperties(false);
		sa.run(args);
	}
}
org.wcy.config包內的MyWebMvcConfig.java用來配置靜態檔案訪問路徑
package org.wcy.config;

import org.springframework.context.annotation.Configuration;
import org.springframework.web.servlet.config.annotation.ResourceHandlerRegistry;
import org.springframework.web.servlet.config.annotation.WebMvcConfigurationSupport;

/**
 * <p>Title : MyWebMvcConfig</p>
 * <p>Description : 自定義靜態資源對映路徑和靜態資源存放路徑</p>
 * <p>DevelopTools : Eclipse_x64_v4.7.1</p>
 * <p>DevelopSystem : Windows 10</p>
 * <p>Company : org.wcy</p>
 * @author : WangChenYang
 * @date : 2018年11月14日 下午9:07:33
 * @version : 0.0.1
 */
@Configuration
public class MyWebMvcConfig extends WebMvcConfigurationSupport {

	/**
	 * 在Spring新增攔截器之前先建立攔截器物件,這樣就能在Spring對映這個攔截器前,把攔截器中的依賴注入的物件給初始化完成了。
	 * </br>避免攔截器中注入的物件為null問題。
	 * @return
	 */
	/*@Bean
	public SecurityInterceptor getSecurityInterceptor(){
		return new SecurityInterceptor();
	}*/

	/**
	 * 新增自定義靜態資源對映路徑和靜態資源存放路徑(圖片)
	 */
	@Override
	public void addResourceHandlers(ResourceHandlerRegistry registry) {
		System.out.println("配置靜態資源");
		registry.addResourceHandler("/resources/**").addResourceLocations("classpath:/WEB-INF/resources/");
		super.addResourceHandlers(registry);
	}

	/**
	 * 新增攔截器
	 * @param registry
	 */
	/*@Override
	public void addInterceptors(InterceptorRegistry registry) {
		// 多個攔截器組成一個攔截器鏈
		// addPathPatterns 用於新增攔截規則
		// excludePathPatterns 使用者排除攔截
		registry.addInterceptor(getSecurityInterceptor()).addPathPatterns("/**");
		super.addInterceptors(registry);
	}*/

}
測試controller訪問login.html
package org.wcy.controller;

import org.springframework.web.bind.annotation.RequestMapping;

@Controller
public class TestController {

	/**
	 * @描述:返回登陸介面
	 * @建立人:WangChenYang
	 * @建立時間:2018年11月16日 上午11:24:41
	 * @return
	 */
	@RequestMapping("/login.html")
	public String login() {
		return "login/login";
	}

}
以上就是springboot的基本配置,接下來我將會繼續學習springboot並更新部落格,這是我的QQ1900353090希望可以和大家一起學習進步^_^
