
HTML 檔案上傳框美化
阿新 • • 發佈:2019-02-08
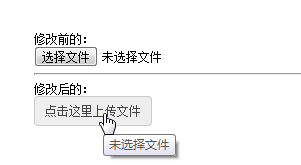
<a href="javascript:;" class="a-upload">
    <input type="file" name="" id="">點選這裡上傳檔案
</a>

<a href="javascript:;" class="file">選擇檔案
    <input type="file" name="" id="">
</a>
CSS樣式1:
CSS樣式2/*a upload */ .a-upload { padding: 4px 10px; height: 20px; line-height: 20px; position: relative; cursor: pointer; color: #888; background: #fafafa; border: 1px solid #ddd; border-radius: 4px; overflow: hidden; display: inline-block; *display: inline; *zoom: 1 } .a-upload input { position: absolute; font-size: 100px; right: 0; top: 0; opacity: 0; filter: alpha(opacity=0); cursor: pointer } .a-upload:hover { color: #444; background: #eee; border-color: #ccc; text-decoration: none }
.file {
    position: relative;
    display: inline-block;
    background: #D0EEFF;
    border: 1px solid #99D3F5;
    border-radius: 4px;
    padding: 4px 12px;
    overflow: hidden;
    color: #1E88C7;
    text-decoration: none;
    text-indent: 0;
    line-height: 20px;
}
.file input {
    position: absolute;
    font-size: 100px;
    right: 0;
    top: 0;
    opacity: 0;
}
.file:hover {
    background: #AADFFD;
    border-color: #78C3F3;
    color: #004974;
    text-decoration: none;
}
1.
2.

美化後顯示檔名
上面美化,把預設顯示的檔名也給隱藏掉了,那麼如何顯示檔名稱呢?沒關係,我們可以用jquery來獲取檔案的檔名。
我們可以寫個change事件
$(".a-upload").on("change","input[type='file']",function(){
    var filePath=$(this).val();
    if(filePath.indexOf("jpg")!=-1 || filePath.indexOf("png")!=-1){
        $(".fileerrorTip").html("").hide();
        var arr=filePath.split('\\');
        var fileName=arr[arr.length-1];
        $(".showFileName").html(fileName);
    }else{
        $(".showFileName").html("");
        $(".fileerrorTip").html("您未上傳檔案,或者您上傳檔案型別有誤!").show();
        return false
    }
})