Spawn-FCGI安裝 Nginx與fastcgi簡單案例
文章轉自:http://blog.csdn.net/Bingo_Zq/article/details/52453114
以獲取當 前最新的版本。tar -zxvf spawn-fcgi-x.x.x.tar.gz
cd spawn-fcgi-x.x.x.tar.gz
./configure。
make
sudo make install
如果遇到 以下錯誤:
如果遇到 以下錯誤:
. /autogen. sh: x: autoreconf: not found- 1
因為沒有安裝automake 工具, ubuntu用 下面的命令安裝好就可以了
sudo apt-get install autoconf automake libtool - 1
spawn-fcgi的幫 助資訊可以通過man spawn-fcgi或spawn-fcgi –h獲得, 下面是部分常用
spawn-fcgi引數資訊:
Nginx與FastCGI
f 指定呼叫 FastCGI的程序的執行程式位置
- a 繫結到 地址addr。
- p 繫結到 埠 port。
- s 繫結到 unix domain socket
- C 指定產 生的FastCGI的程序數, 預設為 5。 ( 僅用 於PHP)
- P 指定產 生的程序的PID檔案路徑。
- F 指定產 生的FastCGI的程序數( C的CGI用 這個)
- u和- g FastCGI使用 什麼 身 份( - u 用 戶 - g 用 戶 組) 執行,
CentOS下可以使用 apache用 戶 , 其他的根據情況配置, 如nobody、 www- data等。
fastgci應 用 程式
使用 C/C++編寫 fastcgi應 用 程式, 可以使用 FastCGI軟體開發套件或者其它開發框架, 如
fastcgi++。
本文使用 FastCGI軟體開發套件——fcgi
http://www.filewatcher.com/d/Gentoo/distfiles/Other/fcgi-2.4.1 -SNAP-
091 0052249.tar.gz.61 4929.html
通過此套件可以輕鬆編寫 fastcgi應 用 程式, 安裝fcgi:
. /configue
make
如果編譯出 現類似以下錯誤:
6.3 Nginx與FastCGI
94
cgio. cpp: In destructor ’ virtual fcgi_streambuf: : ~fcgi_streambuf( ) ’ :
fcgio. cpp: 50: error: ’ EOF’ was not declared in this scope
fcgio. cpp: In member function ’ virtual int fcgi_streambuf: : overflow( int) ’ :
fcgio. cpp: 70: error: ’ EOF’ was not declared in this scope
fcgio. cpp: 75: error: ’ EOF’ was not declared in this scope
fcgio. cpp: In member function ’ virtual int fcgi_streambuf: : sync( ) ’ :
fcgio. cpp: 86: error: ’ EOF’ was not declared in this scope
fcgio. cpp: 87: error: ’ EOF’ was not declared in this scope
fcgio. cpp: In member function ’ virtual int fcgi_streambuf: : underflow( ) ’ :
fcgio. cpp: 113: error: ’ EOF’ was not declared in this scope
make[2] : *
make[2] : Leaving directory
/root/downloads/fcgi- 2. 4. 1- SNAP- 0910052249/libfcgi'
make[1] : *** [all- recursive] Error 1
make[1] : Leaving directory
/root/downloads/fcgi- 2. 4. 1- SNAP- 0910052249’ make: * [all] Error 2
解決辦法:
cd include
sudo vi fcgio.h- 1
- 2
標頭檔案新增
#include <stdio.h>- 1
再次執行
make
sudo make install
編寫一個fcgi簡單的應用程式:
fcgi_demo.c
#include <stdio. h>
#include <stdlib. h>
#include <string. h>
#include <unistd. h>
#include "fcgi_stdio. h"

int main( int argc, char *argv[] )
{
int count = 0;
while ( FCGI_Accept( ) >= 0) {
printf( "Content- type: text/html\r\n") ;
printf( "\r\n") ;
printf( "<title>Fast CGI Hello! </title>") ;
printf( "<h1>Fast CGI Hello! </h1>") ;
printf( "Request number %d running on host <i>%s</i>\n", ++count, getenv( "SERVE
R_NAME") ) ;
}
return 0;
}- 1
- 2
- 3
- 4
- 5
- 6
- 7
- 8
- 9
- 10
- 11
- 12
- 13
- 14
- 15
- 16
- 17
- 18
- 19
*編譯:
gcc fcgi_demo.c -o demo -lfcgi- 1
開啟瀏覽器
192.168.21.128- 1
配置fastcgi.conf
cd usr/local/nginx/conf
sudo vi nginx.conf- 1
- 2
把下面程式碼複製到
nginx.conf檔案裡
location /demo {
                      fastcgi_pass 127.0.0.1:9001;
                     fastcgi_index demo.cgi;
                     include fastcgi.conf;
                         }
         location = /upload.cgi{
                      root html;
                      index upload.html;
                                }

          location = /upload/UploadAction{
                      fastcgi_pass 127.0.0.1:9002;
                      fastcgi_index echo.cgi;
                      include fastcgi.conf;
}- 1
- 2
- 3
- 4
- 5
- 6
- 7
- 8
- 9
- 10
- 11
- 12
- 13
- 14
- 15
將zyfile.tar.gz複製到
/usr/local/nginx/html
解壓
tar -zxvf zyfile.tar.gz
cd zyfile.tar.gz
./configure
make
sudo make install- 1
- 2
- 3
- 4
- 5
然後將demo.html改名為upload.html
sudo mv demo.html upload.html- 1
並把所有檔案包括資料夾移動到
/usr/local/nginx/html目錄下
sudo mv * /usr/local/nginx/html- 1
會根據配置好的檔案,去/usr/local/nginx/html目錄下尋找zy工具。如果目錄下沒有移動過來的檔案,則會出現404錯誤。
依次執行
spawn-fcgi -a 127.0.0.1 -p 9001 -f ./test/echo

spawn-fcgi -a 127.0.0.1 -p 9002 -f ./test/echo- 1
- 2
- 3
出現兩次PID= xxxxx則成功
重啟nginx
sudo /usr/local/nginx/sbin/ -s reload- 1
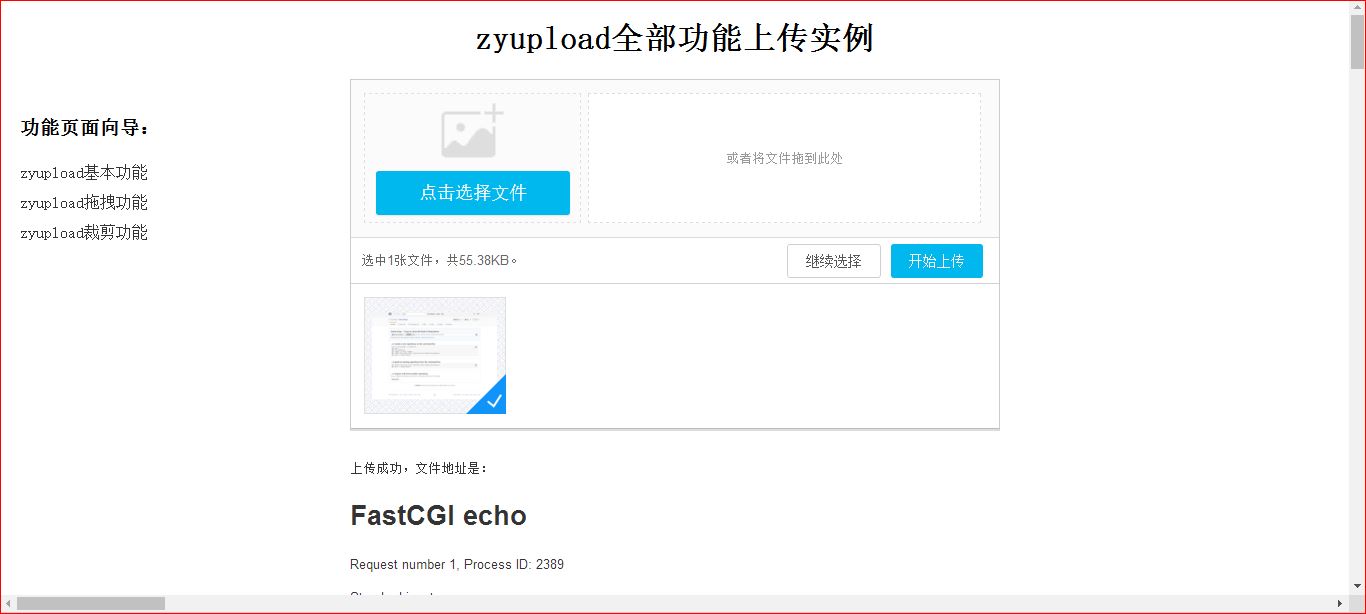
開啟瀏覽器,輸入ip地址192.168.21.128/upload.html
出現上傳介面
選擇檔案,上傳成功!
系統重啟,需進行以下步驟操作:
進入git
make clean

make- 1
- 2
- 3
依次執行
spawn-fcgi -a 127.0.0.1 -p 9001 -f ./test/echo

spawn-fcgi -a 127.0.0.1 -p 9002 -f ./test/echo- 1
- 2
- 3
出現兩次PID= xxxxx則成功
重啟nginx
sudo /usr/local/nginx/sbin/ -s reload- 1
開啟瀏覽器,輸入ip地址192.168.21.128/upload.html
出現上傳介面
選擇檔案,上傳成功!