
利用MQTT資訊協議來控制piglow燈光
在先前的一篇文章"利用Snappy Ubuntu來控制piglow燈光"中,我們已經使用了webserver的方法來控制我們的piglow.在IoT世界裡,MQTT資訊協議也是用得非常多的一種協議.它是一個輕量級的通訊協議.它基於一種訂購(subscribe)及釋出(publish)的機制.用簡單的話說,就像我們的微信公眾號一樣,我們訂購一個公眾號,就可以收到所有從這個公眾號裡發出的訊息.MQTT也是同樣的道理.如果你想聽到一個topic的話語,你可以訂購這個topic.然後所有在這個topic中釋出的訊息,都將被收到.MQTT已經被廣泛應用於各種領域,甚至是一些網路環境不是特別好的環境中.它具有使用資源少,傳輸資料精簡,需要的系統功耗低等特點.
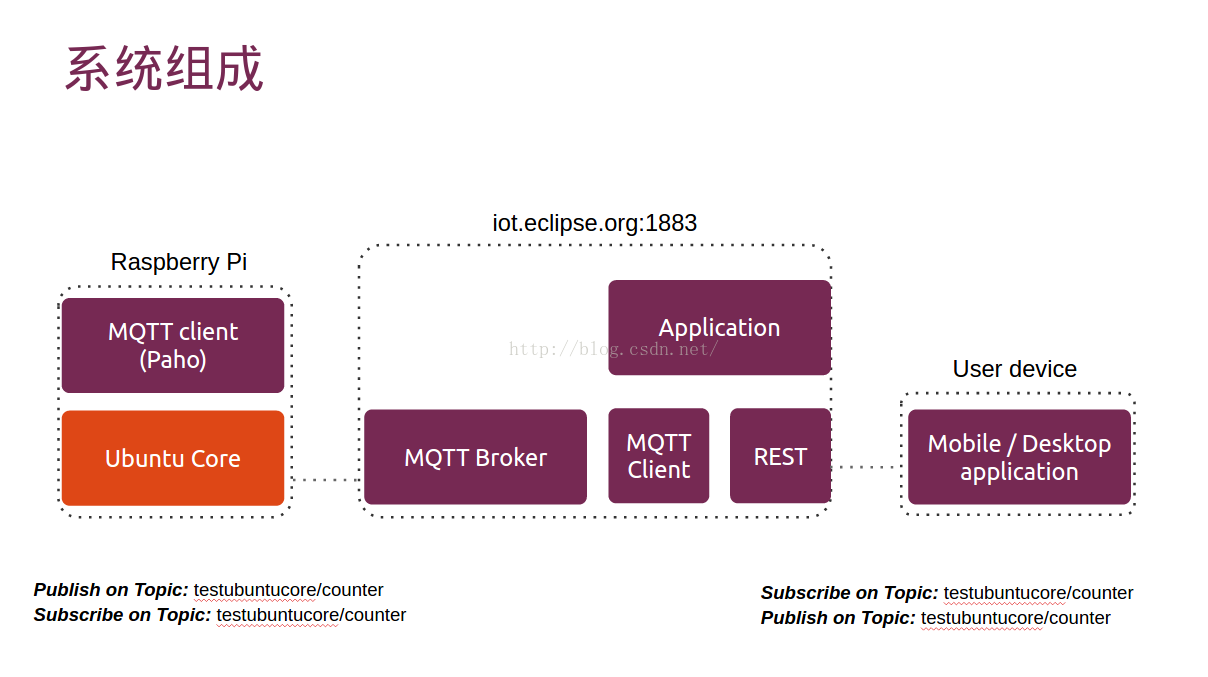
在今天的例程當中,我們將使用MQTT協議來控制我們在樹莓派中的piglow燈光.當然,我們也可以從樹莓派中得到一些釋出的資訊資訊.我們的系統組成如下:
1)Go client
我們首先參閱MQTT的paho客戶端實現.它的這個庫提供了一個使用TCP/Websocket/TLS向MQTT broker進行連線的功能.在我們的設計中,它運行於我們的樹莓派Snappy Ubuntu之中.針對我們的例程,我們的設計非常簡單:mqtt-piglow.go
package main

import (
  	"fmt"
 	 //import the Paho Go MQTT library
 	 MQTT "git.eclipse.org/gitroot/paho/org.eclipse.paho.mqtt.golang.git"
 	 "os"
  	"time"
)

const TOPIC = "testubuntucore/counter"

//define a function for the default message handler
var f MQTT.MessageHandler = func(client *MQTT.Client, msg MQTT.Message) {
  	fmt.Printf("Recived TOPIC: %s\n", msg.Topic())
  	fmt.Printf("Received MSG: %s\n", msg.Payload())

	s := string(msg.Payload()[:])
	fmt.Printf("check: %t\n",  (s == "on"))

	if ( s == "on" ) {
		fmt.Println("on is received!")
		TurnAllOn()
	} else if ( s == "off" )  {
		fmt.Println("off is received!")
		GlowOff()
	}
}

func main() {
	//create a ClientOptions struct setting the broker address, clientid, turn
	//off trace output and set the default message handler
	opts := MQTT.NewClientOptions().AddBroker("tcp://iot.eclipse.org:1883")

	opts.SetClientID("go-simple")
	opts.SetDefaultPublishHandler(f)

	//create and start a client using the above ClientOptions
	c := MQTT.NewClient(opts)
	if token := c.Connect(); token.Wait() && token.Error() != nil {
	 	panic(token.Error())
	}

	//subscribe to the topic and request messages to be delivered
	//at a maximum qos of zero, wait for the receipt to confirm the subscription
	if token := c.Subscribe(TOPIC, 0, nil); token.Wait() && token.Error() != nil {
	 	fmt.Println(token.Error())
	 	os.Exit(1)
	}

	// Pubish messages to TOPIC at qos 1 and wait for the receipt
	//from the server after sending each message
	i := 0;
	for true {
	 	text := fmt.Sprintf("this is msg #%d! from MQTT piglow", i)
	 	token := c.Publish(TOPIC, 0, false, text)
		token.Wait()
		time.Sleep(5 *time.Second)
		i++;
	}

	time.Sleep(3 * time.Second)

	//unsubscribe from /go-mqtt/sample
	if token := c.Unsubscribe(TOPIC); token.Wait() && token.Error() != nil {
	 	fmt.Println(token.Error())
		os.Exit(1)
	}

	c.Disconnect(250)
}
在上面的程式碼中,我們定義了一個TOPIC:
const TOPIC = "testubuntucore/counter"在我們的程式碼中,我們訂購了這個TOPIC:
	if token := c.Subscribe(TOPIC, 0, nil); token.Wait() && token.Error() != nil {
	 	fmt.Println(token.Error())
	 	os.Exit(1)
	}
每當有任何的訊息釋出在這個TOPIC上時,我們的client就會收到訊息,並在如下的handler中進行處理:
//define a function for the default message handler
var f MQTT.MessageHandler = func(client *MQTT.Client, msg MQTT.Message) {
  	fmt.Printf("Recived TOPIC: %s\n", msg.Topic())
  	fmt.Printf("Received MSG: %s\n", msg.Payload())

	s := string(msg.Payload()[:])
	fmt.Printf("check: %t\n",  (s == "on"))

	if ( s == "on" ) {
		fmt.Println("on is received!")
		TurnAllOn()
	} else if ( s == "off" )  {
		fmt.Println("off is received!")
		GlowOff()
	}
}
在我們的應用中,如果我們收到一個字串是"on",我們就開啟所有的燈;如果我們收到的是"off"字串時,我們就關掉所有的燈.
為了能夠在我們其它的client中偵聽到從這個client中發出的任何的訊息,我們有意地在程式中加入如下的程式碼:
	// Pubish messages to TOPIC at qos 1 and wait for the receipt
	//from the server after sending each message
	i := 0;
	for true {
	 	text := fmt.Sprintf("this is msg #%d! from MQTT piglow", i)
	 	token := c.Publish(TOPIC, 0, false, text)
		token.Wait()
		time.Sleep(5 *time.Second)
		i++;
	}
當然在實際的應用中,我們可以傳送任何我們感興趣的資訊,也可以定義其它的TOPIC進行傳輸.
值得注意的是,我們使用了一個免費的MQTT broker,它來自於eclipse:
	//create a ClientOptions struct setting the broker address, clientid, turn
	//off trace output and set the default message handler
	opts := MQTT.NewClientOptions().AddBroker("tcp://iot.eclipse.org:1883")
我們整個專案的原始碼可以通過如下的方式得到:
$ git clone https://github.com/liu-xiao-guo/mqtt-piglow我們可以參照"如何為我們的Snappy Ubuntu應用編譯並打包Snap(2)"中介紹的那樣來生成我們在樹莓派上所需要的snap檔案並安裝上去.在實際操作中,由於下載包"golang.org/x/net/websocket"需要打洞(VPN)才可以下載.目前在樹莓派上還沒有好的辦法來安裝VPN,所有建議大家在desktop的環境中通過VPN的方式下載完整個parts,然後通過scp的方法把所有的檔案都考入到樹莓派中:
$ ls
icon.png  parts  snapcraft.yaml  src
$ scp -r * [email protected]:/home/ubuntu/apps/docker/1.6.2.004/work/mqtt-piglow$ snapcraft build
$ snapcraft stage
$ snapcraft snap
$ snapcraft assemble等我們安裝完我們的應用後,我們一定要使用如下的方法來允許我們的應用來訪問我們的裝置:
$ sudo snappy hw-assign mqtt-piglow.sideload /dev/i2c-12)Ubuntu phone client
為了測試我的應用,我設計了一個Ubuntu phone的客戶端.它的原始碼可以在如下的地址找到$ git clone https://github.com/liu-xiao-guo/mqttmain.qml
import QtQuick 2.0
import Ubuntu.Components 1.1
import Mqtt 1.0
/*!
    \brief MainView with a Label and Button elements.
*/

MainView {
    // objectName for functional testing purposes (autopilot-qt5)
    objectName: "mainView"

    // Note! applicationName needs to match the "name" field of the click manifest
    applicationName: "mqtt.liu-xiao-guo"

    /*
     This property enables the application to change orientation
     when the device is rotated. The default is false.
    */
    //automaticOrientation: true

    // Removes the old toolbar and enables new features of the new header.
    useDeprecatedToolbar: false

    width: units.gu(60)
    height: units.gu(85)

    Page {
        id: page
        title: i18n.tr("mqtt")

        MQTT {
            id: _MQTT
//            host: "mqtt.thingstud.io"
            host: "iot.eclipse.org"
            port: 1883
            topic: "testubuntucore/counter"
            username: "guest"
            password: "guest"
            onMessageReceived: {;
                _ListModel_Messages.append({"message":message});
            }
            onDisconnected: {
                _MQTT.connect();
            }
        }

        ListModel {
            id: _ListModel_Messages
        }

        Rectangle {
            radius: 5
            color: "#ffffff"
            anchors.fill: _ListView
        }

        ListView {
            id: _ListView
            clip: true
            anchors.fill: parent
            anchors.topMargin: 20
            anchors.leftMargin: 20; anchors.rightMargin: 20
            anchors.bottomMargin: 250 // This changes the things
            highlightMoveDuration: 450
            cacheBuffer: 10000
            model: _ListModel_Messages
            onCountChanged: if(count>1) currentIndex=count-1; else currentIndex = 0;
            delegate: Rectangle {
                height: 60
                width: ListView.view.width
                radius: 5
                Text {
                    anchors.fill: parent
                    anchors.margins: 15
                    color: "#000000"
                    text: model.message
                    wrapMode: Text.WordWrap
                }
                Rectangle {
                    width: parent.width
                    height: 1
                    color: "#f1f1f1"
                    anchors.bottom: parent.bottom
                }
            }
        }

        Rectangle {
            anchors.fill: _TextArea
            color: "#ffffff"
            radius: 5
            anchors.margins: -15
        }

        TextEdit {
            id: _TextArea
            anchors.bottom: control.top
            anchors.bottomMargin: 20
            anchors.leftMargin: 35
            anchors.rightMargin: 35
            anchors.left: parent.left
            anchors.right: parent.right
            height: 140
            font.pixelSize: 50
            Keys.onEnterPressed: _Rectangle_Submit.action();
        }

        Row {
            id: control
            anchors.bottom: parent.bottom
            anchors.bottomMargin: 20
            anchors.horizontalCenter: parent.horizontalCenter
            spacing: 20

            Button {
                id: sendMessage
                text: "Send Message"
                onClicked: {
                    console.log("Going to publish message: " + _TextArea.text)
                    _MQTT.publishMessage(_TextArea.text);
                    _TextArea.text = "";
                    Qt.inputMethod.hide();
                }
            }

            Button {
                id: lighton
                text: "Light on"
                onClicked: {
                    console.log("Light on is clicked")
                    _MQTT.publishMessage("on");
                }
            }

            Button {
                id: lightoff
                text: "Light off"
                onClicked: {
                    console.log("Light off is clicked")
                    _MQTT.publishMessage("off");
                }
            }
        }
    }
}
它的實現非常簡單.
        MQTT {
            id: _MQTT
//            host: "mqtt.thingstud.io"
            host: "iot.eclipse.org"
            port: 1883
            topic: "testubuntucore/counter"
            username: "guest"
            password: "guest"
            onMessageReceived: {;
                _ListModel_Messages.append({"message":message});
            }
            onDisconnected: {
                _MQTT.connect();
            }
        }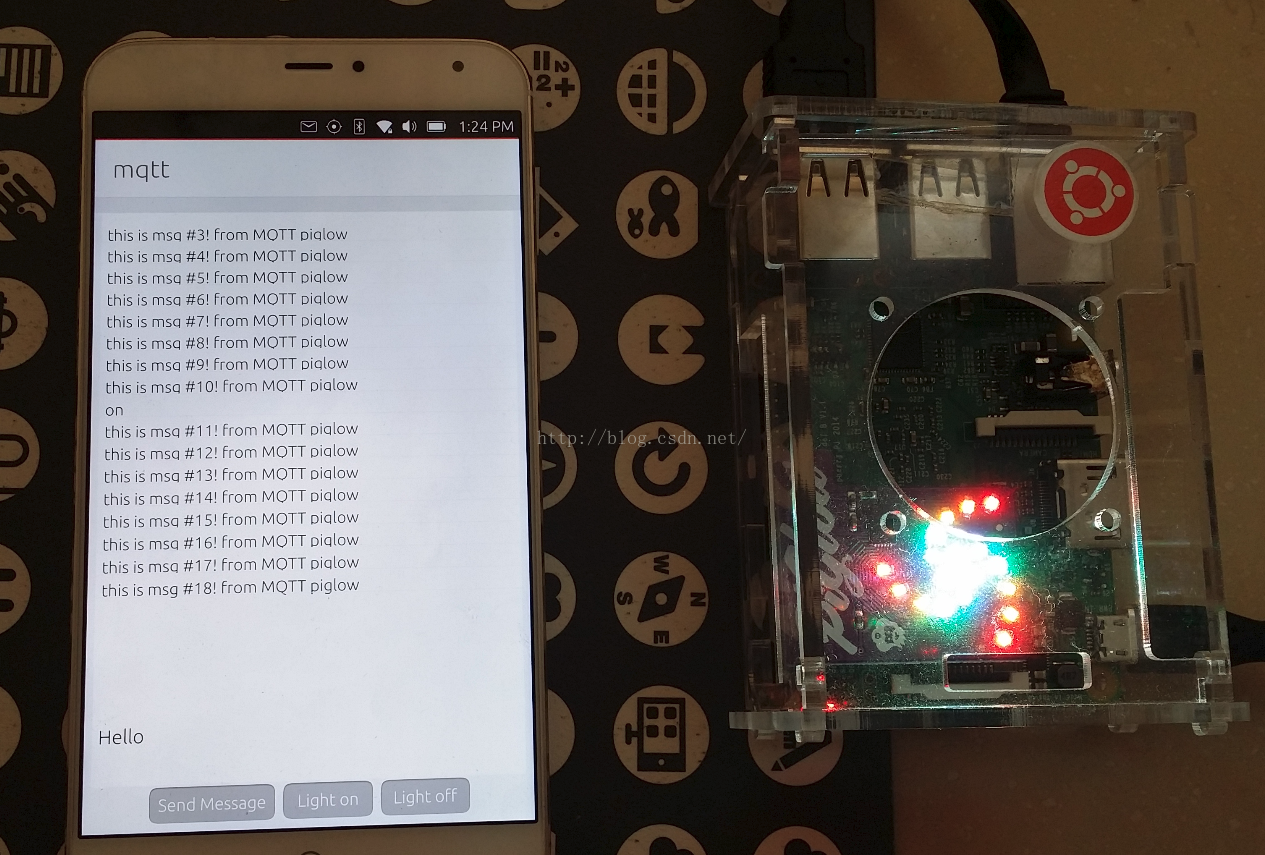
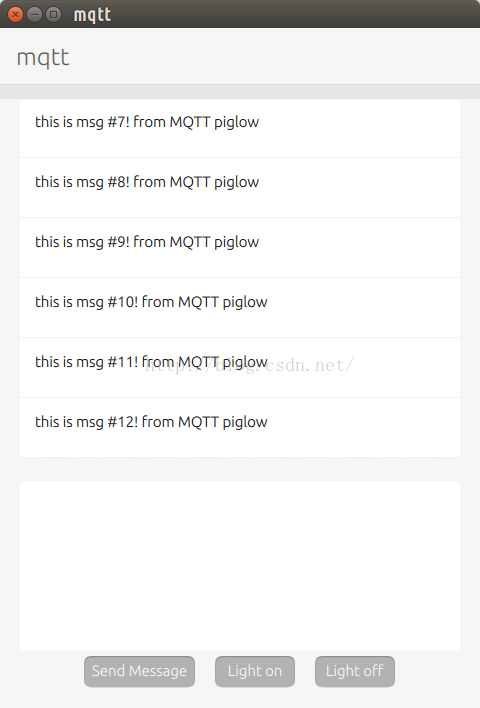
在介面的最上面,我們可以看到來做樹莓派的訊息(上面所說的心跳訊息).當我們按下"Light on"按鈕後,它通MQTT協議,向我們定義的TOPIC釋出一個叫做"on"的訊息.樹莓派偵聽到這個訊息後,就會開啟所有的燈(如上圖所示).當然,我們也可以在螢幕的下角的地方,發動一個"Hello,the world"的訊息給我們的樹莓派:
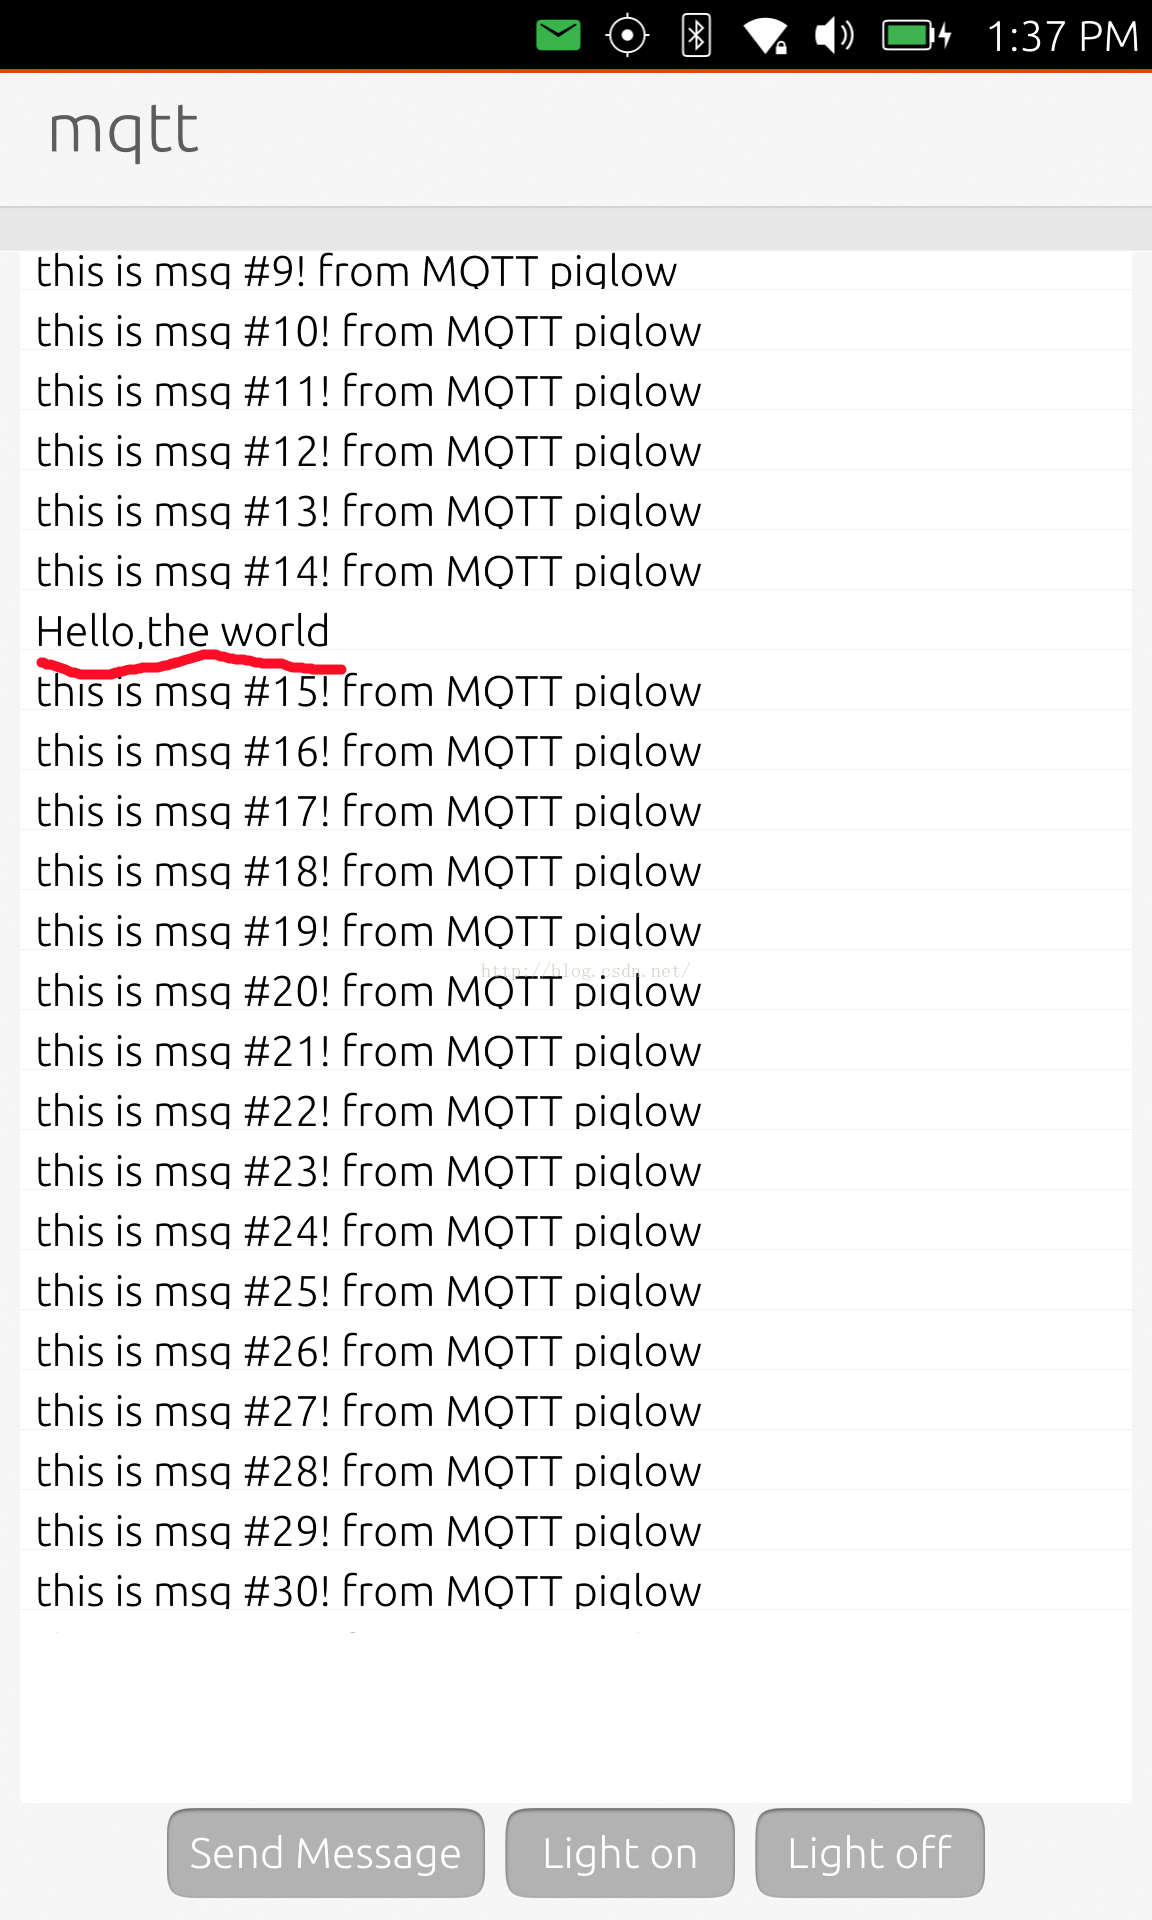
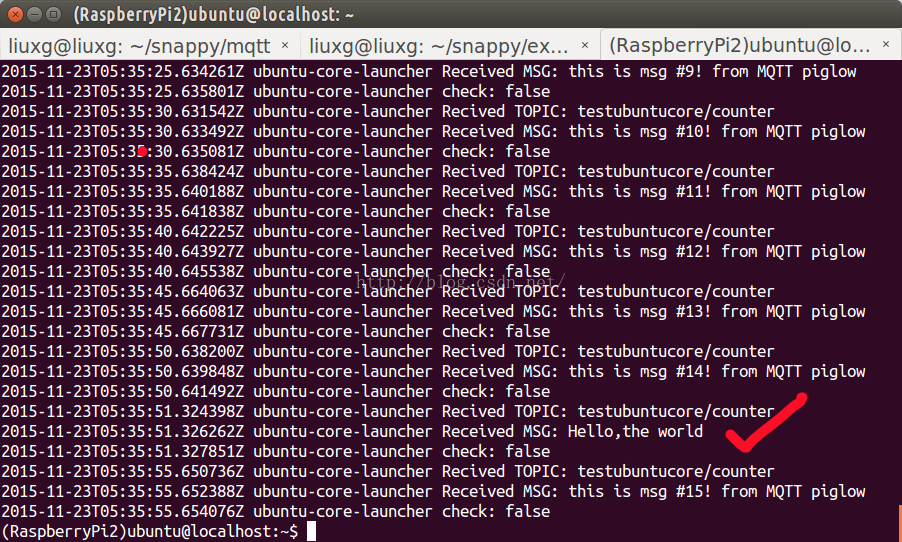
那麼在我們的樹莓派中可以使用如下的方法來檢視我們收到的資訊:
$ sudo snappy service mqtt-piglow從上面我們可以看到我們所傳送的訊息"Hello, the world".在實際的應用中,我們傳輸json格式的資料以更加有效地解析資料.
相關推薦
利用MQTT資訊協議來控制piglow燈光
在先前的一篇文章"利用Snappy Ubuntu來控制piglow燈光"中,我們已經使用了webserver的方法來控制我們的piglow.在IoT世界裡,MQTT資訊協議也是用得非常多的一種協議.它是一個輕量級的通訊協議.它基於一種訂購(subscribe)及釋出(pub
Ubuntu利用TCP協議來獲取server時間
intro term apt 簡單 p s iss stdout tcp tcp連接 Linux利用TCP協議來獲取server時間 這裏使用Unix網絡編程裏面的一個小程序,該client建立一個到server的TCP連接,然後讀取由server以直觀
ThinkPHP5.0下,利用Cookie和Session來儲存使用者資訊
利用tp5框架封裝好的Cookie類和Session類。若發現過期時間沒有生效,可以試試清除快取。 登入頁面Login.php <?php/** * Created by PhpStorm. * User: zjl * Date: 2018/11/1 * Time: 15:21 */namespac
ICMP網路控制資訊協議
ICMP(控制資訊協議) Internet Control Message Protocol經常被認為是IP層的一個組成部分。用於在IP主機,路由器之間傳遞控制訊息。 控制訊息是指網路通不通,主機是否可達,路由是否可用等網路本身的訊息。 目的:檢測網路的連線情況。 ICMP報文通常被I P層或更高
ICMP網路控制資訊協議(二)
ICMP重定向 •R1傳送一個重定向報文給主機172.16.1.1用R2作為閘道器去到達10.1.1.1 •何時傳送重定向報文: 1.資訊包進入路由器的介面是資訊包被髮送的同一個介面。 2.IP源地址的子網或網路是路由資訊包的下一跳IP地址的相同子網或網路。 3.資料包不來源路由。
Python利用元類來控制實例創建
解決 lan singleton blog 定制化 http none reat ins 問題: 改變實例創建方式,以此來實現單例模式,緩存或者其他類似的特性。 解決方法: 如果想定制化創建實例的過程,可以通過定制一個元類並以某種方式重新實現它的__call__()
SAP 收貨時,根據資訊記錄中的價格段來控制收貨價格
問題描述 KF HK在2011-08-22做發票校驗時,發現收貨的價格與發票中的價格不符,檢查發現,PO中的價格為:4.4 ,在2011-07-22 時的105收貨產生的FI憑證價格為:5.63,即:收貨的價格是從info.rec 中獲取的。 HK PO:
利用javascript協議來減少簡化FRAME SRC屬性的設定
最近寫頁面遇到一個需要frame的需求,開始時,我為每個frame的src定義了一個頁面檔案,後來在<javascript應用程式經典例項>一書中看到一個更簡單的辦法,利用javascript協議就不需要為每個src屬性都定義一個檔案了,這就減少了不必要的檔案,該
【android】利用BuildConfig.DEBUG來控制日誌的輸出
前言 在Android 應用程式開發中,不可避免地會常常輸出各種除錯資訊,通常我們會使用android.util.Log類輸出該類日誌資訊(這是推薦使用的方式)。然而,在專案釋出的時候,我們常常需要關閉這些冗餘的Log資訊,手工關閉Log相當不方
利用 GCC 的 __attribute__ 屬性的section選項 來控制 資料區的基地址
http://bigbluesmth.bokee.com/5590910.html 利用 GCC 的 __attribute__ 屬性的section選項 來控制 資料區的基地址 樣例程式碼 file: test.section.c #include#includein
利用vue-router來控制使用者登入許可權
原理 用vue-router來控制使用者登入許可權的原理,實際上就是應用了vue-router提供的router.beforeEach來註冊一個全域性鉤子。具體用法 根據判斷是否具有登入許可權來設定路由跳轉,如果沒有全選統一跳轉到登入頁面。 第一步:新
ICMP(網路控制資訊協議 internet control message protocol)
1.IMCP協議介紹 前面講到了,IP協議並不是一個可靠的協議,它不保證資料被送達,那麼,自然的,保證資料送達的工作應該由其他的模組來完成。其中一個重要的模組就是ICMP(網路控制報文)協議。 當傳送IP資料包發生錯誤--比如主機不可達,路由不可達等等,ICMP協議將會把錯
RFC792- Internet控制資訊協議(ICMP)中文版
【介紹】 在被稱為Catenet的系統中,IP協議被用作主機到主機的資料報服務。網路連線裝置稱為閘道器。這些閘道器通過閘道器到閘道器協議(GGP)相互交換用於控制的資訊。通常,閘道器或目的主機將和源主機通訊,例如,為報告在資料報過程中的錯誤。為了這個目的才使用了ICMP,它
利用Delphi裡面的IdIcmpClient控制來檢測網路是否正常連通
1、引用以下幾個單元 IdBaseComponent, IdComponent, IdRawBase, IdRawClient, IdIcmpClient; 2、函式模組 ---------------------------------------------
Internet控制資訊協議(轉)
Internet控制資訊協議(ICMP) 1.介紹 在被稱為Catenet的系統中,IP協議被用作主機到主機的資料報服務。網路連線裝置稱為閘道器。這些閘道器通過閘道器到閘道器協議(GGP)相互交換用 於控制的資訊。通常,閘道器或目的主機將和源主機通訊,例如,為報告在資料報
利用緩衝輸入流來讀取控制檯資訊,作為一個簡單的文字編輯器
package com.example.shoumahis; import java.io.BufferedReader; import java.io.IOException; import java.io.InputStreamReader; public class
android如何利用基於Http 協議的WebService服務來獲取遠端資料庫資料
初學android,這個問題困擾了多天,在搜尋引擎及論壇各位高手的幫助下,現在終於給搞定了,在這裡分享給大家,希望對大家有所幫助!(其實本來是嘗試用SOAP協議的,試了n天,無果,無奈又只能回到http了!)先來看看伺服器端吧! 首先新建一個ASP.NET Web服務應用程
利用BeEF REST API自動化控制僵屍主機
.... app https uri 應該 啟動 exception 但是 extension 本文已發布於Freebuf,屬於原創獎勵計劃,未經許可禁止轉載。 http://www.freebuf.com/articles/network/137662.html
利用正則實現彩色控制臺輸出
返回 otto get onos soft turn nowrap itl 背景 近期忙了一陣less的二次開發的工作,期間遇到了不少須要向控制臺輸出彩色文字的需求。翻了下曾經同事的代碼,發現要麽自己拼轉義字符串,要麽使用一些不太好用的第三方庫。總之都不是非常合
從輸入的值中獲取最大值和最小值,輸入0後結束(利用do_while boolean isRight來標識用戶輸入)
bool out 用戶 system efault 最大 pub string void mport java.util.Scanner; public class DoWhile2 {public static void main(String[] args) { int