Shader山下(六)鏡面高光
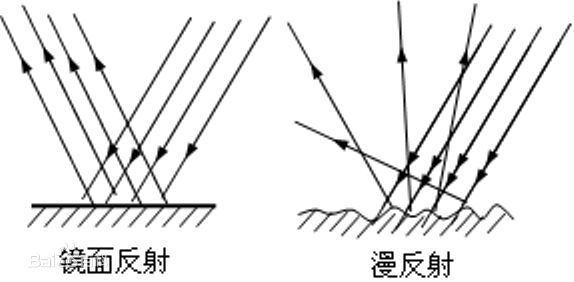
Shader山下(二)光照模型中介紹了漫反射的光照模型,漫反射是投射在粗糙表面上的光向各個方向反射的現象。與之相對的是鏡面反射,也就是當平行入射的光線射到這個反射面時,仍會平行地向一個方向反射出來的現象。
二者區別如圖:
Unity裡內建的漫反射光照模型是Lambert,而鏡面高光模型則是BlinnPhong。
首先我們還是需要一個最簡單的漫反射著色器:
Shader "Custom/SpecularTest" {
	Properties {
		_MainTex ("Albedo (RGB)", 2D) = "white" {}
	}
	SubShader {
		Tags { "RenderType"="Opaque"}
		LOD 200

		CGPROGRAM
		#pragma surface surf Lambert

		sampler2D _MainTex;

		struct Input {
			float2 uv_MainTex;
		};

		void surf (Input IN, inout SurfaceOutput o) {
			fixed2 texUV = IN.uv_MainTex;
			fixed4 c = tex2D (_MainTex, texUV);
			o.Albedo = c.rgb;
			o.Alpha = c.a;
		}

		ENDCG
	}
	FallBack "Diffuse"
}
修改pragma這一句:
#pragma surface surf BlinnPhong這樣就是用了BlinnPhong的高光模型,但是應用到場景裡時,並沒有什麼變化,因為引數還沒有設定。
Properties裡新增:
		_SpecColor ("Specular Color", Color) = (1,1,1,1)
		_SpecPower ("Specular Power", Range(0,1)) = 0.05
_SpecGloss ("Specular Gloss", Range(0,2)) = 1因為Unity3D已經宣告過了_SpecColor,所以只需要在SubShader裡宣告:
		fixed _SpecPower;
		fixed _SpecGloss;
修改surf方法:
void surf (Input IN, inout SurfaceOutput o) {
fixed2 texUV = IN.uv_MainTex;
fixed4 c = tex2D (_MainTex, texUV);
o.Albedo = c.rgb;
o.Alpha = c.a;
o.Specular = _SpecPower;
o.Gloss = _SpecGloss;
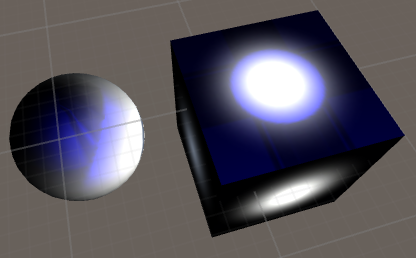
}使用Unity自帶的圖片Default-Particle作為貼圖,並調整Specular Color為0x0000FFFF,我們可以得到這樣的結果:
如果你下載了Unity的內建shader(下載地址),那麼可以開啟CGIncludes/Lighting.cginc檢視LightingBlinnPhong的原始碼:
inline fixed4 UnityBlinnPhongLight (SurfaceOutput s, half3 viewDir, UnityLight light)
{
	half3 h = normalize (light.dir + viewDir);

	fixed diff = max (0, dot (s.Normal, light.dir));

	float nh = max (0, dot (s.Normal, h));
	float spec = pow (nh, s.Specular*128.0) * s.Gloss;

	fixed4 c;
	c.rgb = s.Albedo * light.color * diff + light.color * _SpecColor.rgb * spec;
	c.a = s.Alpha;

	return c;
}

inline fixed4 LightingBlinnPhong (SurfaceOutput s, half3 viewDir, UnityGI gi)
{
	fixed4 c;
	c = UnityBlinnPhongLight (s, viewDir, gi.light);

	#if defined(DIRLIGHTMAP_SEPARATE)
		#ifdef LIGHTMAP_ON
			c += UnityBlinnPhongLight (s, viewDir, gi.light2);
		#endif
		#ifdef DYNAMICLIGHTMAP_ON
			c += UnityBlinnPhongLight (s, viewDir, gi.light3);
		#endif
	#endif

	#ifdef UNITY_LIGHT_FUNCTION_APPLY_INDIRECT
		c.rgb += s.Albedo * gi.indirect.diffuse;
	#endif

	return c;
}
雖然與shader中的寫法不同,但是基本可以看出它的演算法。
我們按照它在shader裡面新增一個CustomBlinnPhong的光照模型。
先修改pragma這一句:
#pragma surface surf CustomBlinnPhong具體實現:
		inline fixed4 LightingCustomBlinnPhong(SurfaceOutput s, fixed3 lightDir, fixed3 viewDir, fixed atten)
		{
			half3 h = normalize (lightDir + viewDir);

			fixed diff = max (0, dot (s.Normal, lightDir));


			float nh = max (0, dot (s.Normal, h));

			float spec = pow (nh, s.Specular*128.0) * s.Gloss;

			fixed4 col;
			col.rgb = s.Albedo * _LightColor0.rgb * diff + _LightColor0.rgb * _SpecColor.rgb * spec;
			col.a = s.Alpha;
			col *= atten;

			return col;
}修改之後,場景裡面物體並沒有什麼改變,證明我們寫(蒙)對了。
簡單分析一下:
第一行將光照向量與實現向量相加並標準化,得到的結果成為半形向量,這是通過視線方向和入射光線方向的角平分線向量來基礎地模擬反射向量 。
第二行將畫素法線向量與光照向量點積,獲得光照值diff。
第三行將畫素法線向量與半形向量點積,獲得高光值nh。
第四行將nh做冪運算,冪為s.Specular*128.0(這也就是為什麼我們在編輯器裡需要把Specular Power調的很小才能看到Cube上的高光),並乘以s.Gloss。得出來的spec表示高光強度。
第五行宣告一個col。
第六行計算色彩值,_LightColor0是Unity中的預設光照顏色。+號之前將光照與畫素色彩值混合得到一個基礎色彩值,+號之後將光照顏色與高光顏色混合得到高光色彩值。
第七行賦值透明度。
第八行將col於atten(光衰減係數)相乘,在CGIncludes/Lighting.cginc沒有體現,但其實在預處理的時候就將光照顏色乘上了這個數值。
第九行返回col。
接著我們可以實現一個高光遮罩的效果。
首先在Properties裡新增遮罩貼圖:
_SpecTex ("Specular Mask", 2D) = "white" {}sampler2D _SpecTex;Input結構裡面需要傳入遮罩貼圖的uv座標:
		struct Input {
			float2 uv_MainTex;
			float2 uv_SpecTex;
		};
另外我們需要宣告一個自定義的SurfaceOutput來傳遞遮罩貼圖的色彩值:
		struct CustomSurfaceOutput {
		    half3 Albedo;
		    half3 Normal;
		    half3 Emission;
		    half Specular;
		    half Gloss;
		    half Alpha;
		    half3 SpecularColor;
		};
增加了型別為half3的SpecularColor。
修改surf,注意輸出型別變了:
		void surf (Input IN, inout CustomSurfaceOutput o) {
			fixed4 c = tex2D (_MainTex, IN.uv_MainTex);
			fixed4 m = tex2D (_SpecTex, IN.uv_SpecTex) * _SpecColor;
			o.Albedo = c.rgb;
			o.Alpha = c.a;
			o.Specular = _SpecPower;
			o.Gloss = _SpecGloss;
			o.SpecularColor = m.rgb;
		}
其他不變,只是第二行將遮罩貼圖上的畫素顏色與_SpecColor相乘得到m,並且最後一行將m的rgb分量賦值給o.SpecularColor。
接著修改LightingCustomBlinnPhong,改動比較少,首先方法宣告:
inline fixed4 LightingCustomBlinnPhong(CustomSurfaceOutput s, fixed3 lightDir, fixed3 viewDir, fixed atten)接著把_SpecColor.rgb替換為s.SpecularColor就OK了。也就是修改第六行:
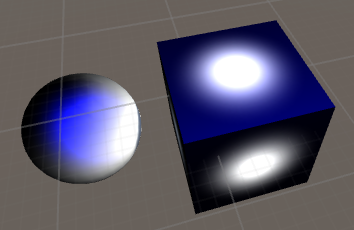
col.rgb = s.Albedo * _LightColor0.rgb * diff + _LightColor0.rgb * s.SpecularColor * spec;場景中,使用Unity自帶的Knob圖片作為高光遮罩,我們可以得到: