
新特性介面之動畫展示
新特性介面
當我們在應用商店下載一個應用或者更新一款應用時,進入應用首先看到的是介面展示,一個炫酷的介面展示肯定會吸引眾多目光,但如何做一個比較有意思的介面呢?
1>首先建立一個控制器,繼承自UIViewController
@interface WTNewFeatureController ()<UICollectionViewDataSource,UICollectionViewDelegate,WTNewFeatureCellDelegate> @property (weak,nonatomic) UICollectionView * collectionView; @property (strong,nonatomic) NSMutableArray * data; /** 大圖片 */ @property (weak,nonatomic) UIImageView * guideImg; /** 大文字圖片 */ @property (weak,nonatomic) UIImageView * textImg; /** 小文字圖片 */ @property (weak,nonatomic) UIImageView * smallTextImg; @end @implementation WTNewFeatureController static NSString * ID = @"Cell"; - (NSMutableArray *)data{ if (_data == nil) { _data = [NSMutableArray array]; for (int i = 0; i < 4; i ++) { UIImage * img = [UIImage imageNamed:[NSString stringWithFormat:@"guide%[email protected]",i + 1]]; [self.data addObject:img]; } } return _data; } - (void)viewDidLoad { [super viewDidLoad]; // 佈局樣式 UICollectionViewFlowLayout * layout = [[UICollectionViewFlowLayout alloc] init]; layout.itemSize = self.view.frame.size; layout.scrollDirection = UICollectionViewScrollDirectionHorizontal; layout.minimumLineSpacing = 0; // collectionView物件 UICollectionView * collectionView = [[UICollectionView alloc] initWithFrame:self.view.bounds collectionViewLayout:layout]; // 自動分頁 collectionView.pagingEnabled = YES;
##使用Masonry新增約束的時候,會出現圖片顯示不出來的情況,比較簡單的還是儘量使用frame設定// 去除彈簧效果 collectionView.bounces = NO; collectionView.backgroundColor = [UIColor whiteColor]; // 資料來源代理 collectionView.dataSource = self; collectionView.delegate = self; self.collectionView = collectionView; [self.view addSubview:collectionView]; [collectionView registerClass:[WTNewFeatureCell class] forCellWithReuseIdentifier:ID]; [self setUpUI]; } - (void)setUpUI{ UIImageView * guideLine = [[UIImageView alloc] initWithImage:[UIImage imageNamed:@"guideLine"]]; [self.collectionView addSubview:guideLine]; // [guideLine mas_makeConstraints:^(MASConstraintMaker *make) { // make.left.equalTo(self.collectionView).offset(-200); // }]; guideLine.x = -200; UIImageView * guideImg = [[UIImageView alloc] initWithImage:[UIImage imageNamed:@"guide1"]]; self.guideImg = guideImg; [self.collectionView addSubview:guideImg]; UIImageView * textImg = [[UIImageView alloc] initWithImage:[UIImage imageNamed:@"guideLargeText1"]]; self.textImg = textImg; [self.collectionView addSubview:textImg]; // [textImg mas_makeConstraints:^(MASConstraintMaker *make) { // make.top.offset(self.view.frame.size.height * 0.7); // }]; textImg.y = self.view.frame.size.height * 0.7; UIImageView * smallTextImg = [[UIImageView alloc] initWithImage:[UIImage imageNamed:@"guideSmallText1"]]; self.smallTextImg = smallTextImg; [self.collectionView addSubview:smallTextImg]; // [smallTextImg mas_makeConstraints:^(MASConstraintMaker *make) { // make.top.offset(self.view.frame.size.height * 0.8); // }]; smallTextImg.y = self.view.frame.size.height * 0.8; }
UICollectionViewDataSource方法
#pragma mark <UICollectionViewDataSource>

- (NSInteger)numberOfSectionsInCollectionView:(UICollectionView *)collectionView {
    return 1;
}


- (NSInteger)collectionView:(UICollectionView *)collectionView numberOfItemsInSection:(NSInteger)section {

    return self.data.count;
}

- (UICollectionViewCell *)collectionView:(UICollectionView *)collectionView cellForItemAtIndexPath:(NSIndexPath *)indexPath {

    WTNewFeatureCell *cell = [collectionView dequeueReusableCellWithReuseIdentifier:ID forIndexPath:indexPath];

    // 設定代理
    cell.delegate = self;
    cell.image = self.data[indexPath.item];

    // 判斷是否是最後一頁
    if (indexPath.item == self.data.count - 1) {
        // 顯示體驗按鈕
        cell.expersionBtn.hidden = NO;
    }else{

        cell.expersionBtn.hidden = YES;
    }
    return cell;
}
代理方法的實現
#pragma mark - UIScrollViewDelegate

- (void)scrollViewDidEndDecelerating:(UIScrollView *)scrollView{

    // 偏移量
    CGFloat offsetX = scrollView.contentOffset.x;

    int startX = 0;

    if (self.guideImg.frame.origin.x < offsetX) { // 向左移動

        startX = self.guideImg.frame.origin.x + scrollView.frame.size.width;

    }else{ // 向右移動

        startX = self.guideImg.frame.origin.x - scrollView.frame.size.width;
    }

    // 計算頁碼
    int page = offsetX / scrollView.width;

    // 拼接圖片名稱
    NSString *secondName = [NSString stringWithFormat:@"guide%@", @(page + 1)];
    NSString *largeName = [NSString stringWithFormat:@"guideLargeText%@", @(page + 1)];
    NSString *smallName = [NSString stringWithFormat:@"guideSmallText%@", @(page + 1)];

    // 修改圖片
    self.guideImg.image = [UIImage imageNamed:secondName];
    self.textImg.image = [UIImage imageNamed:largeName];
    self.smallTextImg.image = [UIImage imageNamed:smallName];

        [UIView animateWithDuration:0.25 animations:^{

            self.guideImg.x = startX;
            self.textImg.x = startX;
            self.smallTextImg.x = startX;

        }];


}
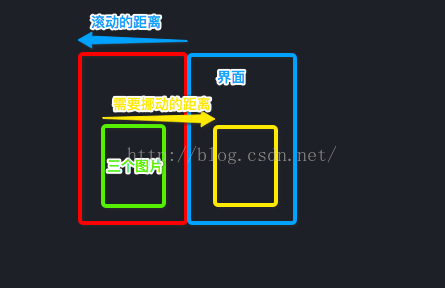
##在滾動介面的時候需要調整三個圖片的位置,此時就需要判斷,向左滾動如圖所示,向右則相反。
自定義cell的實現
.h檔案
@class WTNewFeatureCell;
@protocol WTNewFeatureCellDelegate <NSObject>
@optional
- (void)newFeatureCell:(WTNewFeatureCell *)featureCell didClickWithBtn:(UIButton *)btn;

@end
@interface WTNewFeatureCell : UICollectionViewCell
@property (weak,nonatomic) UIImage * image;
/** 立即體驗按鈕 */
@property (weak,nonatomic) UIButton * expersionBtn;

@property (weak,nonatomic) id<WTNewFeatureCellDelegate> delegate;
.m檔案
@interface WTNewFeatureCell ()
@property (weak,nonatomic) UIImageView * imgView;

@end
@implementation WTNewFeatureCell

- (instancetype)initWithFrame:(CGRect)frame{

    if (self = [super initWithFrame:frame]) {

       // imageView
        UIImageView * imgView = [[UIImageView alloc] init];
        self.imgView = imgView;
        [self.contentView addSubview:imgView];

      // 立即體驗按鈕
        UIButton * btn = [UIButton buttonWithType:UIButtonTypeCustom];

        [btn setImage:[UIImage imageNamed:@"guideStart"] forState:UIControlStateNormal];
        [btn sizeToFit];
        self.expersionBtn = btn;

        btn.hidden = YES;
        [btn addTarget:self action:@selector(btnClick:) forControlEvents:UIControlEventTouchUpInside];
        [self.contentView addSubview:btn];

    }

    return self;
}

- (void)btnClick:(UIButton *)btn{

    if ([self.delegate respondsToSelector:@selector(newFeatureCell:didClickWithBtn:)]) {

        [self.delegate newFeatureCell:self didClickWithBtn:btn];
    }

}
- (void)setImage:(UIImage *)image{

    _image = image;

    self.imgView.image = image;
}

- (void)layoutSubviews{

    self.imgView.frame = self.bounds;
    self.expersionBtn.x = (self.width - self.expersionBtn.width) * 0.5;
    self.expersionBtn.y = self.height * 0.85;
}
@end
相關推薦
新特性介面之動畫展示
新特性介面 當我們在應用商店下載一個應用或者更新一款應用時,進入應用首先看到的是介面展示,一個炫酷的介面展示肯定會吸引眾多目光,但如何做一個比較有意思的介面呢? 1>首先建立一個控制器,繼承自UIViewController @interface WTNewFe
Java8新特性整理之介面的預設方法
Java8新特性整理之介面的預設方法 預設方法 預設方法由default修飾符修飾,並像類中宣告的其他方法一樣包含方法體。 比如,你可以像下面這樣在集合庫中定義一個名為Sized的介面,在其中定義一個抽象方法size,以及一個預設方法isEmpty: public interface
Java8新特性探索之Stream介面
### 一、為什麼引入Stream流 流是一系列與特定儲存機制無關的元素——實際上,流並沒有“儲存”之說。使用流,無需迭代集合中的元素,就可以從管道提取和操作元素。這些管道通常被組合在一起,形成一系列對流進行操作的管道。 在大多數情況下,將物件儲存在集合中是為了處理他們,因此你將會發現你將程式設計的主要焦
Java8新特性探索之函式式介面
一、為什麼引入函式式介面 作為Java函數語言程式設計愛好者,我們都知道方法引用和 Lambda 表示式都必須被賦值,同時賦值需要型別資訊才能使編譯器保證型別的正確性。 我們先看一個Lambda程式碼示例: x -> x.toString() 我們清楚這裡返回型別必須是 String
JDK7新特性學習之 --- switch的表達式
bre image http 例如 style 之前 字符 深入理解 編譯錯誤 JDK7之前,switch中表達式只能是char、byte、short、int及其對應的包裝類和枚舉類型。JDK7之後java中新增加了String類型作為switch的表達式之一。 但
jdk1.8新特性應用之Iterable
accep sub 抽象 default describe dem generate using 操作 我們繼續看lambda表達式的應用: public void urlExcuAspect(RpcController controller, Message
Java8新特性整理之流的介紹與使用
Java8新特性整理之流的介紹與使用 流是什麼 官方定義:支援順序和並行聚合操作的元素序列。 這裡有幾個關鍵詞,順序、並行、聚合、元素序列。 所謂順序就是單執行緒順序執行,並行就是多執行緒分解執行,聚合就是將順序或並行執行的結果計算後得出最終結果,元素序列則是將資料
Java8新特性整理之方法引用
Java8新特性整理之方法引用 方法引用語法 目標引用 ::方法的名稱 1 例子 擷取字串的Lambda表示式 (str, i) -> str.substring(i) 1 等效的方法引用 String::substring
Java8新特性整理之CompletableFuture
Java8新特性整理之CompletableFuture:組合式、非同步程式設計 使用CompletableFuture構建非同步應用 Future 介面的侷限性 Future介面可以構建非同步應用,但依然有其侷限性。它很難直接表述多個Future 結果之間的依賴性。實
Java8新特性整理之Optional取代Null引用
Java8新特性整理之Optional取代Null引用 版權宣告:歡迎轉載!請註明出處! https://blog.csdn.net/u011726984/article/details/79315837 java8之前如何避免空指標異常 相信大家在開發中都會碰到Nul
Java8新特性整理之構建流的方式
Java8新特性整理之構建流的方式 流的建立方式 由值建立流 你可以使用靜態方法Stream.of,通過顯式值建立一個流。它可以接受任意數量的引數。 Stream<String> stream = Stream.of("Java 8 ", "Lambdas ", "In
(Java)jdk-8 - 新特性 - 介面
介面: Java 8允許我們給介面新增一個非抽象的方法實現,只需要使用default關鍵字即可,這個又叫做擴充套件方法 注意:現在介面還可以【存在靜態方法】,可以使用 介面名.靜態方法名 的形式直接呼叫。 例子: public class Test{ public static
JDK8新特性-介面定義增強
1. 使用default、static新增普通方法 JDK8之前,介面中只可以有全域性屬性和抽象方法。 JDK8之後可以在介面中新增普通方法,使用default關鍵字 除了使用default定義方法之外,還可以使用static定義方法。 一旦使用static定義方法,意味著該方法只能通過類名
PostgreSQL技術週刊第9期:PostgreSQL 11新特性解讀之新增非空預設值欄位不需要重寫表
PostgreSQL(簡稱PG)的開發者們: 雲棲社群已有5000位PG開發者,釋出了3000+PG文章(文章列表),沉澱了700+的PG精品問答(問答列表)。 PostgreSQL技術週刊將會為大家介紹最新的PG技術與動態、預告活動、最熱問答、直播教程等,歡迎大家訂閱PostgreSQL技術週刊和關注P
JDK新特性------介面定義加強(普通方法:defult和static方法)
為什麼會有介面定義加強? 因為介面中只有方法宣告沒有方法體,那麼就說明子類需要實現抽象方法,如果有很多子類實現的方法體相同,那麼就有很多相同的程式碼,但是在java中不建議出現相同程式碼,這時在JDK1.8之後,解決辦法是:介面中把相同方法實現。 介面定義如何加
【搞定Java8新特性】之Java7/8 中的 HashMap 和 ConcurrentHashMap 全解析
本文轉載自:https://blog.csdn.net/a724888/article/details/68936953 本文目錄: 1、Java7 中的HashMap 1.1、put過程分析 陣列初始化 計算具體陣列位置 新增節點到連結串列中 陣列擴容 補充:Has
javaSE新特性——介面定義加強、Lambda表示式、方法引用
一、介面定義加強 首先我們回顧一下之前學習過的介面。讓它要求我們的介面只能夠由抽象方法、全域性常量組成。但是我們今天講解一下接口裡面除了這兩種元素以外還可以有普通方法和static方法。但是這樣的特性是在我們JDK1.8以後才有的。 1.可以使用default來定義普通方法,需要通過物件呼叫
Java8新特性-介面中的靜態方法
Java8之前,介面中的方法必須使用public,abstract來修飾,在Java8中,允許使用static來修飾方法。靜態方法,只能通過介面名呼叫。 舉個栗子: 定義一個介面: public
iOS新浪微部落格戶端開發(1)——新特性介面
轉載自:http://blog.csdn.net/chy305chy/article/details/43118361 看完了MJ老師的微博專案視訊,準備自己動手寫一下,記錄開發中的一些感想。 1、首先判斷是否第一次使用該版本,如果是,先跳轉到新特性介面,否則,直接跳
Java8新特性整理之方法引用(二)
方法引用語法 目標引用 ::方法的名稱 例子 擷取字串的Lambda表示式 (str, i) -> str.substring(i) 等效的方法引用 String::