
Python3網路裝置巡檢(交換機篇)
阿新 • • 發佈:2019-02-10
介紹
只寫了交換機的,路由器、防火牆、負載等其它裝置以後,有需求再寫,下面以一組交換機為例。
思路
1、收取交換機的資訊
需要哪些資訊,哪些命令,不同品牌交換機命令不同(本篇以H3C為例),需要提前規劃好。交換機的IP、名字、密碼等資訊,寫入資料庫比較方便。
2、把需要的資訊填入表格
根據關鍵字提取交換機中的狀態資訊,並一次填入設計好的表格中,難點是字串的擷取和excel表格的設計。同款交換機相同的命令,可能用同一個關鍵字,抓取的資訊也不一樣,這個要多試幾次。
3、編寫郵件,傳送郵件。
4、linux編寫任務計劃,crontab定期執行python程式碼,定期傳送郵件。
程式碼
抓取交換機需要的配置資訊
import pexpect
import sys
import datetime
import pymssql
import os
today=datetime.date.today().strftime('%Y%m%d')
path = "/root/xunjian/"+today
os.mkdir(path,777)#建立目錄
def Switch(name,ip,passwd):
try:#try except 防止有一個命令錯誤,導致程式不能進行,其實不加也可以,如果有命令沒輸出,下一個程式碼也會報錯。
name1="---- More ----" 程式碼
提取需要的資訊,並塞入表格,因為裝置太多,我只展示一個裝置的程式碼。
import pymssql
import xlwt
import datetime
from xlwt import *
today=datetime.date.today().strftime('%Y%m%d')
txt='F51FA-HJ-S5560X-x.x.x.x.txt'#開啟裝置的配置資訊,不建議用迴圈開啟所有的,因為有些裝置的輸出會多空格等。
file = open('/root/xunjian/'+today+'/'+txt,'r+')
listlist=file.readlines()#讀取文件的每一行,至列表,如果不是雙電源的問題,直接 for line in file.readlines():
i=1
for line in listlist:#讀取列表每一行,因為兩個電源的所有輸出資訊都一樣,只能匹配關鍵字後輸出下一行字串,實屬無奈。
if '1 Normal' in line:
power11=line[8:15].rstrip()#裝置狀態,都是匹配關鍵字,然後擷取本來的字串輸出,這個要多試幾次。
print(power11)#確認輸出是自己想要的字串。
if 'Uptime is' in line:#執行時間
time11=line[-33:].rstrip()
print(time11)
if 'hotspot' in line:
environment11=line[17:21].rstrip()#執行溫度
print(environment11)
if 'Fan 1:' in line:
fana11=listlist[i+1][-8:].rstrip()#電源狀態,匹配關鍵字,擷取下一行的字串
print(fana11)
if 'Fan 2:' in line:
fanb11=listlist[i+1][-8:].rstrip()#電源狀態,匹配關鍵字,擷取下一行的字串
print(fanb11)
if 'in last 5 minutes' in line:
cpu11=line[6:10].rstrip()#cpu使用率
print(cpu11)
if 'Mem:' in line:
memory11=line[-7:].rstrip()#記憶體
print(memory11)
if 'To_F5-Core-S12508_Ten-G1' in line:#埠
briefa11=line[20:30].rstrip()
print(briefa11)
if 'To_F5-Core-S12508_Ten-G2' in line:
briefb11=line[20:30].rstrip()
print(briefb11)
if 'Current messages:' in line:#日誌條目
log11=line[-5:].rstrip()
print(log11)
if 'Routes' in line:
routingtable11=line[-5:].rstrip()#路由條目
print(routingtable11)
i += 1
workbook = xlwt.Workbook()#建立表格
style = XFStyle()#初始化樣式,此樣式包含了單元格背景顏色和單元格邊框兩個屬性。
pattern = Pattern()
pattern.pattern = Pattern.SOLID_PATTERN
pattern.pattern_fore_colour = Style.colour_map['blue'] #設定單元格背景色為藍色
style.pattern = pattern
borders = xlwt.Borders()#設定表格的邊框,1是預設實線黑色。
borders.left = 1
borders.right = 1
borders.top = 1
borders.bottom = 1
style.borders = borders
style1 = XFStyle()#只有邊框
borders = xlwt.Borders()
borders.left = 1
#borders.left = xlwt.Borders.THIN
borders.right = 1
borders.top = 1
borders.bottom = 1
style1.borders = borders
style3 = XFStyle()#初始化樣式,帶邊框和表格內容居中。
borders = xlwt.Borders()
borders.left = 1
#borders.left = xlwt.Borders.THIN
borders.right = 1
borders.top = 1
borders.bottom = 1
style3.borders = borders
al = xlwt.Alignment()
al.horz = 0x02 # 設定水平居中
al.vert = 0x01 # 設定垂直居中
style3.alignment = al
F51FSwitch = workbook.add_sheet('F51FSwitch',cell_overwrite_ok=True)#建立表格的某一分頁
first_col=F51FSwitch.col(0)#設定0、1、2、3列的列寬
sec_col=F51FSwitch.col(1)
thr_col=F51FSwitch.col(2)
for_col=F51FSwitch.col(3)
first_col.width=150*25
sec_col.width=100*25
thr_col.width=120*25
for_col.width=320*25
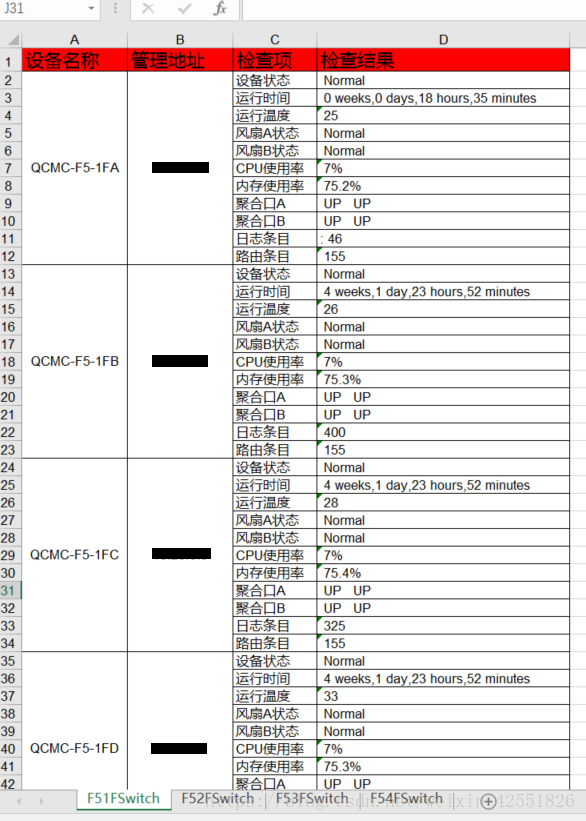
F51FSwitch.write_merge(1,11,0,0,'QCMC-F5-1FA',style3)#合併單元格(1,11為行1到11行 0,0為列0到0),填入內容
#F51FSwitch.write_merge(1,10,0,1,'QCMC-F3-1FA')#合併0到1列,1到10行
F51FSwitch.write_merge(1,11,1,1,'10.20.5.1',style3)#新增style3的樣式,只能填寫一個,所以初始化樣式的時候根據需求新增多個屬性。
F51FSwitch.write(0,0,'裝置名稱',style)
F51FSwitch.write(0,1,'管理地址',style)
F51FSwitch.write(0,2,'檢查項',style)
F51FSwitch.write(0,3,'檢查結果',style)
F51FSwitch.write(1,2,'裝置狀態',style1)
F51FSwitch.write(2,2,'執行時間',style1)
F51FSwitch.write(3,2,'執行溫度',style1)
F51FSwitch.write(4,2,'風扇A狀態',style1)
F51FSwitch.write(5,2,'風扇B狀態',style1)
F51FSwitch.write(6,2,'CPU使用率',style1)
F51FSwitch.write(7,2,'記憶體使用率',style1)
F51FSwitch.write(8,2,'聚合口A',style1)
F51FSwitch.write(9,2,'聚合口B',style1)
F51FSwitch.write(10,2,'日誌條目',style1)
F51FSwitch.write(11,2,'路由條目',style1)
F51FSwitch.write(1,3,power11,style1)#新增抓取的字串到相應的表格
F51FSwitch.write(2,3,time11,style1)
F51FSwitch.write(3,3,environment11,style1)
F51FSwitch.write(4,3,fana11,style1)
F51FSwitch.write(5,3,fanb11,style1)
F51FSwitch.write(6,3,cpu11,style1)
F51FSwitch.write(7,3,memory11,style1)
F51FSwitch.write(8,3,briefa11,style1)
F51FSwitch.write(9,3,briefb11,style1)
F51FSwitch.write(10,3,log11,style1)
F51FSwitch.write(11,3,routingtable11,style1)
print ('建立excel檔案完成!')
workbook.save('/root/xunjian/%sF5Switchxunjian.xls'%today)傳送郵件程式碼
前兩個文章有介紹,不寫了。
任務計劃 linux crontab(不會的請百度)
crontab -l 檢視任務計劃

crontab -e編寫任務計劃

結果
吐槽
程式碼一直執行沒問題,突然前兩天突然不發郵件了。
發現沒生成excel文件
但是交換機的txt文件還在
手動執行生成excel文件的程式碼,報錯。說utf-8格式問題
在windows python下面執行是OK的
後來發現有一個txt的文件是ANSI格式,其它的txt都是UEF-8格式
實在不明白為啥會有個txt是ANSI格式的,然後一頓改程式碼,在linux下面就是不行。
後來無意中發現,交換機的執行時間怎麼是三天???和程式碼出問題很相符啊!!
然後然後,重啟了這臺交換機,居然好了,正常了。
H3C交換機真坑??莫非是上次交換機冷重啟的原因?現在正常重啟後,正常了??吐血的一下午。