
Qt (六) -- Qt5.5.1實現通用串列埠程式
最近教研室在做高速相機,通過影象採集卡和自己做的高速相機連結,從而採集和收集影象。影象採集卡和高速相機是通過Cameralink連線,其中也包含了相機和影象採集卡之間的串列埠的硬體藉口,在老師的要求下,實現了兩種串列埠程式,一種是通過cameralink的API實現串列埠資料的傳輸,一種則是通過USB轉RS422的轉接器,實現對高速相機的暫存器的讀寫。本文主要介紹了通過Qt的QSerialPort和QSerialPortInfo兩個類,實現的串列埠程式。
本文采用的的開發環境是VS2010+Qt5.5.1版本,所有程式不是通過Qt Creator編譯的,如果有需要可以介紹VS2010和Qt環境的搭建和簡單的使用
- QSerialPort
QSerialPort這個類是從QT5.1開始引入的,之前都是通過QIODevice自己定義串列埠類,從而實現串列埠程式的開發。現在引入這個類了,將會非常方便的開發串列埠程式。為了使用這個類,需要在工程目錄和附加依賴項中加入include的路徑,以及連結庫的路徑,以及連結庫的名稱:
- 專案--->屬性---> C++ ---> 常規 --->C:\Qt\Qt5.5.1\5.5\msvc2010\include\QtSerialPort
- 專案--->屬性---> 輸入++ ---> 附加依賴項--->Qt5SerialPort.lib(如果是Debug版本,則是Qt5SerialPortd.lib)版本
- 原始檔或者標頭檔案需要加入#include<QSerialPort>
串列埠資料的寫入是通過writeData(const
char * data, qint64 maxSize)以及write(const char * data, qint64 maxSize),前者是protected屬性,只能在子類中訪問,而後者則是public屬性
串列埠資料的讀入是通過readData(char * data, qint64 maxSize) ,read(qint64 maxSize)實現的,如果需要一次性讀完所有的資料,則可以通過readAll()全部讀取串列埠緩衝區中的資料。
串列埠內部的緩衝區大小可以通過:setReadBufferSize(qint64 size)實現。當設定緩衝區大小時,串列埠只能接收size大小的資料流,因此存在資料丟書的可能。當設定為0的時候,並不是指的緩衝區大小為0,而是無窮大,這樣就可以儲存資料的全部接收完整。這是緩衝區大小的預設屬性。
是否有新的資料讀入緩衝區是通過readReady()訊號來來確定的。這是通過時間驅動的方式來確定是否有資料可以讀入。此外還有waitForReadyRead()來等待輪詢是否有資料到達串列埠,但是這是一種阻塞性讀入,個人覺得不是太好,所以寫串列埠的時候採用的是事件驅動的方式來確定是夠有資料可以讀入。
- QSerialPortInfo
可能會用得比較多的函式是description(),manufacturer(),以及serialNumber()。從而得到描述性資訊,比如通訊埠。USB轉串列埠等描述串列埠的資訊、串列埠的
生產商資訊以及串列埠名,在電腦上表現為COM~等。
- 如何獲取電腦上所有的串列埠
void CameraSerialPort::getSerialPortID()
{
	 serialInfo=new QSerialPortInfo();
	 serialList=serialInfo->availablePorts();
	int nSerialnum=serialList.length();
	for(int i=0;i<nSerialnum;i++)
	{
		QString serialName=serialList[i].portName();
		QString serialDesp=serialList[i].description();
		serialPortAssitant.serialPortcomboBox->addItem(serialName);
	}

	QString currentPort=serialPortAssitant.serialPortcomboBox->currentText();
	portToOpen=currentPort;
	QString  portStatus=currentPort+" closed";
	serialPortAssitant.status->statusInfo->setText(portStatus.toUpper());
	QPalette font_palette;
	font_palette.setColor(QPalette::WindowText,Qt::red);
	serialPortAssitant.status->statusInfo->setPalette(font_palette);
}1、變數的定義,在標頭檔案中,這裡沒有貼出來,擷取定義如下:
	QSerialPortInfo* serialInfo;
QList<QSerialPortInfo>serialList;3、serialPortcomBox是一個QComboBox,下拉列表。
4、最後幾行是用來顯示串列埠的狀態資訊,達到的效果如圖:

- 開啟串列埠並且通過串列埠寫資料
得到串列埠資訊後,就可以選擇埠,進行開啟和讀寫資料。貼出程式碼,然後在給分析分析:
void CameraSerialPort::Write()
{
	QString sendMsg=serialPortAssitant.sendLine->text();
	QByteArray temp=sendMsg.toLatin1();
	if(IsSendByHex)
	{
		temp=HexStrToByteArray(sendMsg);
	}
	char *sendContent=temp.data();
	qint64 sendedNum=serialPort->write(sendContent,temp.count());

	//---------------判斷髮送資料是否成功----------------------//
	if(sendedNum==-1)
	{
		errorValue=serialPort->error();
		if(IsShowCurrentTime)
		{
			errorInfo=" ";
			currentTime=QDateTime::currentDateTime();
			timeinfo=currentTime.toString("yyyy__MM__d__hh:mm:ss");
			errorInfo=QString::fromLocal8Bit("錯誤提示資訊   ");
			errorInfo+=timeinfo;
			errorInfo+="\n";
		}
		else
		{
			errorInfo=" ";
			errorInfo=QString::fromLocal8Bit("錯誤提示資訊   ");
			errorInfo+="\n";
		}
		serialPortAssitant.ReciveWidget->append(errorInfo+getValueContent(errorValue));
		return;
	}
	//-------------顯示傳送資料-----------------------//

	//temp的size的依據是是否以16進位制傳送
	sendCount+=temp.count();
	serialPortAssitant.status->TxByte->setText(QString::number(sendCount));
	QString showSendMsg;
	if(IsShowSendMsg)
	{
		if(IsShowCurrentTime)
		{

			currentTime=QDateTime::currentDateTime();
			timeinfo=currentTime.toString("yyyy__MM__d__hh:mm:ss");
			showSendMsg+=QString::fromLocal8Bit("傳送資料 : ");
			showSendMsg+=timeinfo;
			showSendMsg+="\n";
			//判斷顯示16進位制還是ACSII字元
			if(IsSendByHex)
				showSendMsg+=ByteArrayToHexStr(temp);
			else
				showSendMsg+=temp;
		}
		else
		{
			showSendMsg=QString::fromLocal8Bit("傳送資料 : ");
			if(IsSendByHex)
				showSendMsg+=ByteArrayToHexStr(temp);
			else
				showSendMsg+=temp;

		}
		serialPortAssitant.ReciveWidget->append(showSendMsg);

	}
	IsWrittenSuccessed=true;
}
void CameraSerialPort::sendData()
{
	if(!IsSerialPortOpen)
	{
			if(serialPort!=NULL)
			{
				serialPort->close();
			}
			serialPort=new QSerialPort(portToOpen);
			if(serialPort==NULL)
			{
				errorValue=serialPort->error();
				QString errorContent=getValueContent(errorValue);
				if(IsShowCurrentTime)
				{
						errorInfo=" ";
						currentTime=QDateTime::currentDateTime();
						timeinfo=currentTime.toString("yyyy__MM__d__hh:mm:ss");
						errorInfo=QString::fromLocal8Bit("錯誤提示資訊   ");
						errorInfo+=timeinfo;
						errorInfo+="\n";
				}
					else
				{
						errorInfo=" ";
						errorInfo=QString::fromLocal8Bit("錯誤提示資訊   ");
						errorInfo+="\n";
				}
					serialPortAssitant.ReciveWidget->append(errorInfo +errorContent+QString::fromLocal8Bit(", 請重新選擇正確的埠\n"));
					return;
			}

		if(!serialPort->open(QIODevice::ReadWrite))
		{
			errorValue=serialPort->error();
			QString errorContent=getValueContent(errorValue);
			if(IsShowCurrentTime)
			{
				errorInfo=" ";
				currentTime=QDateTime::currentDateTime();
				timeinfo=currentTime.toString("yyyy__MM__d__hh:mm:ss");
				errorInfo=QString::fromLocal8Bit("錯誤提示資訊   ");
				errorInfo+=timeinfo;
				errorInfo+="\n";
			}
			else
			{
				errorInfo=" ";
				errorInfo=QString::fromLocal8Bit("錯誤提示資訊   ");
				errorInfo+="\n";
			}
			serialPortAssitant.ReciveWidget->append(errorInfo +errorContent);
			return;
		}
		<span style="background-color: rgb(255, 0, 0);">connect(serialPort,SIGNAL(readyRead()),this,SLOT(onReadyRead()));</span>
		serialPort->setDataBits(QSerialPort::Data8);
		serialPort->setStopBits(QSerialPort::OneStop);
		serialPort->setParity(QSerialPort::NoParity);
		serialPort->setFlowControl(QSerialPort::NoFlowControl);

		QString serialStatusInfo;
		serialStatusInfo=serialPortAssitant.serialPortcomboBox->currentText().toUpper();
		serialStatusInfo+=" OPENED";
		serialStatusInfo+=" , ";
		serialStatusInfo+=QString::number(serialPort->baudRate());
		serialStatusInfo+=" , ";
		serialStatusInfo+=serialPortAssitant.DataWidthcomboBox->currentText();
		serialStatusInfo+=" , ";
		serialStatusInfo+=serialPortAssitant.ParityWidthcomboBox->currentText().toUpper();
		serialStatusInfo+=" , ";
		serialStatusInfo+=serialPortAssitant.StopWidthcomboBox->currentText();
		serialStatusInfo+=" , ";
		serialStatusInfo+=serialPortAssitant.FLowControlcomboBox->currentText().toUpper();
		QPalette font_palette;
		font_palette.setColor(QPalette::WindowText,Qt::darkCyan);
		serialPortAssitant.status->statusInfo->setText(serialStatusInfo);
		serialPortAssitant.status->statusInfo->setPalette(font_palette);

		serialPortAssitant.sendBtn->setText(QString::fromLocal8Bit("傳送"));
		IsSerialPortOpen=true;
	}

else
	{
		if(IsRepeatSend)
		{
			repeatSend->start();
		}
		Write();
	}
}
首先看write函式:以下是從write函式中抽離出來的幾行關鍵程式碼:
  <span style="white-space:pre">	</span>QString sendMsg=serialPortAssitant.sendLine->text();
<span style="white-space:pre">	</span>QByteArray temp=sendMsg.toLatin1();
	char *sendContent=temp.data();
qint64 sendedNum=serialPort->write(sendContent,temp.count());2、第二行到第三行程式碼是需要把QString轉換為char *的資料型別。
3、第四行則是通過QIODevice類的成員函式write寫出資料。
4、剩餘的部分是一些細節的錯誤提示顯示以及顯示資訊,以及非常重要的是以ASCII形式發出資料還是以16進位制傳送資料。
接著是sendData()函式。
serialPort=new QSerialPort(portToOpen);
if(!serialPort->open(QIODevice::ReadWrite))
connect(serialPort,SIGNAL(readyRead()),this,SLOT(onReadyRead()));
1、第一行是通過portToOpen例項化QSerialPort,建構函式為:QSerialPort(const QString & name, QObject * parent = Q_NULLPTR)
2、第二行是開啟串列埠,開啟模式是ReadWrite,可寫可讀
3、第三行是通過readRead()訊號來實現串列埠資料的讀出,事件驅動的方式。這一行我在原始碼中加了紅色,原因是,一定要在開啟串列埠後,實現readyRead()訊號和對應的槽函式的連線,如果在沒有初始化串列埠成功後,然後訊號才能啟動。我最開始在CameraSerialPort這個類的初始化中就定義了這個訊號槽的連結,一直沒有讀到串列埠資料,結果在網上找了半天的原因,也沒有找到這個問題。想了一下,然後把程式碼移到了這裡,就可以了。
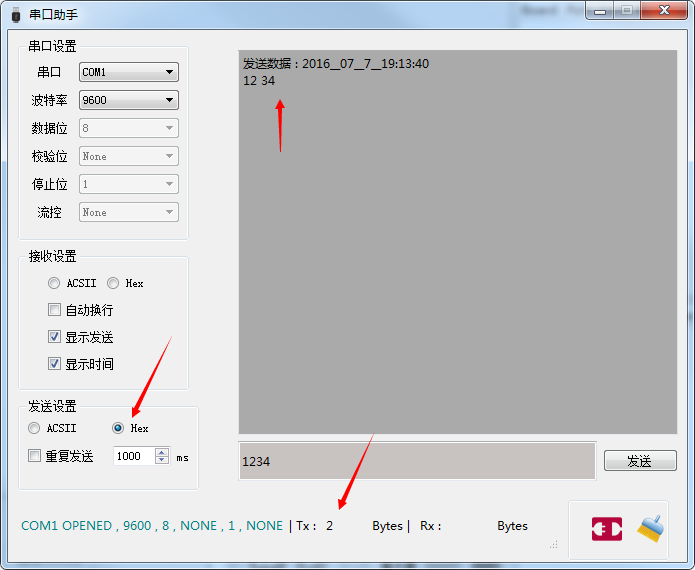
開啟串列埠和傳送資料的結果如圖:

- 串列埠接收資料
void CameraSerialPort::Read()
{
	if(serialPort->bytesAvailable()<0)
	{
		serialPortAssitant.ReciveWidget->setText("No data");
		return;
	}


	QByteArray temp;
	temp=serialPort->readAll();

	QString  receiveMsg;
	if(IsReceiveByHex)
		receiveMsg=ByteArrayToHexStr(temp);
	else
		receiveMsg=temp;

	if(receiveMsg.isEmpty())
	{
		if(IsShowCurrentTime)
		{
			errorInfo=" ";
			currentTime=QDateTime::currentDateTime();
			timeinfo=currentTime.toString("yyyy__MM__d__hh:mm:ss");
			errorInfo=QString::fromLocal8Bit("錯誤提示資訊   ");
			errorInfo+=timeinfo;
			errorInfo+="\n";
		}
		else
		{
			errorInfo=" ";
			errorInfo=QString::fromLocal8Bit("錯誤提示資訊   ");
			errorInfo+="\n";
		}
		serialPortAssitant.ReciveWidget->append(errorInfo +QString::fromLocal8Bit("沒有讀到資料\n"));
		return;
	}

	//接收到的位元組數以初始的bytes為依據
	reciveCount+=temp.count();
	serialPortAssitant.status->RxByte->setText(QString::number(reciveCount));
	QString showReciveMsg;
	if(IsShowCurrentTime)
		{

			currentTime=QDateTime::currentDateTime();
			timeinfo=currentTime.toString("yyyy__MM__d__hh:mm:ss");
			showReciveMsg+=QString::fromLocal8Bit("接收資料 : ");
			showReciveMsg+=timeinfo;
			showReciveMsg+="\n";
			showReciveMsg+=receiveMsg;
		}
		else
		{
			showReciveMsg=QString::fromLocal8Bit("接收資料 : ");
			showReciveMsg+=receiveMsg;
		}
		serialPortAssitant.ReciveWidget->append(showReciveMsg);

}

void CameraSerialPort::onReadyRead()
{
	Read();
}
1、讀入資料之前,需要判斷緩衝區是否有資料,有資料才去讀資料
2、如果有資料,則全部讀出緩衝區資料
- 總結
大致的有關Qt的串列埠類就介紹完了,主要是QSerialPort以及QSerialPortInfo兩個類的使用,當然也需要了解QIODevice。